Acer Aspire 5534 Notebook Series Start Guide
Page 3
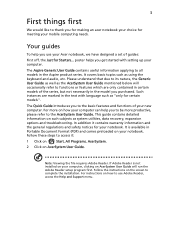
...as well as system utilities, data recovery, expansion options and troubleshooting. Please understand that due to use your Acer notebook, we have designed a set of guides: First off, the Just for certain models". Follow the ... subjects as the AcerSystem User Guide mentioned below will run the Adobe Reader setup program first. The Aspire Generic User Guide contains useful information applying to complete the installation. poster helps you purchased. This guide...you get started with language such as using the keyboard and audio, etc. For instructions on AcerSystem User Guide.
...as well as system utilities, data recovery, expansion options and troubleshooting. Please understand that due to use your Acer notebook, we have designed a set of guides: First off, the Just for certain models". Follow the ... subjects as the AcerSystem User Guide mentioned below will run the Adobe Reader setup program first. The Aspire Generic User Guide contains useful information applying to complete the installation. poster helps you purchased. This guide...you get started with language such as using the keyboard and audio, etc. For instructions on AcerSystem User Guide.
Acer Aspire 5534 Notebook Series Start Guide
Page 5
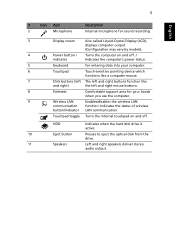
Touchpad toggle Turns the internal touchpad on and off. / indicator Indicates the computer's power status. 5 Keyboard For entering data into your computer. 6 Touchpad Touch-sensitive pointing device which functions like a computer mouse. 7 Click buttons (left The left and right buttons function ...
Touchpad toggle Turns the internal touchpad on and off. / indicator Indicates the computer's power status. 5 Keyboard For entering data into your computer. 6 Touchpad Touch-sensitive pointing device which functions like a computer mouse. 7 Click buttons (left The left and right buttons function ...
Acer Aspire 5534 Notebook Series Start Guide
Page 11
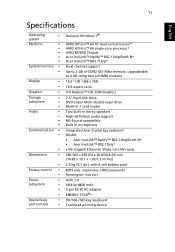
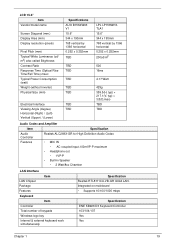
... BIOS user, supervisor, HDD passwords Kensington lock slot ACPI 3.0 48.8 W 4400 mAh 3-pin 65 W AC adapter ENERGY STAR®* 99-/100-/103-key keyboard Touchpad pointing device 11 English Specifications Operating • system Platform • • • • • System memory • • Display &#...; AMD Athlon™ 64 X2 dual-core processor* AMD Athlon™ 64 single-core processor* AMD M780G Chipset Acer InviLink™ Nplify™ 802.11b/g/Draft-N* Acer InviLink™ 802.11b/g* Dual-channel support Up to 2 GB of DDR2 667 MHz memory, upgradeable to 4...
... BIOS user, supervisor, HDD passwords Kensington lock slot ACPI 3.0 48.8 W 4400 mAh 3-pin 65 W AC adapter ENERGY STAR®* 99-/100-/103-key keyboard Touchpad pointing device 11 English Specifications Operating • system Platform • • • • • System memory • • Display &#...; AMD Athlon™ 64 X2 dual-core processor* AMD Athlon™ 64 single-core processor* AMD M780G Chipset Acer InviLink™ Nplify™ 802.11b/g/Draft-N* Acer InviLink™ 802.11b/g* Dual-channel support Up to 2 GB of DDR2 667 MHz memory, upgradeable to 4...
Aspire 5534 Service Guide
Page 7
... 1 Features 1 System Block Diagram 3 Your Notebook Tour 4 Front View 4 Closed Front View 5 Left View 6 Right View 6 Base View 7 Rear View 8 Indicators 8 TouchPad Basics 9 Using the Keyboard 10 Lock Keys and embedded numeric keypad 10 Windows Keys 11 Hot Keys 12 Special Keys 13 Hardware Specifications and Configurations 14 System Utilities 23... Drive Module 49 Removing the DIMM Module 53 Removing the WLAN Board 56 Main Unit Disassembly Process 58 Main Unit Disassembly Flowchart 58 Removing the Keyboard 60 VII
... 1 Features 1 System Block Diagram 3 Your Notebook Tour 4 Front View 4 Closed Front View 5 Left View 6 Right View 6 Base View 7 Rear View 8 Indicators 8 TouchPad Basics 9 Using the Keyboard 10 Lock Keys and embedded numeric keypad 10 Windows Keys 11 Hot Keys 12 Special Keys 13 Hardware Specifications and Configurations 14 System Utilities 23... Drive Module 49 Removing the DIMM Module 53 Removing the WLAN Board 56 Main Unit Disassembly Process 58 Main Unit Disassembly Flowchart 58 Removing the Keyboard 60 VII
Aspire 5534 Service Guide
Page 8
... Speaker Modules 125 Replacing the Power Board 127 Replacing the Touchpad Bracket 128 Replacing the Button Board 130 Replacing the Upper Cover 131 Replacing the Keyboard 136 External Module Reassembly Process 138 Replacing the WLAN Board 138 Replacing the DIMM Modules 139 Replacing the Hard Disk Drive Module 141 Replacing the...
... Speaker Modules 125 Replacing the Power Board 127 Replacing the Touchpad Bracket 128 Replacing the Button Board 130 Replacing the Upper Cover 131 Replacing the Keyboard 136 External Module Reassembly Process 138 Replacing the WLAN Board 138 Replacing the DIMM Modules 139 Replacing the Hard Disk Drive Module 141 Replacing the...
Aspire 5534 Service Guide
Page 9
... Problems 148 Power On Issue 149 No Display Issue 150 Random Loss of BIOS Settings 151 LCD Failure 152 Built-In Keyboard Failure 152 Touchpad Failure 153 Internal Speaker Failure 153 Internal Microphone Failure 155 HDD Not Operating Correctly 156 ODD Failure 157 USB... 175 Clearing Password Check 175 BIOS Recovery by Crisis Disk 176 FRU (Field Replaceable Unit) List 177 Aspire 5534 Exploded Diagrams 178 Main Assembly 178 LCD Assembly 179 Aspire 5534 FRU List 180 Screw List 186 Model Definition and Configuration 188 Test Compatible Components 206 Windows 7 Environment...
... Problems 148 Power On Issue 149 No Display Issue 150 Random Loss of BIOS Settings 151 LCD Failure 152 Built-In Keyboard Failure 152 Touchpad Failure 153 Internal Speaker Failure 153 Internal Microphone Failure 155 HDD Not Operating Correctly 156 ODD Failure 157 USB... 175 Clearing Password Check 175 BIOS Recovery by Crisis Disk 176 FRU (Field Replaceable Unit) List 177 Aspire 5534 Exploded Diagrams 178 Main Assembly 178 LCD Assembly 179 Aspire 5534 FRU List 180 Screw List 186 Model Definition and Configuration 188 Test Compatible Components 206 Windows 7 Environment...

Aspire 5534 Service Guide
Page 12
...™ Nplify™ 802.11b/g/Draft-N* • Acer InviLink™ 802.11b/g* • LAN: Gigabit Ethernet; The exact configuration of the PC depends on -LAN ready Privacy control • BIOS user, supervisor, HDD ... subsystem • ACPI 3.0 • 48.8 W 4400 mAh • 3-pin 65 W AC adapter • ENERGY STAR®* Special keys and controls • 99-/100-/103-key keyboard • Touchpad pointing device I/O interface • Multi-in-1 card reader (SD™, MMC, MS, MS PRO, xD) • USB 2.0 port • External display (VGA) port...
...™ Nplify™ 802.11b/g/Draft-N* • Acer InviLink™ 802.11b/g* • LAN: Gigabit Ethernet; The exact configuration of the PC depends on -LAN ready Privacy control • BIOS user, supervisor, HDD ... subsystem • ACPI 3.0 • 48.8 W 4400 mAh • 3-pin 65 W AC adapter • ENERGY STAR®* Special keys and controls • 99-/100-/103-key keyboard • Touchpad pointing device I/O interface • Multi-in-1 card reader (SD™, MMC, MS, MS PRO, xD) • USB 2.0 port • External display (VGA) port...
Aspire 5534 Service Guide
Page 14
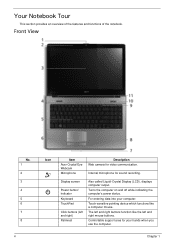
Front View No. 1 2 3 4 5 6 7 8 4 Icon Item Acer Crystal Eye Webcam Microphone Description Web camera for your computer. For entering data into your hands when you use the computer. Touch-sensitive pointing device ... indicating the computer's power status. The left and right buttons function like a computer mouse. Internal microphone for sound recording. Chapter 1 Display screen Power button/ indicator Keyboard TouchPad Click buttons (left and right mouse buttons. Your Notebook Tour This section provides an overview of the features and functions of the notebook.
Front View No. 1 2 3 4 5 6 7 8 4 Icon Item Acer Crystal Eye Webcam Microphone Description Web camera for your computer. For entering data into your hands when you use the computer. Touch-sensitive pointing device ... indicating the computer's power status. The left and right buttons function like a computer mouse. Internal microphone for sound recording. Chapter 1 Display screen Power button/ indicator Keyboard TouchPad Click buttons (left and right mouse buttons. Your Notebook Tour This section provides an overview of the features and functions of the notebook.
Aspire 5534 Service Guide
Page 20
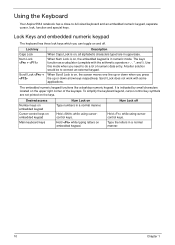
Using the Keyboard Your Aspire 5534 notebook has a close-to connect an external keypad. When Num ... Hold while typing letters on and off Hold while using cursorcontrol keys. Lock Keys and embedded numeric keypad The keyboard has three lock keys which you press the up or down arrow keys respectively. The keys function as a ... the arithmetic operators +, -, *, and /). The embedded numeric keypad functions like a desktop numeric keypad. To simplify the keyboard legend, cursor-control key symbols are in numeric mode. Lock key Caps Lock Num Lock + Scroll Lock + Description When...
Using the Keyboard Your Aspire 5534 notebook has a close-to connect an external keypad. When Num ... Hold while typing letters on and off Hold while using cursorcontrol keys. Lock Keys and embedded numeric keypad The keyboard has three lock keys which you press the up or down arrow keys respectively. The keys function as a ... the arithmetic operators +, -, *, and /). The embedded numeric keypad functions like a desktop numeric keypad. To simplify the keyboard legend, cursor-control key symbols are in numeric mode. Lock key Caps Lock Num Lock + Scroll Lock + Description When...
Aspire 5534 Service Guide
Page 21
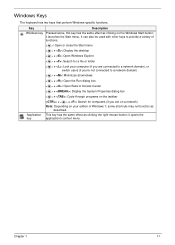
... box < > + : Cycle through programs on the taskbar + < > + : Search for computers (if you are on a network) Note: Depending on the Windows Start button; Windows Keys The keyboard has two keys that perform Windows-specific functions. Key Description Windows key Pressed alone, this key has the same effect as clicking on your edition...
... box < > + : Cycle through programs on the taskbar + < > + : Search for computers (if you are on a network) Note: Depending on the Windows Start button; Windows Keys The keyboard has two keys that perform Windows-specific functions. Key Description Windows key Pressed alone, this key has the same effect as clicking on your edition...

Aspire 5534 Service Guide
Page 23
... 13 Open a text editor or word processor. 2. Hold and then press the key at the upper-center of the keyboard. Hold and then press the key at the upper-center of your keyboard. NOTE: Some fonts and software do not support the Euro symbol. Open a text editor or word processor. 2. Special... Keys You can locate the Euro symbol and the US dollar sign at the upper-center and/or bottom-right of the keyboard. The Euro symbol 1. NOTE: This function varies according to the language settings. See www.microsoft.com/typography/faq/ faq12.htm for more information.
... 13 Open a text editor or word processor. 2. Hold and then press the key at the upper-center of the keyboard. Hold and then press the key at the upper-center of your keyboard. NOTE: Some fonts and software do not support the Euro symbol. Open a text editor or word processor. 2. Special... Keys You can locate the Euro symbol and the US dollar sign at the upper-center and/or bottom-right of the keyboard. The Euro symbol 1. NOTE: This function varies according to the language settings. See www.microsoft.com/typography/faq/ faq12.htm for more information.
Aspire 5534 Service Guide
Page 29
...; Headphone out • 1VP-P • Built-in Speaker • 2 Watt/8cc Chamber LAN Interface Item LAN Chipset Package Features Keyboard Item Controller Total number of keypads Windows logo key Internal & external keyboard work simultaneously Specification Realtek RTL8111CA-VB-GR GIGA LAN. Integrated on mainboard • Supports 10/100/1000 mbps Specification ENE...
...; Headphone out • 1VP-P • Built-in Speaker • 2 Watt/8cc Chamber LAN Interface Item LAN Chipset Package Features Keyboard Item Controller Total number of keypads Windows logo key Internal & external keyboard work simultaneously Specification Realtek RTL8111CA-VB-GR GIGA LAN. Integrated on mainboard • Supports 10/100/1000 mbps Specification ENE...
Aspire 5534 Service Guide
Page 54
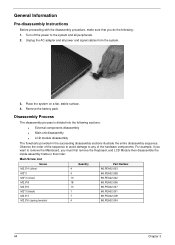
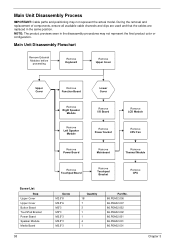
... Mainboard, you do the following sections: q External components disassembly q Main unit disassembly q LCD module disassembly The flowcharts provided in that you must first remove the Keyboard, and LCD Module then disassemble the inside assembly frame in the succeeding disassembly sections illustrate the entire disassembly sequence. Main Screw List Screw M2.5*4 (silver...
... Mainboard, you do the following sections: q External components disassembly q Main unit disassembly q LCD module disassembly The flowcharts provided in that you must first remove the Keyboard, and LCD Module then disassemble the inside assembly frame in the succeeding disassembly sections illustrate the entire disassembly sequence. Main Screw List Screw M2.5*4 (silver...
Aspire 5534 Service Guide
Page 68
Main Unit Disassembly Flowchart Remove External Modules before proceeding Remove Keyboard Remove Upper Cover Upper Cover Remove Function Board Lower Cover Remove Right Speaker Module Remove Left Speaker Module Remove I/O Board Remove Power Socket Remove LCD ...
Main Unit Disassembly Flowchart Remove External Modules before proceeding Remove Keyboard Remove Upper Cover Upper Cover Remove Function Board Lower Cover Remove Right Speaker Module Remove Left Speaker Module Remove I/O Board Remove Power Socket Remove LCD ...
Aspire 5534 Service Guide
Page 70
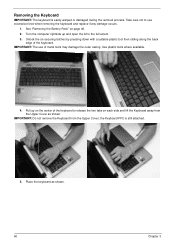
... release the two tabs on page 46. 2. IMPORTANT: The use excessive force when removing the keyboard and replace if any damage occurs. 1. IMPORTANT: Do not remove the Keyboard from the Upper Cover as shown. 60 Chapter 3 Take care not to the full extent. 3. See "Removing the ...Battery Pack" on each side and lift the Keyboard away from the Upper Cover; Removing the Keyboard IMPORTANT: The keyboard is still attached. 5. Turn the computer rightside up on the center of the keyboard. Use plastic tools where available. 4. Pull up and open the lid to...
... release the two tabs on page 46. 2. IMPORTANT: The use excessive force when removing the keyboard and replace if any damage occurs. 1. IMPORTANT: Do not remove the Keyboard from the Upper Cover as shown. 60 Chapter 3 Take care not to the full extent. 3. See "Removing the ...Battery Pack" on each side and lift the Keyboard away from the Upper Cover; Removing the Keyboard IMPORTANT: The keyboard is still attached. 5. Turn the computer rightside up on the center of the keyboard. Use plastic tools where available. 4. Pull up and open the lid to...
Aspire 5534 Service Guide
Page 71
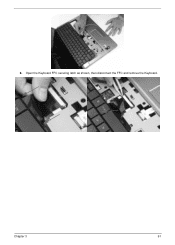
Chapter 3 61 6. Open the Keyboard FFC securing latch as shown, then disconnect the FFC and remove the Keyboard.
Chapter 3 61 6. Open the Keyboard FFC securing latch as shown, then disconnect the FFC and remove the Keyboard.
Aspire 5534 Service Guide
Page 146
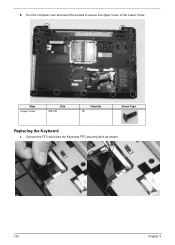
Turn the computer over and insert the screws to secure the Upper Cover to the Lower Cover. 5. Step Upper Cover Size M2.5*8 Quantity 18 Screw Type Replacing the Keyboard 1. Connect the FFC and close the Keyboard FFC securing latch as shown. 136 Chapter 3
Turn the computer over and insert the screws to secure the Upper Cover to the Lower Cover. 5. Step Upper Cover Size M2.5*8 Quantity 18 Screw Type Replacing the Keyboard 1. Connect the FFC and close the Keyboard FFC securing latch as shown. 136 Chapter 3
Aspire 5534 Service Guide
Page 147
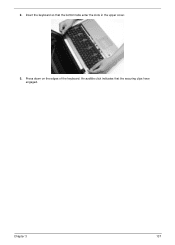
An audible click indicates that the bottom tabs enter the slots in the upper cover. 3. Insert the keyboard so that the securing clips have engaged. Chapter 3 137 2. Press down on the edges of the keyboard.
An audible click indicates that the bottom tabs enter the slots in the upper cover. 3. Insert the keyboard so that the securing clips have engaged. Chapter 3 137 2. Press down on the edges of the keyboard.
Aspire 5534 Service Guide
Page 158
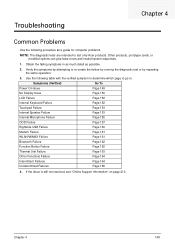
...possible. 2. Obtain the failing symptoms in as much detail as a guide for computer problems. NOTE: The diagnostic tests are intended to test only Acer products. If the Issue is still not resolved, see "Online Support Information" on page 210. Verify the symptoms by attempting to re-create ...page to go to. Symptoms (Verified) Go To Power On Issue Page 149 No Display Issue Page 150 LCD Failure Page 152 Internal Keyboard Failure Page 152 Touchpad Failure Page 153 Internal Speaker Failure Page 153 Internal Microphone Failure Page 155 ODD Failure Page 157 Rightside USB Failure...
...possible. 2. Obtain the failing symptoms in as much detail as a guide for computer problems. NOTE: The diagnostic tests are intended to test only Acer products. If the Issue is still not resolved, see "Online Support Information" on page 210. Verify the symptoms by attempting to re-create ...page to go to. Symptoms (Verified) Go To Power On Issue Page 149 No Display Issue Page 150 LCD Failure Page 152 Internal Keyboard Failure Page 152 Touchpad Failure Page 153 Internal Speaker Failure Page 153 Internal Microphone Failure Page 155 ODD Failure Page 157 Rightside USB Failure...
Aspire 5534 Service Guide
Page 162
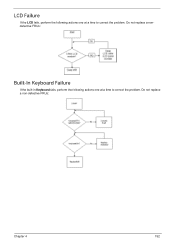
Do not replace a nondefective FRUs: Built-In Keyboard Failure If the built-in Keyboard fails, perform the following actions one at a time to correct the problem. LCD Failure If the LCD fails, perform the following actions one at a time to correct the problem. Do not replace a non-defective FRUs: Chapter 4 152
Do not replace a nondefective FRUs: Built-In Keyboard Failure If the built-in Keyboard fails, perform the following actions one at a time to correct the problem. LCD Failure If the LCD fails, perform the following actions one at a time to correct the problem. Do not replace a non-defective FRUs: Chapter 4 152


