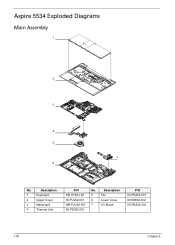
Aspire 5534 Service Guide
Page 9
... Password Check and BIOS Recovery 175 Clearing Password Check 175 BIOS Recovery by Crisis Disk 176 FRU (Field Replaceable Unit) List 177 Aspire 5534 Exploded Diagrams 178 Main Assembly 178 LCD Assembly 179 Aspire 5534 FRU List 180 Screw List 186 Model Definition and Configuration 188 Test Compatible Components 206 Windows 7 Environment Test 207 Online Support...
Aspire 5534 Service Guide
Page 54
... a flat, stable surface. 4. For example, if you want to remove the Mainboard, you must first remove the Keyboard, and LCD Module then disassemble the inside assembly frame in that you do the following sections: q External components disassembly q Main unit disassembly q LCD module disassembly The flowcharts provided in the succeeding disassembly sections...
Aspire 5534 Service Guide
Page 61
Step ODD Module Size M2.5*3 Quantity 1 5. Chapter 3 51 Remove the screws securing the ODD bracket and remove the ODD bracket from the optical disk drive module. Slide the ODD module out of the assembly Screw Type 6.
Aspire 5534 Service Guide
Page 75
Working from the assembly. Chapter 3 65 Lift the cover away from the back corners toward the back center, pry apart the covers to release the securing hooks on the top edge as shown. 7. 6.
Aspire 5534 Service Guide
Page 141
Replace the mylar sheet covering the Button Board. Connect the single FFC to the Touchpad and close the securing latch. 5. 4. Place the Upper Cover on the assembly bottom edge first. Chapter 3 131 Replacing the Upper Cover 1.
Aspire 5534 Service Guide
Page 154
Slide the ODD module into the assembly 5. Insert the screw to secure the ODD module. 4. Step ODD Module Size M2.5*3 Quantity 1 Screw Type 144 Chapter 3
Aspire 5534 Service Guide
Page 172
... one at a time to correct the problem. Do not replace a non-defective FRUs: Start OK Check function /B to M/B FFC OK Check function /B and FFC Re -assemble NG the function /B FFC to M/B OK Swap The NG function /B Swap M/B Chapter 4 162 Bluetooth Function Failure If the Bluetooth fails, perform the following actions one...
Aspire 5534 Service Guide
Page 175
If any problems are found, replace the FRU. 3. If the problem remains, replace the following devices: • Non-Acer devices • Printer, mouse, and other external devices • Battery pack • Hard disk drive • DIMM • CD-ROM/Diskette ... inoperative. Power-off the computer. 2. Power-on page 149): 1. Do not replace a non-defective FRU: • System board • LCD assembly 165 Chapter 4 Remove or disconnect all attached devices are supported by the computer. Undetermined Problems The diagnostic problems does not identify which adapter or device...
Aspire 5534 Service Guide
Page 188
Aspire 5534 Exploded Diagrams Main Assembly 1 2 3 4 5 7 6 No. Description 5 Fan 6 Lower Cover 7 I/O Board P/N 23.PEA02.001 60.N6802.002 55.PEA02.004 178 Chapter 6 Description 1 Keyboard 2 Upper Cover 3 Mainboard 4 Thermal Unit P/N KB.I170A.128 60.PJV02.001 MB.PJU02.001 60.PE902.001 No.
Aspire 5534 Service Guide
Page 191
Category CABLE Acer Description POWER CORD ARGENTINA 3 PIN POWER CORD US 3 PIN POWER CORD EU 3 PIN POWER CORD AUS 3 PIN POWER CORD UK 3 PIN POWER CORD ITALIAN 3 PIN POWER CORD JP 3 PIN IO BOARD CABLE DC-IN CABLE LCD CABLE, W/CMOS CABLE ANTENNA WLAN CASE/COVER/BRACKET ASSEMBLY LCD HINGE R&L TP BRACKET HDD BRACKET Acer P/N 27.APV02.001 27.TAVV5.001 27.TAVV5.002 27.TAVV5.003 27.TAVV5.004 27.TAVV5.007 27.TAVV5.009 50.PEA02.002 50.PEA02.003 50.PEA02.004 50.PEA02.005 33.N6802.001 33.PEA02.001 33.PEA02.002 Chapter 6 ODD BRACKET NAME PLATE-AS5534 33.PEA02.004 40.PJV02.001 181