Aspire 5220/5520/5520G User's Guide
Page 11
...8226; placing your display in one fixed posture • avoid slouching forward and/or leaning backward • stand up and walk around regularly to remove the strain on how to minimize neck strain Taking care of your eyes. xi Finding your comfort zone Find your comfort zone by using drapes...; take short rests to relax your neck and shoulders • avoid tensing your muscles or shrugging your shoulders • install the external display, keyboard and mouse properly and within comfortable reach • if you view your monitor more than the top edge of the display so your eyes point...
...8226; placing your display in one fixed posture • avoid slouching forward and/or leaning backward • stand up and walk around regularly to remove the strain on how to minimize neck strain Taking care of your eyes. xi Finding your comfort zone Find your comfort zone by using drapes...; take short rests to relax your neck and shoulders • avoid tensing your muscles or shrugging your shoulders • install the external display, keyboard and mouse properly and within comfortable reach • if you view your monitor more than the top edge of the display so your eyes point...
Aspire 5220/5520/5520G User's Guide
Page 18
... (ITW) 43 Before you call 43 Battery pack 44 Battery pack characteristics 44 Maximizing the battery's life 44 Installing and removing the battery pack 45 Charging the battery 46 Checking the battery level 46 Optimising battery life 46 Battery-low warning 47... Acer Arcade (for selected models) 48 Finding and playing content 49 Settings 49 Arcade controls 50 Navigation controls 50 Player controls 50 Virtual keyboard 51 Background mode 51 Cinema 52 Settings 52 Album 53 Editing ...
... (ITW) 43 Before you call 43 Battery pack 44 Battery pack characteristics 44 Maximizing the battery's life 44 Installing and removing the battery pack 45 Charging the battery 46 Checking the battery level 46 Optimising battery life 46 Battery-low warning 47... Acer Arcade (for selected models) 48 Finding and playing content 49 Settings 49 Arcade controls 50 Navigation controls 50 Player controls 50 Virtual keyboard 51 Background mode 51 Cinema 52 Settings 52 Album 53 Editing ...
Aspire 5220/5520/5520G User's Guide
Page 85
Disconnecting from the desktop Follow these steps to disconnect your computer from external accessories: 1 Save any open files. 2 Remove any media, floppy disks or compact disks from the drive(s). 3 Shut down the computer. 4 Close the display cover. 5 Disconnect the cord from...English 65 Taking your notebook PC with you This section gives you go within short distances, for example, from the AC adapter. 6 Disconnect the keyboard, pointing device, printer, external monitor and other external devices. 7 Disconnect the Kensington lock if you are using one to secure the computer. then ...
Disconnecting from the desktop Follow these steps to disconnect your computer from external accessories: 1 Save any open files. 2 Remove any media, floppy disks or compact disks from the drive(s). 3 Shut down the computer. 4 Close the display cover. 5 Disconnect the cord from...English 65 Taking your notebook PC with you This section gives you go within short distances, for example, from the AC adapter. 6 Disconnect the keyboard, pointing device, printer, external monitor and other external devices. 7 Disconnect the Kensington lock if you are using one to secure the computer. then ...
Aspire 5220/5520/5520G User's Guide
Page 118
...-low warning 47 caring for xv characteristics 44 charging 46 checking charge level 46 installing 45 low conditions 47 maximizing life 44 optimizing 46 removing 46 using the first time 44 BIOS utility 79 brightness hotkeys 31 C caps lock 29 on indicator 25 care AC adapter xiv battery ... manually 41 troubleshooting 41 charging checking level 46 cleaning computer xv computer caring for xiv cleaning xv disconnecting 65 features 15, 37 indicators 25 keyboards 29 moving around 65 on indicator 25, 26 security 69 setting up a home office 67 taking home 66 traveling internationally 68 traveling on ...
...-low warning 47 caring for xv characteristics 44 charging 46 checking charge level 46 installing 45 low conditions 47 maximizing life 44 optimizing 46 removing 46 using the first time 44 BIOS utility 79 brightness hotkeys 31 C caps lock 29 on indicator 25 care AC adapter xiv battery ... manually 41 troubleshooting 41 charging checking level 46 cleaning computer xv computer caring for xiv cleaning xv disconnecting 65 features 15, 37 indicators 25 keyboards 29 moving around 65 on indicator 25, 26 security 69 setting up a home office 67 taking home 66 traveling internationally 68 traveling on ...

Aspire 5220/5520/5520G Service Guide
Page 63
For example, if you must first remove the keyboard, then disassemble the inside assembly frame in that order. Disassembly Procedure Flowchart The flowchart on the succeeding page gives you a graphic representation on the entire ... Start Battery Pack B*1 D*1 System Fan B*4 Thermal Module F*1 ODD Module CPU D*5 F*1 Thermal Door Memory Lower Case Assembly F*1 Mimi Cover F*2 HDD Door H*4 HDD Bracket HDD Middle Cover F*2 Keyboard C*2 LCD hinges to logic D*2 LCD hinges to logic C*2 on bottom side LCD Module C*8 upper case assembly to lower case assembly on bottom side C*2 upper case...
For example, if you must first remove the keyboard, then disassemble the inside assembly frame in that order. Disassembly Procedure Flowchart The flowchart on the succeeding page gives you a graphic representation on the entire ... Start Battery Pack B*1 D*1 System Fan B*4 Thermal Module F*1 ODD Module CPU D*5 F*1 Thermal Door Memory Lower Case Assembly F*1 Mimi Cover F*2 HDD Door H*4 HDD Bracket HDD Middle Cover F*2 Keyboard C*2 LCD hinges to logic D*2 LCD hinges to logic C*2 on bottom side LCD Module C*8 upper case assembly to lower case assembly on bottom side C*2 upper case...

Aspire 5220/5520/5520G Service Guide
Page 66
Detach the HDD cover from the main unit. 3. Remove the four screws holding the thermal cover. 2. Detach the thermal cover from the main unit. 3. Pull the tab to remove the HDD module in the direction of the arrow. Pop out the memory from the DIMM socket then remove it (If the notebook has two memory, then repeat this step). 73 Chapter 3 Removing the HDD Module/Memory/Wireless LAN Card/Modem Card/ System Fan/Thermal Modules/VGA Board/CPU/Keyboard and the LCD Module Removing the HDD Module 1. Remove the two screws fastening the HDD cover. 2. Removing the Memory 1.
Detach the HDD cover from the main unit. 3. Remove the four screws holding the thermal cover. 2. Detach the thermal cover from the main unit. 3. Pull the tab to remove the HDD module in the direction of the arrow. Pop out the memory from the DIMM socket then remove it (If the notebook has two memory, then repeat this step). 73 Chapter 3 Removing the HDD Module/Memory/Wireless LAN Card/Modem Card/ System Fan/Thermal Modules/VGA Board/CPU/Keyboard and the LCD Module Removing the HDD Module 1. Remove the two screws fastening the HDD cover. 2. Removing the Memory 1.

Aspire 5220/5520/5520G Service Guide
Page 69
... LAN antennas free from the main unit. 7. Remove the keyboard from the main unit as shown. 9. Chapter 3 76 Detach the strip cover from the front side and remove it from the main board. 8. Removing the Keyboard and LCD Module 1. Remove the two screws securing the strip cover from the... main board. 6. Then disconnect the keyboard cable from the bottom of the notebook. 3. Disconnect the...
... LAN antennas free from the main unit. 7. Remove the keyboard from the main unit as shown. 9. Chapter 3 76 Detach the strip cover from the front side and remove it from the main board. 8. Removing the Keyboard and LCD Module 1. Remove the two screws securing the strip cover from the... main board. 6. Then disconnect the keyboard cable from the bottom of the notebook. 3. Disconnect the...
Aspire 5220/5520/5520G Service Guide
Page 80
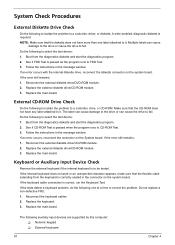
... diskette and start the diagnostics program. 2. If an error occurs, reconnect the connector on the system board. If the tests detect a keyboard problem, do the following one label attached to it . Replace the main board. Do the following to correct the problem. See if ...Drive Check Do the following to isolate the problem to be tested. If the error still remains: 1. Keyboard or Auxiliary Input Device Check Remove the external keyboard if the internal keyboard is correctly seated in the connector on the system board. System Check Procedures External Diskette Drive Check Do...
... diskette and start the diagnostics program. 2. If an error occurs, reconnect the connector on the system board. If the tests detect a keyboard problem, do the following one label attached to it . Replace the main board. Do the following to correct the problem. See if ...Drive Check Do the following to isolate the problem to be tested. If the error still remains: 1. Keyboard or Auxiliary Input Device Check Remove the external keyboard if the internal keyboard is correctly seated in the connector on the system board. System Check Procedures External Diskette Drive Check Do...
Aspire 5220/5520/5520G Service Guide
Page 94
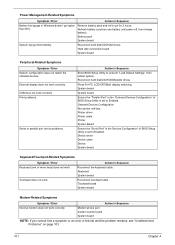
USB does not work . Remove battery pack and let it cool for 2 hours. Hard disk connection board ..." of BIOS Setup Utility is set to Enabled. External display does not work correctly. Touchpad does not work. Keyboard System board Reconnect touchpad cable. Modem phone port modem combo board System board NOTE: If you cannot find a ...symptom or an error in Sequence Reconnect the keyboard cable. Refresh battery (continue use battery until power off, then charge battery). Action in this list and the problem...
USB does not work . Remove battery pack and let it cool for 2 hours. Hard disk connection board ..." of BIOS Setup Utility is set to Enabled. External display does not work correctly. Touchpad does not work. Keyboard System board Reconnect touchpad cable. Modem phone port modem combo board System board NOTE: If you cannot find a ...symptom or an error in Sequence Reconnect the keyboard cable. Refresh battery (continue use battery until power off, then charge battery). Action in this list and the problem...


