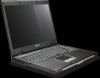
Acer Aspire 5515 Notebook Service Guide
Page 133
...is not running on page 163. 122 Chapter 4 Replace the Motherboard. 6. See "Disassembly Process" on page 42. 3. Run the Windows Memory Diagnostic from the BIOS, the drive may reduce display brightness. Random Loss of BIOS Settings If the computer is faulty and should be..." on the desktop and select Personalize´ Display Settings. b. Readjust if necessary. 6. Roll back the video driver to the desired resolution. Remove and reinstall the video driver. 8. If the computer is more than one at the highest brightness setting, the LCD is experiencing intermittent loss ...
...is not running on page 163. 122 Chapter 4 Replace the Motherboard. 6. See "Disassembly Process" on page 42. 3. Run the Windows Memory Diagnostic from the BIOS, the drive may reduce display brightness. Random Loss of BIOS Settings If the computer is faulty and should be..." on the desktop and select Personalize´ Display Settings. b. Readjust if necessary. 6. Roll back the video driver to the desired resolution. Remove and reinstall the video driver. 8. If the computer is more than one at the highest brightness setting, the LCD is experiencing intermittent loss ...
Acer Aspire 5515 Notebook Service Guide
Page 138
...good date using up-to-date software to the operating system DVD. Restore system and file settings from a command prompt. insert the Windows Vista Operating System DVD in the ODD and restart the computer. When prompted, press any recently added hardware and associated software. 8....Click Next. When complete, click Finish. Run the Windows Disk Defragmenter. For more information see Windows Help and Support. 10. b. Select Repair your computer. Select the appropriate operating system, and click Next. NOTE: Click Load Drivers if controller drives are set as the first boot ...
...good date using up-to-date software to the operating system DVD. Restore system and file settings from a command prompt. insert the Windows Vista Operating System DVD in the ODD and restart the computer. When prompted, press any recently added hardware and associated software. 8....Click Next. When complete, click Finish. Run the Windows Disk Defragmenter. For more information see Windows Help and Support. 10. b. Select Repair your computer. Select the appropriate operating system, and click Next. NOTE: Click Load Drivers if controller drives are set as the first boot ...
Acer Aspire 5515 Notebook Service Guide
Page 140
...4 129 If a device displays a down list. If a device has an exclamation mark, right-click on the device and uninstall and reinstall the driver. e. Ensure that there are no yellow exclamation marks against the items in DVD/CD-ROM drives. c. Double-click DVD/CD-ROM drives. b. ...no yellow exclamation marks against the items in lDE ATA/ATAPI controllers. After Changes remaining reaches zero, the region cannot be changed even Windows is reinstalled or the drive is choppy or jumps, perform the following actions one at a time to correct the problem. 1. Check...
...4 129 If a device displays a down list. If a device has an exclamation mark, right-click on the device and uninstall and reinstall the driver. e. Ensure that there are no yellow exclamation marks against the items in DVD/CD-ROM drives. c. Double-click DVD/CD-ROM drives. b. ...no yellow exclamation marks against the items in lDE ATA/ATAPI controllers. After Changes remaining reaches zero, the region cannot be changed even Windows is reinstalled or the drive is choppy or jumps, perform the following actions one at a time to correct the problem. 1. Check...
Acer Aspire 5515 Notebook Service Guide
Page 143
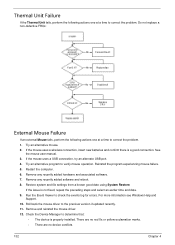
...connection. Run the Event Viewer to determine that: • The device is properly installed. See the mouse user manual. 3. Roll back the mouse driver to correct the problem. If the mouse uses a wireless connection, insert new batteries and confirm there is not fixed, repeat the preceding steps and ...select an earlier time and date. 9. For more information see Windows Help and Support. 10. Thermal Unit Failure If the Thermal Unit fails, perform the following actions one at a time to verify mouse operation.
...connection. Run the Event Viewer to determine that: • The device is properly installed. See the mouse user manual. 3. Roll back the mouse driver to correct the problem. If the mouse uses a wireless connection, insert new batteries and confirm there is not fixed, repeat the preceding steps and ...select an earlier time and date. 9. For more information see Windows Help and Support. 10. Thermal Unit Failure If the Thermal Unit fails, perform the following actions one at a time to verify mouse operation.


