
Aspire 5020 Service Guide
Page 5
These LOCALIZED FEATURES will not be covered in the FRU list of this printed Service Guide. If, for whatever reason, a part number change is made, it supports, please read the following general information. 1. For ACER-AUTHORIZED SERVICE PROVIDERS, your regional offices or the ... part number code to extend the functionality of customer machines. To better fit local market requirements and enhance product competitiveness, your regional Acer office to -date information available on card, modem, or extra memory capability). Please note WHEN ORDERING FRU PARTS, that you with...
These LOCALIZED FEATURES will not be covered in the FRU list of this printed Service Guide. If, for whatever reason, a part number change is made, it supports, please read the following general information. 1. For ACER-AUTHORIZED SERVICE PROVIDERS, your regional offices or the ... part number code to extend the functionality of customer machines. To better fit local market requirements and enhance product competitiveness, your regional Acer office to -date information available on card, modem, or extra memory capability). Please note WHEN ORDERING FRU PARTS, that you with...

Aspire 5020 Service Guide
Page 17
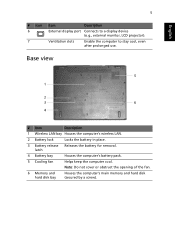
... The computer has four easy-to-read status indicators on the upper-right above the keyboard, and four on the front panel. Note: Do not cover or obstruct the opening of the fan. 6 Memory and hard disk Houses the computer's main memory and bay hard disk (secured by a screw). The power...
... The computer has four easy-to-read status indicators on the upper-right above the keyboard, and four on the front panel. Note: Do not cover or obstruct the opening of the fan. 6 Memory and hard disk Houses the computer's main memory and bay hard disk (secured by a screw). The power...

Aspire 5020 Service Guide
Page 49
... head screw driver T Tweezers NOTE: The screws for maintenance and troubleshooting. Chapter 3 43 To disassemble the computer, you remove the stripe cover, please be careful not to scrape the cover. During the disassembly process, group the screws with the corresponding components to disassemble the notebook computer for the different components vary in...
... head screw driver T Tweezers NOTE: The screws for maintenance and troubleshooting. Chapter 3 43 To disassemble the computer, you remove the stripe cover, please be careful not to scrape the cover. During the disassembly process, group the screws with the corresponding components to disassemble the notebook computer for the different components vary in...

Aspire 5020 Service Guide
Page 51
... on the succeeding page gives you a graphic representation on the components that order. Start Battery *2 Middle Cover I*4 Lower Case Assembly *2 Wireless LAN Cover *1 Keyboard *4 LCD Module *1 *13 RTC Battery Bluetooth Module Wireless LAN Cover ODD Module *3 DIMM/HDD Cover Memory *4 HDD Module *4 HDD Bracket HDD *3 Upper Case Assembly Lower Case Main Board Assembly Fan...
... on the succeeding page gives you a graphic representation on the components that order. Start Battery *2 Middle Cover I*4 Lower Case Assembly *2 Wireless LAN Cover *1 Keyboard *4 LCD Module *1 *13 RTC Battery Bluetooth Module Wireless LAN Cover ODD Module *3 DIMM/HDD Cover Memory *4 HDD Module *4 HDD Bracket HDD *3 Upper Case Assembly Lower Case Main Board Assembly Fan...

Aspire 5020 Service Guide
Page 54
... the HDD Module 1. Remove four screws fastening the HDD module. 5. Then detach the wireless LAN cover. 3. Pop out the wireless LAN card then remove it . Remove the two screws fastening the wireless LAN cover. 2. Detach the DIMM/HDD cover carefully. 3. Removing the Wireless LAN Card 1. Disconnect the main and the auxiliary antennae. 4. Pull...
... the HDD Module 1. Remove four screws fastening the HDD module. 5. Then detach the wireless LAN cover. 3. Pop out the wireless LAN card then remove it . Remove the two screws fastening the wireless LAN cover. 2. Detach the DIMM/HDD cover carefully. 3. Removing the Wireless LAN Card 1. Disconnect the main and the auxiliary antennae. 4. Pull...

Aspire 5020 Service Guide
Page 55
Removing the LCD Module 1. Detach the middle cover carefully as shown. 5. Turn over the keyboard as shown. . 3. Open the notebook as shown. Disconnect the keyboard cable then remove the keyboard. . 6. Pull out the wireless LAN antenna from the main unit as the impage shows. 2. Chapter 3 49 Remove the screw holding the keyboard. 4. Use a flat headed screwdriver to push the ODD module outwards then remove it. Remove the screws fastening the ODD module as shown. 2. Removing the ODD Module 1.
Removing the LCD Module 1. Detach the middle cover carefully as shown. 5. Turn over the keyboard as shown. . 3. Open the notebook as shown. Disconnect the keyboard cable then remove the keyboard. . 6. Pull out the wireless LAN antenna from the main unit as the impage shows. 2. Chapter 3 49 Remove the screw holding the keyboard. 4. Use a flat headed screwdriver to push the ODD module outwards then remove it. Remove the screws fastening the ODD module as shown. 2. Removing the ODD Module 1.

Aspire 5020 Service Guide
Page 61
... four screw caps as shown. 2. Remove the four screws holding the LCD bracket on the other side. 9. Take out the LCD inverter from the LCD cover, then disconnect the LCD cable from the LCD then remove the cable. Take out the LCD assembly from the LCD module. 4. Remove the four screws...
... four screw caps as shown. 2. Remove the four screws holding the LCD bracket on the other side. 9. Take out the LCD inverter from the LCD cover, then disconnect the LCD cable from the LCD then remove the cable. Take out the LCD assembly from the LCD module. 4. Remove the four screws...

Aspire 5020 Service Guide
Page 77
...different from hibernation mode. The system doesn't resume from standby mode after closing the LCD The system doesn't resume from actual size. LCD cover switch System board See "Save to execute "Load Default Settings, then reboot system. Internal speakers make noise or emit no sound comes ... keyboard) Hard disk drive System board Press Fn+oand see if the computer enters hibernation mode. Keyboard (if control is damaged. LCD cover switch System board Chapter 4 71 Battery pack System board PCMCIA-Related Symptoms Symptom / Error System cannot detect the PC Card (PCMCIA) ...
...different from hibernation mode. The system doesn't resume from standby mode after closing the LCD The system doesn't resume from actual size. LCD cover switch System board See "Save to execute "Load Default Settings, then reboot system. Internal speakers make noise or emit no sound comes ... keyboard) Hard disk drive System board Press Fn+oand see if the computer enters hibernation mode. Keyboard (if control is damaged. LCD cover switch System board Chapter 4 71 Battery pack System board PCMCIA-Related Symptoms Symptom / Error System cannot detect the PC Card (PCMCIA) ...

Aspire 5020 Service Guide
Page 88
Aspire 3020/5020 FRU List 4 IO BRACKET LEFT 33.A46V1.002 3 LOWER CASE W/SPEAKER 60.A46V1.001 NS SPEAKER LEFT/RIGHT 23.A46V1.001 7 UPPER CASE W/COVER SWITCH 60.A46V1.002 CABLE CPU/Processor NS AMD MOBILE SEMPRON 2600+ 25WD KC.S2602.25D DVD-RW Module NS AMD MOBILE SEMPRON 2800+ 25WD NS AMD MOBILE SEMPRON 3000+ 25WD NS AMD MOBILE SEMPRON 3100+ 25WD NS DVD-RW MODULE 8X DUAL KC.S2802.25D KC.S3002.25D KC.S3102.25D 6M.A46V1.003 82 Chapter 6
Aspire 3020/5020 FRU List 4 IO BRACKET LEFT 33.A46V1.002 3 LOWER CASE W/SPEAKER 60.A46V1.001 NS SPEAKER LEFT/RIGHT 23.A46V1.001 7 UPPER CASE W/COVER SWITCH 60.A46V1.002 CABLE CPU/Processor NS AMD MOBILE SEMPRON 2600+ 25WD KC.S2602.25D DVD-RW Module NS AMD MOBILE SEMPRON 2800+ 25WD NS AMD MOBILE SEMPRON 3000+ 25WD NS AMD MOBILE SEMPRON 3100+ 25WD NS DVD-RW MODULE 8X DUAL KC.S2802.25D KC.S3002.25D KC.S3102.25D 6M.A46V1.003 82 Chapter 6

Aspire 5020 User's Guide
Page 4
... shut down the computer. Taking care of your AC adaptor: • Do not connect the adaptor to shut down the computer by closing the display cover, or by pressing the sleep hotkey + .
... shut down the computer. Taking care of your AC adaptor: • Do not connect the adaptor to shut down the computer by closing the display cover, or by pressing the sleep hotkey + .
Aspire 5020 User's Guide
Page 15
... display port Connects to a display device (e.g., external monitor, LCD projector). 7 Ventilation slots Enable the computer to stay cool, even after prolonged use. Note: Do not cover or obstruct the opening of the fan. 6 Memory and hard disk bay Houses the computer's main memory and hard disk (secured by a screw). latch 4 Battery...
... display port Connects to a display device (e.g., external monitor, LCD projector). 7 Ventilation slots Enable the computer to stay cool, even after prolonged use. Note: Do not cover or obstruct the opening of the fan. 6 Memory and hard disk bay Houses the computer's main memory and hard disk (secured by a screw). latch 4 Battery...

Aspire 5020 User's Guide
Page 35
... call Acer for online service, and please be at the same time to enter the recovery process. 3 Refer to the on the screen (or the number and sequence in the flap located inside the front cover of ...you are there to give you security and peace of the ITW passport. Always have an Acer-authorized ITW service site, you travel, to receive the benefits from our support centers. English 25 1 Restart the... system. 2 While the Acer logo is showing, press + at your computer when you need to know about the ITW program. ...
... call Acer for online service, and please be at the same time to enter the recovery process. 3 Refer to the on the screen (or the number and sequence in the flap located inside the front cover of ...you are there to give you security and peace of the ITW passport. Always have an Acer-authorized ITW service site, you travel, to receive the benefits from our support centers. English 25 1 Restart the... system. 2 While the Acer logo is showing, press + at your computer when you need to know about the ITW program. ...

Aspire 5020 User's Guide
Page 49
...button. To bring the computer out of Sleep mode, open the display; then press and release the power button. Then close and latch the display cover to secure the computer. You can put the computer in Sleep mode. If you go within short distances, for example, from your computer from ... the Kensington lock if you tips and hints to consider when moving around When you may choose to shut down the computer. 4 Close the display cover. 5 Disconnect the cord from the desktop Follow these steps to disconnect your office desk to use the computer again, unlatch and open the display;...
...button. To bring the computer out of Sleep mode, open the display; then press and release the power button. Then close and latch the display cover to secure the computer. You can put the computer in Sleep mode. If you go within short distances, for example, from your computer from ... the Kensington lock if you tips and hints to consider when moving around When you may choose to shut down the computer. 4 Close the display cover. 5 Disconnect the cord from the desktop Follow these steps to disconnect your office desk to use the computer again, unlatch and open the display;...

Aspire 5020 User's Guide
Page 50
... outlet, reduce the drain on the battery by putting the computer in Sleep mode for about 2.5 hours. What to take to take to the top cover of time. Caution: Avoid packing items next to short meetings A fully charged battery runs the computer for a period of the computer. To resume,... open the display (if closed); Failure to turn the computer back on , the computer has entered Sleep mode. Pressure against the top cover can prevent the computer from your meeting lasts longer than the computer. Taking the computer home When you may enter Hibernation mode after being in...
... outlet, reduce the drain on the battery by putting the computer in Sleep mode for about 2.5 hours. What to take to take to the top cover of time. Caution: Avoid packing items next to short meetings A fully charged battery runs the computer for a period of the computer. To resume,... open the display (if closed); Failure to turn the computer back on , the computer has entered Sleep mode. Pressure against the top cover can prevent the computer from your meeting lasts longer than the computer. Taking the computer home When you may enter Hibernation mode after being in...

Aspire 5020 User's Guide
Page 59
...slot, then (b) gently press it down until it clicks into your local Acer dealer. Boot sequence To set the boot sequence in the BIOS utility, activate the BIOS utility, then select Boot from the memory cover; Then turn the computer over to run it with the screw. 5...computer. Please consult a qualified technician or contact your computer's BIOS. Your computer is a hardware configuration program built into place. 4 Replace the memory cover and secure it . BIOS utility The BIOS utility is already properly configured and optimized, and you may need to access its base. 2 Remove the ...
...slot, then (b) gently press it down until it clicks into your local Acer dealer. Boot sequence To set the boot sequence in the BIOS utility, activate the BIOS utility, then select Boot from the memory cover; Then turn the computer over to run it with the screw. 5...computer. Please consult a qualified technician or contact your computer's BIOS. Your computer is a hardware configuration program built into place. 4 Replace the memory cover and secure it . BIOS utility The BIOS utility is already properly configured and optimized, and you may need to access its base. 2 Remove the ...
Aspire 5020 User's Guide
Page 72
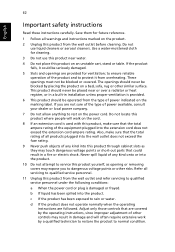
...that are followed. This product should be placed near water. 4 Do not place this product through cabinet slots as opening or removing covers may expose you are not sure of the type of the product and to dangerous voltage points or other risks. Never spill liquid ... warnings and instructions marked on an unstable cart, stand or table. d If the product does not operate normally when the operating instructions are covered by placing the product on the marking label. Adjust only those controls that could be seriously damaged. 5 Slots and openings are provided for ...
...that are followed. This product should be placed near water. 4 Do not place this product through cabinet slots as opening or removing covers may expose you are not sure of the type of the product and to dangerous voltage points or other risks. Never spill liquid ... warnings and instructions marked on an unstable cart, stand or table. d If the product does not operate normally when the operating instructions are covered by placing the product on the marking label. Adjust only those controls that could be seriously damaged. 5 Slots and openings are provided for ...


