
Aspire 4735ZG/4935/4935G Quick Guide
Page 3
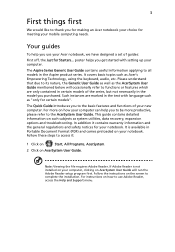
... information and the general regulations and safety notices for your new computer. The Aspire Series Generic User Guide contains useful information applying to all models in the text with setting up your Acer notebook, we have designed a set of your notebook. This guide contains detailed...functions or features which are marked in the Aspire product series. If Adobe Reader is available in the model you purchased. Please understand that due to its nature, the Generic User Guide as well as Acer's Empowering Technology, using the keyboard, audio, etc. The Quick Guide introduces...
... information and the general regulations and safety notices for your new computer. The Aspire Series Generic User Guide contains useful information applying to all models in the text with setting up your Acer notebook, we have designed a set of your notebook. This guide contains detailed...functions or features which are marked in the Aspire product series. If Adobe Reader is available in the model you purchased. Please understand that due to its nature, the Generic User Guide as well as Acer's Empowering Technology, using the keyboard, audio, etc. The Quick Guide introduces...

Aspire 4735ZG/4935/4935G Quick Guide
Page 5
...left and right mouse buttons. *The center button serves as Acer Bio- Please refer to show the status of the computer's functions and components. Please refer to the Generic User Guide for more details. 6 Keyboard For entering data into your computer. 7 Palmrest Comfortable support area... for your hands when you use with Acer Arcade and other keys media playing programs. 12 Easy-launch Buttons for launching ...
...left and right mouse buttons. *The center button serves as Acer Bio- Please refer to show the status of the computer's functions and components. Please refer to the Generic User Guide for more details. 6 Keyboard For entering data into your computer. 7 Palmrest Comfortable support area... for your hands when you use with Acer Arcade and other keys media playing programs. 12 Easy-launch Buttons for launching ...

Aspire 4735ZG/4935/4935G Quick Guide
Page 11
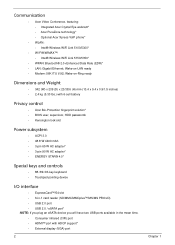
...3-pin 65 W AC adapter* • 3-pin 90 W AC adapter* • ENERGY STAR® 4.0* • 88-/89-/93-key keyboard • Touchpad pointing device Wake-on -LAN ready • Modem: 56K ITU V.92; 11 English Communication Privacy control Dimensions and weight Power subsystem... Special keys and controls Acer Video Conference, featuring: • Integrated Acer Crystal Eye webcam* • Acer PureZone technology* • Optional Acer Xpress VoIP phone* • WLAN: • Intel® Wireless WiFi Link ...
...3-pin 65 W AC adapter* • 3-pin 90 W AC adapter* • ENERGY STAR® 4.0* • 88-/89-/93-key keyboard • Touchpad pointing device Wake-on -LAN ready • Modem: 56K ITU V.92; 11 English Communication Privacy control Dimensions and weight Power subsystem... Special keys and controls Acer Video Conference, featuring: • Integrated Acer Crystal Eye webcam* • Acer PureZone technology* • Optional Acer Xpress VoIP phone* • WLAN: • Intel® Wireless WiFi Link ...

Service Guide
Page 7
...1 Features 1 System Block Diagram 4 Your Acer Notebook tour 5 Front View 5 Closed Front View 6 Left View 7 Right View 8 Rear View 8 Bottom View 9 Indicators 10 Easy-Launch Buttons 10 Touchpad Basics (with fingerprint reader 11 Using the Keyboard 12 Lock Keys and embedded numeric keypad 12 ...Windows Keys 13 Hot Keys 14 Special Key 15 Using the System Utilities 16 Acer GridVista (dual-display compatible 16 Hardware Specifications and Configurations 18 ...
...1 Features 1 System Block Diagram 4 Your Acer Notebook tour 5 Front View 5 Closed Front View 6 Left View 7 Right View 8 Rear View 8 Bottom View 9 Indicators 10 Easy-Launch Buttons 10 Touchpad Basics (with fingerprint reader 11 Using the Keyboard 12 Lock Keys and embedded numeric keypad 12 ...Windows Keys 13 Hot Keys 14 Special Key 15 Using the System Utilities 16 Acer GridVista (dual-display compatible 16 Hardware Specifications and Configurations 18 ...

Service Guide
Page 8
Table of Contents Main Unit Disassembly Flowchart 65 Removing the Hinge Covers 67 Removing the Switch Cover 68 Removing the Keyboard 70 Removing the Function Board 71 Removing the Speaker Module 72 Removing the LCD Module 74 Removing the Upper Base 79 Removing the Finger...Print Reader 126 Replacing the Upper Cover 127 Replacing the LCD Module 130 Replacing the Speaker Module 134 Replacing the Function Board 135 Replacing the Keyboard 136 Replacing the Switch Cover 137 Replacing the Hinge Covers 139 Replacing the ODD Module 140 Replacing the Hard Disk Drive Module 141 Replacing ...
Table of Contents Main Unit Disassembly Flowchart 65 Removing the Hinge Covers 67 Removing the Switch Cover 68 Removing the Keyboard 70 Removing the Function Board 71 Removing the Speaker Module 72 Removing the LCD Module 74 Removing the Upper Base 79 Removing the Finger...Print Reader 126 Replacing the Upper Cover 127 Replacing the LCD Module 130 Replacing the Speaker Module 134 Replacing the Function Board 135 Replacing the Keyboard 136 Replacing the Switch Cover 137 Replacing the Hinge Covers 139 Replacing the ODD Module 140 Replacing the Hard Disk Drive Module 141 Replacing ...
Service Guide
Page 9
... Problems 145 Power On Issue 146 No Display Issue 147 Random Loss of BIOS Settings 148 LCD Failure 149 Built-In Keyboard Failure 149 Touchpad Failure 150 Internal Speaker Failure 150 Internal Microphone Failure 152 HDD Not Operating Correctly 153 ODD Failure 154 USB... BIOS Recovery by Crisis Disk 172 FRU (Field Replaceable Unit) List 173 Aspire 4935/4935G Exploded Diagrams 174 Main Module 174 Aspire 4935/4935G FRU List 175 Screw List 182 Model Definition and Configuration 184 Aspire 4935/4935G Series 184 Test Compatible Components 223 Microsoft® Windows® Vista...
... Problems 145 Power On Issue 146 No Display Issue 147 Random Loss of BIOS Settings 148 LCD Failure 149 Built-In Keyboard Failure 149 Touchpad Failure 150 Internal Speaker Failure 150 Internal Microphone Failure 152 HDD Not Operating Correctly 153 ODD Failure 154 USB... BIOS Recovery by Crisis Disk 172 FRU (Field Replaceable Unit) List 173 Aspire 4935/4935G Exploded Diagrams 174 Main Module 174 Aspire 4935/4935G FRU List 175 Screw List 182 Model Definition and Configuration 184 Aspire 4935/4935G Series 184 Test Compatible Components 223 Microsoft® Windows® Vista...
Service Guide
Page 12
...342 (W) x 239 (D) x 23/38.6 (H) mm (13.4 x 9.4 x 0.9/1.5 inches) • 2.4 kg (5.30 lbs.) with 6-cell battery Privacy control • Acer Bio-Protection fingerprint solution* • BIOS user, supervisor, HDD passwords • Kensington lock slot Power subsystem • ACPI 3.0 • 48.8 W 4400 mAh • ...65 W AC adapter* • 3-pin 90 W AC adapter* • ENERGY STAR® 4.0* Special keys and controls • 88-/89-/93-key keyboard • Touchpad pointing device I/O interface • ExpressCard™/54 slot • 6-in-1 card reader (SD/MMC/MMCplus™/MS/MS PRO/xD) ...
...342 (W) x 239 (D) x 23/38.6 (H) mm (13.4 x 9.4 x 0.9/1.5 inches) • 2.4 kg (5.30 lbs.) with 6-cell battery Privacy control • Acer Bio-Protection fingerprint solution* • BIOS user, supervisor, HDD passwords • Kensington lock slot Power subsystem • ACPI 3.0 • 48.8 W 4400 mAh • ...65 W AC adapter* • 3-pin 90 W AC adapter* • ENERGY STAR® 4.0* Special keys and controls • 88-/89-/93-key keyboard • Touchpad pointing device I/O interface • ExpressCard™/54 slot • 6-in-1 card reader (SD/MMC/MMCplus™/MS/MS PRO/xD) ...

Service Guide
Page 15
Internal microphone for certain models). Status indicators Keyboard Palmrest Light-Emitting Diodes (LEDs) that light up to show you use the computer. Display screen Power button Also called Liquid-Crystal Display (LCD), displays ... (Configuration may vary by models). For entering data into your hands when you around your new computer. Comfortable support area for your computer. Chapter 1 5 Your Acer Notebook tour After knowing your computer features, let us show the status of the computer's functions and components. Front View No. 1 2 3 4 5 6 7 Icon Item...
Internal microphone for certain models). Status indicators Keyboard Palmrest Light-Emitting Diodes (LEDs) that light up to show you use the computer. Display screen Power button Also called Liquid-Crystal Display (LCD), displays ... (Configuration may vary by models). For entering data into your hands when you around your new computer. Comfortable support area for your computer. Chapter 1 5 Your Acer Notebook tour After knowing your computer features, let us show the status of the computer's functions and components. Front View No. 1 2 3 4 5 6 7 Icon Item...

Service Guide
Page 20
...They are called easy-launch buttons. To set to -read status indicators: The front panel indicators are application buttons. Launch Acer Empowering Technology. (user-programmable) 10 Chapter 1 Indicates when the hard disk drive is activated. These buttons are : WLAN, Internet,... email, Bluetooth, Arcade and Acer Empowering Technology. Fully charged: The light shows green when in AC mode. Easy-Launch Buttons Located beside the keyboard are visible even when the computer cover is closed. NOTE: 1. Icon ...
...They are called easy-launch buttons. To set to -read status indicators: The front panel indicators are application buttons. Launch Acer Empowering Technology. (user-programmable) 10 Chapter 1 Indicates when the hard disk drive is activated. These buttons are : WLAN, Internet,... email, Bluetooth, Arcade and Acer Empowering Technology. Fully charged: The light shows green when in AC mode. Easy-Launch Buttons Located beside the keyboard are visible even when the computer cover is closed. NOTE: 1. Icon ...

Service Guide
Page 22
...Desired access Number keys on embedded keypad Cursor-control keys on embedded keypad Main keyboard keys Num Lock on embedded keypad. The keys function as a calculator (complete with some applications. Using the Keyboard The keyboard has full-sized keys and an embedded numeric keypad, separate cursor, lock, ...upper right corner of numeric data entry. Use this mode when you can toggle on the keys. Lock Keys and embedded numeric keypad The keyboard has three lock keys which you need to connect an external keypad. Scroll Lock does not work with the arithmetic operators +, -, *,...
...Desired access Number keys on embedded keypad Cursor-control keys on embedded keypad Main keyboard keys Num Lock on embedded keypad. The keys function as a calculator (complete with some applications. Using the Keyboard The keyboard has full-sized keys and an embedded numeric keypad, separate cursor, lock, ...upper right corner of numeric data entry. Use this mode when you can toggle on the keys. Lock Keys and embedded numeric keypad The keyboard has three lock keys which you need to connect an external keypad. Scroll Lock does not work with the arithmetic operators +, -, *,...
Service Guide
Page 23
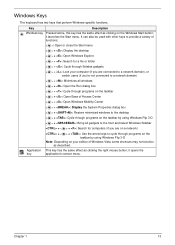
... This key has the same effect as described. it opens the key application's context menu. Chapter 1 13 it launches the Start menu. Windows Keys The keyboard has two keys that perform Windows-specific functions. Key Description Windows key Pressed alone, this key has the same effect as clicking on your edition...
... This key has the same effect as described. it opens the key application's context menu. Chapter 1 13 it launches the Start menu. Windows Keys The keyboard has two keys that perform Windows-specific functions. Key Description Windows key Pressed alone, this key has the same effect as clicking on your edition...

Service Guide
Page 25
.../ typography/faq/faq12.htm for more information. Open a text editor or word processor. 2. Hold and then press the key at the upper-center of your keyboard. NOTE: Note: Some fonts and software do not support the Euro symbol. Special Key You can locate the Euro symbol and the US dollar sign... at the upper-center and/or bottom-right of the keyboard. Open a text editor or word processor. 2. NOTE: This function varies by the operating system version. Chapter 1 15 Hold and then press the key at the...
.../ typography/faq/faq12.htm for more information. Open a text editor or word processor. 2. Hold and then press the key at the upper-center of your keyboard. NOTE: Note: Some fonts and software do not support the Euro symbol. Special Key You can locate the Euro symbol and the US dollar sign... at the upper-center and/or bottom-right of the keyboard. Open a text editor or word processor. 2. NOTE: This function varies by the operating system version. Chapter 1 15 Hold and then press the key at the...
Service Guide
Page 37
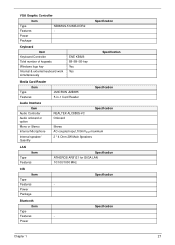
VGA Graphic Controller Item Type NB9MGS-512MB-DDR2 Features • Power Package Keyboard Item Keyboard Controller Total number of keypads Windows logo key Internal & external keyboard work simultaneously ENE KB926 88-/89-/93-key Yes Yes Specification Specification Media Card Reader Type Item Features Audio Interface Item Audio Controller Audio onboard ...
VGA Graphic Controller Item Type NB9MGS-512MB-DDR2 Features • Power Package Keyboard Item Keyboard Controller Total number of keypads Windows logo key Internal & external keyboard work simultaneously ENE KB926 88-/89-/93-key Yes Yes Specification Specification Media Card Reader Type Item Features Audio Interface Item Audio Controller Audio onboard ...

Service Guide
Page 62
For example, if you want to remove the main board, you must first remove the keyboard, then disassemble the inside assembly frame in that you do the following stages: • External module disassembly • Main unit disassembly • LCD module disassembly ... the order of the sequence to avoid damage to the system and all power and signal cables from the system. 3. Main Screw List Description Quantity Acer P/N M2.0D 3.0L K4.6D 0.8T ZK 17 86.AD302.001 M2.5D 3.0L K5.5D 0.8T ZK 15 86.AD302.002 M2.5D 5L...
For example, if you want to remove the main board, you must first remove the keyboard, then disassemble the inside assembly frame in that you do the following stages: • External module disassembly • Main unit disassembly • LCD module disassembly ... the order of the sequence to avoid damage to the system and all power and signal cables from the system. 3. Main Screw List Description Quantity Acer P/N M2.0D 3.0L K4.6D 0.8T ZK 17 86.AD302.001 M2.5D 3.0L K5.5D 0.8T ZK 15 86.AD302.002 M2.5D 5L...

Service Guide
Page 63
...*3 Quantity 2 4 1 2 Part No. 86.AD302.001 86.AD302.005 86.AD302.003 86.AD302.001 Chapter 3 53 For example, if you must first remove the keyboard, then disassemble the inside assembly frame in that need to remove the main board, you want to be removed during servicing.
...*3 Quantity 2 4 1 2 Part No. 86.AD302.001 86.AD302.005 86.AD302.003 86.AD302.001 Chapter 3 53 For example, if you must first remove the keyboard, then disassemble the inside assembly frame in that need to remove the main board, you want to be removed during servicing.

Service Guide
Page 75
Main Unit Disassembly Process Main Unit Disassembly Flowchart Remove External Modules before proceeding Rem ove Hinge Covers Rem ove Switch Cover Rem ove Keyboard Rem ove Function Board Rem ove Speaker Module Rem ove LCD Module Upper Cover Rem ove Upper Cover Lower Cover Rem ove Fingerprint Reader Rem ...
Main Unit Disassembly Process Main Unit Disassembly Flowchart Remove External Modules before proceeding Rem ove Hinge Covers Rem ove Switch Cover Rem ove Keyboard Rem ove Function Board Rem ove Speaker Module Rem ove LCD Module Upper Cover Rem ove Upper Cover Lower Cover Rem ove Fingerprint Reader Rem ...

Service Guide
Page 80
Lift the keyboard from both sides of the Keyboard. 3. Remove the keyboard from the Mainboard. 5. Unlock the connector and pull the FFC to remove it from the chassis. 70 Chapter 3 Push the Keyboard toward the LCD screen to clear the securing tabs on page 68. 2. Removing the Keyboard 1. See "Removing the Switch Cover" on both sides to expose the Keyboard FFC cable. 4.
Lift the keyboard from both sides of the Keyboard. 3. Remove the keyboard from the Mainboard. 5. Unlock the connector and pull the FFC to remove it from the chassis. 70 Chapter 3 Push the Keyboard toward the LCD screen to clear the securing tabs on page 68. 2. Removing the Keyboard 1. See "Removing the Switch Cover" on both sides to expose the Keyboard FFC cable. 4.

Service Guide
Page 82
Disconnect the speaker cable as shown. 72 Chapter 3 Remove the two securing screws from the Speaker Module. Step Speaker Module Size M2.5*3 Quantity 2 Screw Type 3. Removing the Speaker Module 1. Remove the adhesive tape securing the LCD cables to the Speaker Module. 4. See "Removing the Keyboard" on page 70. 2.
Disconnect the speaker cable as shown. 72 Chapter 3 Remove the two securing screws from the Speaker Module. Step Speaker Module Size M2.5*3 Quantity 2 Screw Type 3. Removing the Speaker Module 1. Remove the adhesive tape securing the LCD cables to the Speaker Module. 4. See "Removing the Keyboard" on page 70. 2.

Service Guide
Page 84
Step LCD Module Size M2.5*5 Quantity 2 4. Turn the computer over. Lift the securing tape to expose the Antenna cable as shown. 74 Chapter 3 Screw Type 5. Push the Antenna cables through the casing as shown. Remove the two securing screws as shown. Removing the LCD Module 1. See "Removing the Keyboard" on page 59. 2. See "Removing the WLAN Module" on page 70. 3.
Step LCD Module Size M2.5*5 Quantity 2 4. Turn the computer over. Lift the securing tape to expose the Antenna cable as shown. 74 Chapter 3 Screw Type 5. Push the Antenna cables through the casing as shown. Remove the two securing screws as shown. Removing the LCD Module 1. See "Removing the Keyboard" on page 59. 2. See "Removing the WLAN Module" on page 70. 3.

Service Guide
Page 146
Replacing the Keyboard 1. Ensure that the five tabs are correctly seated. 3. Insert the Keyboard, front edge first, into the Upper Cover as shown. Press down both sides of the keyboard to the Mainboard. 2. Place the Keyboard on the Upper Cover, face up and reconnect the FFC cable to locate it correctly. 136 Chapter 3
Replacing the Keyboard 1. Ensure that the five tabs are correctly seated. 3. Insert the Keyboard, front edge first, into the Upper Cover as shown. Press down both sides of the keyboard to the Mainboard. 2. Place the Keyboard on the Upper Cover, face up and reconnect the FFC cable to locate it correctly. 136 Chapter 3


