Acer Aspire 4250 Notebook Service Manual
Page 6
... in this model 1-39 USB Port 1-39 AC Adapter 1-39 System Power Management 1-40 Card Reader 1-40 System LED Indicator 1-41 System DMA Specification 1-41 CHAPTER 2 System Utilities BIOS Setup Utility 2-3 Navigating the BIOS Utility 2-3 BIOS 2-4 Information 2-4 Main 2-6 Security 2-8 Boot 2-12 Exit 2-13 BIOS Flash Utilities 2-14 DOS Flash Utility 2-15 WinFlash Utility 2-17 Clearing BIOS Passwords 2-18 Removing BIOS Passwords 2-19 Removing Insyde HDD Password 2-21 Miscellaneous Tools 2-22 Using DMITools 2-22 Using UUIDTools 2-26 Using the LAN MAC EEPROM Utility 2-27 vi
... in this model 1-39 USB Port 1-39 AC Adapter 1-39 System Power Management 1-40 Card Reader 1-40 System LED Indicator 1-41 System DMA Specification 1-41 CHAPTER 2 System Utilities BIOS Setup Utility 2-3 Navigating the BIOS Utility 2-3 BIOS 2-4 Information 2-4 Main 2-6 Security 2-8 Boot 2-12 Exit 2-13 BIOS Flash Utilities 2-14 DOS Flash Utility 2-15 WinFlash Utility 2-17 Clearing BIOS Passwords 2-18 Removing BIOS Passwords 2-19 Removing Insyde HDD Password 2-21 Miscellaneous Tools 2-22 Using DMITools 2-22 Using UUIDTools 2-26 Using the LAN MAC EEPROM Utility 2-27 vi
Acer Aspire 4250 Notebook Service Manual
Page 7
... Maintenance Flowchart 3-6 Getting Started 3-7 Battery Pack Removal 3-8 Battery Pack Installation 3-8 Dummy Card Removal 3-9 Dummy Card Installation 3-9 Keyboard Removal 3-10 Keyboard Installation 3-11 Base Assembly Removal 3-12 Base Assembly Installation 3-13 ODD (Optical Disk Drive) Module Removal 3-14 ODD Module Installation 3-15 USB Module Removal 3-16 USB Module Installation 3-17 HDD (Hard Disk Drive) Module Removal 3-18 HDD Module Installation 3-19 Mainboard Removal 3-20 Mainboard Installation 3-22 DIMM (Dual In-line Memory Module) Module Removal . . . 3-23 DIMM Module...
... Maintenance Flowchart 3-6 Getting Started 3-7 Battery Pack Removal 3-8 Battery Pack Installation 3-8 Dummy Card Removal 3-9 Dummy Card Installation 3-9 Keyboard Removal 3-10 Keyboard Installation 3-11 Base Assembly Removal 3-12 Base Assembly Installation 3-13 ODD (Optical Disk Drive) Module Removal 3-14 ODD Module Installation 3-15 USB Module Removal 3-16 USB Module Installation 3-17 HDD (Hard Disk Drive) Module Removal 3-18 HDD Module Installation 3-19 Mainboard Removal 3-20 Mainboard Installation 3-22 DIMM (Dual In-line Memory Module) Module Removal . . . 3-23 DIMM Module...
Acer Aspire 4250 Notebook Service Manual
Page 12
... Media Drive 1-7 Communication 1-7 Dimension and Weight 1-7 Power Adapter and Battery 1-7 Special Keys and Controls 1-8 I/O Ports 1-8 Optional Items 1-8 Warranty 1-8 Environment 1-8 Software 1-9 Notebook Tour 1-10 Touchpad Basics 1-18 Using the Keyboard 1-19 Windows Keys 1-20 Hotkeys 1-21 Specification Tables 1-24 Computer specifications 1-24 Processor 1-25 Processor Specifications 1-25 CPU Fan True Value Table 1-26 GPU Fan True Value Table 1-26 System Memory 1-26 Memory Combinations 1-27 Video Interface 1-27 BIOS 1-27 LAN Interface 1-28 Keyboard 1-28 Hard Disk Drive...
... Media Drive 1-7 Communication 1-7 Dimension and Weight 1-7 Power Adapter and Battery 1-7 Special Keys and Controls 1-8 I/O Ports 1-8 Optional Items 1-8 Warranty 1-8 Environment 1-8 Software 1-9 Notebook Tour 1-10 Touchpad Basics 1-18 Using the Keyboard 1-19 Windows Keys 1-20 Hotkeys 1-21 Specification Tables 1-24 Computer specifications 1-24 Processor 1-25 Processor Specifications 1-25 CPU Fan True Value Table 1-26 GPU Fan True Value Table 1-26 System Memory 1-26 Memory Combinations 1-27 Video Interface 1-27 BIOS 1-27 LAN Interface 1-28 Keyboard 1-28 Hard Disk Drive...
Acer Aspire 4250 Notebook Service Manual
Page 16
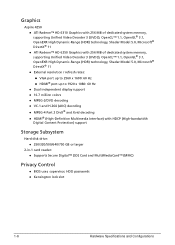
... display support 16.7 million colors MPEG-2/DVD decoding VC-1 and H.264 (AVC) decoding MPEG-4 Part 2 DivX® and Xvid decoding HDMI® (High-Definition Multimedia Interface) with HDCP (High-bandwidth Digital Content Protection) support Storage Subsystem 0 Hard disk drive: 250/320/500/640/750 GB or larger 2-in-1 card reader: Supports Secure Digital™ (SD) Card and MultiMediaCard™ (MMC) Privacy Control 0 BIOS user, supervisor, HDD passwords Kensington lock slot 1-6 Hardware Specifications...
... display support 16.7 million colors MPEG-2/DVD decoding VC-1 and H.264 (AVC) decoding MPEG-4 Part 2 DivX® and Xvid decoding HDMI® (High-Definition Multimedia Interface) with HDCP (High-bandwidth Digital Content Protection) support Storage Subsystem 0 Hard disk drive: 250/320/500/640/750 GB or larger 2-in-1 card reader: Supports Secure Digital™ (SD) Card and MultiMediaCard™ (MMC) Privacy Control 0 BIOS user, supervisor, HDD passwords Kensington lock slot 1-6 Hardware Specifications...
Acer Aspire 4250 Notebook Service Manual
Page 21
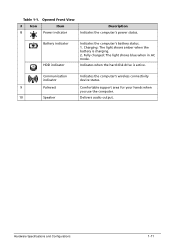
Charging: The light shows amber when the battery is active. Indicates when the hard disk drive is charging. 2. Communication indicator Indicates the computer's wireless connectivity device status. 9 Palmrest 10 Speaker Comfortable support area for your hands when you use the computer. Battery indicator HDD indicator Indicates the computer's battery status. 1. Hardware Specifications and Configurations 1-11 Fully charged: The light shows blue when in AC mode. Delivers audio output. Table 1-1. Opened Front View # Icon Item 8 Power indicator Description Indicates...
Charging: The light shows amber when the battery is active. Indicates when the hard disk drive is charging. 2. Communication indicator Indicates the computer's wireless connectivity device status. 9 Palmrest 10 Speaker Comfortable support area for your hands when you use the computer. Battery indicator HDD indicator Indicates the computer's battery status. 1. Hardware Specifications and Configurations 1-11 Fully charged: The light shows blue when in AC mode. Delivers audio output. Table 1-1. Opened Front View # Icon Item 8 Power indicator Description Indicates...

Acer Aspire 4250 Notebook Service Manual
Page 25
... Item Description 1 Kensington lock slot Connects to secure the lock. Left View Table 1-5. Some keyless models are also available. 2 DC-in jack Connects to an AC adapter. 3 Ventilation slots Enable the computer to stay cool, even after prolonged use. 4 External display Connects to a display device (e.g., external (VGA) port monitor, LCD projector). 5 Ethernet (RJ-45) port Connects to an Ethernet 10/100/1000-based network. 6 USB 2.0 port Connects to USB 2.0 devices (e.g., USB mouse, USB camera). Note: Wrap the computer security lock cable around an immovable...
... Item Description 1 Kensington lock slot Connects to secure the lock. Left View Table 1-5. Some keyless models are also available. 2 DC-in jack Connects to an AC adapter. 3 Ventilation slots Enable the computer to stay cool, even after prolonged use. 4 External display Connects to a display device (e.g., external (VGA) port monitor, LCD projector). 5 Ethernet (RJ-45) port Connects to an Ethernet 10/100/1000-based network. 6 USB 2.0 port Connects to USB 2.0 devices (e.g., USB mouse, USB camera). Note: Wrap the computer security lock cable around an immovable...

Acer Aspire 4250 Notebook Service Manual
Page 29
.... Embedded Numeric Keypad Desired access Num Lock on , the embedded keypad is indicated by small characters located on embedded keypad. Main keyboard keys Hold while typing letters on the upper right corner of numeric data entry. It is in a normal manner. Type the letters in numeric mode. Hardware Specifications and Configurations 1-19 Scroll Lock does not work with the arithmetic operators +, -, *, and /). The keys function as a calculator (complete...
.... Embedded Numeric Keypad Desired access Num Lock on , the embedded keypad is indicated by small characters located on embedded keypad. Main keyboard keys Hold while typing letters on the upper right corner of numeric data entry. It is in a normal manner. Type the letters in numeric mode. Hardware Specifications and Configurations 1-19 Scroll Lock does not work with the arithmetic operators +, -, *, and /). The keys function as a calculator (complete...
Acer Aspire 4250 Notebook Service Manual
Page 30
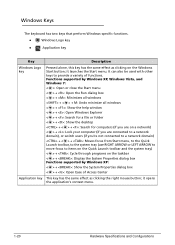
... mouse button; it launches the Start menu. It can also be used with other keys to items on the Quick Launch toolbar and the system tray) < > + : Cycle through programs on the taskbar < > + : Display the System Properties dialog box Functions supported by Windows XP: < > + : Show the System Properties dialog box < > + : Open Ease of functions. Windows Keys 0 The keyboard has two keys that perform Windows-specific functions. it opens the application's context menu. 1-20 Hardware Specifications...
... mouse button; it launches the Start menu. It can also be used with other keys to items on the Quick Launch toolbar and the system tray) < > + : Cycle through programs on the taskbar < > + : Display the System Properties dialog box Functions supported by Windows XP: < > + : Show the System Properties dialog box < > + : Open Ease of functions. Windows Keys 0 The keyboard has two keys that perform Windows-specific functions. it opens the application's context menu. 1-20 Hardware Specifications...

Acer Aspire 4250 Notebook Service Manual
Page 31
...display screen backlight off to return. Keyboard Hotkeys To activate hotkeys, press and hold the key before pressing the other key in Sleep mode. + + + Display toggle Display off . Hot key + Icon Function Communication Description Enables/disables the computer's communication devices. (Communication devices may vary by configuration.) + Sleep Puts the computer in the hockey combination. Press any key to save power. Turns the touchpad on and off. + + Speaker toggle Brightness up Increases the sound volume. Hotkeys 0 The computer employs hotkeys or key...
...display screen backlight off to return. Keyboard Hotkeys To activate hotkeys, press and hold the key before pressing the other key in Sleep mode. + + + Display toggle Display off . Hot key + Icon Function Communication Description Enables/disables the computer's communication devices. (Communication devices may vary by configuration.) + Sleep Puts the computer in the hockey combination. Press any key to save power. Turns the touchpad on and off. + + Speaker toggle Brightness up Increases the sound volume. Hotkeys 0 The computer employs hotkeys or key...
Acer Aspire 4250 Notebook Service Manual
Page 46
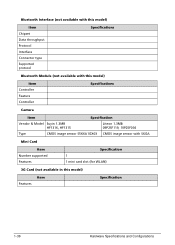
... with this model) Item Chipset Data throughput Protocol Interface Connector type Supported protocol Specifications Bluetooth Module (not available with this model) Item Controller Feature Controller Specifications Camera Item Specification Vendor & Model Suyin 1.3MB HF1316, HF1315 Liteon 1.3MB 09P2SF119, 10P2SF036 Type CMOS image sensor S5K6A1GX03 CMOS image sensor with SXGA Mini Card Item Number supported Features Specification 1 1 mini card slot (for WLAN) 3G Card (not available in this model) Features Item Specification 1-36 Hardware Specifications and Configurations
... with this model) Item Chipset Data throughput Protocol Interface Connector type Supported protocol Specifications Bluetooth Module (not available with this model) Item Controller Feature Controller Specifications Camera Item Specification Vendor & Model Suyin 1.3MB HF1316, HF1315 Liteon 1.3MB 09P2SF119, 10P2SF036 Type CMOS image sensor S5K6A1GX03 CMOS image sensor with SXGA Mini Card Item Number supported Features Specification 1 1 mini card slot (for WLAN) 3G Card (not available in this model) Features Item Specification 1-36 Hardware Specifications and Configurations

Acer Aspire 4250 Notebook Service Manual
Page 59
... default settings - Press F10 to save changes and exit BIOS Setup Utility NOTE: NOTE: Parameter values can be run it. System Utilities BIOS Setup Utility 0 This utility is subject to specific models. use the up and down arrow keys Change parameter value - Read parameter help is pre-configured and optimized so most users do not need to Disabled. Refer to parameter values. To change the boot device without entering the BIOS SETUP, press F12 during POST (power...
... default settings - Press F10 to save changes and exit BIOS Setup Utility NOTE: NOTE: Parameter values can be run it. System Utilities BIOS Setup Utility 0 This utility is subject to specific models. use the up and down arrow keys Change parameter value - Read parameter help is pre-configured and optimized so most users do not need to Disabled. Refer to parameter values. To change the boot device without entering the BIOS SETUP, press F12 during POST (power...
Acer Aspire 4250 Notebook Service Manual
Page 67
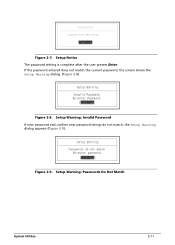
Figure 2-9. Setup Warning: Passwords Do Not Match System Utilities 2-11 Figure 2-7. Setup Warning: Invalid Password If new password and confirm new password strings do not match, the Setup Warning dialog appears (Figure 2-9). If the password entered does not match the current password, the screen shows the Setup Warning dialog. (Figure 2-8) Figure 2-8. Setup Notice The password setting is complete after the user presses Enter.
Figure 2-9. Setup Warning: Passwords Do Not Match System Utilities 2-11 Figure 2-7. Setup Warning: Invalid Password If new password and confirm new password strings do not match, the Setup Warning dialog appears (Figure 2-9). If the password entered does not match the current password, the screen shows the Setup Warning dialog. (Figure 2-8) Figure 2-8. Setup Notice The password setting is complete after the user presses Enter.
Acer Aspire 4250 Notebook Service Manual
Page 69
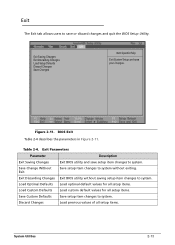
... Saving Changes Exit BIOS utility and save setup item changes to save or discard changes and quit the BIOS Setup Utility. 3.5 Exit Saving Changes Exit Discarding Changes Load Setup Defaults Discard Changes Save Changes Item Specific Help Exit System Setup and save your changes. Table 2-4. Save Change Without Exit Save setup item changes to system without saving setup item changes to system. Exit 0 The Exit tab allows users to system. Load Optimal Defaults Load optimal default...
... Saving Changes Exit BIOS utility and save setup item changes to save or discard changes and quit the BIOS Setup Utility. 3.5 Exit Saving Changes Exit Discarding Changes Load Setup Defaults Discard Changes Save Changes Item Specific Help Exit System Setup and save your changes. Table 2-4. Save Change Without Exit Save setup item changes to system without saving setup item changes to system. Exit 0 The Exit tab allows users to system. Load Optimal Defaults Load optimal default...

Acer Aspire 4250 Notebook Service Manual
Page 86
... Maintenance Flowchart 3-6 Getting Started 3-7 Battery Pack Removal 3-8 Battery Pack Installation 3-8 Dummy Card Removal 3-9 Dummy Card Installation 3-9 Keyboard Removal 3-10 Keyboard Installation 3-11 Base Assembly Removal 3-12 Base Assembly Installation 3-13 ODD (Optical Disk Drive) Module Removal 3-14 ODD Module Installation 3-15 USB Module Removal 3-16 USB Module Installation 3-17 HDD (Hard Disk Drive) Module Removal 3-18 HDD Module Installation 3-19 Mainboard Removal 3-20 Mainboard Installation 3-22 DIMM (Dual In-line Memory Module) Module Removal . . . .3-23 DIMM Module...
... Maintenance Flowchart 3-6 Getting Started 3-7 Battery Pack Removal 3-8 Battery Pack Installation 3-8 Dummy Card Removal 3-9 Dummy Card Installation 3-9 Keyboard Removal 3-10 Keyboard Installation 3-11 Base Assembly Removal 3-12 Base Assembly Installation 3-13 ODD (Optical Disk Drive) Module Removal 3-14 ODD Module Installation 3-15 USB Module Removal 3-16 USB Module Installation 3-17 HDD (Hard Disk Drive) Module Removal 3-18 HDD Module Installation 3-19 Mainboard Removal 3-20 Mainboard Installation 3-22 DIMM (Dual In-line Memory Module) Module Removal . . . .3-23 DIMM Module...
Acer Aspire 4250 Notebook Service Manual
Page 133
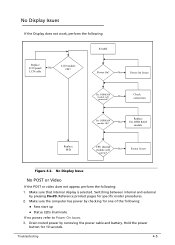
DDR RAM module Replace M/B CPU thermal module well No screw? Make sure that internal display is selected. Drain stored power by checking for one of the following: Fans start up Status LEDs illuminate If no power, refer to Power On Issues. 3. Make sure the computer has power by removing the power cable and battery. Hold the power button for specific model procedures. 2. Troubleshooting 4-5 Check connection Replace Ext. Reference product pages for 10 seconds. Power On? No Power On Issues Ext...
DDR RAM module Replace M/B CPU thermal module well No screw? Make sure that internal display is selected. Drain stored power by checking for one of the following: Fans start up Status LEDs illuminate If no power, refer to Power On Issues. 3. Make sure the computer has power by removing the power cable and battery. Hold the power button for specific model procedures. 2. Troubleshooting 4-5 Check connection Replace Ext. Reference product pages for 10 seconds. Power On? No Power On Issues Ext...
Acer Aspire 4250 Notebook Service Manual
Page 134
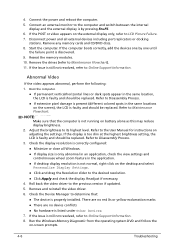
... Device Manager to LCD Picture Failure. 7. Remove the drives (refer to Disassembly Process. Refer to Maintenance Flowchart). 11. Adjust the brightness to Disassembly Process. 3. Refer to its highest level. Readjust if necessary. 4. Connect an external monitor to the computer and switch between the internal display and the external display is still not resolved, refer to the desired resolution. NOTE: NOTE: Make sure that : The device is not running on -screen prompts. 4-6 Troubleshooting...
... Device Manager to LCD Picture Failure. 7. Remove the drives (refer to Disassembly Process. Refer to Maintenance Flowchart). 11. Adjust the brightness to Disassembly Process. 3. Refer to its highest level. Readjust if necessary. 4. Connect an external monitor to the computer and switch between the internal display and the external display is still not resolved, refer to the desired resolution. NOTE: NOTE: Make sure that : The device is not running on -screen prompts. 4-6 Troubleshooting...
Acer Aspire 4250 Notebook Service Manual
Page 144
...-Acer devices Printer, mouse, and other external devices Battery pack Hard disk drive DIMM CD-ROM/Diskette drive Module PC Cards 4. Apply power to Power On Issues). 1. NOTE: NOTE: Verify that have nothing to do not replace any problems are supported by a variety of the failure is detected, replace the FRU. If any FRU. 3. Determine if the problem has changed. 6. If no more errors. Visually check components for the system board in loop mode...
...-Acer devices Printer, mouse, and other external devices Battery pack Hard disk drive DIMM CD-ROM/Diskette drive Module PC Cards 4. Apply power to Power On Issues). 1. NOTE: NOTE: Verify that have nothing to do not replace any problems are supported by a variety of the failure is detected, replace the FRU. If any FRU. 3. Determine if the problem has changed. 6. If no more errors. Visually check components for the system board in loop mode...
Acer Aspire 4250 Notebook Service Manual
Page 148
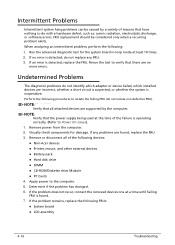
... Functionality Name (Include\ PostCode.h) Phase Post Code Description BDS_ENTER_BDS BDS 10 Enter BDS entry BDS_INSTALL_HOTKEY BDS 11 Install Hotkey service BDS_ASF_INIT* BDS 12 ASF Initialization BDS_PCI_ENUMERATION_START BDS 13 PCI enumeration BDS_BEFORE_PCIIO_INSTALL BDS 14 PCI resource assign complete BDS_PCI_ENUMERATION_END BDS 15 PCI enumeration complete BDS_CONNECT_CONSOLE_IN BDS 16 Keyboard Controller, Keyboard and Mouse initialization BDS_CONNECT_CONSOLE_OUT BDS 17 Video device initialization BDS_CONNECT_STD_ERR BDS 18 Error report device...
... Functionality Name (Include\ PostCode.h) Phase Post Code Description BDS_ENTER_BDS BDS 10 Enter BDS entry BDS_INSTALL_HOTKEY BDS 11 Install Hotkey service BDS_ASF_INIT* BDS 12 ASF Initialization BDS_PCI_ENUMERATION_START BDS 13 PCI enumeration BDS_BEFORE_PCIIO_INSTALL BDS 14 PCI resource assign complete BDS_PCI_ENUMERATION_END BDS 15 PCI enumeration complete BDS_CONNECT_CONSOLE_IN BDS 16 Keyboard Controller, Keyboard and Mouse initialization BDS_CONNECT_CONSOLE_OUT BDS 17 Video device initialization BDS_CONNECT_STD_ERR BDS 18 Error report device...
Acer Aspire 4250 Notebook Service Manual
Page 159
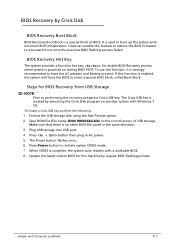
... USB port. 4. Update the latest version BIOS for this feature to restore the BIOS firmware to the root directory of BIOS. Save ROM file (file name: BIOS HM40X64.bin) to a successful one once the previous BIOS flashing process failed. It is a special block of USB storage. Format the USB storage disk using the Fast Format option. 2. Users can enable this machine by Crisis Disk 0 BIOS Recovery Boot Block 0 BIOS Recovery Boot Block is used to initiate system CRISIS mode. 7. Press Power button...
... USB port. 4. Update the latest version BIOS for this feature to restore the BIOS firmware to the root directory of BIOS. Save ROM file (file name: BIOS HM40X64.bin) to a successful one once the previous BIOS flashing process failed. It is a special block of USB storage. Format the USB storage disk using the Fast Format option. 2. Users can enable this machine by Crisis Disk 0 BIOS Recovery Boot Block 0 BIOS Recovery Boot Block is used to initiate system CRISIS mode. 7. Press Power button...
Acer Aspire 4250 Notebook Service Manual
Page 199
... will require a user i.d. These can download information on Acer's International Traveller's Warranty (ITW) Returned material authorization procedures An overview of all the support services we offer, accompanied by a list of telephone, fax and email contacts for all models Bios updates Software utilities Spare parts lists TABs (Technical Announcement Bulletin) For these purposes, we have included an Acrobat File to a local Acer branch office. Acer's Website offers...
... will require a user i.d. These can download information on Acer's International Traveller's Warranty (ITW) Returned material authorization procedures An overview of all the support services we offer, accompanied by a list of telephone, fax and email contacts for all models Bios updates Software utilities Spare parts lists TABs (Technical Announcement Bulletin) For these purposes, we have included an Acrobat File to a local Acer branch office. Acer's Website offers...


