Aspire 2930 / 2930Z / 2430 Service Guide
Page 37
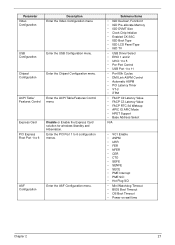
...; IGD DVMT Size • Clock Chip Intialize • Enabled CK SSC • IGD Boot Type • IGD LCD Panel Type • IGD TV • USB Driver Select • EHCI 1 and 2 • UHCI 1 to 5 • Per-Port Control • USB Port 1 to 11 • Port 80h Cycles • DMI Link ASPM Control...
...; IGD DVMT Size • Clock Chip Intialize • Enabled CK SSC • IGD Boot Type • IGD LCD Panel Type • IGD TV • USB Driver Select • EHCI 1 and 2 • UHCI 1 to 5 • Per-Port Control • USB Port 1 to 11 • Port 80h Cycles • DMI Link ASPM Control...
Aspire 2930 / 2930Z / 2430 Service Guide
Page 45
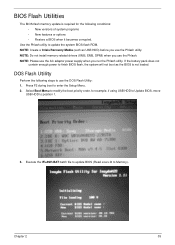
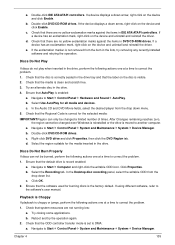
... conditions: • New versions of system programs • New features or options • Restore a BIOS when it becomes corrupted. NOTE: Do not install memory-related drivers (XMS, EMS, DPMI) when you use the AC adaptor power supply when you use the DOS Flash Utility: 1. Press F2 during boot to position 1. 3. Select...
... conditions: • New versions of system programs • New features or options • Restore a BIOS when it becomes corrupted. NOTE: Do not install memory-related drivers (XMS, EMS, DPMI) when you use the AC adaptor power supply when you use the DOS Flash Utility: 1. Press F2 during boot to position 1. 3. Select...
Aspire 2930 / 2930Z / 2430 Service Guide
Page 62
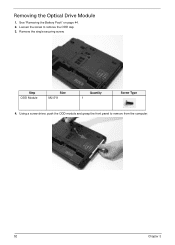
Loosen the screw to remove from the computer. 52 Chapter 3 Removing the Optical Drive Module 1. See "Removing the Battery Pack" on page 44. 2. Step ODD Module Size M2.5*8 Quantity 1 Screw Type 4. Using a screw driver, push the ODD module and grasp the front panel to remove the ODD cap. 3. Remove the single securing screw.
Loosen the screw to remove from the computer. 52 Chapter 3 Removing the Optical Drive Module 1. See "Removing the Battery Pack" on page 44. 2. Step ODD Module Size M2.5*8 Quantity 1 Screw Type 4. Using a screw driver, push the ODD module and grasp the front panel to remove the ODD cap. 3. Remove the single securing screw.
Aspire 2930 / 2930Z / 2430 Service Guide
Page 114
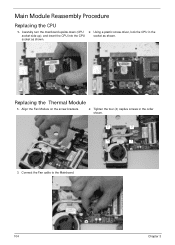
Align the Fan Module on the screw brackets. 2. Tighten the four (4) captive screws in the socket side up), and insert the CPU into the CPU socket as shown. Replacing the Thermal Module 1. Connect the Fan cable to the Mainboard. 104 Chapter 3 socket as shown. Using a plastic screw driver, lock the CPU in the order shown. 2 3 4 1 3. Main Module Reassembly Procedure Replacing the CPU 1. Carefully turn the mainboard upside down (CPU 2.
Align the Fan Module on the screw brackets. 2. Tighten the four (4) captive screws in the socket side up), and insert the CPU into the CPU socket as shown. Replacing the Thermal Module 1. Connect the Fan cable to the Mainboard. 104 Chapter 3 socket as shown. Using a plastic screw driver, lock the CPU in the order shown. 2 3 4 1 3. Main Module Reassembly Procedure Replacing the CPU 1. Carefully turn the mainboard upside down (CPU 2.
Aspire 2930 / 2930Z / 2430 Service Guide
Page 138
...42. 3. If the computer is listed under Other Devices. 9. Replace the Motherboard. 6. Minimize or close all Windows. Remove and reinstall the video driver. 8. If the BIOS settings are no red Xs or yellow exclamation marks. • There are still lost, replace the cables. 4. See "... If permanent vertical/horizontal lines or dark spots display in the same locations on page 235. 128 Chapter 4 Roll back the video driver to the desired resolution. b. If HDD information is faulty and should be replaced. Adjust the brightness to correct the problem. 1. If...
...42. 3. If the computer is listed under Other Devices. 9. Replace the Motherboard. 6. Minimize or close all Windows. Remove and reinstall the video driver. 8. If the BIOS settings are no red Xs or yellow exclamation marks. • There are still lost, replace the cables. 4. See "... If permanent vertical/horizontal lines or dark spots display in the same locations on page 235. 128 Chapter 4 Roll back the video driver to the desired resolution. b. If HDD information is faulty and should be replaced. Adjust the brightness to correct the problem. 1. If...
Aspire 2930 / 2930Z / 2430 Service Guide
Page 141
Remove and reinstall the audio driver. 5. Navigate to the previous version, if updated recently. 4. Ensure that Speakers are set to start Speaker Setup. NOTE: If Speakers does not show, right-click ... to 50. Chapter 4 131 b. If the issue is still not resolved, see "Online Support Information" on page 235. Reboot the computer. 2. Roll back the audio driver to Start´ Control Panel´ Hardware and Sound´ Sound. Ensure that all volume controls are selected as the default audio device (green check...
Remove and reinstall the audio driver. 5. Navigate to the previous version, if updated recently. 4. Ensure that Speakers are set to start Speaker Setup. NOTE: If Speakers does not show, right-click ... to 50. Chapter 4 131 b. If the issue is still not resolved, see "Online Support Information" on page 235. Reboot the computer. 2. Roll back the audio driver to Start´ Control Panel´ Hardware and Sound´ Sound. Ensure that all volume controls are selected as the default audio device (green check...
Aspire 2930 / 2930Z / 2430 Service Guide
Page 143
... ensure the computer is set correctly. 7. When prompted, press any recently added hardware and associated software. 8. The System Recovery Options screen displays. NOTE: Click Load Drivers if controller drives are correct and that CD/DVD drive is virus free. 3. g. When complete, click Finish. Ensure all external devices. 2. For more information see...
... ensure the computer is set correctly. 7. When prompted, press any recently added hardware and associated software. 8. The System Recovery Options screen displays. NOTE: Click Load Drivers if controller drives are correct and that CD/DVD drive is virus free. 3. g. When complete, click Finish. Ensure all external devices. 2. For more information see...
Aspire 2930 / 2930Z / 2430 Service Guide
Page 145
... a limited number of times. Chapter 4 135 b. If a device has an exclamation mark, right-click on the device and uninstall and reinstall the driver. b. Double-click DVD/CD-ROM drives. Select the region suitable for the selected media: IMPORTANT:Region can not be burned, perform the following actions... on the disc is enabled: a. If a device has an exclamation mark, right-click on the device and uninstall and reinstall the driver. b. Try an alternate disc in the drive tray and that the software used for all media and devices. Check that AutoPlay is visible. 2.
... a limited number of times. Chapter 4 135 b. If a device has an exclamation mark, right-click on the device and uninstall and reinstall the driver. b. Double-click DVD/CD-ROM drives. Select the region suitable for the selected media: IMPORTANT:Region can not be burned, perform the following actions... on the disc is enabled: a. If a device has an exclamation mark, right-click on the device and uninstall and reinstall the driver. b. Try an alternate disc in the drive tray and that the software used for all media and devices. Check that AutoPlay is visible. 2.
Aspire 2930 / 2930Z / 2430 Service Guide
Page 151
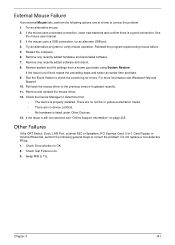
... reboot. 8. If the issue is listed under Other Devices. 13. Run the Event Viewer to verify mouse operation. Remove and reinstall the mouse driver. 12. There are no red Xs or yellow exclamation marks. • There are no device conflicts. • No hardware is not fixed,...try an alternate USB port. 4. If the mouse uses a wireless connection, insert new batteries and confirm there is properly installed. Roll back the mouse driver to Try. Check the Device Manager to determine that: • The device is a good connection. Chapter 4 141 For more information see "Online Support...
... reboot. 8. If the issue is listed under Other Devices. 13. Run the Event Viewer to verify mouse operation. Remove and reinstall the mouse driver. 12. There are no red Xs or yellow exclamation marks. • There are no device conflicts. • No hardware is not fixed,...try an alternate USB port. 4. If the mouse uses a wireless connection, insert new batteries and confirm there is properly installed. Roll back the mouse driver to Try. Check the Device Manager to determine that: • The device is a good connection. Chapter 4 141 For more information see "Online Support...
Aspire 2930 / 2930Z / 2430 Service Guide
Page 153
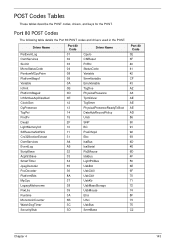
Driver Name PeiEventLog OemServices SioInit MonoStatusCode PentiumMCpuPeim PlatformStage1 Variable IchInit PlatformStage2 IchSmbusArpDisabled ClockGen OpPresence ... 2F 10 11 31 A4 A5 32 33 34 35 36 8A 37 38 39 3A 3B 3C 3D Driver Name CpuIo Cf9Reset PcRtc StatusCode Variable SmmVariable EmuVariable TcgDxe PhysicalPresence TpmDriver TcgSmm PhysicalPresenceReadyToBoot DataHubRecordPolicy Undi SNP BC PxeDhcp4 Ebc ... 75 C2 Chapter 4 143 POST Codes Tables These tables describe the POST codes, drivers, and keys for the POST. Port 80 POST Codes The following table details the Port 80 POST codes and...
Driver Name PeiEventLog OemServices SioInit MonoStatusCode PentiumMCpuPeim PlatformStage1 Variable IchInit PlatformStage2 IchSmbusArpDisabled ClockGen OpPresence ... 2F 10 11 31 A4 A5 32 33 34 35 36 8A 37 38 39 3A 3B 3C 3D Driver Name CpuIo Cf9Reset PcRtc StatusCode Variable SmmVariable EmuVariable TcgDxe PhysicalPresence TpmDriver TcgSmm PhysicalPresenceReadyToBoot DataHubRecordPolicy Undi SNP BC PxeDhcp4 Ebc ... 75 C2 Chapter 4 143 POST Codes Tables These tables describe the POST codes, drivers, and keys for the POST. Port 80 POST Codes The following table details the Port 80 POST codes and...

Aspire 2930 / 2930Z / 2430 Service Guide
Page 154
Driver Name SmmDisp SmmReloc SmmRuntime SmmThunk OemServices ChipsetInit SmmAccess PciHostBridge PciExpress GmchMbi IchInit IdeController SataController IchSmbusLight SmmControl Ich7MSmmDispatcher IsaAcpiDriver Fwh SmmFwh PciHotPlug BootOptionPolicy SetupUtility ...4A 4B C1 C8 4C 52 CE 54 51 76 55 56 D9 CC D0 f9 D1 D2 57 58 59 AB AC D7 A6 Driver Name HiiDatabase OemSetupBrowser Font(English) Font(French) Font(Chinese) UnicodeCollation ConPlatform ConSplitter GraphicsConsole Terminal VgaClass SaveMemoryConfig AcpiSupport AcpiPlatform DataHub DataHubStdErr GenericMemoryTest DiskIo Fat Partition...
Driver Name SmmDisp SmmReloc SmmRuntime SmmThunk OemServices ChipsetInit SmmAccess PciHostBridge PciExpress GmchMbi IchInit IdeController SataController IchSmbusLight SmmControl Ich7MSmmDispatcher IsaAcpiDriver Fwh SmmFwh PciHotPlug BootOptionPolicy SetupUtility ...4A 4B C1 C8 4C 52 CE 54 51 76 55 56 D9 CC D0 f9 D1 D2 57 58 59 AB AC D7 A6 Driver Name HiiDatabase OemSetupBrowser Font(English) Font(French) Font(Chinese) UnicodeCollation ConPlatform ConSplitter GraphicsConsole Terminal VgaClass SaveMemoryConfig AcpiSupport AcpiPlatform DataHub DataHubStdErr GenericMemoryTest DiskIo Fat Partition...


