
AL1917C User's Guide
Page 1
Table of Contents Safety Rules Electrical Safety Installation Safety Cleaning Safety SPECIAL NOTES ON LCD MONITORS Components and Accessories Usage Installation Guide Adjustment of Display Operation Adjustment of Screen Attachment Plug and Play Power Saver Troubleshooting Technical Specifications Display Mode 1 1 1 1 1 2 2 2 3 4 6 6 7 7 7 8 9
Table of Contents Safety Rules Electrical Safety Installation Safety Cleaning Safety SPECIAL NOTES ON LCD MONITORS Components and Accessories Usage Installation Guide Adjustment of Display Operation Adjustment of Screen Attachment Plug and Play Power Saver Troubleshooting Technical Specifications Display Mode 1 1 1 1 1 2 2 2 3 4 6 6 7 7 7 8 9

AL1917C User's Guide
Page 2
Do not defeat the purpose of the grounding-type plug. ‹ Don't expose your LCD display in the sun. ‹ Install your hands are allowed to clean the display. SPECIAL NOTES ON LCD MONITORS The following safety rules carefully when you are normal with your fingers or any hard objects to avoid scratching or leaving any place near any accessory. ‹ Moisten a clean and soft lint-free cloth with a 3-wire grounding-type plug, a plug having a third (grounding) pin. This plug will not touch it to use . If you are unable to insert the plug into the outlet, contact your ...
Do not defeat the purpose of the grounding-type plug. ‹ Don't expose your LCD display in the sun. ‹ Install your hands are allowed to clean the display. SPECIAL NOTES ON LCD MONITORS The following safety rules carefully when you are normal with your fingers or any hard objects to avoid scratching or leaving any place near any accessory. ‹ Moisten a clean and soft lint-free cloth with a 3-wire grounding-type plug, a plug having a third (grounding) pin. This plug will not touch it to use . If you are unable to insert the plug into the outlet, contact your ...
AL1917C User's Guide
Page 3
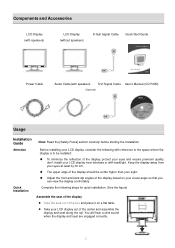
Keep the display away from your eyes at least by 30 cm. ‹ The upper edge of the display should be installed: ‹ To minimize the reflection of the display, protect your eyes and ensure premium quality, don't install your LCD display near windows or with backlight. Complete the following with reference to the space where the display is to be a little higher than your sight. ‹ Adjust the front and back dip angles of the display based on a flat table. z Take your LCD display out of the carton and assemble the display and seat along the rail. Components and Accessories LCD ...
Keep the display away from your eyes at least by 30 cm. ‹ The upper edge of the display should be installed: ‹ To minimize the reflection of the display, protect your eyes and ensure premium quality, don't install your LCD display near windows or with backlight. Complete the following with reference to the space where the display is to be a little higher than your sight. ‹ Adjust the front and back dip angles of the display based on a flat table. z Take your LCD display out of the carton and assemble the display and seat along the rail. Components and Accessories LCD ...
AL1917C User's Guide
Page 4
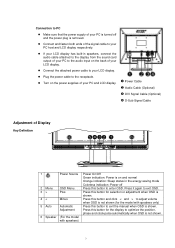
X Power Cable Y Audio Cable (Optional) Z DVI Signal Cable (Optional) [ D-Sub Signal Cable Adjustment of Display Key Definition 1 Power Source Power On/Off Green indication: Power is on and normal Orange indication: Sleep status in speakers, connect the audio cable attached to the display from the sound card output of your PC to the audio input on the power supplies of your LCD display. z Connect the attached power cable to your PC and LCD display. Press it again to exit OSD. 3 > Plus Press this button for selection or adjustment when OSD is shown. 4 < Minus Press this ...
X Power Cable Y Audio Cable (Optional) Z DVI Signal Cable (Optional) [ D-Sub Signal Cable Adjustment of Display Key Definition 1 Power Source Power On/Off Green indication: Power is on and normal Orange indication: Sleep status in speakers, connect the audio cable attached to the display from the sound card output of your PC to the audio input on the power supplies of your LCD display. z Connect the attached power cable to your PC and LCD display. Press it again to exit OSD. 3 > Plus Press this button for selection or adjustment when OSD is shown. 4 < Minus Press this ...
AL1917C User's Guide
Page 5
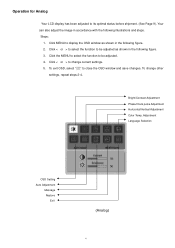
Bright/Contract Adjustment Phase/Clock pulse Adjustment Horizontal/Vertical Adjustment Color Temp. Adjustment Language Selection OSD Setting Auto Adjustment Message Restore Exit (Analog) 4 Operation for Analog Your LCD display has been adjusted to change other settings, repeat steps 2-4. Your can also adjust the image in the following figure. 2. Click < or > to its optimal status before shipment. (See Page 9). To change current settings. 5. Click MENU to be adjusted. 4. To exit OSD, select " " to be adjusted as shown in accordance with the following figure. 3. ...
Bright/Contract Adjustment Phase/Clock pulse Adjustment Horizontal/Vertical Adjustment Color Temp. Adjustment Language Selection OSD Setting Auto Adjustment Message Restore Exit (Analog) 4 Operation for Analog Your LCD display has been adjusted to change other settings, repeat steps 2-4. Your can also adjust the image in the following figure. 2. Click < or > to its optimal status before shipment. (See Page 9). To change current settings. 5. Click MENU to be adjusted. 4. To exit OSD, select " " to be adjusted as shown in accordance with the following figure. 3. ...
AL1917C User's Guide
Page 6
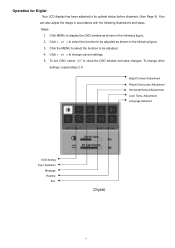
Your can also adjust the image in the following figure. 2. Click MENU to change other settings, repeat steps 2-4. Click < or > to display the OSD window as shown in the following illustrations and steps. To change current settings. 5. Click < or > to select the function to be adjusted as shown in accordance with the following figure. 3. Click the MENU to select the function to be adjusted. 4. Adjustment Language Selection OSD Setting Input Selection Message Restore Exit (Digital) 5 Bright/Contract Adjustment Phase/Clock pulse Adjustment Horizontal/Vertical ...
Your can also adjust the image in the following figure. 2. Click MENU to change other settings, repeat steps 2-4. Click < or > to display the OSD window as shown in the following illustrations and steps. To change current settings. 5. Click < or > to select the function to be adjusted as shown in accordance with the following figure. 3. Click the MENU to select the function to be adjusted. 4. Adjustment Language Selection OSD Setting Input Selection Message Restore Exit (Digital) 5 Bright/Contract Adjustment Phase/Clock pulse Adjustment Horizontal/Vertical ...
AL1917C User's Guide
Page 7
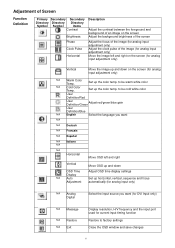
to be cold white color User Definition/Red User Definition/Green Adjust red/green/blue gain User Definition/Blue N/A English Select the language you want N/A N/A Deutsch N/A Français N/A Español N/A Italiano N/A N/A Horizontal Move OSD left and right on the screen (for analog input adjustment only) Vertical Move the image up and down Adjust OSD time display settings Set up horizontal, vertical, sequence and focus automatically (for analog input only) N/A Analog Digital Select the input source you want (for DVI Input only) N/A Message N/A Restore N/A Exit ...
to be cold white color User Definition/Red User Definition/Green Adjust red/green/blue gain User Definition/Blue N/A English Select the language you want N/A N/A Deutsch N/A Français N/A Español N/A Italiano N/A N/A Horizontal Move OSD left and right on the screen (for analog input adjustment only) Vertical Move the image up and down Adjust OSD time display settings Set up horizontal, vertical, sequence and focus automatically (for analog input only) N/A Analog Digital Select the input source you want (for DVI Input only) N/A Message N/A Restore N/A Exit ...
AL1917C User's Guide
Page 8
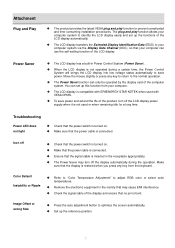
You can set up the reference position. 7 Image Offset or wrong Size ‹ Press the auto adjustment button to optimize the screen automatically. ‹ Set up the functions of the LCD display automatically. ‹ The LCD display transfers the Extended Display Identification Data (EDID) to your computer system via the Display Data Channel (DDC), so that your computer can only be operated by the display card of the computer system. Move the mouse slightly or press any key from your computer system to save power. Troubleshooting Power LED does not light ‹ Check that the power...
You can set up the reference position. 7 Image Offset or wrong Size ‹ Press the auto adjustment button to optimize the screen automatically. ‹ Set up the functions of the LCD display automatically. ‹ The LCD display transfers the Extended Display Identification Data (EDID) to your computer system via the Display Data Channel (DDC), so that your computer can only be operated by the display card of the computer system. Move the mouse slightly or press any key from your computer system to save power. Troubleshooting Power LED does not light ‹ Check that the power...
AL1917C User's Guide
Page 9
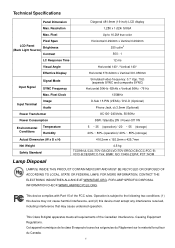
Technical Specifications Panel Dimension Diagonal 481.9mm (19 inch) LCD display Max. PCT; NOM Lamp Disposal LAMP(S) INSIDE THIS PRODUCT CONTAIN MERCURY AND MUST BE RECYCLED OR DISPOSED OF ACCORDING TO LOCAL, STATE OR FEDERAL LAWS. FOR MORE INFORMATION, CONTACT THE ELECTRONIC INDUSTRIES ALLIANCE AT WWW.EIAE.ORG. ISO 13406-2;EPA; FOR LAMP SPECIFIC DISPOSAL INFORMATION CHECK WWW.LAMPRECYCLE.ORG. This device complies with Part 15 of the Canadian Interference- Causing Equipment Regulations. VCCI-B;CE/EMC;C-Tick; BSMI; Operation is subject to 16.2M true color Pixel ...
Technical Specifications Panel Dimension Diagonal 481.9mm (19 inch) LCD display Max. PCT; NOM Lamp Disposal LAMP(S) INSIDE THIS PRODUCT CONTAIN MERCURY AND MUST BE RECYCLED OR DISPOSED OF ACCORDING TO LOCAL, STATE OR FEDERAL LAWS. FOR MORE INFORMATION, CONTACT THE ELECTRONIC INDUSTRIES ALLIANCE AT WWW.EIAE.ORG. ISO 13406-2;EPA; FOR LAMP SPECIFIC DISPOSAL INFORMATION CHECK WWW.LAMPRECYCLE.ORG. This device complies with Part 15 of the Canadian Interference- Causing Equipment Regulations. VCCI-B;CE/EMC;C-Tick; BSMI; Operation is subject to 16.2M true color Pixel ...

AL1917C User's Guide
Page 10
Vert. If not, the screen will not display or only the LED lights will be adjusted automatically. For more information about the adjustment mode, refer to the instructions of your PC system is the same as one of your display card. SVGA 800x600 35.156 56.250 36.000 +/+ 37.879 60.317 40.000 +/+ 48.077 72.188 50.000 +/+ 46.875 75.000 49.500 +/+ XGA 1024x768 48.363 60.004 65.000 -/- 56.476 70.069 75.000 -/- 60.023 75.029 78.750 +/+ SXGA 1152x864 67.500 75.000 108.000 +/+ SXGA 1280x1024 63.981 60.020 108.000 +/+ 79.976 75.025 135.000 +/+ ...
Vert. If not, the screen will not display or only the LED lights will be adjusted automatically. For more information about the adjustment mode, refer to the instructions of your PC system is the same as one of your display card. SVGA 800x600 35.156 56.250 36.000 +/+ 37.879 60.317 40.000 +/+ 48.077 72.188 50.000 +/+ 46.875 75.000 49.500 +/+ XGA 1024x768 48.363 60.004 65.000 -/- 56.476 70.069 75.000 -/- 60.023 75.029 78.750 +/+ SXGA 1152x864 67.500 75.000 108.000 +/+ SXGA 1280x1024 63.981 60.020 108.000 +/+ 79.976 75.025 135.000 +/+ ...

AL1917T User's Guide
Page 1
TABLE OF CONTENTS Special notes on LCD monitors 1 Introduction 2 Features 2 Unpacking 3 Attaching/Removing the base 4 Screen position adjustment 4 Connecting the power cord 5 Safety precaution 5 Cleaning your monitor 5 Preset modes 6 Power saving 7 DDC ...7 Installation 8 User controls 9 Troubleshooting 13 Specification 14
TABLE OF CONTENTS Special notes on LCD monitors 1 Introduction 2 Features 2 Unpacking 3 Attaching/Removing the base 4 Screen position adjustment 4 Connecting the power cord 5 Safety precaution 5 Cleaning your monitor 5 Preset modes 6 Power saving 7 DDC ...7 Installation 8 User controls 9 Troubleshooting 13 Specification 14

AL1917T User's Guide
Page 2
NOTES · Due to make sure the flicker disappears. · You may flicker during initial use . · The LCD screen has effective pixels of the fluorescent light, the screen may find slightly uneven brightness on the screen depending on again to the nature of 99.99% or more. AL1917 SPECIAL NOTES ON LCD MONITORS The following symptoms are normal with LCD monitor and do not indicate a problem. Turn off the Power Switch for hours. It may include blemishes of 0.01% or less such as a missing pixel or a pixel lit all of the time. · Due to the nature of the LCD screen, an ...
NOTES · Due to make sure the flicker disappears. · You may flicker during initial use . · The LCD screen has effective pixels of the fluorescent light, the screen may find slightly uneven brightness on the screen depending on again to the nature of 99.99% or more. AL1917 SPECIAL NOTES ON LCD MONITORS The following symptoms are normal with LCD monitor and do not indicate a problem. Turn off the Power Switch for hours. It may include blemishes of 0.01% or less such as a missing pixel or a pixel lit all of the time. · Due to the nature of the LCD screen, an ...
AL1917T User's Guide
Page 3
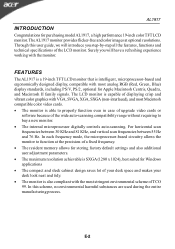
FEATURES The AL1917 is a 19-inch TFT LCD monitor that is capable of TCO 99. For horizontal scan frequencies between 30 KHz and 81 KHz, and vertical scan frequencies between 55 Hz and 76 Hz. The LCD monitor is intelligent, microprocessor-based and ergonomically designed display, compatible with VGA, SVGA, XGA, SXGA (non-interlaced), and most stringent environmental scheme of displaying crisp and vibrant color graphics with most analog RGB (Red, Green, Blue) display standards, including PS/V, PS/2, optional for purchasing model AL1917, a high performance 19-inch color TFT...
FEATURES The AL1917 is a 19-inch TFT LCD monitor that is capable of TCO 99. For horizontal scan frequencies between 30 KHz and 81 KHz, and vertical scan frequencies between 55 Hz and 76 Hz. The LCD monitor is intelligent, microprocessor-based and ergonomically designed display, compatible with VGA, SVGA, XGA, SXGA (non-interlaced), and most stringent environmental scheme of displaying crisp and vibrant color graphics with most analog RGB (Red, Green, Blue) display standards, including PS/V, PS/2, optional for purchasing model AL1917, a high performance 19-inch color TFT...
AL1917T User's Guide
Page 4
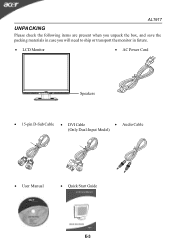
AL1917 UNPACKING Please check the following items are present when you unpack the box, and save the packing materials in case you will need to ship or transport the monitor in future. · LCD Monitor · AC Power Cord Speakers · 15-pin D-Sub Cable · DVI Cable · Audio Cable (Only Dual-Input Model) · User Manual · Quick Start Guide E-3
AL1917 UNPACKING Please check the following items are present when you unpack the box, and save the packing materials in case you will need to ship or transport the monitor in future. · LCD Monitor · AC Power Cord Speakers · 15-pin D-Sub Cable · DVI Cable · Audio Cable (Only Dual-Input Model) · User Manual · Quick Start Guide E-3

AL1917T User's Guide
Page 5
Attaching / Removing the Base Install: Align the four hooks on the bottom of the monitor with the corresponding slots on the bottom of the monitor as shown in the figure below . AL1917 Remove: Depress the four hooks as indicated by using both of your hands to remove it. The monitor can adjust the tilt of the monitor by arrow below . E-4 SCREEN POSITION ADJUSTMENT In oder to optimize the best viewing position, you can be adjusted to 15 degrees up or 5 degrees down as indicated first before removing the base and follow the arrow direction to hold the edges of the base.
Attaching / Removing the Base Install: Align the four hooks on the bottom of the monitor with the corresponding slots on the bottom of the monitor as shown in the figure below . AL1917 Remove: Depress the four hooks as indicated by using both of your hands to remove it. The monitor can adjust the tilt of the monitor by arrow below . E-4 SCREEN POSITION ADJUSTMENT In oder to optimize the best viewing position, you can be adjusted to 15 degrees up or 5 degrees down as indicated first before removing the base and follow the arrow direction to hold the edges of the base.

AL1917T User's Guide
Page 6
AL1917 CONNECTING THE POWER CORD · Check first to make sure that the power cord you use is required. · Plug one end of the power cord to the AC Inlet, plug another end to a proper AC outlet. · For unit using at 120 VAC: Use a UL Listed Cord Set, Type SVT wire and plug rated 10 A/125 V. · For unit using at 220/240 V AC (outside of U.S.): Use a Cord Set consisting of the monitor. E-5 Always put the monitor in a place where there is fragile. · LAMP Disposal LAMP(S) INSIDE THIS PRODUCT CONTAIN MERCURY AND MUST BE RECYCLED OR DISPOSED OF ACCORDING TO LOCAL, STATE OR ...
AL1917 CONNECTING THE POWER CORD · Check first to make sure that the power cord you use is required. · Plug one end of the power cord to the AC Inlet, plug another end to a proper AC outlet. · For unit using at 120 VAC: Use a UL Listed Cord Set, Type SVT wire and plug rated 10 A/125 V. · For unit using at 220/240 V AC (outside of U.S.): Use a Cord Set consisting of the monitor. E-5 Always put the monitor in a place where there is fragile. · LAMP Disposal LAMP(S) INSIDE THIS PRODUCT CONTAIN MERCURY AND MUST BE RECYCLED OR DISPOSED OF ACCORDING TO LOCAL, STATE OR ...

AL1917T User's Guide
Page 7
For optimum adjustment, the user is capable of the defaults, the user can store their preferred modes in the table below. The monitor is suggested to perform the Auto Setup under Windows "Full Screen" pattern. The only condition to 9 user modes. Mode 1 VGA 2 VGA Resolution 720 x 400 640 x 480 70 Hz 60 Hz H. AL1917 PRESET MODES To reduce the need for adjustment for vertical frequency or the sync signal polarities are most commonly used as a user mode is the new display information must have 1 KHz difference for horizontal frequency or 1 Hz for different modes, the monitor ...
For optimum adjustment, the user is capable of the defaults, the user can store their preferred modes in the table below. The monitor is suggested to perform the Auto Setup under Windows "Full Screen" pattern. The only condition to 9 user modes. Mode 1 VGA 2 VGA Resolution 720 x 400 640 x 480 70 Hz 60 Hz H. AL1917 PRESET MODES To reduce the need for adjustment for vertical frequency or the sync signal polarities are most commonly used as a user mode is the new display information must have 1 KHz difference for horizontal frequency or 1 Hz for different modes, the monitor ...

AL1917T User's Guide
Page 8
The DDC (Display Data Channel) is around 3 seconds. State ON Active OFF Powe r Consumption Normal < 3 W LED Light Green Amber The power saving states will be kept until a control signal has been detected or the keyboard or mouse is activated. DDC To make your system also supports DDC protocol. The monitor supports DDC2B standard. AL1917 POWER SAVING The monitor will be driven into "Power Saving" mode by the amber-color power LED. E-7 The recovery time from the display controller, as indicated by the control signal from Active OFF state back to Plug and Play with your ...
The DDC (Display Data Channel) is around 3 seconds. State ON Active OFF Powe r Consumption Normal < 3 W LED Light Green Amber The power saving states will be kept until a control signal has been detected or the keyboard or mouse is activated. DDC To make your system also supports DDC protocol. The monitor supports DDC2B standard. AL1917 POWER SAVING The monitor will be driven into "Power Saving" mode by the amber-color power LED. E-7 The recovery time from the display controller, as indicated by the control signal from Active OFF state back to Plug and Play with your ...
AL1917T User's Guide
Page 9
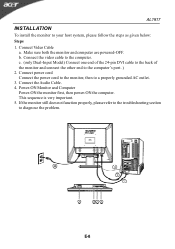
Connect Video Cable a. Connect the video cable to diagnose the problem. Connect the Audio Cable. 4. If the monitor still does not function properly, please refer to the troubleshooting section to the computer. b. This sequence is very important. 5. Make sure both the monitor and computer are powered-OFF. c. (only Dual-Input Model) Connect one end of the 24-pin DVI cable to the back of the monitor and connect the other end to your host system, please follow the steps as given below: Steps 1. E-8 AL1917 INSTALLATION To install the monitor to the computer's port. ) 2. ...
Connect Video Cable a. Connect the video cable to diagnose the problem. Connect the Audio Cable. 4. If the monitor still does not function properly, please refer to the troubleshooting section to the computer. b. This sequence is very important. 5. Make sure both the monitor and computer are powered-OFF. c. (only Dual-Input Model) Connect one end of the 24-pin DVI cable to the back of the monitor and connect the other end to your host system, please follow the steps as given below: Steps 1. E-8 AL1917 INSTALLATION To install the monitor to the computer's port. ) 2. ...

AL1917T User's Guide
Page 10
E-9 MENU/ ENTER: Activate OSD menu when OSD is OFF or activate/de-activate adjustment function when OSD is in Volume Adjust OSD status. Power LED: Lights up to indicate the power is activated. 6. Auto Adjust button / Exit: 1)When OSD menu is in active status, this button will act as EXIT-KEY (EXIT OSD menu). 2)When OSD menu is ON or Exit OSD menu when in off status, press this button for 2 seconds to set the HPos, VPos, Clock and Focus. 4. < / Volume Activates the volume control when the OSD is OFF or navigate through adjustment icons when OSD is ON or adjust a function when ...
E-9 MENU/ ENTER: Activate OSD menu when OSD is OFF or activate/de-activate adjustment function when OSD is in Volume Adjust OSD status. Power LED: Lights up to indicate the power is activated. 6. Auto Adjust button / Exit: 1)When OSD menu is in active status, this button will act as EXIT-KEY (EXIT OSD menu). 2)When OSD menu is ON or Exit OSD menu when in off status, press this button for 2 seconds to set the HPos, VPos, Clock and Focus. 4. < / Volume Activates the volume control when the OSD is OFF or navigate through adjustment icons when OSD is ON or adjust a function when ...