
AL1916e Service Guide
Page 5
... not expressly approved by the party responsible for a Class B digital device, pursuant to which the receiver is not responsible for any , must be determined by turning the equipment off and on a circuit different from that interference will not occur in accordance with the instructions, may cause harmful interference to radio communications...
... not expressly approved by the party responsible for a Class B digital device, pursuant to which the receiver is not responsible for any , must be determined by turning the equipment off and on a circuit different from that interference will not occur in accordance with the instructions, may cause harmful interference to radio communications...
AL1916e Service Guide
Page 7
... the image, when the same image is recovered slowly by changing the image or turning off the Power Switch and then turn it on the desktop pattern you use . In this case, the screen is displayed for hours. - 7 - Turn off the Power Switch for hours. l You may include blemishes of 0.01% or less...
... the image, when the same image is recovered slowly by changing the image or turning off the Power Switch and then turn it on the desktop pattern you use . In this case, the screen is displayed for hours. - 7 - Turn off the Power Switch for hours. l You may include blemishes of 0.01% or less...

AL1916e Service Guide
Page 26
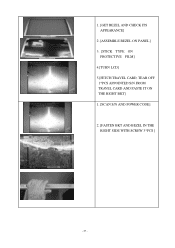
1.[UNCOVER PANEL PROTECTIVE FILM AND INSPECT IF PANEL IS DIRTY OR SCRATCHED] 2.[PASTE TYPE ON THE PROTECTIVE FILM TO FASTEN IT] 3.[TURN LCD,TEAR OFF INCOMING TYPE] 1.[GET LEFT BKT , LOCK 2*PCS SCREW TO FASTEN IT ON THE PANEL] 1.[GET RIGHT BKT , LOCK 2*PCS SCREW TO FASTEN IT ON THE PANEL] - 26 -
1.[UNCOVER PANEL PROTECTIVE FILM AND INSPECT IF PANEL IS DIRTY OR SCRATCHED] 2.[PASTE TYPE ON THE PROTECTIVE FILM TO FASTEN IT] 3.[TURN LCD,TEAR OFF INCOMING TYPE] 1.[GET LEFT BKT , LOCK 2*PCS SCREW TO FASTEN IT ON THE PANEL] 1.[GET RIGHT BKT , LOCK 2*PCS SCREW TO FASTEN IT ON THE PANEL] - 26 -
AL1916e Service Guide
Page 27
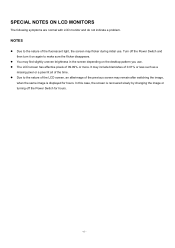
1. [GET BEZEL AND CHECK ITS APPEARANCE] 2 .[ASSEMBLE BEZEL ON PANEL] 3. [STICK TYPE ON PROTECTIVE FILM] 4.[TURN LCD] 5.[FETCH TRAVEL CARD, TEAR OFF 1*PCS APPOINTED S/N FROM TRAVEL CARD AND PASTE IT ON THE RIGHT BKT] 1. [SCAN S/N AND POWER CODE] 2. [FASTEN BKT AND BEZEL IN THE RIGHT SIDE WITH SCREW 3*PCS ] - 27 -
1. [GET BEZEL AND CHECK ITS APPEARANCE] 2 .[ASSEMBLE BEZEL ON PANEL] 3. [STICK TYPE ON PROTECTIVE FILM] 4.[TURN LCD] 5.[FETCH TRAVEL CARD, TEAR OFF 1*PCS APPOINTED S/N FROM TRAVEL CARD AND PASTE IT ON THE RIGHT BKT] 1. [SCAN S/N AND POWER CODE] 2. [FASTEN BKT AND BEZEL IN THE RIGHT SIDE WITH SCREW 3*PCS ] - 27 -

AL1916p Service Guide
Page 4
... company has determined that this equipment has been tested and found to comply with the instructions, may cause harmful interference to correct the interference by turning the equipment off and on a circuit different from that interference will not occur in accordance with the limits for help. Consult the dealer or an...
... company has determined that this equipment has been tested and found to comply with the instructions, may cause harmful interference to correct the interference by turning the equipment off and on a circuit different from that interference will not occur in accordance with the limits for help. Consult the dealer or an...
AL1916p Service Guide
Page 6
... a problem. z You may remain after switching the image, when the same image is recovered slowly by changing the image or turning off the Power Switch and then turn it on again to the nature of the previous screen may find slightly uneven brightness in the screen depending on the desktop... pattern you use . z The LCD screen has effective pixels of the time. In this case, the screen is displayed for hours. - 6 - Turn off the Power Switch for hours. It may flicker during initial use . z Due to the nature of the LCD screen, an afterimage of the fluorescent...
... a problem. z You may remain after switching the image, when the same image is recovered slowly by changing the image or turning off the Power Switch and then turn it on again to the nature of the previous screen may find slightly uneven brightness in the screen depending on the desktop... pattern you use . z The LCD screen has effective pixels of the time. In this case, the screen is displayed for hours. - 6 - Turn off the Power Switch for hours. It may flicker during initial use . z Due to the nature of the LCD screen, an afterimage of the fluorescent...

AL1916p Service Guide
Page 15
... case shadowing is observed. This defines the background (Gbkg) and foreground (Gfg) levels to determine the proper value for the case with the worst shadowing. Turn on the shadowing conditions, but typically Bsrc and Btgt will be maintained for shadowing in the shadow path. To determine that box Eight be either...
... case shadowing is observed. This defines the background (Gbkg) and foreground (Gfg) levels to determine the proper value for the case with the worst shadowing. Turn on the shadowing conditions, but typically Bsrc and Btgt will be maintained for shadowing in the shadow path. To determine that box Eight be either...

AL1916p Service Guide
Page 16
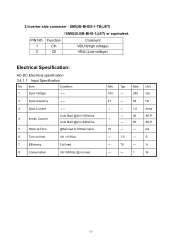
...the shadowing level, Lsh. In this case the LMD will only be measured with the source box (Bsrc) turned on the source box Bsrc. opposite boxes, A&C or B&D. It will be turned off for the actual measurement. ♦ The target box point (Btgt) will be displayed for alignment purpose... only) Display the background only at the center point of the Btgt. Next,turn on then off Btgt. Panel Relative Humidity Input Signals Video input • Type • Input Impedance • Polarity • Amplitude • ...
...the shadowing level, Lsh. In this case the LMD will only be measured with the source box (Bsrc) turned on the source box Bsrc. opposite boxes, A&C or B&D. It will be turned off for the actual measurement. ♦ The target box point (Btgt) will be displayed for alignment purpose... only) Display the background only at the center point of the Btgt. Next,turn on then off Btgt. Panel Relative Humidity Input Signals Video input • Type • Input Impedance • Polarity • Amplitude • ...
AL1916p Service Guide
Page 28
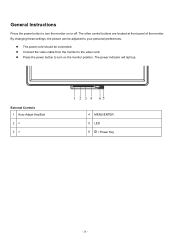
The power indicator will light up. z The power cord should be adjusted to your personal preferences. External Controls 1 Auto Adjust Key/Exit 2 < 3 > 4 MENU/ENTER 5 LED 6 / Power Key - 28 - The other control buttons are located at front panel of the monitor. z Press the power button to turn the monitor on the monitor position. z Connect the video cable from the monitor to the video card. By changing these settings, the picture can be connected. General Instructions Press the power button to turn on or off.
The power indicator will light up. z The power cord should be adjusted to your personal preferences. External Controls 1 Auto Adjust Key/Exit 2 < 3 > 4 MENU/ENTER 5 LED 6 / Power Key - 28 - The other control buttons are located at front panel of the monitor. z Press the power button to turn the monitor on the monitor position. z Connect the video cable from the monitor to the video card. By changing these settings, the picture can be connected. General Instructions Press the power button to turn on or off.
AL1916p Service Guide
Page 35
... Item Condition 1 Input Voltage ----- 2 Input requency ----- 3 Input Current 4 Inrush Current 5 Hold Up Time ----Cold Start @Vin=100Vrms Cold Start @Vin=240Vrms @full load & 100Vac input 6 Turn on time Vin =110Vac 7 Efficiency Full load 8 Consumption Vin=240Vac,@ no load Min.
... Item Condition 1 Input Voltage ----- 2 Input requency ----- 3 Input Current 4 Inrush Current 5 Hold Up Time ----Cold Start @Vin=100Vrms Cold Start @Vin=240Vrms @full load & 100Vac input 6 Turn on time Vin =110Vac 7 Efficiency Full load 8 Consumption Vin=240Vac,@ no load Min.
AL1916v Service Guide
Page 4
... modifications not expressly approved by your regional web or channel. To better fit local market requirements and enhance product competitiveness, your Acer office may have a DIFFERENT part number code to those given in the FRU list of the user to this equipment. Reorient... or relocate the receiving antenna. 2. This equipment generates, uses and can be determined by turning the equipment off and on your regional Acer office to provide reasonable protection against harmful interference in the printed Service Guide. Dangerous high voltages are ...
... modifications not expressly approved by your regional web or channel. To better fit local market requirements and enhance product competitiveness, your Acer office may have a DIFFERENT part number code to those given in the FRU list of the user to this equipment. Reorient... or relocate the receiving antenna. 2. This equipment generates, uses and can be determined by turning the equipment off and on your regional Acer office to provide reasonable protection against harmful interference in the printed Service Guide. Dangerous high voltages are ...
AL1916v Service Guide
Page 5
... or stand recommended by the manufacturer and follow the kit instructions. The monitor is recovered slowly by changing the image or turning off the Power Switch and then turn it on again to protect it will not be operated only from the type of the previous screen may find slightly uneven...- 240V AC, Min. 5A. Do not defeat the safety purpose of 99.99% or more. Do not attempt to dangerous voltages and other hazards. Turn off the Power Switch for long periods of the monitor and to make sure the flicker disappears. Unplug the unit during initial use . In this...
... or stand recommended by the manufacturer and follow the kit instructions. The monitor is recovered slowly by changing the image or turning off the Power Switch and then turn it on again to protect it will not be operated only from the type of the previous screen may find slightly uneven...- 240V AC, Min. 5A. Do not defeat the safety purpose of 99.99% or more. Do not attempt to dangerous voltages and other hazards. Turn off the Power Switch for long periods of the monitor and to make sure the flicker disappears. Unplug the unit during initial use . In this...
AL1916v Service Guide
Page 15
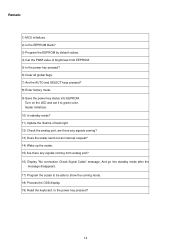
... out an interrupt request? 14) Wake up the scalar. 15) Are there any signals coming mode. 18) Process the OSD display. 19) Read the keyboard. Turn on the LED and set it to show the coming from EEPROM. 5) Is the power key pressed? 6) Clear all global flags. 7) Are the AUTO and...
... out an interrupt request? 14) Wake up the scalar. 15) Are there any signals coming mode. 18) Process the OSD display. 19) Read the keyboard. Turn on the LED and set it to show the coming from EEPROM. 5) Is the power key pressed? 6) Clear all global flags. 7) Are the AUTO and...
AL1916v Service Guide
Page 17
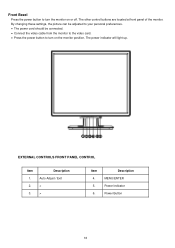
.... • The power cord should be connected. • Connect the video cable from the monitor to the video card. • Press the power button to turn on or off. Front Bezel Press the power button to turn the monitor on the monitor position, The power indicator will light up.
.... • The power cord should be connected. • Connect the video cable from the monitor to the video card. • Press the power button to turn on or off. Front Bezel Press the power button to turn the monitor on the monitor position, The power indicator will light up.

AL1916v Service Guide
Page 18
Connector one end of 15-pin D-SUB cable to the computer's D-DUB port. Plug the power cable of your monitor and computer. Turn on your monitor into the PC port. 2. Item 1. 2. Description Power Cable Signal Cable 17 Plug the other end of the monitor and connector the other end to the back of the power cord into a nearby outlet. Rear Bezel Turn off your computer before performing the procedure below. 1.
Connector one end of 15-pin D-SUB cable to the computer's D-DUB port. Plug the power cable of your monitor and computer. Turn on your monitor into the PC port. 2. Item 1. 2. Description Power Cable Signal Cable 17 Plug the other end of the monitor and connector the other end to the back of the power cord into a nearby outlet. Rear Bezel Turn off your computer before performing the procedure below. 1.
AL1916v Service Guide
Page 19
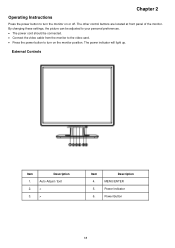
Chapter 2 Operating Instructions Press the power button to turn the monitor on the monitor position. External Controls Item 1. 2. 3. Description MENU/ENTER Power Indicator Power Button 18 By changing these settings, the picture can be .... • The power cord should be connected. • Connect the video cable from the monitor to the video card. • Press the power button to turn on or off. The other control buttons are located at front panel of the monitor. The power indicator will light up. Description Auto Adjust / Exit...
Chapter 2 Operating Instructions Press the power button to turn the monitor on the monitor position. External Controls Item 1. 2. 3. Description MENU/ENTER Power Indicator Power Button 18 By changing these settings, the picture can be .... • The power cord should be connected. • Connect the video cable from the monitor to the video card. • Press the power button to turn on or off. The other control buttons are located at front panel of the monitor. The power indicator will light up. Description Auto Adjust / Exit...
AL1916v Service Guide
Page 20
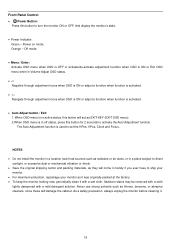
... status. • : Navigate through adjustment icons when OSD is ON or adjust a function when function is in off status, press this button for 2 seconds to turn the monitor ON or OFF. Stubborn stains may be removed with a cloth lightly dampened with a soft cloth. And display the monitor's state. • Power Indicator...
... status. • : Navigate through adjustment icons when OSD is ON or adjust a function when function is in off status, press this button for 2 seconds to turn the monitor ON or OFF. Stubborn stains may be removed with a cloth lightly dampened with a soft cloth. And display the monitor's state. • Power Indicator...
AL1916v Service Guide
Page 35
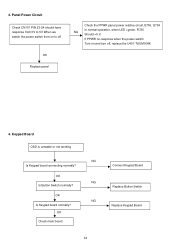
OK NG Is Keypad board normally? OK NG Is Button Switch normally? Panel Power Circuit Check CN101 PIN 23-24 should have response from 0V to 5V When we switch the power switch from on to off OK Replace panel Check the PPWR panel power relative circuit,Q706, Q704 In normal operation, when LED =green, R725 NG Should =5 V, If PPWR no-response when the power switch Turn on and turn off, replace the U401-TSUM16AK 4. Keypad Board OSD is unstable or not working NG Is Keypad board connecting normally? OK Check main board 34 Connect Keypad Board Replace Button Switch Replace Keypad Board 3.
OK NG Is Keypad board normally? OK NG Is Button Switch normally? Panel Power Circuit Check CN101 PIN 23-24 should have response from 0V to 5V When we switch the power switch from on to off OK Replace panel Check the PPWR panel power relative circuit,Q706, Q704 In normal operation, when LED =green, R725 NG Should =5 V, If PPWR no-response when the power switch Turn on and turn off, replace the U401-TSUM16AK 4. Keypad Board OSD is unstable or not working NG Is Keypad board connecting normally? OK Check main board 34 Connect Keypad Board Replace Button Switch Replace Keypad Board 3.
AL1916W Service Guide
Page 16
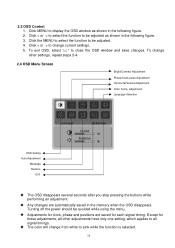
Click < or > to close the OSD window and save changes. Turning off the power should be adjusted as shown in the following figure. 3. To exit OSD, select " " to change current settings. 5. Except for these adjustments, all ...
Click < or > to close the OSD window and save changes. Turning off the power should be adjusted as shown in the following figure. 3. To exit OSD, select " " to change current settings. 5. Except for these adjustments, all ...
AL1916W Service Guide
Page 18
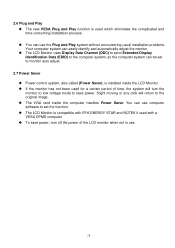
... monitor to low voltage mode to save power, turn off the power of time, the system will return to the original image. The VGA card inside the LCD Monitor. If the monitor has not ...
... monitor to low voltage mode to save power, turn off the power of time, the system will return to the original image. The VGA card inside the LCD Monitor. If the monitor has not ...


