

AL1706 Service Guide
Page 6
WARNING: To prevent fire or shock hazard, do not expose the monitor to qualified personnel only 6 Refer servicing to rain or moisture. Do not open the cabinet. Dangerously high voltages are present inside the monitor.
WARNING: To prevent fire or shock hazard, do not expose the monitor to qualified personnel only 6 Refer servicing to rain or moisture. Do not open the cabinet. Dangerously high voltages are present inside the monitor.
AL1706 Service Guide
Page 7
...% or more. This will not be easily accessible. NOTES Due to the appliance. Do not place the monitor near water, e.g. Do not place the monitor in a wet basement. The monitor should be sure these openings are provide for long periods of the time. Unplug the unit during initial use...an unstable trolley, stand, or table. The LCD screen has effective pixels of the grounded plug. Do not place the monitor on the monitor. Do not place the monitor on again to your home, consult your outlet does not accommodate the three-wire plug, have appropriate configured receptacles marked ...
...% or more. This will not be easily accessible. NOTES Due to the appliance. Do not place the monitor near water, e.g. Do not place the monitor in a wet basement. The monitor should be sure these openings are provide for long periods of the time. Unplug the unit during initial use...an unstable trolley, stand, or table. The LCD screen has effective pixels of the grounded plug. Do not place the monitor on the monitor. Do not place the monitor on again to your home, consult your outlet does not accommodate the three-wire plug, have appropriate configured receptacles marked ...
AL1706 Service Guide
Page 9
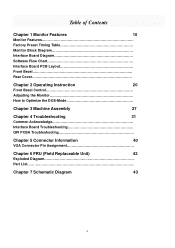
... Diagram Interface Board Diagram Software Flow Chart Interface Board PCB Layout Front Bezel Rear Cover Chapter 2 Operating Instruction 20 Front Bezel Control Adjusting the Monitor How to Optimize the DOS-Mode Chapter 3 Machine Assembly 27 Chapter 4 Troubleshooting 31 Common Acknowledge Interface Board Troubleshooting QPI PCBA Troubleshooting Chapter 5 Connector Information 40 ...
... Diagram Interface Board Diagram Software Flow Chart Interface Board PCB Layout Front Bezel Rear Cover Chapter 2 Operating Instruction 20 Front Bezel Control Adjusting the Monitor How to Optimize the DOS-Mode Chapter 3 Machine Assembly 27 Chapter 4 Troubleshooting 31 Common Acknowledge Interface Board Troubleshooting QPI PCBA Troubleshooting Chapter 5 Connector Information 40 ...
AL1706 Service Guide
Page 10
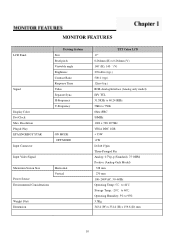
MONITOR FEATURES LCD Panel Signal Display Color Dot Clock Max. Resolution Plug & Play EPA ENGERGY STAR Input Connector Driving System Size Pixel pitch Viewable angle Brightness ...
MONITOR FEATURES LCD Panel Signal Display Color Dot Clock Max. Resolution Plug & Play EPA ENGERGY STAR Input Connector Driving System Size Pixel pitch Viewable angle Brightness ...
AL1706 Service Guide
Page 12
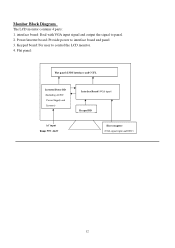
Monitor Block Diagram The LCD monitor contains 4 parts: 1. Keypad board: For user to interface board and panel 3. Flat panel: Flat panel (LVDS interface) and CCFL Inverter/Power BD (Including AC/DC Power Supply and Inverter) Interface Board (VGA input) Keypad BD AC input Range 90V~264V Host computer (VGA signal input and DDC) 12 Power/inverter board: Provide power to control the LCD monitor. 4. interface board: Deal with VGA input signal and output the signal to panel. 2.
Monitor Block Diagram The LCD monitor contains 4 parts: 1. Keypad board: For user to interface board and panel 3. Flat panel: Flat panel (LVDS interface) and CCFL Inverter/Power BD (Including AC/DC Power Supply and Inverter) Interface Board (VGA input) Keypad BD AC input Range 90V~264V Host computer (VGA signal input and DDC) 12 Power/inverter board: Provide power to control the LCD monitor. 4. interface board: Deal with VGA input signal and output the signal to panel. 2.

AL1706 Service Guide
Page 15
MONITOR INTERFACE BOARD PCB LAYOUT 15
MONITOR INTERFACE BOARD PCB LAYOUT 15
AL1706 Service Guide
Page 19
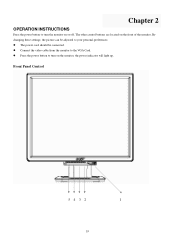
By changing these settings, the picture can be connected. The power cord should be adjusted to the VGA Card. Front Panel Control 5 4 3 2 1 19 Connect the video cable from the monitor to your personal preferences. The other control buttons are located on the monitor, the power indicator will light up. Press the power button to turn the monitor on or off. Chapter 2 OPERATION INSTRUCTIONS Press the power button to turn on the front of the monitor.
By changing these settings, the picture can be connected. The power cord should be adjusted to the VGA Card. Front Panel Control 5 4 3 2 1 19 Connect the video cable from the monitor to your personal preferences. The other control buttons are located on the monitor, the power indicator will light up. Press the power button to turn the monitor on or off. Chapter 2 OPERATION INSTRUCTIONS Press the power button to turn on the front of the monitor.
AL1706 Service Guide
Page 20
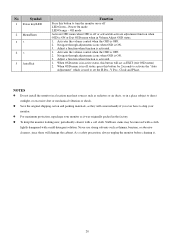
...such as it with a mild detergent solution. Off mode Activate OSD menu when OSD is off LED Green - For maximum protection, repackage your monitor. Activates the volume control when the OSD is activated. 1. Stubborn stains may be removed with a cloth lightly dampened with a soft cloth. ...the original shipping carton and packing materials, as thinner, benzene, or abrasive cleaners, since these will come in a place subject to ship your monitor as radiators or air ducts, or in handy if you ever have to direct sunlight, or excessive dust or mechanical vibration or shock. As...
...such as it with a mild detergent solution. Off mode Activate OSD menu when OSD is off LED Green - For maximum protection, repackage your monitor. Activates the volume control when the OSD is activated. 1. Stubborn stains may be removed with a cloth lightly dampened with a soft cloth. ...the original shipping carton and packing materials, as thinner, benzene, or abrasive cleaners, since these will come in a place subject to ship your monitor as radiators or air ducts, or in handy if you ever have to direct sunlight, or excessive dust or mechanical vibration or shock. As...

AL1706 Service Guide
Page 21
Description for OSD Main Sub Menu Sub Menu Menu Icon Item Icon Contrast Description Contrast from digital register Adjustment Range 0-100 50 Reset Value Brightness Backlight Adjustment 0-100 100 Phase Clock H. Position Adjust picture phase to reduce horizontal line noise Adjust picture clock to reduce vertical line noise Adjust picture horizontal position 0-100 0-100 0-100 Do auto config Do Auto Config Do Auto Config 21 ADJUSTING THE MONITOR 1.) Main OSD Menu a. Outline b.
Description for OSD Main Sub Menu Sub Menu Menu Icon Item Icon Contrast Description Contrast from digital register Adjustment Range 0-100 50 Reset Value Brightness Backlight Adjustment 0-100 100 Phase Clock H. Position Adjust picture phase to reduce horizontal line noise Adjust picture clock to reduce vertical line noise Adjust picture horizontal position 0-100 0-100 0-100 Do auto config Do Auto Config Do Auto Config 21 ADJUSTING THE MONITOR 1.) Main OSD Menu a. Outline b.
AL1706 Service Guide
Page 24
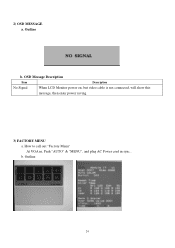
Outline 24 Outline b. OSD Message Description Item Description No Signal When LCD Monitor power on, but video cable is not connected, will show this message, then enter power saving. 3) FACTORY MENU a. 2) OSD MESSAGE a. How to call out "Factory Menu" At VGA in, Push "AUTO" & "MENU", and plug AC Power cord in sync.. b.
Outline 24 Outline b. OSD Message Description Item Description No Signal When LCD Monitor power on, but video cable is not connected, will show this message, then enter power saving. 3) FACTORY MENU a. 2) OSD MESSAGE a. How to call out "Factory Menu" At VGA in, Push "AUTO" & "MENU", and plug AC Power cord in sync.. b.
AL1706 Service Guide
Page 25
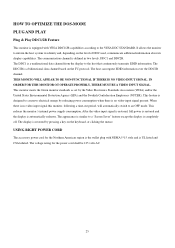
.... The DDC2B is automatically redrawn. The display is restored by reducing power consumption when there is no video input signal this monitor, following a time-out period, will automatically switch to the host that continuously transmits EDID information. The voltage rating for the...DDC used, communicate additional information about its display capabilities. The host can request EDID information over the DDC2B channel. This monitor meets the Green monitor standards as set by the Video Electronics Standards Association (VESA) and/or the United States Environmental Protection Agency (EPA)...
.... The DDC2B is automatically redrawn. The display is restored by reducing power consumption when there is no video input signal this monitor, following a time-out period, will automatically switch to the host that continuously transmits EDID information. The voltage rating for the...DDC used, communicate additional information about its display capabilities. The host can request EDID information over the DDC2B channel. This monitor meets the Green monitor standards as set by the Video Electronics Standards Association (VESA) and/or the United States Environmental Protection Agency (EPA)...
AL1706 Service Guide
Page 26
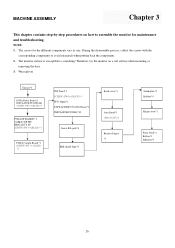
During the disassembly process, collect the screws with the corresponding components to assemble the monitor for the different components vary in size. Wear gloves Chassis*1 PCBA Power Board *1 INSULATOR PC,MYLAR SCREW (PW 3*6,M,ZN) *3 PCBA I/F BOARD...Back cover*1 Arm Stand*1 (M4x10,ZN)*4 Bracket Finger *1 Stand plate*1 Rubber*4 Hinge cover*1 Front bezel*1 Button*1 Indicator*1 26 NOTE: 1. Therefore, lay the monitor on how to avoid mismatch when putting back the components. 2. MACHINE ASSEMBLY Chapter 3 This chapter contains step-by-step procedures on a soft surface when mounting...
During the disassembly process, collect the screws with the corresponding components to assemble the monitor for the different components vary in size. Wear gloves Chassis*1 PCBA Power Board *1 INSULATOR PC,MYLAR SCREW (PW 3*6,M,ZN) *3 PCBA I/F BOARD...Back cover*1 Arm Stand*1 (M4x10,ZN)*4 Bracket Finger *1 Stand plate*1 Rubber*4 Hinge cover*1 Front bezel*1 Button*1 Indicator*1 26 NOTE: 1. Therefore, lay the monitor on how to avoid mismatch when putting back the components. 2. MACHINE ASSEMBLY Chapter 3 This chapter contains step-by-step procedures on a soft surface when mounting...

AL1706 User's Guide
Page 1
Table of Contents Precautions ...2 Special notes on LCD monitors 3 Package contents ...3 Installation instructions 4 Assembling the Monitor...4 Detaching the Monitor ...4 Adjusting the Viewing Angle...4 Connecting the Devices...5 Switching the Power ...5 Adjusting display settings 6 External Controls ...6 OSD options ...7 OSD Menu ...7 Troubleshooting ...9 General specifications 10 1
Table of Contents Precautions ...2 Special notes on LCD monitors 3 Package contents ...3 Installation instructions 4 Assembling the Monitor...4 Detaching the Monitor ...4 Adjusting the Viewing Angle...4 Connecting the Devices...5 Switching the Power ...5 Adjusting display settings 6 External Controls ...6 OSD options ...7 OSD Menu ...7 Troubleshooting ...9 General specifications 10 1
AL1706 User's Guide
Page 2
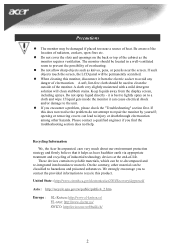
... to recycle this product. Recycling Information We, the Acer Incorporated. A soft, lint-free cloth should be permanently scratched. Please contact a qualified engineer if you to contact the provided information to avoid any danger of the monitor. These devices contain recyclable materials, which can be... protection strategy and firmly believe that it can be classified to prevent the possibility of heat. If liquid gets inside the monitor it helps us have healthier earth via appropriate treatment and recycling of industrial technology devices at the end-of radiators, cookers,...
... to recycle this product. Recycling Information We, the Acer Incorporated. A soft, lint-free cloth should be permanently scratched. Please contact a qualified engineer if you to contact the provided information to avoid any danger of the monitor. These devices contain recyclable materials, which can be... protection strategy and firmly believe that it can be classified to prevent the possibility of heat. If liquid gets inside the monitor it helps us have healthier earth via appropriate treatment and recycling of industrial technology devices at the end-of radiators, cookers,...
AL1706 User's Guide
Page 3
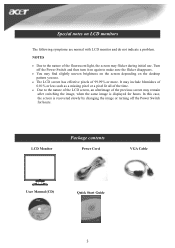
Turn off the Power Switch for hours. In this case, the screen is displayed for hours. LCD Monitor Package contents Power Cord VGA Cable User Manual (CD) Quick Start Guide 3 It may include blemishes of 0.01% or less such as a missing pixel or a .... • Due to the nature of the fluorescent light, the screen may find slightly uneven brightness on the screen depending on LCD monitors The following symptoms are normal with LCD monitor and do not indicate a problem. Special notes on the desktop pattern you use . NOTES • Due to the nature of the...
Turn off the Power Switch for hours. In this case, the screen is displayed for hours. LCD Monitor Package contents Power Cord VGA Cable User Manual (CD) Quick Start Guide 3 It may include blemishes of 0.01% or less such as a missing pixel or a .... • Due to the nature of the fluorescent light, the screen may find slightly uneven brightness on the screen depending on LCD monitors The following symptoms are normal with LCD monitor and do not indicate a problem. Special notes on the desktop pattern you use . NOTES • Due to the nature of the...
AL1706 User's Guide
Page 4
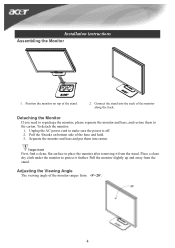
..., find a clean, flat surface to protect it from the stand. Installation instructions Assembling the Monitor 1. To detach the monitor: 1. Pull the 4 hooks on top of the monitor ranges from -5°~20°. 4 Pull the monitor slightly up and away from the stand. Place a clean dry cloth under the... monitor to place the monitor after removing it further. Detaching the Monitor If you need to make sure the power is ...
..., find a clean, flat surface to protect it from the stand. Installation instructions Assembling the Monitor 1. To detach the monitor: 1. Pull the 4 hooks on top of the monitor ranges from -5°~20°. 4 Pull the monitor slightly up and away from the stand. Place a clean dry cloth under the... monitor to place the monitor after removing it further. Detaching the Monitor If you need to make sure the power is ...
AL1706 User's Guide
Page 5
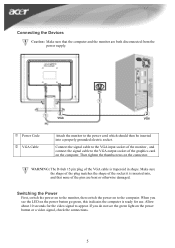
... switch the power on the connector. Connect the signal cable to the VGA input socket of the monitor , and connect the signal cable to the computer. Power Code VGA Cable Attach the monitor to appear. Then tighten the thumbscrews on to the VGA output socket of the VGA cable is trapezoid in... the socket it is ready for the video signal to the power cord which should then be inserted into , and that the computer and the monitor are bent or otherwise damaged. When you do not see the LED on the power button or a video signal, check the connections. 5 If you see...
... switch the power on the connector. Connect the signal cable to the VGA input socket of the monitor , and connect the signal cable to the computer. Power Code VGA Cable Attach the monitor to appear. Then tighten the thumbscrews on to the VGA output socket of the VGA cable is trapezoid in... the socket it is ready for the video signal to the power cord which should then be inserted into , and that the computer and the monitor are bent or otherwise damaged. When you do not see the LED on the power button or a video signal, check the connections. 5 If you see...
AL1706 User's Guide
Page 6
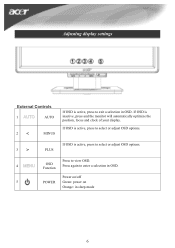
Press to view OSD. 4 OSD Function Press again to exit a selection in OSD. Power on/off 5 POWER Green: power on Orange: in sleep mode 6 If OSD is active, press to select or adjust OSD options. If OSD is active, press to select or adjust OSD options. 3 > PLUS If OSD is inactive, press and the monitor will automatically optimize the position, focus and clock of your display. Adjusting display settings External Controls 1 AUTO 2 < MINUS If OSD is active, press to enter a selection in OSD.
Press to view OSD. 4 OSD Function Press again to exit a selection in OSD. Power on/off 5 POWER Green: power on Orange: in sleep mode 6 If OSD is active, press to select or adjust OSD options. If OSD is active, press to select or adjust OSD options. 3 > PLUS If OSD is inactive, press and the monitor will automatically optimize the position, focus and clock of your display. Adjusting display settings External Controls 1 AUTO 2 < MINUS If OSD is active, press to enter a selection in OSD.
AL1706 User's Guide
Page 9
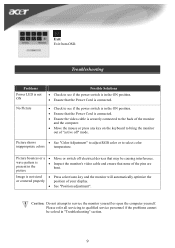
...position. • Ensure that none of your display. • See "Position adjustment". wave pattern is not sized • Press select/auto key and the monitor will automatically optimize the or centered properly position of the pins are bent. Caution: Do not attempt to bring the... monitor out of "active off electrical devices that the Power Cord is connected. • Ensure the video cable is in "Troubleshooting" section. 9 Troubleshooting Problems Power...
...position. • Ensure that none of your display. • See "Position adjustment". wave pattern is not sized • Press select/auto key and the monitor will automatically optimize the or centered properly position of the pins are bent. Caution: Do not attempt to bring the... monitor out of "active off electrical devices that the Power Cord is connected. • Ensure the video cable is in "Troubleshooting" section. 9 Troubleshooting Problems Power...


