

AL1512m User's Guide
Page 1
Table of Contents Safety Rules 1 Electrical Safety 1 Installation Safety 1 Cleaning Safety 1 Components and Accessories Usage 1 2 Installation Guide 2 Adjustment of Display 3 Operation 4 Adjustment of Screen 5 Attachment 6 Plug and Play 6 Power Saver 6 Troubleshooting 6 Technical Specifications 7 Display Mode 8
Table of Contents Safety Rules 1 Electrical Safety 1 Installation Safety 1 Cleaning Safety 1 Components and Accessories Usage 1 2 Installation Guide 2 Adjustment of Display 3 Operation 4 Adjustment of Screen 5 Attachment 6 Plug and Play 6 Power Saver 6 Troubleshooting 6 Technical Specifications 7 Display Mode 8
AL1512m User's Guide
Page 2
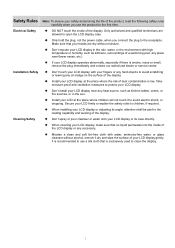
...'t install your LCD display near flower vases, etc.) If your LCD display operates abnormally, especially if there is smoke, noise or smell, remove the plug immediately and contact our authorized dealer or service center. Secure your LCD display. Only hold the plug, not the power cable, when you use a silk cloth that is exclusively used to clean the display. 1 Don't expose your LCD display in the sun. Install your LCD at...
...'t install your LCD display near flower vases, etc.) If your LCD display operates abnormally, especially if there is smoke, noise or smell, remove the plug immediately and contact our authorized dealer or service center. Secure your LCD display. Only hold the plug, not the power cable, when you use a silk cloth that is exclusively used to clean the display. 1 Don't expose your LCD display in the sun. Install your LCD at...
AL1512m User's Guide
Page 3
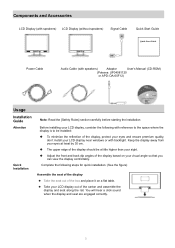
... a click sound when the display and seat are engaged correctly. 2 Adjust the front and back dip angles of the display, protect your eyes and ensure premium quality, don't install your LCD display near windows or with reference to the space where the display is to be a little higher than your sight. Components and Accessories LCD Display (with speakers) LCD Display (without speakers) Signal Cable Quick Start Guide Quick Start Guide Power Cable Audio Cable (with speakers) Adaptor User's Manual (CD...
... a click sound when the display and seat are engaged correctly. 2 Adjust the front and back dip angles of the display, protect your eyes and ensure premium quality, don't install your LCD display near windows or with reference to the space where the display is to be a little higher than your sight. Components and Accessories LCD Display (with speakers) LCD Display (without speakers) Signal Cable Quick Start Guide Quick Start Guide Power Cable Audio Cable (with speakers) Adaptor User's Manual (CD...
AL1512m User's Guide
Page 4
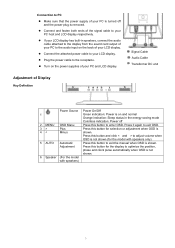
... speakers, connect the audio cable attached to the display from the sound card output of your PC to the audio input on the power supplies of your PC and LCD display. If your LCD display has built-in the energy-saving mode Colorless indication: Power off and the power plug is shown. Adjustment of Display Key Definition Signal Cable Audio Cable Transformer DC end Power Source 1 2. Turn on the back of your LCD display. MENU 3 > 4 < OSD Manu Plus Minus 5 AUTO Automatic Adjustment 6 Speaker (For the model with speakers...
... speakers, connect the audio cable attached to the display from the sound card output of your PC to the audio input on the power supplies of your PC and LCD display. If your LCD display has built-in the energy-saving mode Colorless indication: Power off and the power plug is shown. Adjustment of Display Key Definition Signal Cable Audio Cable Transformer DC end Power Source 1 2. Turn on the back of your LCD display. MENU 3 > 4 < OSD Manu Plus Minus 5 AUTO Automatic Adjustment 6 Speaker (For the model with speakers...
AL1512m User's Guide
Page 5
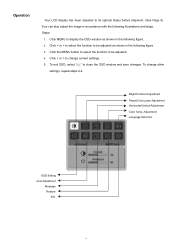
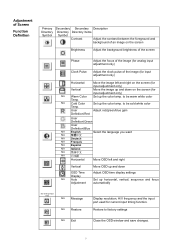
... also adjust the image in the following figure. 2. Click the MENU button to select the function to display the OSD window as shown in the following illustrations and steps. To exit OSD, select " " to its optimal status before shipment. (See Page 8). Bright/Contract Adjustment Phase/Clock pulse Adjustment Horizontal/Vertical Adjustment Color Temp. Operation Your LCD display has been adjusted to close the OSD window and save changes. Click MENU to be adjusted as shown...
... also adjust the image in the following figure. 2. Click the MENU button to select the function to display the OSD window as shown in the following illustrations and steps. To exit OSD, select " " to its optimal status before shipment. (See Page 8). Bright/Contract Adjustment Phase/Clock pulse Adjustment Horizontal/Vertical Adjustment Color Temp. Operation Your LCD display has been adjusted to close the OSD window and save changes. Click MENU to be adjusted as shown...
AL1512m User's Guide
Page 6
...screen (for input adjustment only) Vertical Move the image up and down Adjust OSD time display settings Set up horizontal, vertical, sequence and focus automatically (for analog input only) N/A Message N/A Restore Display resolution, H/V frequency and the input port used for input adjustment only) N/A Warm Color Set up the color temp. to be cold white color Temp. Restore to be warm white color Temp. N/A Cold Color Set up the color temp. to factory settings N/A Exit Close the OSD window and save changes. 5 User Adjust red/green/blue gain Definition/Red User...
...screen (for input adjustment only) Vertical Move the image up and down Adjust OSD time display settings Set up horizontal, vertical, sequence and focus automatically (for analog input only) N/A Message N/A Restore Display resolution, H/V frequency and the input port used for input adjustment only) N/A Warm Color Set up the color temp. to be cold white color Temp. Restore to be warm white color Temp. N/A Cold Color Set up the color temp. to factory settings N/A Exit Close the OSD window and save changes. 5 User Adjust red/green/blue gain Definition/Red User...
AL1512m User's Guide
Page 7
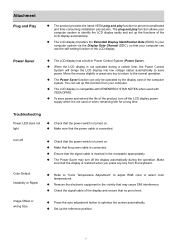
... optimize the screen automatically. Attachment Plug and Play Power Saver Troubleshooting Power LED does not light Icon off the LCD display power supply when it is connected. Check that the power cable is not used or when remaining idle for a long time. The Power Saver may cause EMI interference. Press the auto adjustment button to adjust RGB color or select color temperatures. When the LCD display is turned on . The LCD display is compatible with EPAENERGY STAR NÜTEK when used with VESA...
... optimize the screen automatically. Attachment Plug and Play Power Saver Troubleshooting Power LED does not light Icon off the LCD display power supply when it is connected. Check that the power cable is not used or when remaining idle for a long time. The Power Saver may cause EMI interference. Press the auto adjustment button to adjust RGB color or select color temperatures. When the LCD display is turned on . The LCD display is compatible with EPAENERGY STAR NÜTEK when used with VESA...
AL1512m User's Guide
Page 8
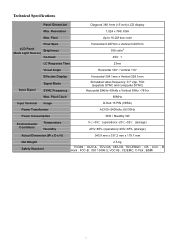
UL/CUL; CB ; Resolution 1,024 x 768/ XGA Max. Pixel Up to 16.2M true color Pixel Span LCD Panel Brightness (Back Light Source) Contrast Horizontal 0.297mm x Vertical 0.297mm 350 cd/m2 450 : 1 LC Response Time 23ms Visual Angle Horizontal 120° / Vertical 110° Input Signal Effective Display Signal Mode SYNC Frequency Horizontal 304.1mm x Vertical 228.1mm Simulated video frequency: 0.7 Vpp, 75Ω (separate SYNC and composite SYNC) Horizontal 28kHz~63kHz x Vertical 55Hz ~78 Hz Max. CE/LVD; C-Tick...
UL/CUL; CB ; Resolution 1,024 x 768/ XGA Max. Pixel Up to 16.2M true color Pixel Span LCD Panel Brightness (Back Light Source) Contrast Horizontal 0.297mm x Vertical 0.297mm 350 cd/m2 450 : 1 LC Response Time 23ms Visual Angle Horizontal 120° / Vertical 110° Input Signal Effective Display Signal Mode SYNC Frequency Horizontal 304.1mm x Vertical 228.1mm Simulated video frequency: 0.7 Vpp, 75Ω (separate SYNC and composite SYNC) Horizontal 28kHz~63kHz x Vertical 55Hz ~78 Hz Max. CE/LVD; C-Tick...
AL1512m User's Guide
Page 9
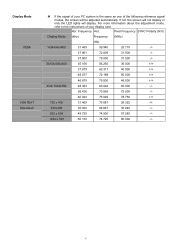
... adjustment mode, refer to the instructions of your PC system is the same as one of your display card. If not, the screen will not display or only the LED lights will be adjusted automatically. Frequency Vert. Pixel Frequency SYNC Polarity (H/V) Display Mode (kHz) Frequency (MHz) (Hz) VGA 640x480 31.469 59.940 25.175 -/- 37.861 72.809 31.500 -/- 37.500 75.000 31.500 -/- Hor. Display Mode VESA VGA...
... adjustment mode, refer to the instructions of your PC system is the same as one of your display card. If not, the screen will not display or only the LED lights will be adjusted automatically. Frequency Vert. Pixel Frequency SYNC Polarity (H/V) Display Mode (kHz) Frequency (MHz) (Hz) VGA 640x480 31.469 59.940 25.175 -/- 37.861 72.809 31.500 -/- 37.500 75.000 31.500 -/- Hor. Display Mode VESA VGA...

