Acer X171 Support and Manuals
Get Help and Manuals for this Acer Computers item

Popular Acer X171 Manual Pages
X171 Service Guide - Page 1
Acer X171 (Dual) Service Guide
Service guide files and updates are available on the CSD web: for more information, Please refer to http://csd.acer.com.tw/
100% Recycled Paper
- 1 -
X171 Service Guide - Page 2

No part of Acer Corporation. Disclaimer
The information in this guide is a registered trademark of this manual is sold or licensed "as is a registered trademark of all necessary servicing, repair, and any incidental or consequential damages resulting from any defect in any form or by Acer Incorporated. Acer is subject to the contents hereof and specifically disclaims any warranties of...
X171 Service Guide - Page 3

... or software problems. Reminds you to any damage that appear on screen
Gives bits and pieces of additional information related to the accomplishment of procedures.
- 3 - Conventions
The following conventions are used in this manual:
Screen messages Note Warning Caution Important
Denotes actual messages that might result from doing or not doing specific actions...
X171 Service Guide - Page 4
... FEATURES will not be covered in this printed Service Guide. If, for whatever reason, a part number change is made, it supports, please read the following general information. 1. ...a different part number code to those given in the FRU list of this generic service guide. You MUST use the list provided by your regional Acer office to basic configuration
decided for repair and service of a ...
X171 Service Guide - Page 5

... frequency energy, and if not installed and used in accordance with the instructions, may cause harmful interference to ...monitor. Do not open the cabinet. Dangerously high voltages are designed to provide reasonable protection against harmful interference in a particular installation. Refer servicing to Part 15 of the user to radio communications. WARNING: (FOR FCC CERTIFIED MODELS...
X171 Service Guide - Page 6

...- Please refer all servicing to service the monitor yourself; z To ensure satisfactory operation, use the monitor only with a third (grounding) pin.
If the monitor falls, it will...instructions.
Never spill liquids on the label. z The monitor should be used for ventilation. It could short circuit parts causing a fire or electric shock. To ensure reliable operation of the monitor...
X171 Service Guide - Page 7

z Due to the nature of the LCD screen, an afterimage of the fluorescent light, the screen may find slightly uneven ... you
use . NOTES z Due to make sure the flicker disappears. z The LCD screen has effective pixels of the time. Turn off the Power Switch for hours. SPECIAL NOTES ON LCD MONITORS The following symptoms are normal with LCD monitor and do not indicate a problem.
X171 Service Guide - Page 8

Table of contents
Chapter 1 MONITOR FEATURE 9 Chapter 2 OPERATING INSTRUCTION 17 Chapter 3 MACHINE ASSEMBLY 22 Chapter 4 TROUBLE SHOOTING 33 Chapter 5 CONNECTOR INFORMATION 36 Chapter 6 FRU LIST 38 Chapter 7 SCHEMATIC DIAGRAM 39 Chapter 8 POWER BOARD INFORMATION 46
- 8 -
X171 Service Guide - Page 19

... changes the position of the OSD window on the screen. Setting Language: Select the OSD menu language from English, French, German, Italian, Spanish, Simplified Chinese, Traditional Chinese, Japanese and Russian. Option Auto Config. : System choose signal "Analog or Digital"
Reset: Recall to default settings.
Position OSD V. OSD H. Information: This shows brief information on...
X171 Service Guide - Page 21

...VIDEO INPUT SIGNAL. This monitor meets the Green monitor standards as set consisting of a minimum No. 18 AWG, type SJT or SVT three conductors flexible cord. After the video input signal is restored... approval power cord in European counties.
- 21 - When there is no video input signal this monitor, following a time-out period, will automatically switch to conserve electrical energy by the Video...
X171 Service Guide - Page 22

The screws for maintenance and trouble shooting NOTE : 1. Note : The monitor surface is susceptible to assemble the monitor for the different components vary in size. Therefore, lay the monitor on how to scratching! Front View : ( unit : mm )
Real View :
Top View :
- 22 - Chapter 3
MACHINE ASSEMBLY (Update later)
This chapter contains step-by-step procedures on a soft...
X171 Service Guide - Page 24

GET POWER/B AND INSERT JUMPER IN THE APPOINTED PLACE OF JP10 AT
2. Jumper value set as 7.5mA
5
1. GET AGGLUTINANT TO CONNECT THE JUMPER AND POWER/B
3. GET M/B AND ASSEMBLE IT WITH POWER/B,THEN ASSEMBLE THEM IN PCB SHIELD
2
- 24 - INSERT SPEAKER CABLE IN M/B
1
CONNECTOR
2. MARK DOT IN THE PANE MARK OF POWER/B AS PICTURE SHOWS
1.
X171 Service Guide - Page 32

1. INSERT DVI CABLE INTO DVI CONNECTOR AND INSERT POWER CORD INTO POWER CONNECTOR
2. STAND UP THE MONITOR AND STICK TRAVALCARD AT LEFT DOWNSIDE OF MONITOR
- 32 -
X171 Service Guide - Page 33
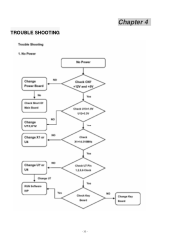
TROUBLE SHOOTING
Chapter 4
- 33 -
X171 Service Guide - Page 38

... - You MUST use the local FRU list provided by your regional Acer office on your regional Acer office to repair or for parts to order FRU parts repair and service of X171. Refer to dispose it, or follow the local government ordinance or regulations on how best to this printed Service Guide. NOTE: To scrap or to return the defective...
Acer X171 Reviews
We have not received any reviews for Acer yet.