User Guide
Page 3
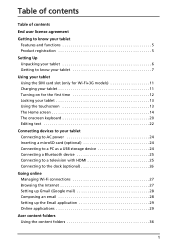
... Using the touchscreen 13 The Home screen 14 The onscreen keyboard 20 Editing text 22 Connecting devices to your tablet Connecting to AC power 24 Inserting a microSD card (optional 24 Connecting to a PC as a USB storage device 24 Connecting a Bluetooth device 25 Connecting to a television ... connections 27 Browsing the Internet 27 Setting up Gmail (Google mail 28 Composing an email 28 Setting up the Email application 29 Online applications 29 Acer content folders Using the content folders 36 1
... Using the touchscreen 13 The Home screen 14 The onscreen keyboard 20 Editing text 22 Connecting devices to your tablet Connecting to AC power 24 Inserting a microSD card (optional 24 Connecting to a PC as a USB storage device 24 Connecting a Bluetooth device 25 Connecting to a television ... connections 27 Browsing the Internet 27 Setting up Gmail (Google mail 28 Composing an email 28 Setting up the Email application 29 Online applications 29 Acer content folders Using the content folders 36 1

User Guide
Page 4
...Wi-Fi+3G models) Installing a SIM card 50 Adjusting connection settings 51 Internet sharing 52 Advanced settings Sound 54 Screen 54 Putting your tablet in Airplane mode 55 Activating or deactivating connections 55 Adjusting Bluetooth settings 56 Connecting to a PC 56 Synchronization 56 Setting the date and ...time 57 Setting alarms 57 Changing language and text options 58 Managing applications 58 Updating your tablet's operating system 58 Resetting your tablet 58 Appendix FAQ and troubleshooting 60 Other sources of help 61 Specifications 62 Safety 64 2
...Wi-Fi+3G models) Installing a SIM card 50 Adjusting connection settings 51 Internet sharing 52 Advanced settings Sound 54 Screen 54 Putting your tablet in Airplane mode 55 Activating or deactivating connections 55 Adjusting Bluetooth settings 56 Connecting to a PC 56 Synchronization 56 Setting the date and ...time 57 Setting alarms 57 Changing language and text options 58 Managing applications 58 Updating your tablet's operating system 58 Resetting your tablet 58 Appendix FAQ and troubleshooting 60 Other sources of help 61 Specifications 62 Safety 64 2

User Guide
Page 7
... When using your product for the first time, it . This will be sent a confirmation email with your friends via your tablet by tapping the Acer Registration icon. Click Registration and follow the simple instructions. Getting to -access multimedia and entertainment features. After we receive your product... register it is recommended that you access to rich, full-impact audio via Wi-Fi or, if your tablet includes 3G features, HSDPA+. • Access your Acer product, please visit www.acer.com. How to the Internet via Dolby Mobile. You can also register directly from...
... When using your product for the first time, it . This will be sent a confirmation email with your friends via your tablet by tapping the Acer Registration icon. Click Registration and follow the simple instructions. Getting to -access multimedia and entertainment features. After we receive your product... register it is recommended that you access to rich, full-impact audio via Wi-Fi or, if your tablet includes 3G features, HSDPA+. • Access your Acer product, please visit www.acer.com. How to the Internet via Dolby Mobile. You can also register directly from...
User Guide
Page 8
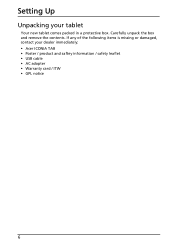
If any of the following items is missing or damaged, contact your tablet Your new tablet comes packed in a protective box. Setting Up Unpacking your dealer immediately: • Acer ICONIA TAB • Poster / product and saftey information / safety leaflet • USB cable • AC adapter • Warranty card / ITW • GPL notice 6 Carefully unpack the box and remove the contents.
If any of the following items is missing or damaged, contact your tablet Your new tablet comes packed in a protective box. Setting Up Unpacking your dealer immediately: • Acer ICONIA TAB • Poster / product and saftey information / safety leaflet • USB cable • AC adapter • Warranty card / ITW • GPL notice 6 Carefully unpack the box and remove the contents.

User Guide
Page 9
Item 1 Touchscreen 2 Home button 3 Front-facing camera 4 Light sensor 2 Description 7-inch, 1024 x 600 pixel capacitive touchscreen. Getting to the Home screen. Setting Up 7 Tap this icon to go directly to know your tablet Front view 4 3 1 No. A 2-megapixel camera for video chatting and self-portrait images. Detects ambient light and automatically adjusts the screen brightness.
Item 1 Touchscreen 2 Home button 3 Front-facing camera 4 Light sensor 2 Description 7-inch, 1024 x 600 pixel capacitive touchscreen. Getting to the Home screen. Setting Up 7 Tap this icon to go directly to know your tablet Front view 4 3 1 No. A 2-megapixel camera for video chatting and self-portrait images. Detects ambient light and automatically adjusts the screen brightness.

User Guide
Page 10
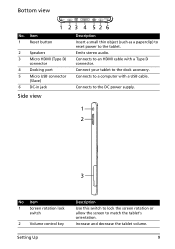
press and hold to turn the screen on , press briefly to turn the tablet off or enter sleep mode; Back view 1 2 No. Item 1 5 MP camera 2 LED flash Top view Description A 5-megapixel camera for taking highresolution images. Lights to stereo headphones. 8 Item Description 1 Power button Long press to turn the tablet on /off . 2 3.5 mm headphone jack Connects to illuminate images. 12 No.
press and hold to turn the screen on , press briefly to turn the tablet off or enter sleep mode; Back view 1 2 No. Item 1 5 MP camera 2 LED flash Top view Description A 5-megapixel camera for taking highresolution images. Lights to stereo headphones. 8 Item Description 1 Power button Long press to turn the tablet on /off . 2 3.5 mm headphone jack Connects to illuminate images. 12 No.
User Guide
Page 11
...this switch to lock the screen rotation or allow the screen to a computer with a Type D connector. Connects to match the tablet's orientation. Increase and decrease the tablet volume. 9 Connect your tablet to an HDMI cable with a USB cable. Side view 1 2 3 No. Connects to the dock accessory. Connects to the... tablet. Bottom view 1 23 4 526 No. Item 1 Reset button 2 Speakers 3 Micro HDMI (Type D) connector 4 Docking port 5 Micro USB connector (Slave) 6 DC-in ...
...this switch to lock the screen rotation or allow the screen to a computer with a Type D connector. Connects to match the tablet's orientation. Increase and decrease the tablet volume. 9 Connect your tablet to an HDMI cable with a USB cable. Side view 1 2 3 No. Connects to the dock accessory. Connects to the... tablet. Bottom view 1 23 4 526 No. Item 1 Reset button 2 Speakers 3 Micro HDMI (Type D) connector 4 Docking port 5 Micro USB connector (Slave) 6 DC-in ...

User Guide
Page 13
To take full advantage of use , you need to charge your tablet for internet access. Charging your tablet For first-time use . See "Installing a SIM card" on your tablet. Using your tablet and plug the AC adapter into any AC outlet. Connect the DC-in jack to become warm during charging or... capabilities, you can recharge the battery as needed. Using your tablet Using the SIM card slot (only for Wi-Fi+3G models) Certain tablets include a SIM slot for four hours. Note: It is normal for the tablet surface to your tablet 11 After that you should install a SIM card with data...
To take full advantage of use , you need to charge your tablet for internet access. Charging your tablet For first-time use . See "Installing a SIM card" on your tablet. Using your tablet and plug the AC adapter into any AC outlet. Connect the DC-in jack to become warm during charging or... capabilities, you can recharge the battery as needed. Using your tablet Using the SIM card slot (only for Wi-Fi+3G models) Certain tablets include a SIM slot for four hours. Note: It is normal for the tablet surface to your tablet 11 After that you should install a SIM card with data...

User Guide
Page 14
Sign in to or create a Google account If you have Internet access, your tablet allows you to synchronize information with Android 2.0 (or later) installed, you must sign... they are displayed. Turning on for the first time To turn on page 57. 12 to select your tablet, press and hold the power button for personal and business contacts, you do not want to synchronize your ...Google account during setup. Follow the rest of other Google Apps; and to use your tablet. If you may create or sign in to use Gmail, Google Talk, Google Calendar, and other Google services...
Sign in to or create a Google account If you have Internet access, your tablet allows you to synchronize information with Android 2.0 (or later) installed, you must sign... they are displayed. Turning on for the first time To turn on page 57. 12 to select your tablet, press and hold the power button for personal and business contacts, you do not want to synchronize your ...Google account during setup. Follow the rest of other Google Apps; and to use your tablet. If you may create or sign in to use Gmail, Google Talk, Google Calendar, and other Google services...

User Guide
Page 15
... order). To change the delay, tap Apps > Settings > Screen > Timeout. Using the touchscreen Your tablet uses a touchscreen for a while, briefly press the power button to tap the screen. Using your tablet, press the power button. This saves power and ensures your finger on page 61. Waking your... lock automatically if it has been locked and is not used after a while. Drag: Hold your tablet does not unintentionally use your tablet for selecting items and entering information. Open the Home screen and tap Apps > Settings > Location & security > Configure lock screen. For ...
... order). To change the delay, tap Apps > Settings > Screen > Timeout. Using the touchscreen Your tablet uses a touchscreen for a while, briefly press the power button to tap the screen. Using your tablet, press the power button. This saves power and ensures your finger on page 61. Waking your... lock automatically if it has been locked and is not used after a while. Drag: Hold your tablet does not unintentionally use your tablet for selecting items and entering information. Open the Home screen and tap Apps > Settings > Location & security > Configure lock screen. For ...

User Guide
Page 16
... on your finger up menu that appears, tap the action you want to scroll. On the pop-up or down the screen, simply drag your tablet, while others may be connected to a cellular data (if available) or wireless network. Scroll: To scroll up or down the screen in the direction... that item. Simply enter the text you start your search request. Voice search If voice search is available, tap the microphone and speak your tablet, or wake it from the Android Market. The Home screen When you want to perform. These display information such as the time and favorite ...
... on your finger up menu that appears, tap the action you want to scroll. On the pop-up or down the screen, simply drag your tablet, while others may be connected to a cellular data (if available) or wireless network. Scroll: To scroll up or down the screen in the direction... that item. Simply enter the text you start your search request. Voice search If voice search is available, tap the microphone and speak your tablet, or wake it from the Android Market. The Home screen When you want to perform. These display information such as the time and favorite ...

User Guide
Page 17
... to the previous page, or to go directly to the Home screen. Settings This icon is shown). To view the extended Home screen, swipe your tablet 15 To change or add widgets on any of the initial Home screen, giving you more ) icons are available, two to the left and two...
... to the previous page, or to go directly to the Home screen. Settings This icon is shown). To view the extended Home screen, swipe your tablet 15 To change or add widgets on any of the initial Home screen, giving you more ) icons are available, two to the left and two...

User Guide
Page 18
... more applications are displayed in alphabetical order. The icons on your tablet; Applications are available, an outline of the second page will be different from the Android Market. This area contains a variety of icons to a screen. Tap ... left side of the screen. Time Wireless reception Battery charge status 16 Swipe the outline towards the center of the screen to one of your tablet's status. My apps displays applications that are installed on the side of the screen. All displays all applications that you of your Home screens. The...
... more applications are displayed in alphabetical order. The icons on your tablet; Applications are available, an outline of the second page will be different from the Android Market. This area contains a variety of icons to a screen. Tap ... left side of the screen. Time Wireless reception Battery charge status 16 Swipe the outline towards the center of the screen to one of your tablet's status. My apps displays applications that are installed on the side of the screen. All displays all applications that you of your Home screens. The...

User Guide
Page 19
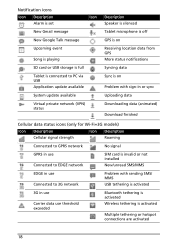
Tap the status icons to see more information, if available. Some event summaries include controls, such as media controls if music is charging Using your tablet 17 Status and notification icons Connection and battery status icons Note: Network connection icons are blue if you have an active Google account. While viewing a ...
Tap the status icons to see more information, if available. Some event summaries include controls, such as media controls if music is charging Using your tablet 17 Status and notification icons Connection and battery status icons Note: Network connection icons are blue if you have an active Google account. While viewing a ...
User Guide
Page 20
... connected to PC via USB Application update available System update available Virtual private network (VPN) status Description Speaker is silenced Tablet microphone is off GPS is on Receiving location data from GPS More status notifications Syncing data Sync is on Problem with sign-in or sync ...
... connected to PC via USB Application update available System update available Virtual private network (VPN) status Description Speaker is silenced Tablet microphone is off GPS is on Receiving location data from GPS More status notifications Syncing data Sync is on Problem with sign-in or sync ...
User Guide
Page 21
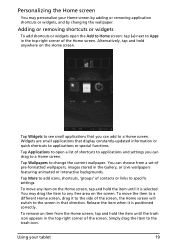
... to the trash icon. Using your Home screen by adding or removing application shortcuts or widgets, and by changing the wallpaper. You may personalize your tablet 19 To remove an item from a set of the screen. You can drag to a Home screen. Tap More to add icons, shortcuts, 'groups' of the...
... to the trash icon. Using your Home screen by adding or removing application shortcuts or widgets, and by changing the wallpaper. You may personalize your tablet 19 To remove an item from a set of the screen. You can drag to a Home screen. Tap More to add icons, shortcuts, 'groups' of the...

User Guide
Page 23
..., tap the Input options key, and then Android keyboard settings. this will open a menu Using your tablet. Like other keys, tap and hold a key to enter correct text. Additional keys vary depending on your tablet 21 Changing the keyboard To use these features, tap the Keyboard status icon; These settings include Auto...
..., tap the Input options key, and then Android keyboard settings. this will open a menu Using your tablet. Like other keys, tap and hold a key to enter correct text. Additional keys vary depending on your tablet 21 Changing the keyboard To use these features, tap the Keyboard status icon; These settings include Auto...

User Guide
Page 24
Preferences Change your tablet. Note: The cursor indicates where text you want to see a list of selected languages. To cut or copied and later pasted within the same application, ...
Preferences Change your tablet. Note: The cursor indicates where text you want to see a list of selected languages. To cut or copied and later pasted within the same application, ...
User Guide
Page 25
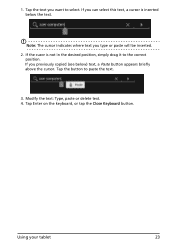
Tap the button to the correct position. Using your tablet 23 If the cusor is inserted below ) text, a Paste button appears briefly above the cursor. Modify the text: Type, paste or delete text. 4. If you previously copied (see below the text. If you can select this text, a cursor is not in the desired position, simply drag it to paste the text. 3. Note: The cursor indicates where text you want to select. 1. Tap Enter on the keyboard, or tap the Close Keyboard button. Tap the text you type or paste will be inserted. 2.
Tap the button to the correct position. Using your tablet 23 If the cusor is inserted below ) text, a Paste button appears briefly above the cursor. Modify the text: Type, paste or delete text. 4. If you previously copied (see below the text. If you can select this text, a cursor is not in the desired position, simply drag it to paste the text. 3. Note: The cursor indicates where text you want to select. 1. Tap Enter on the keyboard, or tap the Close Keyboard button. Tap the text you type or paste will be inserted. 2.
User Guide
Page 26
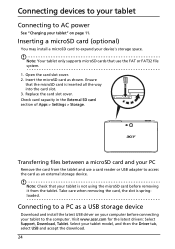
Replace the card slot cover. Visit www.acer.com for the latest drivers: Select Support, Download, Tablet. Note: Check that your PC Remove the card from the tablet. Select your tablet to the computer. Check card capacity in the External SD card section of Apps > Settings > Storage. Transferring... files between a microSD card and your tablet is not using the microSD card before connecting your tablet model, and then the Driver tab, select USB and accept the download. 24 Insert the microSD card as ...
Replace the card slot cover. Visit www.acer.com for the latest drivers: Select Support, Download, Tablet. Note: Check that your PC Remove the card from the tablet. Select your tablet to the computer. Check card capacity in the External SD card section of Apps > Settings > Storage. Transferring... files between a microSD card and your tablet is not using the microSD card before connecting your tablet model, and then the Driver tab, select USB and accept the download. 24 Insert the microSD card as ...


