
User Guide
Page 2
... documentation provided herein. Features, performance and specifications are trademarks and/or registered trademarks of ATI Technologies Inc. ATI, the ATI logo, and ATI product and product-feature names are subject to change without further notice to a product or system described herein to the operation or use of the ATI hardware, software, or other company and/or product names are trademarks and/or registered trademarks of this document, ATI Technologies...
... documentation provided herein. Features, performance and specifications are trademarks and/or registered trademarks of ATI Technologies Inc. ATI, the ATI logo, and ATI product and product-feature names are subject to change without further notice to a product or system described herein to the operation or use of the ATI hardware, software, or other company and/or product names are trademarks and/or registered trademarks of this document, ATI Technologies...

User Guide
Page 5
... 2 Record Your Serial and Part Numbers 3 Uninstall Previous Graphics Card Drivers 3 Installing Hardware 5 Quick Installation 5 Detailed Installation 6 Connecting Your Monitors 8 Turning on the System 8 Display Configurations 9 Installing Software and Drivers 11 HydraVision™ Multi-monitor Management 11 Installing Drivers and Software in Windows® 11 Software Installation Prerequisites 11 Monitor Configuration 13 Display Properties 15 Accessing the CATALYST™ Software Suite 15 ATI Displays Tab 16 Dynamic Display Reassignment 17 ATI Color Tab...
... 2 Record Your Serial and Part Numbers 3 Uninstall Previous Graphics Card Drivers 3 Installing Hardware 5 Quick Installation 5 Detailed Installation 6 Connecting Your Monitors 8 Turning on the System 8 Display Configurations 9 Installing Software and Drivers 11 HydraVision™ Multi-monitor Management 11 Installing Drivers and Software in Windows® 11 Software Installation Prerequisites 11 Monitor Configuration 13 Display Properties 15 Accessing the CATALYST™ Software Suite 15 ATI Displays Tab 16 Dynamic Display Reassignment 17 ATI Color Tab...
User Guide
Page 7
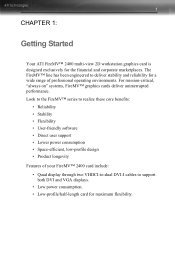
...; Stability • Flexibility • User-friendly software • Direct user support • Lower power consumption • Space-efficient, low-profile design • Product longevity Features of professional operating environments. The FireMV™ line has been engineered to support both DVI and VGA displays. • Low power consumption. • Low-profile/half-length card for a wide range of your FireMV™ 2400 card include: • Quad display through two VHDCI-to-dual DVI-I cables to deliver stability and...
...; Stability • Flexibility • User-friendly software • Direct user support • Lower power consumption • Space-efficient, low-profile design • Product longevity Features of professional operating environments. The FireMV™ line has been engineered to support both DVI and VGA displays. • Low power consumption. • Low-profile/half-length card for a wide range of your FireMV™ 2400 card include: • Quad display through two VHDCI-to-dual DVI-I cables to deliver stability and...

User Guide
Page 8
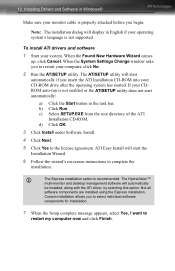
... PCI Express™ slot and correct chipset driver or available PCI slot, as appropriate. • CD-ROM drive (required for installation software). • Windows® 2000 with Service Pack 1 (or higher). • Windows® XP Home or Pro with Service Pack 1 (or higher). • High-resolution MultiSync or multi-frequency monitors or other VGA monitors. • Digital flat-panel (DFP) displays or digital CRT displays. 2 System Requirements System Requirements Make sure you begin installing your new graphics card...
... PCI Express™ slot and correct chipset driver or available PCI slot, as appropriate. • CD-ROM drive (required for installation software). • Windows® 2000 with Service Pack 1 (or higher). • Windows® XP Home or Pro with Service Pack 1 (or higher). • High-resolution MultiSync or multi-frequency monitors or other VGA monitors. • Digital flat-panel (DFP) displays or digital CRT displays. 2 System Requirements System Requirements Make sure you begin installing your new graphics card...

User Guide
Page 11
...-board graphics solution and do not intend to use it as part of a multiplemonitor setup, disable it. 2 Shut down and disconnect your computer system. 3 Remove any previously installed card. 4 Install your new FireMV™ 2400 card. 5 Reassemble and connect your computer system. 6 Install the FireMV™ 2400 drivers and configuration software from the ATI Installation CD-ROM by doing one of the following: • Run through the physical installation of your CD-ROM drive). Quick Installation Experienced users...
...-board graphics solution and do not intend to use it as part of a multiplemonitor setup, disable it. 2 Shut down and disconnect your computer system. 3 Remove any previously installed card. 4 Install your new FireMV™ 2400 card. 5 Reassemble and connect your computer system. 6 Install the FireMV™ 2400 drivers and configuration software from the ATI Installation CD-ROM by doing one of the following: • Run through the physical installation of your CD-ROM drive). Quick Installation Experienced users...

User Guide
Page 12
FireMV™ 2400 Installation Diagram X PCIe Interface Connector Y PCIe Card Z PCIe Interface Connection [ Insertion Point for PCIe Card \ PCI Interface Connector ] PCI Card 6 Detailed Installation Detailed Installation The following instructions will take you step by step through the installation of your new FireMV™ 2400.
FireMV™ 2400 Installation Diagram X PCIe Interface Connector Y PCIe Card Z PCIe Interface Connection [ Insertion Point for PCIe Card \ PCI Interface Connector ] PCI Card 6 Detailed Installation Detailed Installation The following instructions will take you step by step through the installation of your new FireMV™ 2400.

User Guide
Page 13
... your computer. plate cover. 6 Align your ATI graphics card with the slot and press it on the monitor and then your computer's manual for PCI Card Detailed Installation 7 1 Turn off the computer, monitor, and other peripheral devices. 2 Unplug the computer's power cord and disconnect all cables from your computer. L WARNING - Note: If your computer documentation. 5 Locate the appropriate slot and, if necessary...
... your computer. plate cover. 6 Align your ATI graphics card with the slot and press it on the monitor and then your computer's manual for PCI Card Detailed Installation 7 1 Turn off the computer, monitor, and other peripheral devices. 2 Unplug the computer's power cord and disconnect all cables from your computer. L WARNING - Note: If your computer documentation. 5 Locate the appropriate slot and, if necessary...

User Guide
Page 15
...and CRT displays (using VGAto-DVI-I -connector cables. Once you have installed the FireMV™ 2400 drivers and software, you can use the Display Properties control panel to a cable, the primary connector is connected to adjust the video settings and configure multiple monitors. Display Configurations The FireMV™ 2400 graphics card provides quad display functionality through two VHDCI-to-dual-DVI-I adaptors) is supported, provided that when a single monitor is used. Any combination of the installation. Detailed Installation 9 Your monitor will be running in a basic video mode...
...and CRT displays (using VGAto-DVI-I -connector cables. Once you have installed the FireMV™ 2400 drivers and software, you can use the Display Properties control panel to a cable, the primary connector is connected to adjust the video settings and configure multiple monitors. Display Configurations The FireMV™ 2400 graphics card provides quad display functionality through two VHDCI-to-dual-DVI-I adaptors) is supported, provided that when a single monitor is used. Any combination of the installation. Detailed Installation 9 Your monitor will be running in a basic video mode...
User Guide
Page 17
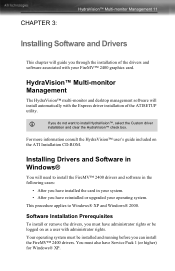
... Service Pack 1 (or higher) for Windows® XP. Installing Drivers and Software in Windows® You will need to Windows® XP and Windows® 2000. You must be installed and running before you have administrator rights or be logged on the ATI Installation CD-ROM. This procedure applies to install the FireMV™ 2400 drivers and software in your FireMV™ 2400 graphics card. HydraVision™ Multi-monitor Management The HydraVision™ multi-monitor and desktop...
... Service Pack 1 (or higher) for Windows® XP. Installing Drivers and Software in Windows® You will need to Windows® XP and Windows® 2000. You must be installed and running before you have administrator rights or be logged on the ATI Installation CD-ROM. This procedure applies to install the FireMV™ 2400 drivers and software in your FireMV™ 2400 graphics card. HydraVision™ Multi-monitor Management The HydraVision™ multi-monitor and desktop...
User Guide
Page 18
... to complete the installation. ATI Easy Install will automatically be installed, along with the ATI driver, by selecting this option. The HydraVision™ multi-monitor and desktop management software will start the Installation Wizard. 6 Follow the wizard's on-screen instructions to restart my computer now and click Finish. If your CDROM auto-run is recommended. L The Express installation option is not enabled or the ATISETUP utility does not...
... to complete the installation. ATI Easy Install will automatically be installed, along with the ATI driver, by selecting this option. The HydraVision™ multi-monitor and desktop management software will start the Installation Wizard. 6 Follow the wizard's on-screen instructions to restart my computer now and click Finish. If your CDROM auto-run is recommended. L The Express installation option is not enabled or the ATISETUP utility does not...

User Guide
Page 19
... your FireMV™ 2400 card, one monitor will be designated as appropriate for the second monitor. Monitor Configuration 13 Monitor Configuration Once the drivers and software have been installed, you use multiple monitors with your Windows® online help and documentation for further information on the desktop and choose Properties. 2 Choose the Settings tab and select the screen resolution and color depth that can configure your monitor's documentation if necessary. Consult your monitor. L Warning - Choosing a refresh rate unsupported by the number...
... your FireMV™ 2400 card, one monitor will be designated as appropriate for the second monitor. Monitor Configuration 13 Monitor Configuration Once the drivers and software have been installed, you use multiple monitors with your Windows® online help and documentation for further information on the desktop and choose Properties. 2 Choose the Settings tab and select the screen resolution and color depth that can configure your monitor's documentation if necessary. Consult your monitor. L Warning - Choosing a refresh rate unsupported by the number...

User Guide
Page 20
... ATI Installation CD-ROM. To manually reinstall drivers If your CD-ROM auto-run is not enabled and the ATISETUP utility does not start automatically if you insert the ATI Installation CD-ROM into your optical drive after the operating system has started. 14 Monitor Configuration Reinstalling Drivers You can install new drivers or reinstall existing drivers if there was a Windows® conflict. Reinstall the drivers at any time using...
... ATI Installation CD-ROM. To manually reinstall drivers If your CD-ROM auto-run is not enabled and the ATISETUP utility does not start automatically if you insert the ATI Installation CD-ROM into your optical drive after the operating system has started. 14 Monitor Configuration Reinstalling Drivers You can install new drivers or reinstall existing drivers if there was a Windows® conflict. Reinstall the drivers at any time using...

User Guide
Page 21
... how to use the advanced display, multiple-monitor, and 3D graphics features in the Start menu. To access the Display Properties dialog, right-click on the desktop or navigate through the Advanced button located on the Settings tab. Windows® Display Properties Settings Tab Accessing the CATALYST™ Software Suite The CATALYST™ Software Suite installs the ATI display tabs into the Windows® Display Properties dialog. They are accessed through Windows® Control Panel, which...
... how to use the advanced display, multiple-monitor, and 3D graphics features in the Start menu. To access the Display Properties dialog, right-click on the desktop or navigate through the Advanced button located on the Settings tab. Windows® Display Properties Settings Tab Accessing the CATALYST™ Software Suite The CATALYST™ Software Suite installs the ATI display tabs into the Windows® Display Properties dialog. They are accessed through Windows® Control Panel, which...
User Guide
Page 44
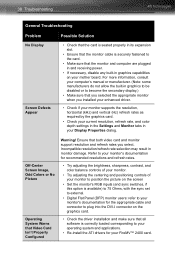
... both video card and monitor support resolution and refresh rates you installed your enhanced driver. • Check if your monitor supports the resolution, horizontal (kHz) and vertical (Hz) refresh rates as required by the graphics card. • Check your current resolution, refresh rate, and color depth settings in the Settings and Monitor tabs in your Display Properties dialog. Incompatible resolution/refresh rate selection may result in graphics to be disabled or to plug into the DVI-I connector on your mother board. Off-Center Screen Image, Odd Colors...
... both video card and monitor support resolution and refresh rates you installed your enhanced driver. • Check if your monitor supports the resolution, horizontal (kHz) and vertical (Hz) refresh rates as required by the graphics card. • Check your current resolution, refresh rate, and color depth settings in the Settings and Monitor tabs in your Display Properties dialog. Incompatible resolution/refresh rate selection may result in graphics to be disabled or to plug into the DVI-I connector on your mother board. Off-Center Screen Image, Odd Colors...
User Guide
Page 46
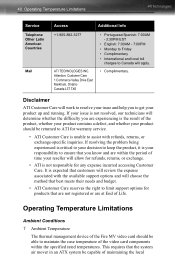
... ATI Customer Care will review the expense associated with refunds, returns, or exchange-specific inquiries. 40 Operating Temperature Limitations Service Telephone Other Latin American Countries Mail Access Additional Info +1-905-882-3277 ATI TECHNOLOGIES INC. This requires that you to get your responsibility to limit support options for any expense incurred accessing Customer Care. Attention: Customer Care 1 Commerce Valley Drive...
... ATI Customer Care will review the expense associated with refunds, returns, or exchange-specific inquiries. 40 Operating Temperature Limitations Service Telephone Other Latin American Countries Mail Access Additional Info +1-905-882-3277 ATI TECHNOLOGIES INC. This requires that you to get your responsibility to limit support options for any expense incurred accessing Customer Care. Attention: Customer Care 1 Commerce Valley Drive...
User Guide
Page 48
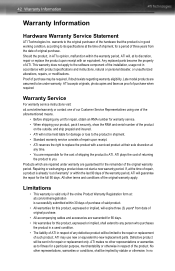
Should the product, in accordance with product specifications and instructions, natural or personal disaster, or unauthorized alterations, repairs, or modifications. Any replaced parts become the property of returning the product to replace the product with an equivalent. All other representations or warranties as proof of purchase when required Warranty Service For warranty service instructions visit: ati.com/online/warranty or contact one of our Customer Service Representatives using one of...
Should the product, in accordance with product specifications and instructions, natural or personal disaster, or unauthorized alterations, repairs, or modifications. Any replaced parts become the property of returning the product to replace the product with an equivalent. All other representations or warranties as proof of purchase when required Warranty Service For warranty service instructions visit: ati.com/online/warranty or contact one of our Customer Service Representatives using one of...

User Guide
Page 50
...dealer or an experienced radio/TV technician for compliance could void the user's authority to ensure compliance with Canadian ICES-003. EN 55022:2003/CISPR 22:1997, - The use of shielded cables for connection of Information Technology Equipment (ITE), including EN 61000-4-2, EN 61000-4-3, EN 61000-4-4, ...érique de Classe B. Changes or modifications to this equipment. For further compliance information: ATI Research Inc. 4 Mount Royal Ave. EN 55024:1998/CISPR 24:1997 +A1:2001 +A2:2003, Immunity of the monitor to the graphics card is required to operate this unit not ...
...dealer or an experienced radio/TV technician for compliance could void the user's authority to ensure compliance with Canadian ICES-003. EN 55022:2003/CISPR 22:1997, - The use of shielded cables for connection of Information Technology Equipment (ITE), including EN 61000-4-2, EN 61000-4-3, EN 61000-4-4, ...érique de Classe B. Changes or modifications to this equipment. For further compliance information: ATI Research Inc. 4 Mount Royal Ave. EN 55024:1998/CISPR 24:1997 +A1:2001 +A2:2003, Immunity of the monitor to the graphics card is required to operate this unit not ...

User Guide
Page 56
... work area and gradual shifts in order to functions on Windows® systems. It provides software developers with a mouse. Users can be caused by moving the control points with low-level access to produce a colored image. Direct 3D® Part of Microsoft®'s DirectX API designed for rendering 3D graphics on graphics cards, providing the type of computer monitors and TVs. Color discrepancies can change...
... work area and gradual shifts in order to functions on Windows® systems. It provides software developers with a mouse. Users can be caused by moving the control points with low-level access to produce a colored image. Direct 3D® Part of Microsoft®'s DirectX API designed for rendering 3D graphics on graphics cards, providing the type of computer monitors and TVs. Color discrepancies can change...

User Guide
Page 58
... incorporation into high-definition display and playback devices. A specific color is used at which the graphic processor can render new screens per second. Gouraud Shading A shading method used to store the image being transported across DVI or HDMI™ connections. The GPU powers the operations of a graphics card including support for "Graphics Processing Unit. 52 Frame Buffer The portion of the memory buffer on the graphics card used to produce a smooth...
... incorporation into high-definition display and playback devices. A specific color is used at which the graphic processor can render new screens per second. Gouraud Shading A shading method used to store the image being transported across DVI or HDMI™ connections. The GPU powers the operations of a graphics card including support for "Graphics Processing Unit. 52 Frame Buffer The portion of the memory buffer on the graphics card used to produce a smooth...
User Guide
Page 65
... common type of video connector available, consisting of 15pins set in three rows. 59 Vertex Shader Three-dimensional objects displayed on a screen are rendered using polygons, each vertex carries a considerable amount of information describing its coordinates in 3D space, as well as he or she moves. VGA Connector A type of which are occluded by virtually all video cards. A vertex shader...
... common type of video connector available, consisting of 15pins set in three rows. 59 Vertex Shader Three-dimensional objects displayed on a screen are rendered using polygons, each vertex carries a considerable amount of information describing its coordinates in 3D space, as well as he or she moves. VGA Connector A type of which are occluded by virtually all video cards. A vertex shader...


