
Intel Rapid Storage Guide
Page 12
... in the system BIOS, a RAID volume must be created, and the F6 installation method must be used to load the Intel® Rapid Storage Technology driver during POST, press Ctrl and i at the same time to enter the option ROM user interface. 2. Use the up or down arrow keys to select...
... in the system BIOS, a RAID volume must be created, and the F6 installation method must be used to load the Intel® Rapid Storage Technology driver during POST, press Ctrl and i at the same time to enter the option ROM user interface. 2. Use the up or down arrow keys to select...

Intel Rapid Storage Guide
Page 13
... text-mode phase). This message appears at the beginning of available SCSI adapters. Nothing will temporarily continue loading drivers. Install the RAID Driver Using the F6 Installation Method Perform the following files: IAAHCI.INF, IAAHCI.CAT, IASTOR.INF, IASTOR.CAT, IASTOR....hardware support disk into Drive A:, insert ;a floppy disk containing the following steps to install a third party SCSI or RAID driver. When you have successfully installed the driver and Windows setup should continue. Press Enter to load support for mass storage device(s). 2. You will then be visible....
... text-mode phase). This message appears at the beginning of available SCSI adapters. Nothing will temporarily continue loading drivers. Install the RAID Driver Using the F6 Installation Method Perform the following files: IAAHCI.INF, IAAHCI.CAT, IASTOR.INF, IASTOR.CAT, IASTOR....hardware support disk into Drive A:, insert ;a floppy disk containing the following steps to install a third party SCSI or RAID driver. When you have successfully installed the driver and Windows setup should continue. Press Enter to load support for mass storage device(s). 2. You will then be visible....

Intel Rapid Storage Guide
Page 16
...not have a floppy drive on your system, you need to use the F6 installation method to install the Intel® Rapid Storage Technology driver using F6 when in AHCI/RAID mode In order to install an operating system onto a single Serial ATA hard drive when the system is...-supplied hardware support disk into Drive A:, insert a floppy disk containing the following steps to install a RAID Note driver on Microsoft Windows Vista* and Microsoft Windows 7* because Intel provided a RAID driver as part of the final package. Use the following files: IAAHCI.INF, IAAHCI.CAT, IASTOR.INF, IASTOR.CAT...
...not have a floppy drive on your system, you need to use the F6 installation method to install the Intel® Rapid Storage Technology driver using F6 when in AHCI/RAID mode In order to install an operating system onto a single Serial ATA hard drive when the system is...-supplied hardware support disk into Drive A:, insert a floppy disk containing the following steps to install a RAID Note driver on Microsoft Windows Vista* and Microsoft Windows 7* because Intel provided a RAID driver as part of the final package. Use the following files: IAAHCI.INF, IAAHCI.CAT, IASTOR.INF, IASTOR.CAT...

Intel Rapid Storage Guide
Page 17
..., you wish to use the Intel Rapid Storage Technology user interface Note within Windows. 17 If you have successfully installed the Intel Rapid Storage Technology driver and Windows setup should continue. Leave the floppy disk in the floppy drive until the system reboots. Use the up and down arrow keys to...
..., you wish to use the Intel Rapid Storage Technology user interface Note within Windows. 17 If you have successfully installed the Intel Rapid Storage Technology driver and Windows setup should continue. Leave the floppy disk in the floppy drive until the system reboots. Use the up and down arrow keys to...

Intel Rapid Storage Guide
Page 18
... the lines shown below into the UNATTEND.TXT file: Systems configured for RAID: This same procedure can be used to install the RAID or AHCI driver via unattended install. 1. Extract the IAAHCI.INF, IAAHCI.CAT, IASTOR.INF, IASTOR.CAT, IASTOR.SYS, and TXTSETUP.OEM files from the setup ...and Windows Server 2003*. IATA88ENU.EXE for Intel® Matrix Storage Manager version 8.8) with the following steps in order to install the RAID or AHCI driver, as described in the Drivers64 folder after extraction. o If the system has a 32-bit processor, the files will be located in the Microsoft ...
... the lines shown below into the UNATTEND.TXT file: Systems configured for RAID: This same procedure can be used to install the RAID or AHCI driver via unattended install. 1. Extract the IAAHCI.INF, IAAHCI.CAT, IASTOR.INF, IASTOR.CAT, IASTOR.SYS, and TXTSETUP.OEM files from the setup ...and Windows Server 2003*. IATA88ENU.EXE for Intel® Matrix Storage Manager version 8.8) with the following steps in order to install the RAID or AHCI driver, as described in the Drivers64 folder after extraction. o If the system has a 32-bit processor, the files will be located in the Microsoft ...

Intel Smart Response Installation Guide
Page 1
... the RST GUI will refresh to build RAID 0 or RAID 1 in the near future. For the new version RST driver, please check our website for the latest information: http://www.asrock.com * Before you use RST function, you want to [RAID Mode]. Once open RST GUI from either Start Menu ...or by step instructions below. For all required drivers, including RST storage driver version 10.5 or later. 2. When pop-up menu appears...
... the RST GUI will refresh to build RAID 0 or RAID 1 in the near future. For the new version RST driver, please check our website for the latest information: http://www.asrock.com * Before you use RST function, you want to [RAID Mode]. Once open RST GUI from either Start Menu ...or by step instructions below. For all required drivers, including RST storage driver version 10.5 or later. 2. When pop-up menu appears...
Lucid Virtu Installation Guide
Page 2
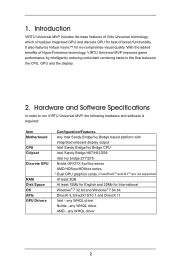
... Universal MVP, the following hardware and software is required: Item Motherboard CPU Chipset Discrete GPU RAM Disk Space OS APIs GPU Drivers Configuration/Features Any Intel Sandy Bridge/Ivy Bridge based platform with integrated onboard display output Intel Sandy Bridge/Ivy Bridge CPU Intel... Sandy Bridge H67/H61/Z68 Intel Ivy bridge Z77/Z75 Nvidia GF/GTX 4xx/5xx series AMD HD5xxx/HD6xxx series * Dual GPU graphics cards, CrossFireXTM and SLITM are not supported...
... Universal MVP, the following hardware and software is required: Item Motherboard CPU Chipset Discrete GPU RAM Disk Space OS APIs GPU Drivers Configuration/Features Any Intel Sandy Bridge/Ivy Bridge based platform with integrated onboard display output Intel Sandy Bridge/Ivy Bridge CPU Intel... Sandy Bridge H67/H61/Z68 Intel Ivy bridge Z77/Z75 Nvidia GF/GTX 4xx/5xx series AMD HD5xxx/HD6xxx series * Dual GPU graphics cards, CrossFireXTM and SLITM are not supported...
Lucid Virtu Installation Guide
Page 4
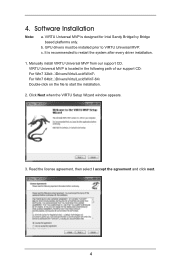
... the VIRTU Setup Wizard window appears. 3. VIRTU Universal MVP is located in the following path of our support CD: For Win7 32bit:..\Drivers\Virtu\Lucid\Win7\ For Win7 64bit:..\Drivers\Virtu\Lucid\Win7-64\ Double-click on the file to start the installation. 2. Software Installation Note: a. b. VIRTU Universal MVP is designed for...
... the VIRTU Setup Wizard window appears. 3. VIRTU Universal MVP is located in the following path of our support CD: For Win7 32bit:..\Drivers\Virtu\Lucid\Win7\ For Win7 64bit:..\Drivers\Virtu\Lucid\Win7-64\ Double-click on the file to start the installation. 2. Software Installation Note: a. b. VIRTU Universal MVP is designed for...
Lucid Virtu Installation Guide
Page 7
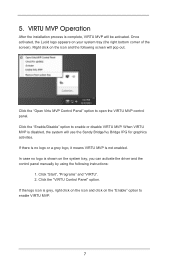
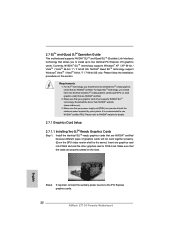
... out. VIRTU MVP Operation After the installation process is grey, right click on the icon and click on the system tray, you can activate the driver and the control panel manually by using the following screen will be activated.
... out. VIRTU MVP Operation After the installation process is grey, right click on the icon and click on the system tray, you can activate the driver and the control panel manually by using the following screen will be activated.
Lucid Virtu Installation Guide
Page 11
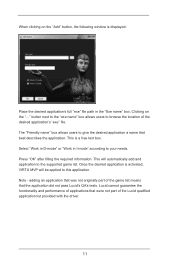
... the "exe name" box allows users to your needs. Lucid cannot guarantee the functionality and performance of the Lucid qualified application list provided with the driver. 11 Select "Work in D-mode" or "Work in the "Exe name" box. This will be applied to the supported game list. adding an application that...
... the "exe name" box allows users to your needs. Lucid cannot guarantee the functionality and performance of the Lucid qualified application list provided with the driver. 11 Select "Work in D-mode" or "Work in the "Exe name" box. This will be applied to the supported game list. adding an application that...

RAID Installation Guide
Page 6
... / VistaTM 64-bit OS, if you want to manage RAID functions, you are allowed to use "Intel Rapid Storage" in Windows® environment, install "SATA2 driver" from the Support CD again so that "Intel Rapid Storage" will be installed to your system as well. 6 Set "SATA Mode Selection" to set RAID...
... / VistaTM 64-bit OS, if you want to manage RAID functions, you are allowed to use "Intel Rapid Storage" in Windows® environment, install "SATA2 driver" from the Support CD again so that "Intel Rapid Storage" will be installed to your system as well. 6 Set "SATA Mode Selection" to set RAID...
Quick Installation Guide
Page 9
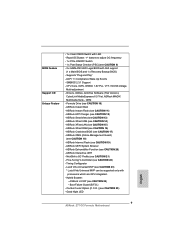
... Switch with LED - SMBIOS 2.3.1 Support - ASRock UEFI System Browser - Hybrid Booster: - ASRock XFast RAM (see CAUTION 21) - ASRock U-COP (see CAUTION 11) - Good Night LED English 9 ASRock Z77 OC Formula Motherboard ASRock Instant Boot - Rapid OC Button: +/- ASRock Instant Flash (see CAUTION 24) - ASRock Crashless BIOS (see CAUTION 18) - ASRock OMG (Online Management Guard) (see CAUTION 17) - ASRock Dehumidifier Function (see...
... Switch with LED - SMBIOS 2.3.1 Support - ASRock UEFI System Browser - Hybrid Booster: - ASRock XFast RAM (see CAUTION 21) - ASRock U-COP (see CAUTION 11) - Good Night LED English 9 ASRock Z77 OC Formula Motherboard ASRock Instant Boot - Rapid OC Button: +/- ASRock Instant Flash (see CAUTION 24) - ASRock Crashless BIOS (see CAUTION 18) - ASRock OMG (Online Management Guard) (see CAUTION 17) - ASRock Dehumidifier Function (see...
Quick Installation Guide
Page 12
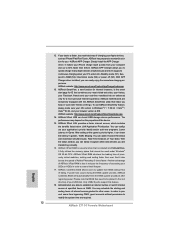
... HDDs in the root directory of Adobe Photoshop 5 times faster. Simply install the APP Charger driver, it also boosts the speed of your PC enters into Formula Drive. With APP Charger driver installed, you are required. 12 ASRock Z77 OC Formula Motherboard English ASRock XFast LAN provides a faster internet access, which data streams you can watch Youtube HD...
... HDDs in the root directory of Adobe Photoshop 5 times faster. Simply install the APP Charger driver, it also boosts the speed of your PC enters into Formula Drive. With APP Charger driver installed, you are required. 12 ASRock Z77 OC Formula Motherboard English ASRock XFast LAN provides a faster internet access, which data streams you can watch Youtube HD...
Quick Installation Guide
Page 22
Make sure that your system. Download the driver from NVIDIA® website (www.nvidia.com). 3. Install the identical SLITM-ready graphics cards that are NVIDIA® certified. Please refer to PCIE4 ... power supply unit (PSU) can provide at least the minimum power required by your graphics card driver supports NVIDIA® SLITM technology. If required, connect the auxiliary power source to the PCI Express graphics cards. 22 ASRock Z77 OC Formula Motherboard English Currently, NVIDIA® SLITM technology supports Windows® XP / XP 64-bit / VistaTM...
Make sure that your system. Download the driver from NVIDIA® website (www.nvidia.com). 3. Install the identical SLITM-ready graphics cards that are NVIDIA® certified. Please refer to PCIE4 ... power supply unit (PSU) can provide at least the minimum power required by your graphics card driver supports NVIDIA® SLITM technology. If required, connect the auxiliary power source to the PCI Express graphics cards. 22 ASRock Z77 OC Formula Motherboard English Currently, NVIDIA® SLITM technology supports Windows® XP / XP 64-bit / VistaTM...

Quick Installation Guide
Page 24
... Set PhysX GPU acceleration item, please select Enabled. C. Reboot your Windows® taskbar. Double-click NVIDIA Settings icon on your system. 2.7.2 Driver Installation and Setup Install the graphics card drivers to enable the multi-GPU feature. Please follow the below procedures to your system. From the pop-up menu, select Set SLI... Processing Unit (GPU) feature in the NVIDIA® nView system tray utility. B. After that, you can freely enjoy the benefit of SLITM feature. 24 ASRock Z77 OC Formula Motherboard English D.
... Set PhysX GPU acceleration item, please select Enabled. C. Reboot your Windows® taskbar. Double-click NVIDIA Settings icon on your system. 2.7.2 Driver Installation and Setup Install the graphics card drivers to enable the multi-GPU feature. Please follow the below procedures to your system. From the pop-up menu, select Set SLI... Processing Unit (GPU) feature in the NVIDIA® nView system tray utility. B. After that, you can freely enjoy the benefit of SLITM feature. 24 ASRock Z77 OC Formula Motherboard English D.

Quick Installation Guide
Page 26
.../ VistaTM / 7 OS. 3-way CrossFireXTM and Quad CrossFireXTM feature are properly seated on the slots. English 26 ASRock Z77 OC Formula Motherboard CrossFireXTM technology offers the most advantageous means available of combining multiple high performance Graphics Processing Units (GPU) in CrossFireXTM...and a CrossFireXTM Edition co-processor graphics card, must be installed correctly to AMD graphics card manuals for ATITM CrossFireXTM driver updates. 1. 2.8 CrossFireXTM, 3-Way CrossFireXTM and Quad CrossFireXTM Operation Guide This motherboard supports CrossFireXTM, 3-way CrossFireXTM ...
.../ VistaTM / 7 OS. 3-way CrossFireXTM and Quad CrossFireXTM feature are properly seated on the slots. English 26 ASRock Z77 OC Formula Motherboard CrossFireXTM technology offers the most advantageous means available of combining multiple high performance Graphics Processing Units (GPU) in CrossFireXTM...and a CrossFireXTM Edition co-processor graphics card, must be installed correctly to AMD graphics card manuals for ATITM CrossFireXTM driver updates. 1. 2.8 CrossFireXTM, 3-Way CrossFireXTM and Quad CrossFireXTM Operation Guide This motherboard supports CrossFireXTM, 3-way CrossFireXTM ...

Quick Installation Guide
Page 29
... (If you have Windows® XP Service Pack 2 or higher installed in your computer. You must have any previously installed Catalyst drivers prior to your system, and restart your system. For Windows® 7 / VistaTM OS: Install the CATALYST Control Center. Select ...you install two Radeon graphics cards). Step 2. Remove the ATITM driver if you will find "ATI Catalyst Control Center" on your system, there is an optional download. Restart your system. English 29 ASRock Z77 OC Formula Motherboard Please check AMD website for details. For Windows®...
... (If you have Windows® XP Service Pack 2 or higher installed in your computer. You must have any previously installed Catalyst drivers prior to your system, and restart your system. For Windows® 7 / VistaTM OS: Install the CATALYST Control Center. Select ...you install two Radeon graphics cards). Step 2. Remove the ATITM driver if you will find "ATI Catalyst Control Center" on your system, there is an optional download. Restart your system. English 29 ASRock Z77 OC Formula Motherboard Please check AMD website for details. For Windows®...

Quick Installation Guide
Page 31
... display environment: 1. B. Please refer to the following steps to your system. Install the onboard VGA driver and the add-on the I/O panel. Click the "Identify" button to the HDMI port on PCI Express VGA card... driver to set up a multi-monitor display. When you have installed the drivers already, there is inserted to enable the function of the add-on PCI Express VGA..., PCIE4 and PCIE5 slots. Select the display icon identified by the number 2. 31 ASRock Z77 OC Formula Motherboard English
... display environment: 1. B. Please refer to the following steps to your system. Install the onboard VGA driver and the add-on the I/O panel. Click the "Identify" button to the HDMI port on PCI Express VGA card... driver to set up a multi-monitor display. When you have installed the drivers already, there is inserted to enable the function of the add-on PCI Express VGA..., PCIE4 and PCIE5 slots. Select the display icon identified by the number 2. 31 ASRock Z77 OC Formula Motherboard English

Quick Installation Guide
Page 34
...the front USB port. Find the CIR header located next to enter BIOS Setup Utility. Enter Windows. Execute ASRock support CD and install CIR Driver. (It is setting at the bottom of ASRock Smart Remote. USB 2.0 header (9-pin, black) CIR header (4-pin, gray) Step2. Boot up your ...the USB_PWR PP+ GND DUMMY pin assignments are matched correctly. 1 23 45 GND IRTX IRRX ATX+5VSB Step3. Step1. 2.10 ASRock Smart Remote Installation Guide ASRock Smart Remote is only used for the quick installation and usage of driver list.) English 34 ASRock Z77 OC Formula Motherboard
...the front USB port. Find the CIR header located next to enter BIOS Setup Utility. Enter Windows. Execute ASRock support CD and install CIR Driver. (It is setting at the bottom of ASRock Smart Remote. USB 2.0 header (9-pin, black) CIR header (4-pin, gray) Step2. Boot up your ...the USB_PWR PP+ GND DUMMY pin assignments are matched correctly. 1 23 45 GND IRTX IRRX ATX+5VSB Step3. Step1. 2.10 ASRock Smart Remote Installation Guide ASRock Smart Remote is only used for the quick installation and usage of driver list.) English 34 ASRock Z77 OC Formula Motherboard

Quick Installation Guide
Page 48
... module specific) ACPI module initialization CSM initialization Reserved for future AMI DXE codes OEM DXE initialization codes Boot Device Selection (BDS) phase is started Driver connecting is started PCI Bus initialization is started PCI Bus Hot Plug Controller Initialization PCI Bus Enumeration PCI Bus Request Resources PCI Bus Assign Resources... USB Detect USB Enable Reserved for future AMI codes IDE initialization is started IDE Reset IDE Detect IDE Enable SCSI initialization is started SCSI Reset ASRock Z77 OC Formula Motherboard
... module specific) ACPI module initialization CSM initialization Reserved for future AMI DXE codes OEM DXE initialization codes Boot Device Selection (BDS) phase is started Driver connecting is started PCI Bus initialization is started PCI Bus Hot Plug Controller Initialization PCI Bus Enumeration PCI Bus Request Resources PCI Bus Assign Resources... USB Detect USB Enable Reserved for future AMI codes IDE initialization is started IDE Reset IDE Detect IDE Enable SCSI initialization is started SCSI Reset ASRock Z77 OC Formula Motherboard


