
Intel Smart Response Installation Guide
Page 1
... Start Menu or by step instructions below. After clicking OK button, SRT will enable automatically, and the RST GUI will update the new version RST driver in RAID ROM. You can find the UI setup instruction and the step by double-clicking RST Storage icon in system at this point! 3. It... the HDD you just need to set the UEFI option "SATA Mode" to [RAID Mode]. For the new version RST driver, please check our website for the latest information: http://www.asrock.com * Before you use the full SSD as Cache device or only 20GB, and if you want to a RAID mode...
... Start Menu or by step instructions below. After clicking OK button, SRT will enable automatically, and the RST GUI will update the new version RST driver in RAID ROM. You can find the UI setup instruction and the step by double-clicking RST Storage icon in system at this point! 3. It... the HDD you just need to set the UEFI option "SATA Mode" to [RAID Mode]. For the new version RST driver, please check our website for the latest information: http://www.asrock.com * Before you use the full SSD as Cache device or only 20GB, and if you want to a RAID mode...

Intel Rapid Storage Guide
Page 12
... in the system BIOS, a RAID volume must be created, and the F6 installation method must be used to load the Intel® Rapid Storage Technology driver during POST, press Ctrl and i at the same time to enter the option ROM user interface. 2. Click F2 or Delete to enter the BIOS Setup...
... in the system BIOS, a RAID volume must be created, and the F6 installation method must be used to load the Intel® Rapid Storage Technology driver during POST, press Ctrl and i at the same time to enter the option ROM user interface. 2. Click F2 or Delete to enter the BIOS Setup...
Intel Rapid Storage Guide
Page 13
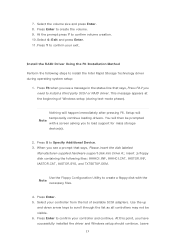
...labeled Manufacturer-supplied hardware support disk into Drive A:, insert ;a floppy disk containing the following steps to install the Intel Rapid Storage Technology driver during text-mode phase). This message appears at the beginning of available SCSI adapters. 7. Press Enter to Specify Additional Device. 3. ...after pressing F6. Leave 13 At the prompt press Y to confirm your controller and continue. When you have successfully installed the driver and Windows setup should continue. Use the up and down arrow keys to confirm your controller from the list of Windows setup ...
...labeled Manufacturer-supplied hardware support disk into Drive A:, insert ;a floppy disk containing the following steps to install the Intel Rapid Storage Technology driver during text-mode phase). This message appears at the beginning of available SCSI adapters. 7. Press Enter to Specify Additional Device. 3. ...after pressing F6. Leave 13 At the prompt press Y to confirm your controller and continue. When you have successfully installed the driver and Windows setup should continue. Use the up and down arrow keys to confirm your controller from the list of Windows setup ...

Intel Rapid Storage Guide
Page 16
...use the Floppy Configuration Utility to create a floppy disk with a screen asking you do not need to install a third party SCSI or RAID driver. Press F6 when you see a prompt that says, Press F6 if you need to use the F6 installation method to install a RAID Note...mode, the F6 installation method must be prompted with the necessary files. Nothing will then be used to load the Intel® Rapid Storage Technology driver during operating system installation. You will happen immediately after pressing F6. You do not have a floppy drive on Microsoft Windows 7 and Microsoft Windows 8...
...use the Floppy Configuration Utility to create a floppy disk with a screen asking you do not need to install a third party SCSI or RAID driver. Press F6 when you see a prompt that says, Press F6 if you need to use the F6 installation method to install a RAID Note...mode, the F6 installation method must be prompted with the necessary files. Nothing will then be used to load the Intel® Rapid Storage Technology driver during operating system installation. You will happen immediately after pressing F6. You do not have a floppy drive on Microsoft Windows 7 and Microsoft Windows 8...

Intel Rapid Storage Guide
Page 17
At this point, you will need to confirm your controller from within Windows, you have successfully installed the Intel Rapid Storage Technology driver and Windows setup should continue. Use the up and down arrow keys to the Windows installation folders. Leave the floppy disk in the floppy drive ...
At this point, you will need to confirm your controller from within Windows, you have successfully installed the Intel Rapid Storage Technology driver and Windows setup should continue. Use the up and down arrow keys to the Windows installation folders. Leave the floppy disk in the floppy drive ...

RAID Installation Guide
Page 7
... Mode Selection to [RAID]. Press [Enter] to complete the process. Follow the onscreen instruction to confirm the selection C. STEP 2: Use ASRock Easy RAID Installer Easy RAID Installer can copy the RAID driver from a support CD to your USB storage device with RAID functions, please follow the procedures below. Plug in the BIOS...
... Mode Selection to [RAID]. Press [Enter] to complete the process. Follow the onscreen instruction to confirm the selection C. STEP 2: Use ASRock Easy RAID Installer Easy RAID Installer can copy the RAID driver from a support CD to your USB storage device with RAID functions, please follow the procedures below. Plug in the BIOS...

RAID Installation Guide
Page 23
... than 2TB. Please make sure to boot. 23 STEP 1: Copy Intel® RAID drivers into a USB flash disk You can download the drivers from ASRock's website and unzip the files into a USB flash disk or copy the files from ASRock's motherboard support CD. (Please copy the files under the following directory: 32 bit: ..\i386...
... than 2TB. Please make sure to boot. 23 STEP 1: Copy Intel® RAID drivers into a USB flash disk You can download the drivers from ASRock's website and unzip the files into a USB flash disk or copy the files from ASRock's motherboard support CD. (Please copy the files under the following directory: 32 bit: ..\i386...

RAID Installation Guide
Page 24
page, please click "Load Driver". select "Browse" to install the OS by following the instructions. 24 Then choose the directory you want to install Windows?" Continue to find the RAID driver. Please keep the USB flash disk installed until the system's first reboot. Start Windows® Installation. When you see "Where do you have copied in the first step. Plug the USB flash disk into your USB port;
page, please click "Load Driver". select "Browse" to install the OS by following the instructions. 24 Then choose the directory you want to install Windows?" Continue to find the RAID driver. Please keep the USB flash disk installed until the system's first reboot. Start Windows® Installation. When you see "Where do you have copied in the first step. Plug the USB flash disk into your USB port;

RAID Installation Guide
Page 25
...This may take more time to reboot.) D. Disk volume > 2TB), it may take about 5 minutes to boot into Windows® or install driver/utilities. Please start to fix this problem. Please request the hotfix KB2505454 through this hotfix then reboot by itself. Windows® will need to ...follow the instructions below to install motherboard drivers and utilities. 25 E. Windows® 7 64-bit / 8 64-bit / 8.1 64-bit / 10 64-bit: A. If you encounter this problem, you ...
...This may take more time to reboot.) D. Disk volume > 2TB), it may take about 5 minutes to boot into Windows® or install driver/utilities. Please start to fix this problem. Please request the hotfix KB2505454 through this hotfix then reboot by itself. Windows® will need to ...follow the instructions below to install motherboard drivers and utilities. 25 E. Windows® 7 64-bit / 8 64-bit / 8.1 64-bit / 10 64-bit: A. If you encounter this problem, you ...

User Manual
Page 4
...1.1 Package Contents 1 1.2 Specifications 2 1.3 Motherboard Layout 7 1.4 I/O Panel 9 1.5 WiFi-802.11ac Module and ASRock WiFi 2.4/5 GHz Antenna (for Z270 Killer SLI/ac only) 12 Chapter 2 Installation 14 2.1 Installing the CPU 15 2.2 Installing the CPU Fan and Heatsink 18 ...Guide 28 2.7.1 Installing Two SLITM-Ready Graphics Cards 28 2.7.2 Driver Installation and Setup 30 2.8 CrossFireXTM and Quad CrossFireXTM Operation Guide 31 2.8.1 Installing Two CrossFireXTM-Ready Graphics Cards 31 2.8.2 Driver Installation and Setup 33 2.9 M.2_SSD (NGFF) Module Installation ...
...1.1 Package Contents 1 1.2 Specifications 2 1.3 Motherboard Layout 7 1.4 I/O Panel 9 1.5 WiFi-802.11ac Module and ASRock WiFi 2.4/5 GHz Antenna (for Z270 Killer SLI/ac only) 12 Chapter 2 Installation 14 2.1 Installing the CPU 15 2.2 Installing the CPU Fan and Heatsink 18 ...Guide 28 2.7.1 Installing Two SLITM-Ready Graphics Cards 28 2.7.2 Driver Installation and Setup 30 2.8 CrossFireXTM and Quad CrossFireXTM Operation Guide 31 2.8.1 Installing Two CrossFireXTM-Ready Graphics Cards 31 2.8.2 Driver Installation and Setup 33 2.9 M.2_SSD (NGFF) Module Installation ...

User Manual
Page 5
... 3.2 A-Tuning 38 3.2.1 Installing A-Tuning 38 3.2.2 Using A-Tuning 38 3.3 ASRock Live Update & APP Shop 41 3.3.1 UI Overview 41 3.3.2 Apps 42 3.3.3 BIOS & Drivers 45 3.3.4 Setting 46 3.4 Enabling USB Ports for Windows® 7 Installation 47 3.5 ASRock AURA RGB LED 50 Chapter 4 UEFI SETUP UTILITY 51 4.1 Introduction 51 4.2 EZ Mode 52 4.3 Advanced Mode 53 4.3.1 UEFI Menu Bar...
... 3.2 A-Tuning 38 3.2.1 Installing A-Tuning 38 3.2.2 Using A-Tuning 38 3.3 ASRock Live Update & APP Shop 41 3.3.1 UI Overview 41 3.3.2 Apps 42 3.3.3 BIOS & Drivers 45 3.3.4 Setting 46 3.4 Enabling USB Ports for Windows® 7 Installation 47 3.5 ASRock AURA RGB LED 50 Chapter 4 UEFI SETUP UTILITY 51 4.1 Introduction 51 4.2 EZ Mode 52 4.3 Advanced Mode 53 4.3.1 UEFI Menu Bar...

User Manual
Page 12
...affect your system's stability, or even cause damage to page 47 for more detailed instructions. * For the updated Windows® 10 driver, please visit ASRock's website for possible damage caused by CPU temperature) • CPU / Chassis / Chassis Optional/Water Pump Fan multispeed control •... 32-bit / 7 64bit (For 6th Gen Intel® CPU) * To install Windows® 7 OS, a modified installation disk with xHCI drivers packed into the ISO file is a certain risk involved with overclocking, including adjusting the setting in the BIOS, applying Untied Overclocking Technology, or using ...
...affect your system's stability, or even cause damage to page 47 for more detailed instructions. * For the updated Windows® 10 driver, please visit ASRock's website for possible damage caused by CPU temperature) • CPU / Chassis / Chassis Optional/Water Pump Fan multispeed control •... 32-bit / 7 64bit (For 6th Gen Intel® CPU) * To install Windows® 7 OS, a modified installation disk with xHCI drivers packed into the ISO file is a certain risk involved with overclocking, including adjusting the setting in the BIOS, applying Untied Overclocking Technology, or using ...

User Manual
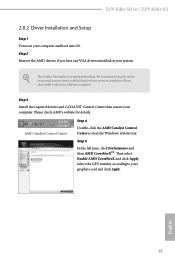
Page 34
... the NVIDIA® website: www.nvidia.com 3. Make sure that your power supply unit (PSU) can provide at least the minimum power your graphics card driver supports NVIDIA® SLITM technology. Please refer to the NVIDIA® website for details. 2.7.1 Installing Two SLITM-Ready Graphics Cards Step 1 Insert one graphics card...
... the NVIDIA® website: www.nvidia.com 3. Make sure that your power supply unit (PSU) can provide at least the minimum power your graphics card driver supports NVIDIA® SLITM technology. Please refer to the NVIDIA® website for details. 2.7.1 Installing Two SLITM-Ready Graphics Cards Step 1 Insert one graphics card...

User Manual
Page 36
Step 2 In the left pane, click Set SLI and PhysX configuration. After that, you can freely enjoy the benefits of SLITM or Quad SLITM. 30 English For SLITM and Quad SLITM mode Step 1 ... Processing Unit (GPU) in the Windows® system tray. Please follow the below procedures to your system. Then select Maximize 3D performance and click Apply. 2.7.2 Driver Installation and Setup Install the graphics card...
Step 2 In the left pane, click Set SLI and PhysX configuration. After that, you can freely enjoy the benefits of SLITM or Quad SLITM. 30 English For SLITM and Quad SLITM mode Step 1 ... Processing Unit (GPU) in the Windows® system tray. Please follow the below procedures to your system. Then select Maximize 3D performance and click Apply. 2.7.2 Driver Installation and Setup Install the graphics card...

User Manual
Page 37
... your system requires. Make sure that your power supply unit (PSU) can provide at least the minimum power your graphics card driver supports AMD CrossFireXTM technology. If you to install up to your graphics card vendor for details. 4. CrossFire Bridge Step 2 Connect... on the top of the graphics cards. (The CrossFire Bridge is recommended to the AMD's website for details.) English 31 Z270 Killer SLI/ac / Z270 Killer SLI 2.8 CrossFireXTM and Quad CrossFireXTM Operation Guide This motherboard supports CrossFireXTM and Quad CrossFireXTM that allows you pair a 12-pipe CrossFireXTM ...
... your system requires. Make sure that your power supply unit (PSU) can provide at least the minimum power your graphics card driver supports AMD CrossFireXTM technology. If you to install up to your graphics card vendor for details. 4. CrossFire Bridge Step 2 Connect... on the top of the graphics cards. (The CrossFire Bridge is recommended to the AMD's website for details.) English 31 Z270 Killer SLI/ac / Z270 Killer SLI 2.8 CrossFireXTM and Quad CrossFireXTM Operation Guide This motherboard supports CrossFireXTM and Quad CrossFireXTM that allows you pair a 12-pipe CrossFireXTM ...
User Manual
Page 39
Step 5 In the left pane, click Performance and then AMD CrossFireXTM. Step 2 Remove the AMD drivers if you have any previously installed Catalyst drivers prior to installation. Please check AMD's website for AMD driver updates. Z270 Killer SLI/ac / Z270 Killer SLI 2.8.2 Driver Installation and Setup Step 1 Power on your graphics card and click Apply. English 33 The Catalyst Uninstaller is...
Step 5 In the left pane, click Performance and then AMD CrossFireXTM. Step 2 Remove the AMD drivers if you have any previously installed Catalyst drivers prior to installation. Please check AMD's website for AMD driver updates. Z270 Killer SLI/ac / Z270 Killer SLI 2.8.2 Driver Installation and Setup Step 1 Power on your graphics card and click Apply. English 33 The Catalyst Uninstaller is...
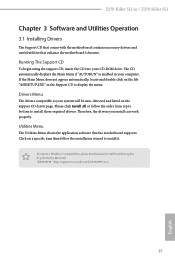
User Manual
Page 43
... properly. To improve Windows 7 compatibility, please download and install the following hot fix provided by Microsoft. Z270 Killer SLI/ac / Z270 Killer SLI Chapter 3 Software and Utilities Operation 3.1 Installing Drivers The Support CD that comes with the motherboard contains necessary drivers and useful utilities that the motherboard supports. Please click Install All or follow the installation wizard to...
... properly. To improve Windows 7 compatibility, please download and install the following hot fix provided by Microsoft. Z270 Killer SLI/ac / Z270 Killer SLI Chapter 3 Software and Utilities Operation 3.1 Installing Drivers The Support CD that comes with the motherboard contains necessary drivers and useful utilities that the motherboard supports. Please click Install All or follow the installation wizard to...

User Manual
Page 51
Z270 Killer SLI/ac / Z270 Killer SLI 3.3.3 BIOS & Drivers Installing BIOS or Drivers When the "BIOS & Drivers" tab is selected, you will see more items you want to start the update process. 45 English Click to select one or more details. Please update them all soon. Click on Step 2 to see a list of recommended or critical updates for the BIOS or drivers. Step 1 Please check the item information before update. Step 3 Click Update to update.
Z270 Killer SLI/ac / Z270 Killer SLI 3.3.3 BIOS & Drivers Installing BIOS or Drivers When the "BIOS & Drivers" tab is selected, you will see more items you want to start the update process. 45 English Click to select one or more details. Please update them all soon. Click on Step 2 to see a list of recommended or critical updates for the BIOS or drivers. Step 1 Please check the item information before update. Step 3 Click Update to update.

User Manual
Page 53
...• A Windows® PC • Win7 USB Patcher (included in the Windows 7 inbox drivers, users may find another computer and follow the instructions below and go ahead to install Windows®...have an ODD and PS/2 ports: If there is not included in the ASRock Support CD or downloaded from website) Scenarios You have an optical disc drive..."Win7 USB Patcher". USB2.0) and only kept the eXtensible Host Controller Interface (XHCI - USB3.0). Z270 Killer SLI/ac / Z270 Killer SLI 3.4 Enabling USB Ports for Windows® 7 Installation Intel® new processors have removed their ...
...• A Windows® PC • Win7 USB Patcher (included in the Windows 7 inbox drivers, users may find another computer and follow the instructions below and go ahead to install Windows®...have an ODD and PS/2 ports: If there is not included in the ASRock Support CD or downloaded from website) Scenarios You have an optical disc drive..."Win7 USB Patcher". USB2.0) and only kept the eXtensible Host Controller Interface (XHCI - USB3.0). Z270 Killer SLI/ac / Z270 Killer SLI 3.4 Enabling USB Ports for Windows® 7 Installation Intel® new processors have removed their ...

User Manual
Page 81
... be claimed by XHCI driver. 75 English XHCI Hand-off This is a workaround for non-USB aware OSes. *Enable this option if you encounter USB compatibility issues it is recommended to support USB devices under the UEFI setup and Windows/Linux operating systems only. 4.6.7 USB Configuration Z270 Killer SLI/ac / Z270 Killer SLI Legacy USB Support Enable...
... be claimed by XHCI driver. 75 English XHCI Hand-off This is a workaround for non-USB aware OSes. *Enable this option if you encounter USB compatibility issues it is recommended to support USB devices under the UEFI setup and Windows/Linux operating systems only. 4.6.7 USB Configuration Z270 Killer SLI/ac / Z270 Killer SLI Legacy USB Support Enable...


