User Manual
Page 6
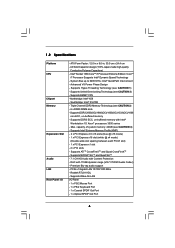
...Premium Blu-ray audio support - Supports Wake-On-LAN I /O - Max. Southbridge: Intel® ICH10R - Intel® Socket 1366 CoreTM i7 Processor Extreme Edition / CoreTM i7 Processor Supports Intel® Dynamic Speed Technology - System Bus up to 6400 MT/s; Supports Untied Overclocking Technology... Triple Channel DDR3 Memory Technology (see CAUTION 2) - DAC with Intel® Workstation 1S Xeon® processors 3500 series - PCIE x1 Gigabit LAN 10/100/1000 Mb/s - Northbridge: Intel® X58 - Supports Hyper-Threading Technology (see CAUTION 4) - 1.2 Specifications ...
...Premium Blu-ray audio support - Supports Wake-On-LAN I /O - Max. Southbridge: Intel® ICH10R - Intel® Socket 1366 CoreTM i7 Processor Extreme Edition / CoreTM i7 Processor Supports Intel® Dynamic Speed Technology - System Bus up to 6400 MT/s; Supports Untied Overclocking Technology... Triple Channel DDR3 Memory Technology (see CAUTION 2) - DAC with Intel® Workstation 1S Xeon® processors 3500 series - PCIE x1 Gigabit LAN 10/100/1000 Mb/s - Northbridge: Intel® X58 - Supports Hyper-Threading Technology (see CAUTION 4) - 1.2 Specifications ...
User Manual
Page 13
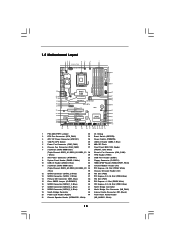
...HDMI_SPDIF1 1 FLOPPY1 NEC USB 3.0 SATA3 6Gb/s IDE1 PCIE1 QPI 6.4GT/s PCIE2 PCI Express 2.0 PCI1 X58 Extreme3 8Mb BIOS 1394a CMOS Battery CLRCMOS1 1 PCIE3 ErP/EuP Ready PCI2 VIA VT6308S Intel ICH10R RoHS PCIE4 COM1 1 1 TPM1 FRONT_1394 CHA_FAN1 1 USB6_7 1 PWRBTN RSTBTN Debug LED PLED1 1 ...Dr. Debug 2 CPU Fan Connector (CPU_FAN1) 23 Reset Switch (RSTBTN) 3 ATX 12V Power Connector (ATX12V1) 24 Power Switch (PWRBTN) 4 1366-Pin CPU Socket 25 USB 2.0 Header (USB6_7, Blue) 5 Power Fan Connector (PWR_FAN1) 26 8Mb SPI Flash 6 Chassis Fan Connector (CHA_FAN2) 27 Front ...
...HDMI_SPDIF1 1 FLOPPY1 NEC USB 3.0 SATA3 6Gb/s IDE1 PCIE1 QPI 6.4GT/s PCIE2 PCI Express 2.0 PCI1 X58 Extreme3 8Mb BIOS 1394a CMOS Battery CLRCMOS1 1 PCIE3 ErP/EuP Ready PCI2 VIA VT6308S Intel ICH10R RoHS PCIE4 COM1 1 1 TPM1 FRONT_1394 CHA_FAN1 1 USB6_7 1 PWRBTN RSTBTN Debug LED PLED1 1 ...Dr. Debug 2 CPU Fan Connector (CPU_FAN1) 23 Reset Switch (RSTBTN) 3 ATX 12V Power Connector (ATX12V1) 24 Power Switch (PWRBTN) 4 1366-Pin CPU Socket 25 USB 2.0 Header (USB6_7, Blue) 5 Power Fan Connector (PWR_FAN1) 26 8Mb SPI Flash 6 Chassis Fan Connector (CHA_FAN2) 27 Front ...
User Manual
Page 17
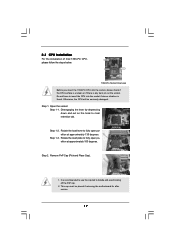
2.3 CPU Installation For the installation of Intel 1366-Pin CPU, please follow the steps below. Load Plate Contact Array Socket Body Load Lever 1366-Pin Socket Overview Before you insert the 1366-Pin CPU into the socket if above situation is any bent pin on the hook to clear retention tab. Do not force to...load plate to fully open position at approximately 135 degrees. Step 1-2. Step 2. Step 1. Open the socket: Step 1-1. It is recommended to use the cap tab to insert the CPU into the socket, please check if the CPU surface is unclean or if there is found. This cap must be ...
2.3 CPU Installation For the installation of Intel 1366-Pin CPU, please follow the steps below. Load Plate Contact Array Socket Body Load Lever 1366-Pin Socket Overview Before you insert the 1366-Pin CPU into the socket if above situation is any bent pin on the hook to clear retention tab. Do not force to...load plate to fully open position at approximately 135 degrees. Step 1-2. Step 2. Step 1. Open the socket: Step 1-1. It is recommended to use the cap tab to insert the CPU into the socket, please check if the CPU surface is unclean or if there is found. This cap must be ...

User Manual
Page 19
... fasteners without rotating them clockwise, the heatsink cannot be secured on the motherboard. Apply Thermal Interface Material Step 2. Align fasteners with Intel 1366-Pin CPU to improve heat dissipation. Step 6. Below is equipped with the CPU fan connector on the motherboard. Please adopt the ...interface material between the CPU and the heatsink to dissipate heat. Ensure that supports Intel 1366-Pin CPU. Step 5. Repeat with each other components. 19 Connect fan header with 1366-Pin socket that the CPU and the heatsink are oriented on side closest to illustrate the ...
... fasteners without rotating them clockwise, the heatsink cannot be secured on the motherboard. Apply Thermal Interface Material Step 2. Align fasteners with Intel 1366-Pin CPU to improve heat dissipation. Step 6. Below is equipped with the CPU fan connector on the motherboard. Please adopt the ...interface material between the CPU and the heatsink to dissipate heat. Ensure that supports Intel 1366-Pin CPU. Step 5. Repeat with each other components. 19 Connect fan header with 1366-Pin socket that the CPU and the heatsink are oriented on side closest to illustrate the ...
Quick Installation Guide
Page 6
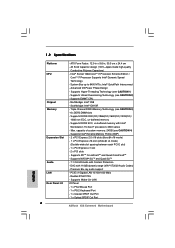
...; Socket 1366 CoreTM i7 Processor Extreme Edition / CoreTM i7 Processor Supports Intel® Dynamic Speed Technology - Supports ATITM CrossFireXTM and Quad CrossFireXTM - Advanced V8 Power Phase Design - 1.2 Specifications Platform CPU Chipset Memory Expansion Slot Audio LAN Rear Panel I /O Panel - 1 x PS/2 Mouse Port - 1 x PS/2 Keyboard Port - 1 x Coaxial SPDIF Out Port - 1 x Optical SPDIF Out Port 6 ASRock X58 Extreme3...
...; Socket 1366 CoreTM i7 Processor Extreme Edition / CoreTM i7 Processor Supports Intel® Dynamic Speed Technology - Supports ATITM CrossFireXTM and Quad CrossFireXTM - Advanced V8 Power Phase Design - 1.2 Specifications Platform CPU Chipset Memory Expansion Slot Audio LAN Rear Panel I /O Panel - 1 x PS/2 Mouse Port - 1 x PS/2 Keyboard Port - 1 x Coaxial SPDIF Out Port - 1 x Optical SPDIF Out Port 6 ASRock X58 Extreme3...
Quick Installation Guide
Page 13
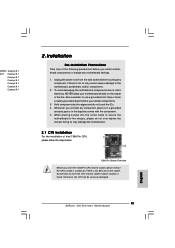
... it on the socket. English 13 ASRock X58 Extreme3 Motherboard Unplug the power cord from the wall socket before touching any motherboard settings. 1. Also remember to use a grounded wrist strap or touch a safety grounded object before you handle components. 3. Otherwise, the CPU will be seriously damaged. Installation Pre-installation Precautions Take note of Intel 1366-Pin CPU...
... it on the socket. English 13 ASRock X58 Extreme3 Motherboard Unplug the power cord from the wall socket before touching any motherboard settings. 1. Also remember to use a grounded wrist strap or touch a safety grounded object before you handle components. 3. Otherwise, the CPU will be seriously damaged. Installation Pre-installation Precautions Take note of Intel 1366-Pin CPU...


