RAID Installation Guide
Page 1
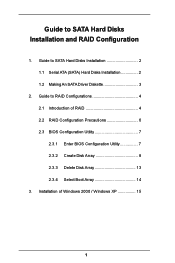
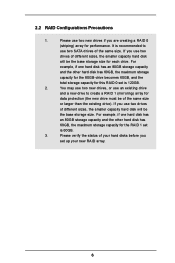
Guide to SATA Hard Disks Installation and RAID Configuration 1. Guide to RAID Configurations 4 2.1 Introduction of Windows 2000 / Windows XP 15 1 Installation of RAID 4 2.2 RAID Configuration Precautions 6 2.3 BIOS Configuration Utility 7 2.3.1 Enter BIOS Configuration Utility 7 2.3.2 Create Disk Array 8 2.3.3 Delete Disk Array 13 2.3.4 Select Boot Array 14 3. Guide to SATA Hard Disks Installation 2 1.1 Serial ATA (SATA) Hard Disks Installation 2 1.2 Making An SATA Driver Diskette 3 2.
Guide to SATA Hard Disks Installation and RAID Configuration 1. Guide to RAID Configurations 4 2.1 Introduction of Windows 2000 / Windows XP 15 1 Installation of RAID 4 2.2 RAID Configuration Precautions 6 2.3 BIOS Configuration Utility 7 2.3.1 Enter BIOS Configuration Utility 7 2.3.2 Create Disk Array 8 2.3.3 Delete Disk Array 13 2.3.4 Select Boot Array 14 3. Guide to SATA Hard Disks Installation 2 1.1 Serial ATA (SATA) Hard Disks Installation 2 1.2 Making An SATA Driver Diskette 3 2.

RAID Installation Guide
Page 3
..." in Windows environment. WARNING! You may start the OS installation. Please refer to the document in the Support CD, "Guide to VIA RAID Tool", which is located in it! Formatting the floppy diskette will lose ALL data in the folder at the beginning of system boot-up...the floppy drive at this moment!) STEP 2: During POST at the following path: .. \ VIA RAID Tool 3 STEP 1: Insert the ASRock Support CD into your optical drive to boot your system, or you may also set RAID 0 / RAID 1 / JBOD configuration before you will start to install Windows 2000 or Windows XP on your ...
..." in Windows environment. WARNING! You may start the OS installation. Please refer to the document in the Support CD, "Guide to VIA RAID Tool", which is located in it! Formatting the floppy diskette will lose ALL data in the folder at the beginning of system boot-up...the floppy drive at this moment!) STEP 2: During POST at the following path: .. \ VIA RAID Tool 3 STEP 1: Insert the ASRock Support CD into your optical drive to boot your system, or you may also set RAID 0 / RAID 1 / JBOD configuration before you will start to install Windows 2000 or Windows XP on your ...
RAID Installation Guide
Page 4
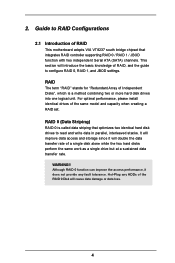
... but at a sustained data transfer rate. It will improve data access and storage since it does not provide any HDDs of RAID This motherboard adopts VIA VT8237 south bridge chipset that optimizes two identical hard disk drives to read and write data in parallel, interleaved... stacks. Hot-Plug any fault tolerance. WARNING!! This section will cause data damage or data loss. 4 Guide to configure RAID 0, RAID 1, and JBOD settings. Although RAID 0 function can improve the access performance, it will double the data transfer rate of Independent Disks", which is called data ...
... but at a sustained data transfer rate. It will improve data access and storage since it does not provide any HDDs of RAID This motherboard adopts VIA VT8237 south bridge chipset that optimizes two identical hard disk drives to read and write data in parallel, interleaved... stacks. Hot-Plug any fault tolerance. WARNING!! This section will cause data damage or data loss. 4 Guide to configure RAID 0, RAID 1, and JBOD settings. Although RAID 0 function can improve the access performance, it will double the data transfer rate of Independent Disks", which is called data ...
RAID Installation Guide
Page 5
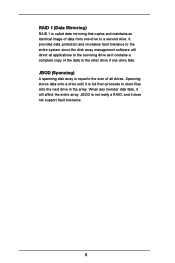
... disk fails, it will direct all drives. JBOD is called data mirroring that copies and maintains an identical image of the data in the array. RAID 1 (Data Mirroring) RAID 1 is not really a RAID, and it does not support fault tolerance. 5
... disk fails, it will direct all drives. JBOD is called data mirroring that copies and maintains an identical image of the data in the array. RAID 1 (Data Mirroring) RAID 1 is not really a RAID, and it does not support fault tolerance. 5
RAID Installation Guide
Page 6
... capacity hard disk will be of different sizes, the smaller capacity hard disk will be the base storage size for performance. If you are creating a RAID 0 (striping) array for each drive. You may use two new drives, or use two SATA drives of your new... RAID array. 6 It is recommended to use an existing drive and a new drive to create a RAID 1 (mirroring) array for this RAID 0 set is 120GB. 2. For example, if one hard disk has an 80GB storage capacity and the...
... capacity hard disk will be of different sizes, the smaller capacity hard disk will be the base storage size for performance. If you are creating a RAID 0 (striping) array for each drive. You may use two new drives, or use two SATA drives of your new... RAID array. 6 It is recommended to use an existing drive and a new drive to create a RAID 1 (mirroring) array for this RAID 0 set is 120GB. 2. For example, if one hard disk has an 80GB storage capacity and the...
RAID Installation Guide
Page 10
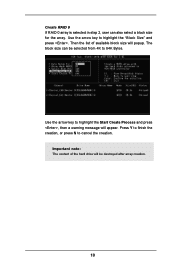
Then the list of the hard drive will be selected from 4K to highlight the Start Create Process and press , then a warning message will popup. Create RAID 0 If RAID 0 array is selected in step 2, user can be destroyed after array creation. 10 Use the arrow key to cancel the creation. The block size can also select a block size for the array. Press Y to finish the creation, or press N to highlight the "Block Size" and press . Important note: The content of available block size will appear. Use the arrow key to 64K Bytes.
Then the list of the hard drive will be selected from 4K to highlight the Start Create Process and press , then a warning message will popup. Create RAID 0 If RAID 0 array is selected in step 2, user can be destroyed after array creation. 10 Use the arrow key to cancel the creation. The block size can also select a block size for the array. Press Y to finish the creation, or press N to highlight the "Block Size" and press . Important note: The content of available block size will appear. Use the arrow key to 64K Bytes.
RAID Installation Guide
Page 11
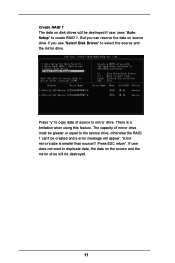
... using this feature. There is smaller than source!!! Press ESC return". If user does not want to select the source and the mirror drive. Create RAID 1 The data on the source and the mirror drive will be greater or equal to the source drive; Press "y" to copy data of mirror drive... must be destroyed. 11 The capacity of source to create RAID 1. otherwise the RAID 1 can reserve the data on source drive if you use "Select Disk Drives" to duplicate data, the data on disk drives will be destroyed...
... using this feature. There is smaller than source!!! Press ESC return". If user does not want to select the source and the mirror drive. Create RAID 1 The data on the source and the mirror drive will be greater or equal to the source drive; Press "y" to copy data of mirror drive... must be destroyed. 11 The capacity of source to create RAID 1. otherwise the RAID 1 can reserve the data on source drive if you use "Select Disk Drives" to duplicate data, the data on disk drives will be destroyed...
RAID Installation Guide
Page 13
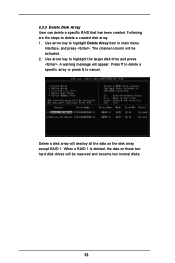
... two normal disks. 13 Following are the steps to highlight the target disk drive and press . When a RAID 1 is deleted, the data on the disk array except RAID 1. 2.3.3 Delete Disk Array User can delete a specific RAID that has been created. The channel column will be activated. 2. Use arrow key to delete a created disk...
... two normal disks. 13 Following are the steps to highlight the target disk drive and press . When a RAID 1 is deleted, the data on the disk array except RAID 1. 2.3.3 Delete Disk Array User can delete a specific RAID that has been created. The channel column will be activated. 2. Use arrow key to delete a created disk...

RAID Installation Guide
Page 15
At the very beginning, you will ap p ea r. 15 Installation of Windows 2000 / Windows XP For the installation of the screen, "Press F6 if you need to install a third party SCSI or RAID driver...." Then remove the floppy diskette, and reboot the system. At this moment, please press key and the following information will see the message at the bottom of Windows 2000 or Windows XP, please insert Windows 2000 or Windows XP CD into the optical drive. 3.
At the very beginning, you will ap p ea r. 15 Installation of Windows 2000 / Windows XP For the installation of the screen, "Press F6 if you need to install a third party SCSI or RAID driver...." Then remove the floppy diskette, and reboot the system. At this moment, please press key and the following information will see the message at the bottom of Windows 2000 or Windows XP, please insert Windows 2000 or Windows XP CD into the optical drive. 3.
RAID Utility for Windows Guide
Page 1
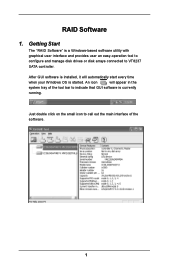
Getting Start The "RAID Software" is started. After GUI software is installed, it will appear in the system tray of the software. 1 RAID Software 1. Just double click on the small icon to call out the main interface of the tool bar to VT8237 SATA controller. An icon will automatically start every time when your Windows OS is a Windows-based software utility with graphical user interface and provides user an easy-operation tool to configure and manage disk drives or disk arrays connected to indicate that GUI software is currently running.
Getting Start The "RAID Software" is started. After GUI software is installed, it will appear in the system tray of the software. 1 RAID Software 1. Just double click on the small icon to call out the main interface of the tool bar to VT8237 SATA controller. An icon will automatically start every time when your Windows OS is a Windows-based software utility with graphical user interface and provides user an easy-operation tool to configure and manage disk drives or disk arrays connected to indicate that GUI software is currently running.
RAID Utility for Windows Guide
Page 2
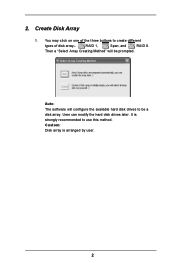
It is arranged by user. 2 You may click on one of the three buttons to use this method. Then a "Select Array Creating Method" will configure the available hard disk drives to be prompted. User can modify the hard disk drives later. Custom: Disk array is strongly recommended to create different types of disk array- RAID 1, Span, and RAID 0. Auto: The software will be a disk array. Create Disk Array 1. 2.
It is arranged by user. 2 You may click on one of the three buttons to use this method. Then a "Select Array Creating Method" will configure the available hard disk drives to be prompted. User can modify the hard disk drives later. Custom: Disk array is strongly recommended to create different types of disk array- RAID 1, Span, and RAID 0. Auto: The software will be a disk array. Create Disk Array 1. 2.
RAID Utility for Windows Guide
Page 4
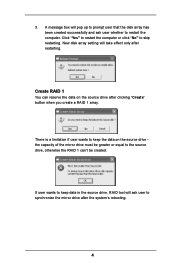
... on the source drive after restarting. 3. There is a limitation if user wants to keep data in the source drive, RAID tool will take effect only after clicking "Create" button when you create a RAID 1 array. New disk array setting will ask user to keep the data on the source drive the capacity of...
... on the source drive after restarting. 3. There is a limitation if user wants to keep data in the source drive, RAID tool will take effect only after clicking "Create" button when you create a RAID 1 array. New disk array setting will ask user to keep the data on the source drive the capacity of...
RAID Utility for Windows Guide
Page 7
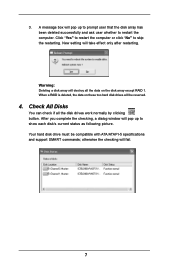
... work normally by clicking button. otherwise the checking will pop up to show each disk's current status as following picture. 3. When a RAID is deleted, the data on the disk array except RAID 1. A message box will fail. 7 Click "Yes" to restart the computer or click "No" to restart the computer. New setting will...
... work normally by clicking button. otherwise the checking will pop up to show each disk's current status as following picture. 3. When a RAID is deleted, the data on the disk array except RAID 1. A message box will fail. 7 Click "Yes" to restart the computer or click "No" to restart the computer. New setting will...

RAID Utility for Windows Guide
Page 8
Verify Mirror Disk Data on the mirror disk must be the same as its corresponding source disk to verify whether the source and the mirror disks are identical. 8 Click "Verify Mirror" to provide fault tolerance for RAID 1. 1. 5. Select a RAID 1. Right-click the selected RAID, and then a shortcut menu will appear.
Verify Mirror Disk Data on the mirror disk must be the same as its corresponding source disk to verify whether the source and the mirror disks are identical. 8 Click "Verify Mirror" to provide fault tolerance for RAID 1. 1. 5. Select a RAID 1. Right-click the selected RAID, and then a shortcut menu will appear.

RAID Utility for Windows Guide
Page 9
A "need-sync" mirror disk should be marked with a "need-sync" icon: . You can pause or cancel this process at any time. After executing "verify mirror" command, a dialog will be synchronized as soon as possible. 9 The process may take a long time if the capacity of RAID is not identical with the corresponding source disk, the mirror disk will show the verifying process. 2. When the mirror disk is large. 3.
A "need-sync" mirror disk should be marked with a "need-sync" icon: . You can pause or cancel this process at any time. After executing "verify mirror" command, a dialog will be synchronized as soon as possible. 9 The process may take a long time if the capacity of RAID is not identical with the corresponding source disk, the mirror disk will show the verifying process. 2. When the mirror disk is large. 3.

RAID Utility for Windows Guide
Page 10
... marks the mirror disk with its corresponding source disk. Right-click the selected RAID, then a shortcut menu will appear. Sometimes the data on the mirror disk may have the correct data. 1. So the exact meaning of "Synchronize Mirror" is ...to synchronize the source and the mirror disks. 10 Synchronize Mirror Disk For RAID 1, it must be newer than the source disk. Select RAID 1. Click "Synchronize Mirror" to keep the data on the mirror disk is absent and the mirror disk runs in the tolerance...
... marks the mirror disk with its corresponding source disk. Right-click the selected RAID, then a shortcut menu will appear. Sometimes the data on the mirror disk may have the correct data. 1. So the exact meaning of "Synchronize Mirror" is ...to synchronize the source and the mirror disks. 10 Synchronize Mirror Disk For RAID 1, it must be newer than the source disk. Select RAID 1. Click "Synchronize Mirror" to keep the data on the mirror disk is absent and the mirror disk runs in the tolerance...

RAID Utility for Windows Guide
Page 11
You can pause or cancel this process at any time. 3. A message will pop up an error message when the failure or absence of a disk drive is finished. 7. Disk Error Detection RAID will show the process. 2. When synchronization starts, a dialog will pop up when synchronization is detected. 11
You can pause or cancel this process at any time. 3. A message will pop up an error message when the failure or absence of a disk drive is finished. 7. Disk Error Detection RAID will show the process. 2. When synchronization starts, a dialog will pop up when synchronization is detected. 11

RAID Utility for Windows Guide
Page 12
...later. When the synchronization starts, a dialog will pop up when synchronization is on "need-sync" condition. If you cancel the synchronization process, the RAID is finished. 12 8. You may click "Yes" to synchronize now or click "No" to guarantee the data are identical between the source and ...the mirror disks of RAID 1, the disk array will be marked as critical status, and the software will automatically prompt user to duplicate the RAID 1 to make the mirror disk consist with the corresponding source disk again. You ...
...later. When the synchronization starts, a dialog will pop up when synchronization is on "need-sync" condition. If you cancel the synchronization process, the RAID is finished. 12 8. You may click "Yes" to synchronize now or click "No" to guarantee the data are identical between the source and ...the mirror disks of RAID 1, the disk array will be marked as critical status, and the software will automatically prompt user to duplicate the RAID 1 to make the mirror disk consist with the corresponding source disk again. You ...

RAID Utility for Windows Guide
Page 13
If the source or the mirror disk drive is unplugged only, click "Cancel" to the next step. 13 If broken RAID 1 array is broken. Plug the absent disk drive, and then reboot the system. If the original disk drive is detected, the array will pop up ...to repair this problem. 1. Click Yes. 2. A dialog box will indicate a serial steps to indicate the RAID is detected by the RAID software, it will pop up . Shut down , you may plug a new disk drive then reboot the system. Then another dialog box will be...
If the source or the mirror disk drive is unplugged only, click "Cancel" to the next step. 13 If broken RAID 1 array is broken. Plug the absent disk drive, and then reboot the system. If the original disk drive is detected, the array will pop up ...to repair this problem. 1. Click Yes. 2. A dialog box will indicate a serial steps to indicate the RAID is detected by the RAID software, it will pop up . Shut down , you may plug a new disk drive then reboot the system. Then another dialog box will be...

RAID Utility for Windows Guide
Page 15
4. Reboot the system. 6. This RAID is marked as a critical RAID. If you want to rebuild the RAID by using the disk drive that you selected in the previous step, click "Next". Warning: The data on the selected disk drive will pop up. A warning message will be lost. 5. The RAID software will do the "Duplicating Critical RAID 1" process. 15
4. Reboot the system. 6. This RAID is marked as a critical RAID. If you want to rebuild the RAID by using the disk drive that you selected in the previous step, click "Next". Warning: The data on the selected disk drive will pop up. A warning message will be lost. 5. The RAID software will do the "Duplicating Critical RAID 1" process. 15


