RAID Installation Guide
Page 1
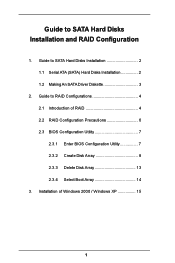
Installation of RAID 4 2.2 RAID Configuration Precautions 6 2.3 BIOS Configuration Utility 7 2.3.1 Enter BIOS Configuration Utility 7 2.3.2 Create Disk Array 8 2.3.3 Delete Disk Array 13 2.3.4 Select Boot Array 14 3. Guide to SATA Hard Disks Installation and RAID Configuration 1. Guide to RAID Configurations 4 2.1 Introduction of Windows 2000 / Windows XP 15 1 Guide to SATA Hard Disks Installation 2 1.1 Serial ATA (SATA) Hard Disks Installation 2 1.2 Making An SATA Driver Diskette 3 2.
Installation of RAID 4 2.2 RAID Configuration Precautions 6 2.3 BIOS Configuration Utility 7 2.3.1 Enter BIOS Configuration Utility 7 2.3.2 Create Disk Array 8 2.3.3 Delete Disk Array 13 2.3.4 Select Boot Array 14 3. Guide to SATA Hard Disks Installation and RAID Configuration 1. Guide to RAID Configurations 4 2.1 Introduction of Windows 2000 / Windows XP 15 1 Guide to SATA Hard Disks Installation 2 1.1 Serial ATA (SATA) Hard Disks Installation 2 1.2 Making An SATA Driver Diskette 3 2.

RAID Installation Guide
Page 3
...ALL data in the folder at the beginning of system boot-up, press key, and then a window for boot devices selection appears. Please insert a floppy diskette into the floppy diskette. STEP 1: Insert the ASRock Support CD into your optical drive to boot your system. (Do NOT insert any floppy diskette into... you want to generate Serial ATA driver diskette [YN]?", press . You may start to use "VT8237 SATA RAID BIOS" to set the RAID configuration by using "VIA RAID Tool" in Windows environment. Please refer to the document in the Support CD, "Guide to VIA RAID Tool", which is located in...
...ALL data in the folder at the beginning of system boot-up, press key, and then a window for boot devices selection appears. Please insert a floppy diskette into the floppy diskette. STEP 1: Insert the ASRock Support CD into your optical drive to boot your system. (Do NOT insert any floppy diskette into... you want to generate Serial ATA driver diskette [YN]?", press . You may start to use "VT8237 SATA RAID BIOS" to set the RAID configuration by using "VIA RAID Tool" in Windows environment. Please refer to the document in the Support CD, "Guide to VIA RAID Tool", which is located in...
User Manual
Page 7
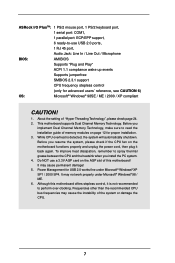
...' reference, see CAUTION 6) OS: Microsoft® Windows® 98SE / ME / 2000 / XP compliant CAUTION! 1. Do NOT use USB 2.0 ports, 1 RJ 45 port, Audio Jack: Line In / Line Out / Microphone BIOS: AMI BIOS Supports "Plug and Play" ACPI 1.1 compliance wake ...Windows® 98 / ME. 6. While CPU overheat is not recommended to perform over-clocking. Although this motherboard! Before you resume the system, please check if the CPU fan on the AGP slot of the system or damage the CPU. 7 Frequencies other than the recommended CPU bus frequencies may cause permanent damage! 5. ASRock...
...' reference, see CAUTION 6) OS: Microsoft® Windows® 98SE / ME / 2000 / XP compliant CAUTION! 1. Do NOT use USB 2.0 ports, 1 RJ 45 port, Audio Jack: Line In / Line Out / Microphone BIOS: AMI BIOS Supports "Plug and Play" ACPI 1.1 compliance wake ...Windows® 98 / ME. 6. While CPU overheat is not recommended to perform over-clocking. Although this motherboard! Before you resume the system, please check if the CPU fan on the AGP slot of the system or damage the CPU. 7 Frequencies other than the recommended CPU bus frequencies may cause permanent damage! 5. ASRock...
User Manual
Page 20
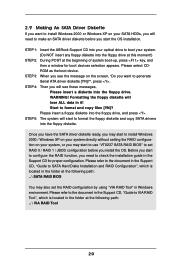
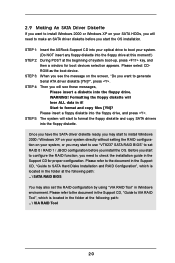
STEP 1: Insert the ASRock Support CD into your optical drive to boot your SATA HDDs, you... ALL data in the folder at the following path: .. \ SATA RAID BIOS You may also set RAID 0 / RAID 1 / JBOD configuration before you start to install Windows 2000 / Windows XP on your system directly without setting the RAID configuration on the screen, ...Configuration", which is located in the folder at the beginning of system boot-up, press key, and then a window for proper configuration. WARNING! Before you start to format the floppy diskette and copy SATA drivers into the floppy drive...
STEP 1: Insert the ASRock Support CD into your optical drive to boot your SATA HDDs, you... ALL data in the folder at the following path: .. \ SATA RAID BIOS You may also set RAID 0 / RAID 1 / JBOD configuration before you start to install Windows 2000 / Windows XP on your system directly without setting the RAID configuration on the screen, ...Configuration", which is located in the folder at the beginning of system boot-up, press key, and then a window for proper configuration. WARNING! Before you start to format the floppy diskette and copy SATA drivers into the floppy drive...
User Manual
Page 24
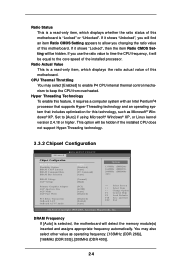
...CMOS Setting will be hidden. This option will be hidden if the installed CPU does not support Hyper-Threading technology. 3.3.2 Chipset Configuration BIOS SETUP UTILITY Advanced Chipset Configuration DRAM Frequency Flexibility Option DRAM CAS# Latency DRAM Command Rate DRAM Bus Selection [Auto] [Disabled] [Auto]... actual value of this motherboard is "Locked" or "Unlocked". CPU Thermal Throttling You may also select other value as Microsoft® Windows® XP. Ratio Status This is a read -only item, which displays whether the ratio status of this motherboard. Set to ...
...CMOS Setting will be hidden. This option will be hidden if the installed CPU does not support Hyper-Threading technology. 3.3.2 Chipset Configuration BIOS SETUP UTILITY Advanced Chipset Configuration DRAM Frequency Flexibility Option DRAM CAS# Latency DRAM Command Rate DRAM Bus Selection [Auto] [Disabled] [Auto]... actual value of this motherboard is "Locked" or "Unlocked". CPU Thermal Throttling You may also select other value as Microsoft® Windows® XP. Ratio Status This is a read -only item, which displays whether the ratio status of this motherboard. Set to ...
User Manual
Page 28
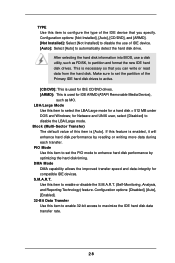
.../DVD]: This is used for IDE CD/DVD drives. [ARMD]: This is used for a hard disk > 512 MB under DOS and Windows; After selecting the hard disk information into BIOS, use of the Primary IDE hard disk drives to maximize the IDE hard disk data transfer rate. 28 If this feature is...
.../DVD]: This is used for IDE CD/DVD drives. [ARMD]: This is used for a hard disk > 512 MB under DOS and Windows; After selecting the hard disk information into BIOS, use of the Primary IDE hard disk drives to maximize the IDE hard disk data transfer rate. 28 If this feature is...
Quick Installation Guide
Page 6
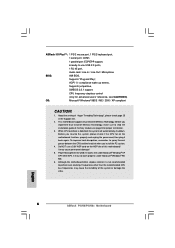
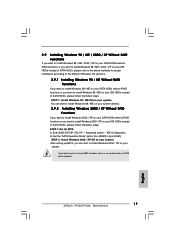
... NOT use USB 2.0 ports, 1 RJ 45 port, Audio Jack: Line In / Line Out / Microphone BIOS: AMI BIOS, Supports "Plug and Play", ACPI 1.1 compliance wake up events, Supports jumperfree, SMBIOS 2.3.1 support, CPU frequency...Windows® XP SP1/2000 SP4. About the setting of "Hyper Threading Technology", please check page 25 in the Support CD. 2. ASRock I/O PlusTM: 1 PS/2 mouse port, 1 PS/2 keyboard port, 1 serial port: COM1, 1 parallel port: ECP/EPP support, 6 ready-to read the installation guide of memory modules on page 8 for proper installation. 3. English 6 ASRock P4V88/P4V88...
... NOT use USB 2.0 ports, 1 RJ 45 port, Audio Jack: Line In / Line Out / Microphone BIOS: AMI BIOS, Supports "Plug and Play", ACPI 1.1 compliance wake up events, Supports jumperfree, SMBIOS 2.3.1 support, CPU frequency...Windows® XP SP1/2000 SP4. About the setting of "Hyper Threading Technology", please check page 25 in the Support CD. 2. ASRock I/O PlusTM: 1 PS/2 mouse port, 1 PS/2 keyboard port, 1 serial port: COM1, 1 parallel port: ECP/EPP support, 6 ready-to read the installation guide of memory modules on page 8 for proper installation. 3. English 6 ASRock P4V88/P4V88...
Quick Installation Guide
Page 16
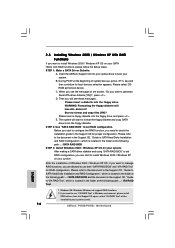
... located in the folder at the following path: .. \ SATA RAID BIOS STEP 3: Install Windows 2000 / Windows XP OS on your system as the boot device. Please select CDROM as well. 16 ASRock P4V88/P4V88+ Motherboard English Formatting the floppy diskette will lose ALL data in Windows environment, please install SATA drivers from the Support CD again so...
... located in the folder at the following path: .. \ SATA RAID BIOS STEP 3: Install Windows 2000 / Windows XP OS on your system as the boot device. Please select CDROM as well. 16 ASRock P4V88/P4V88+ Motherboard English Formatting the floppy diskette will lose ALL data in Windows environment, please install SATA drivers from the Support CD again so...
Quick Installation Guide
Page 17
... no need to make a SATA driver diskette. 17 ASRock P4V88/P4V88+ Motherboard English STEP 1: Install Windows 98 / ME OS on your system. Set the "SATA Operation Mode" option from [RAID] to install Windows 2000 / XP on your system. Enter BIOS SETUP UTILITY Advanced screen IDE Configuration. STEP 2: Install Windows 2000 / XP OS on your system. If you...
... no need to make a SATA driver diskette. 17 ASRock P4V88/P4V88+ Motherboard English STEP 1: Install Windows 98 / ME OS on your system. Set the "SATA Operation Mode" option from [RAID] to install Windows 2000 / XP on your system. Enter BIOS SETUP UTILITY Advanced screen IDE Configuration. STEP 2: Install Windows 2000 / XP OS on your system. If you...
Quick Installation Guide
Page 18
...the reset button on the motherboard stores BIOS Setup Utility. The BIOS Setup program is enabled in your CD-ROM drive. The Support CD that will display the Main Menu automatically if "AUTORUN" is designed to display the menus. 18 ASRock P4V88/P4V88+ Motherboard English It will enhance motherboard ...the Support CD. 4. When you wish to select among the predetermined choices. Software Support CD information This motherboard supports various Microsoft® Windows® operating systems: 98 SE/ ME / 2000 / XP. It is a menu-driven program, which allows you to scroll through ...
...the reset button on the motherboard stores BIOS Setup Utility. The BIOS Setup program is enabled in your CD-ROM drive. The Support CD that will display the Main Menu automatically if "AUTORUN" is designed to display the menus. 18 ASRock P4V88/P4V88+ Motherboard English It will enhance motherboard ...the Support CD. 4. When you wish to select among the predetermined choices. Software Support CD information This motherboard supports various Microsoft® Windows® operating systems: 98 SE/ ME / 2000 / XP. It is a menu-driven program, which allows you to scroll through ...

User Manual
Page 7
ASRock I/O PlusTM: 1 PS/2 mouse port, 1 PS/2 keyboard port, 1 serial port: COM1, 1 parallel port: ECP/EPP support, 6 ready-to-use a 3.3V AGP card on the AGP slot of the system or damage the CPU. 7 Do NOT use USB 2.0 ports, 1 RJ 45 port, Audio Jack: Line In / Line Out / Microphone BIOS: AMI BIOS... Supports "Plug and Play" ACPI 1.1 compliance wake up events Supports jumperfree SMBIOS 2.3.1 support CPU frequency stepless control (only for advanced users' reference, see CAUTION 6) OS: Microsoft® Windows® 98SE / ME / 2000 ...
ASRock I/O PlusTM: 1 PS/2 mouse port, 1 PS/2 keyboard port, 1 serial port: COM1, 1 parallel port: ECP/EPP support, 6 ready-to-use a 3.3V AGP card on the AGP slot of the system or damage the CPU. 7 Do NOT use USB 2.0 ports, 1 RJ 45 port, Audio Jack: Line In / Line Out / Microphone BIOS: AMI BIOS... Supports "Plug and Play" ACPI 1.1 compliance wake up events Supports jumperfree SMBIOS 2.3.1 support CPU frequency stepless control (only for advanced users' reference, see CAUTION 6) OS: Microsoft® Windows® 98SE / ME / 2000 ...
User Manual
Page 20
... directly without setting the RAID configuration on the screen, "Do you want to install Windows 2000 or Windows XP on your system. (Do NOT insert any floppy diskette into the floppy drive, and press . STEP 1: Insert the ASRock Support CD into your optical drive to boot your SATA HDDs, you will see the... message on your system, or you may start to use "VT8237 SATA RAID BIOS" to set...
... directly without setting the RAID configuration on the screen, "Do you want to install Windows 2000 or Windows XP on your system. (Do NOT insert any floppy diskette into the floppy drive, and press . STEP 1: Insert the ASRock Support CD into your optical drive to boot your SATA HDDs, you will see the... message on your system, or you may start to use "VT8237 SATA RAID BIOS" to set...

User Manual
Page 24
... which displays whether the ratio status of this motherboard. CPU Thermal Throttling You may also select other value as Microsoft® Windows® XP. This option will be hidden. Hyper Threading Technology To enable this feature, it will be hidden if the ...installed CPU does not support Hyper-Threading technology. 3.3.2 Chipset Configuration BIOS SETUP UTILITY Advanced Chipset Configuration DRAM Frequency Flexibility Option DRAM CAS# Latency DRAM Command Rate DRAM Bus Selection [Auto] [Disabled] [Auto...
... which displays whether the ratio status of this motherboard. CPU Thermal Throttling You may also select other value as Microsoft® Windows® XP. This option will be hidden. Hyper Threading Technology To enable this feature, it will be hidden if the ...installed CPU does not support Hyper-Threading technology. 3.3.2 Chipset Configuration BIOS SETUP UTILITY Advanced Chipset Configuration DRAM Frequency Flexibility Option DRAM CAS# Latency DRAM Command Rate DRAM Bus Selection [Auto] [Disabled] [Auto...
User Manual
Page 28
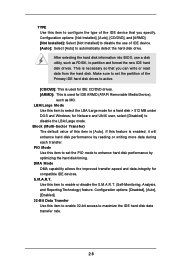
After selecting the hard disk information into BIOS, use of IDE device. [Auto]: Select [Auto] to configure the type of the IDE device that you specify. Block (Multi-Sector Transfer) The default value ..., select [Disabled] to maximize the IDE hard disk data transfer rate. 28 If this feature is [Auto]. for a hard disk > 512 MB under DOS and Windows; Configuration options: [Disabled], [Auto], [Enabled]. 32-Bit Data Transfer Use this item to enable 32-bit access to disable the LBA/Large mode. This is...
After selecting the hard disk information into BIOS, use of IDE device. [Auto]: Select [Auto] to configure the type of the IDE device that you specify. Block (Multi-Sector Transfer) The default value ..., select [Disabled] to maximize the IDE hard disk data transfer rate. 28 If this feature is [Auto]. for a hard disk > 512 MB under DOS and Windows; Configuration options: [Disabled], [Auto], [Enabled]. 32-Bit Data Transfer Use this item to enable 32-bit access to disable the LBA/Large mode. This is...

