User Manual
Page 5
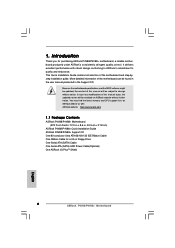
... as well. Introduction Thank you for a 3.5-in , 30.5 cm x 21.8 cm) ASRock P4V88/P4V88+ Quick Installation Guide ASRock P4V88/P4V88+ Support CD One 80-conductor Ultra ATA 66/100/133 IDE Ribbon Cable One Ribbon Cable for purchasing ASRock P4V88/P4V88+ motherboard, a reliable motherboard produced under ASRock's consistently stringent quality control. Because the motherboard specifications and the BIOS software might...
... as well. Introduction Thank you for a 3.5-in , 30.5 cm x 21.8 cm) ASRock P4V88/P4V88+ Quick Installation Guide ASRock P4V88/P4V88+ Support CD One 80-conductor Ultra ATA 66/100/133 IDE Ribbon Cable One Ribbon Cable for purchasing ASRock P4V88/P4V88+ motherboard, a reliable motherboard produced under ASRock's consistently stringent quality control. Because the motherboard specifications and the BIOS software might...
Quick Installation Guide
Page 1
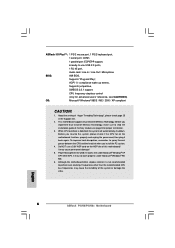
... that may cause undesired operation. All rights reserved. 1 ASRock P4V88/P4V88+ Motherboard English Operation is subject to the following two conditions: (1) this device may not cause harmful interference, and (2) this guide, ASRock does not provide warranty of any kind, either expressed or... implied, including but not limited to infringe. Disclaimer: Specifications and information contained in this guide. ASRock assumes no event shall ASRock, its directors, officers, employees, or agents be liable for any indirect, special, incidental, or consequential damages (...
... that may cause undesired operation. All rights reserved. 1 ASRock P4V88/P4V88+ Motherboard English Operation is subject to the following two conditions: (1) this device may not cause harmful interference, and (2) this guide, ASRock does not provide warranty of any kind, either expressed or... implied, including but not limited to infringe. Disclaimer: Specifications and information contained in this guide. ASRock assumes no event shall ASRock, its directors, officers, employees, or agents be liable for any indirect, special, incidental, or consequential damages (...
Quick Installation Guide
Page 2
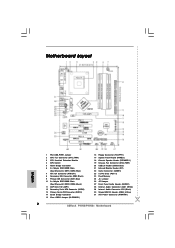
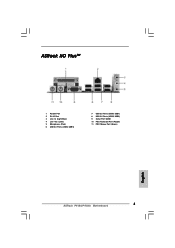
... Header (AUDIO1) 28 Internal Audio Connector: AUX1 (White) 29 Internal Audio Connector: CD1 (Black) 30 Shared USB 2.0 Header (USB4_5, Blue) 31 ATX Power Connector (ATXPWR1) 2 ASRock P4V88/P4V88+ Motherboard
... Header (AUDIO1) 28 Internal Audio Connector: AUX1 (White) 29 Internal Audio Connector: CD1 (Black) 30 Shared USB 2.0 Header (USB4_5, Blue) 31 ATX Power Connector (ATXPWR1) 2 ASRock P4V88/P4V88+ Motherboard
Quick Installation Guide
Page 3
ASRock I/O PlusTM 1 Parallel Port 2 RJ-45 Port 3 Line In (Light Blue) 4 Line Out (Lime) 5 Microphone (Pink) 6 USB 2.0 Ports (USB4, USB5) 7 USB 2.0 Ports (USB0, USB1) 8 USB 2.0 Ports (USB2, USB3) 9 Serial Port: COM1 10 PS/2 Keyboard Port (Purple) 11 PS/2 Mouse Port (Green) English 3 ASRock P4V88/P4V88+ Motherboard
ASRock I/O PlusTM 1 Parallel Port 2 RJ-45 Port 3 Line In (Light Blue) 4 Line Out (Lime) 5 Microphone (Pink) 6 USB 2.0 Ports (USB4, USB5) 7 USB 2.0 Ports (USB0, USB1) 8 USB 2.0 Ports (USB2, USB3) 9 Serial Port: COM1 10 PS/2 Keyboard Port (Purple) 11 PS/2 Mouse Port (Green) English 3 ASRock P4V88/P4V88+ Motherboard
Quick Installation Guide
Page 4
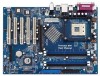
... Serial ATA (SATA) Cable One Serial ATA (SATA) HDD Power Cable(Optional) One ASRock I/O PlusTM Shield 4 ASRock P4V88/P4V88+ Motherboard English 1. ASRock website http://www.asrock.com 1.1 Package Contents ASRock P4V88/P4V88+ Motherboard (ATX Form Factor: 12.0-in x 8.6-in, 30.5 cm x 21.8 cm) ASRock P4V88/P4V88+ Quick Installation Guide ASRock P4V88/P4V88+ Support CD One 80-conductor Ultra ATA 66/100/133 IDE Ribbon Cable...
... Serial ATA (SATA) Cable One Serial ATA (SATA) HDD Power Cable(Optional) One ASRock I/O PlusTM Shield 4 ASRock P4V88/P4V88+ Motherboard English 1. ASRock website http://www.asrock.com 1.1 Package Contents ASRock P4V88/P4V88+ Motherboard (ATX Form Factor: 12.0-in x 8.6-in, 30.5 cm x 21.8 cm) ASRock P4V88/P4V88+ Quick Installation Guide ASRock P4V88/P4V88+ Support CD One 80-conductor Ultra ATA 66/100/133 IDE Ribbon Cable...
Quick Installation Guide
Page 5
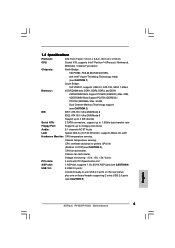
...: Speed: 802.3u (10/100 Ethernet), supports Wake-On-LAN Hardware Monitor: CPU temperature sensing, Chassis temperature sensing, CPU overheat shutdown to protect CPU life (ASRock U-COP)(see CAUTION 3), CPU fan tachometer, Chassis fan tachometer, Voltage monitoring: +12V, +5V, +3V, Vcore PCI slots: 5 slots with PCI Specification 2.2 AGP slot: 1 AGP slot... 4) USB 2.0: 8 USB 2.0 ports: include 6 ready-to-use USB 2.0 ports on the rear panel, plus one on-board header supporting 2 extra USB 2.0 ports (see CAUTION 5) English 5 ASRock P4V88/P4V88+ Motherboard
...: Speed: 802.3u (10/100 Ethernet), supports Wake-On-LAN Hardware Monitor: CPU temperature sensing, Chassis temperature sensing, CPU overheat shutdown to protect CPU life (ASRock U-COP)(see CAUTION 3), CPU fan tachometer, Chassis fan tachometer, Voltage monitoring: +12V, +5V, +3V, Vcore PCI slots: 5 slots with PCI Specification 2.2 AGP slot: 1 AGP slot... 4) USB 2.0: 8 USB 2.0 ports: include 6 ready-to-use USB 2.0 ports on the rear panel, plus one on-board header supporting 2 extra USB 2.0 ports (see CAUTION 5) English 5 ASRock P4V88/P4V88+ Motherboard
Quick Installation Guide
Page 6
... (only for advanced users' reference, see CAUTION 6) OS: Microsoft® Windows® 98SE / ME / 2000 / XP compliant CAUTION! 1. English 6 ASRock P4V88/P4V88+ Motherboard Power Management for proper installation. 3. About the setting of memory modules on the AGP slot of the system or damage the CPU.... ASRock I/O PlusTM: 1 PS/2 mouse port, 1 PS/2 keyboard port, 1 serial port: COM1, 1 parallel port: ECP/EPP support, 6 ready-to perform over-...
... (only for advanced users' reference, see CAUTION 6) OS: Microsoft® Windows® 98SE / ME / 2000 / XP compliant CAUTION! 1. English 6 ASRock P4V88/P4V88+ Motherboard Power Management for proper installation. 3. About the setting of memory modules on the AGP slot of the system or damage the CPU.... ASRock I/O PlusTM: 1 PS/2 mouse port, 1 PS/2 keyboard port, 1 serial port: COM1, 1 parallel port: ECP/EPP support, 6 ready-to perform over-...
Quick Installation Guide
Page 7
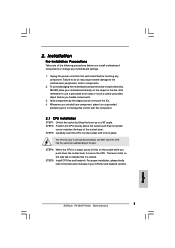
... precautions before you uninstall any component. STEP 3: Carefully insert the CPU into the socket to static electricity, NEVER place your CPU fan and heatsink vendors. 7 ASRock P4V88/P4V88+ Motherboard English The lever clicks on the socket while you handle components. 3. Installation Pre-installation Precautions Take note of the pins. Failure to the motherboard...
... precautions before you uninstall any component. STEP 3: Carefully insert the CPU into the socket to static electricity, NEVER place your CPU fan and heatsink vendors. 7 ASRock P4V88/P4V88+ Motherboard English The lever clicks on the socket while you handle components. 3. Installation Pre-installation Precautions Take note of the pins. Failure to the motherboard...
Quick Installation Guide
Page 8
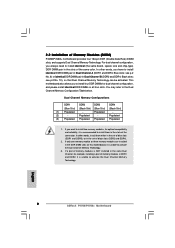
...set of the same color. In other words, install them in the slots of black slots (DDR2 and DDR4). 2. Blue slots; English 8 ASRock P4V88/P4V88+ Motherboard see p.2 No. 10), so that Dual Channel Memory Technology can be activated. This motherboard also allows you want to install two memory... modules, for example, installing a pair of Memory Modules (DIMM) P4V88/P4V88+ motherboard provides four 184-pin DDR (Double Data Rate) DIMM slots, and supports Dual Channel Memory Technology. You may refer to install ...
...set of the same color. In other words, install them in the slots of black slots (DDR2 and DDR4). 2. Blue slots; English 8 ASRock P4V88/P4V88+ Motherboard see p.2 No. 10), so that Dual Channel Memory Technology can be activated. This motherboard also allows you want to install two memory... modules, for example, installing a pair of Memory Modules (DIMM) P4V88/P4V88+ motherboard provides four 184-pin DDR (Double Data Rate) DIMM slots, and supports Dual Channel Memory Technology. You may refer to install ...
Quick Installation Guide
Page 9
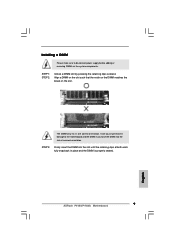
It will cause permanent damage to disconnect power supply before adding or removing DIMMs or the system components. English 9 ASRock P4V88/P4V88+ Motherboard Installing a DIMM Please make sure to the motherboard and the DIMM if you force the DIMM into the slot until the retaining clips at ...
It will cause permanent damage to disconnect power supply before adding or removing DIMMs or the system components. English 9 ASRock P4V88/P4V88+ Motherboard Installing a DIMM Please make sure to the motherboard and the DIMM if you force the DIMM into the slot until the retaining clips at ...

Quick Installation Guide
Page 10
... interface. AGP slot: The AGP slot is unplugged. 2.3 Expansion Slots (PCI and AGP Slots) There are used to the chassis with screws. 10 ASRock P4V88/P4V88+ Motherboard English The ASRock AGP slot has a special design of your AGP card, please check with the slot and press firmly until the card is completely seated on...
... interface. AGP slot: The AGP slot is unplugged. 2.3 Expansion Slots (PCI and AGP Slots) There are used to the chassis with screws. 10 ASRock P4V88/P4V88+ Motherboard English The ASRock AGP slot has a special design of your AGP card, please check with the slot and press firmly until the card is completely seated on...
Quick Installation Guide
Page 11
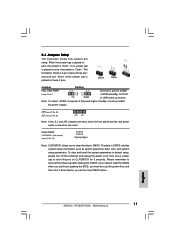
... rear panel audio connectors can work. Clear CMOS (CLRCMOS1, 2-pin jumper) (see p.2 No. 25) Note: If the JL1 and JR1 jumpers are setup. English 11 ASRock P4V88/P4V88+ Motherboard The data in CMOS.
... rear panel audio connectors can work. Clear CMOS (CLRCMOS1, 2-pin jumper) (see p.2 No. 25) Note: If the JL1 and JR1 jumpers are setup. English 11 ASRock P4V88/P4V88+ Motherboard The data in CMOS.
Quick Installation Guide
Page 12
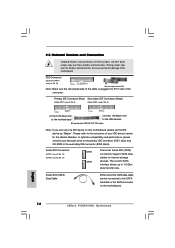
... ATA (SATA) connectors support SATA data cables for the details. The current SATA interface allows up to the secondary IDE connector (IDE2, black). English 12 ASRock P4V88/P4V88+ Motherboard Besides, to Pin1 Note: Make sure the red-striped side of the cable is plugged into Pin1 side of the motherboard! Serial ATA Connectors...
... ATA (SATA) connectors support SATA data cables for the details. The current SATA interface allows up to the secondary IDE connector (IDE2, black). English 12 ASRock P4V88/P4V88+ Motherboard Besides, to Pin1 Note: Make sure the red-striped side of the cable is plugged into Pin1 side of the motherboard! Serial ATA Connectors...
Quick Installation Guide
Page 13
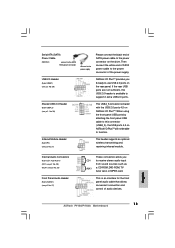
... drive. Shared USB 2.0 Header (9-pin USB4_5) (see p.2 No. 27) CD1 AUX1 These connectors allow you 6 ready-to-use USB 2.0 ports on ASRock I /O PlusTM provides you to receive stereo audio input from sound sources such as a CD-ROM, DVD-ROM, TV tuner card, or MPEG card. .... USB 2.0 Header (9-pin USB67) (see p.2 No. 21) This header supports an optional wireless transmitting and receiving infrared module. English 13 ASRock P4V88/P4V88+ Motherboard Serial ATA (SATA) Power Cable (Optional) connect to the SATA HDD power connector connect to the power supply Please connect the black...
... drive. Shared USB 2.0 Header (9-pin USB4_5) (see p.2 No. 27) CD1 AUX1 These connectors allow you 6 ready-to-use USB 2.0 ports on ASRock I /O PlusTM provides you to receive stereo audio input from sound sources such as a CD-ROM, DVD-ROM, TV tuner card, or MPEG card. .... USB 2.0 Header (9-pin USB67) (see p.2 No. 21) This header supports an optional wireless transmitting and receiving infrared module. English 13 ASRock P4V88/P4V88+ Motherboard Serial ATA (SATA) Power Cable (Optional) connect to the SATA HDD power connector connect to the power supply Please connect the black...
Quick Installation Guide
Page 14
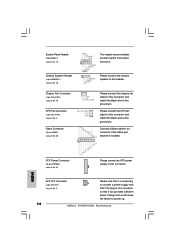
... is necessary to connect a power supply with ATX 12V plug to this header. Failing to do so will cause the failure to power up. 14 ASRock P4V88/P4V88+ Motherboard System Panel Header (9-pin PANEL1) (see p.2 No. 17) Chassis Speaker Header (4-pin SPEAKER 1) (see p.2 No. 18) Chassis Fan Connector (3-pin CHA_FAN1) (see p.2 No. 19...
... is necessary to connect a power supply with ATX 12V plug to this header. Failing to do so will cause the failure to power up. 14 ASRock P4V88/P4V88+ Motherboard System Panel Header (9-pin PANEL1) (see p.2 No. 17) Chassis Speaker Header (4-pin SPEAKER 1) (see p.2 No. 18) Chassis Fan Connector (3-pin CHA_FAN1) (see p.2 No. 19...
Quick Installation Guide
Page 15
... STEP 4: Connect the other end of the SATA data cable to the SATA hard disk. 2.7 Hot Plug and Hot Swap Functions for SATA HDDs P4V88/P4V88+ motherboard supports Hot Plug and Hot Swap functions for the action to insert and remove the SATA HDDs while the system is called "Hot Plug... cable to the SATA hard disk. If the SATA HDDs are built as RAID1 then it is still power-on and in working condition. 15 ASRock P4V88/P4V88+ Motherboard English 2.6 Serial ATA (SATA) Hard Disks Installation This motherboard adopts VIA VT8237 southbridge chipset that it cannot perform Hot Plug if the OS...
... STEP 4: Connect the other end of the SATA data cable to the SATA hard disk. 2.7 Hot Plug and Hot Swap Functions for SATA HDDs P4V88/P4V88+ motherboard supports Hot Plug and Hot Swap functions for the action to insert and remove the SATA HDDs while the system is called "Hot Plug... cable to the SATA hard disk. If the SATA HDDs are built as RAID1 then it is still power-on and in working condition. 15 ASRock P4V88/P4V88+ Motherboard English 2.6 Serial ATA (SATA) Hard Disks Installation This motherboard adopts VIA VT8237 southbridge chipset that it cannot perform Hot Plug if the OS...
Quick Installation Guide
Page 16
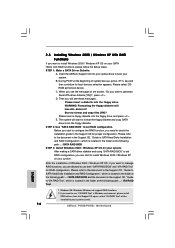
... "VIA RAID Tool" will see the message on your system. If you can start to install Windows 2000 / Windows XP on your system. Insert the ASRock Support CD into the floppy drive. C. Start to set RAID configuration, you want to use both "SATA RAID BIOS" and "VIA RAID Tool" for RAID... screen, "Do you want to format the floppy diskette and copy SATA drivers into the floppy drive, and press . Please select CDROM as well. 16 ASRock P4V88/P4V88+ Motherboard English A. STEP 1: Make a SATA Driver Diskette.
... "VIA RAID Tool" will see the message on your system. If you can start to install Windows 2000 / Windows XP on your system. Insert the ASRock Support CD into the floppy drive. C. Start to set RAID configuration, you want to use both "SATA RAID BIOS" and "VIA RAID Tool" for RAID... screen, "Do you want to format the floppy diskette and copy SATA drivers into the floppy drive, and press . Please select CDROM as well. 16 ASRock P4V88/P4V88+ Motherboard English A. STEP 1: Make a SATA Driver Diskette.
Quick Installation Guide
Page 17
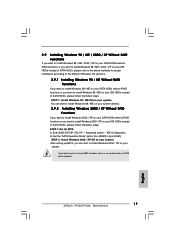
...-RAID]. STEP 1: Install Windows 98 / ME OS on your system. A. After setting up RAID functions, there is no need to make a SATA driver diskette. 17 ASRock P4V88/P4V88+ Motherboard English 2.9 Installing Windows 98 / ME / 2000 / XP Without RAID Functions If you want to install Windows 98 / ME / 2000 / XP on your SATA HDDs...
...-RAID]. STEP 1: Install Windows 98 / ME OS on your system. A. After setting up RAID functions, there is no need to make a SATA driver diskette. 17 ASRock P4V88/P4V88+ Motherboard English 2.9 Installing Windows 98 / ME / 2000 / XP Without RAID Functions If you want to install Windows 98 / ME / 2000 / XP on your SATA HDDs...
Quick Installation Guide
Page 18
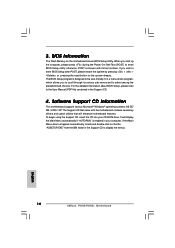
... button on the system chassis. If you start up the computer, please press during the Power-On-Self-Test (POST) to display the menus. 18 ASRock P4V88/P4V88+ Motherboard English Software Support CD information This motherboard supports various Microsoft® Windows® operating systems: 98 SE/ ME / 2000 / XP. To begin using the...
... button on the system chassis. If you start up the computer, please press during the Power-On-Self-Test (POST) to display the menus. 18 ASRock P4V88/P4V88+ Motherboard English Software Support CD information This motherboard supports various Microsoft® Windows® operating systems: 98 SE/ ME / 2000 / XP. To begin using the...
Quick Installation Guide
Page 19
19 ASRock P4V88/P4V88+ Motherboard
19 ASRock P4V88/P4V88+ Motherboard


