User Manual
Page 3
... ...Installing Windows® 7 / 7 64-bit / VistaTM / VistaTM 64-bit With RAID Functions ...Untied Overclocking Technology ...Introduction ...3.1.1 BIOS Menu Bar ...3.1.2 Navigation Keys ...Main Screen ...OC Tweaker Screen ...Advanced Screen ...3.4.1 CPU Configuration ...3.4.2 Chipset Configuration ...3.4.3 ACPI Configuration ...3.4.4 Storage Configuration ...3.4.5 PCIPnP Configuration ...3.4.6 Super IO Configuration ... 3 . BIOS S ETUP UTILITY ...30 SETUP 3.2 3.3 3.4 3 Introduction ...5 1.1 1.2 1.3 1.4 1.5 Package Contents ...Specifications ...Motherboard Layout (N68-VGS3 UCC / N68-VS3 UCC...
... ...Installing Windows® 7 / 7 64-bit / VistaTM / VistaTM 64-bit With RAID Functions ...Untied Overclocking Technology ...Introduction ...3.1.1 BIOS Menu Bar ...3.1.2 Navigation Keys ...Main Screen ...OC Tweaker Screen ...Advanced Screen ...3.4.1 CPU Configuration ...3.4.2 Chipset Configuration ...3.4.3 ACPI Configuration ...3.4.4 Storage Configuration ...3.4.5 PCIPnP Configuration ...3.4.6 Super IO Configuration ... 3 . BIOS S ETUP UTILITY ...30 SETUP 3.2 3.3 3.4 3 Introduction ...5 1.1 1.2 1.3 1.4 1.5 Package Contents ...Specifications ...Motherboard Layout (N68-VGS3 UCC / N68-VS3 UCC...
User Manual
Page 9
... other complicated flash utility. Connecting your PC and apple devices via Bluetooth or WiFi networks, then you have to your iPhone/iPod touch. ASRock Instant Flash is just to install the ASRock AIWI utility either from ASRock official website or ASRock software support CD to your motherboard, and also download the free AIWI Lite from App store to your USB flash drive, floppy disk or hard drive, then you to record the OC settings and...
... other complicated flash utility. Connecting your PC and apple devices via Bluetooth or WiFi networks, then you have to your iPhone/iPod touch. ASRock Instant Flash is just to install the ASRock AIWI utility either from ASRock official website or ASRock software support CD to your motherboard, and also download the free AIWI Lite from App store to your USB flash drive, floppy disk or hard drive, then you to record the OC settings and...
User Manual
Page 11
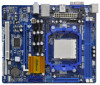
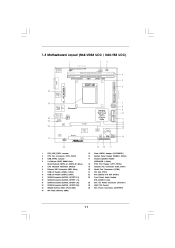
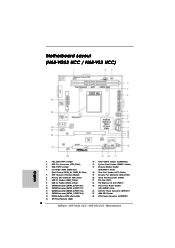
... (PORT 0.1)) SATAII Connector (SATAII_4 (PORT 1.1)) SATAII Connector (SATAII_3 (PORT 1.0)) SATAII Connector (SATAII_1 (PORT 0.0)) NVIDIA GeForce 7025 / nForce 630a SPI Flash Memory (4Mb) 15 16 17 18 19 20 21 22 23 24 25 26 19 18 17 Clear CMOS Jumper (CLRCMOS1) System Panel Header (PANEL1, White) Chassis Speaker Header (SPEAKER 1, White) Print Port Header (LPT1, White) Chassis Fan Connector (CHA_FAN1) Serial Port Connector (COM1) PCI Slot (PCI1) PCI Express x16 Slot (PCIE1) Front Panel Audio Header (HD_AUDIO1, Lime) ATX 12V Power Connector (ATX12V1) AM3 CPU Socket ATX Power Connector...
... (PORT 0.1)) SATAII Connector (SATAII_4 (PORT 1.1)) SATAII Connector (SATAII_3 (PORT 1.0)) SATAII Connector (SATAII_1 (PORT 0.0)) NVIDIA GeForce 7025 / nForce 630a SPI Flash Memory (4Mb) 15 16 17 18 19 20 21 22 23 24 25 26 19 18 17 Clear CMOS Jumper (CLRCMOS1) System Panel Header (PANEL1, White) Chassis Speaker Header (SPEAKER 1, White) Print Port Header (LPT1, White) Chassis Fan Connector (CHA_FAN1) Serial Port Connector (COM1) PCI Slot (PCI1) PCI Express x16 Slot (PCIE1) Front Panel Audio Header (HD_AUDIO1, Lime) ATX 12V Power Connector (ATX12V1) AM3 CPU Socket ATX Power Connector...
User Manual
Page 18
... PCIE1 (PCIE x16 slot). Install the NVIDIA® PCI Express VGA card to set up a multi-monitor display. Please refer to this motherboard. Connect the DVI-D monitor cable to enter BIOS setup. Boot your system. Press or to the VGA/DVI-D connector of the multi-monitor according to apply these new values. If you do not adjust the BIOS setup, the default value of "Share Memory", [Auto], will be Primary, and all additional monitors will disable onboard VGA/D-Sub function...
... PCIE1 (PCIE x16 slot). Install the NVIDIA® PCI Express VGA card to set up a multi-monitor display. Please refer to this motherboard. Connect the DVI-D monitor cable to enter BIOS setup. Boot your system. Press or to the VGA/DVI-D connector of the multi-monitor according to apply these new values. If you do not adjust the BIOS setup, the default value of "Share Memory", [Auto], will be Primary, and all additional monitors will disable onboard VGA/D-Sub function...
User Manual
Page 24
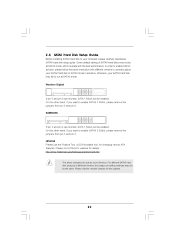
... hard disks may not be enabled. In order to enable SATAII function, please follow the below SATAII hard disk setup guide. 2.8 SA TAII Hard Disk Setup Guide SAT Before installing SATAII hard disk to your reference. Please visit the vendors' website for changing various ATA features. Western Digital 7 8 5 6 3 4 1 2 If pin 5 and pin 6 are shorted, SATA 1.5Gb/s will be at SATAII mode. Please visit HITACHI's website for details: http://www.hitachigst.com/hdd/support/download...
... hard disks may not be enabled. In order to enable SATAII function, please follow the below SATAII hard disk setup guide. 2.8 SA TAII Hard Disk Setup Guide SAT Before installing SATAII hard disk to your reference. Please visit the vendors' website for changing various ATA features. Western Digital 7 8 5 6 3 4 1 2 If pin 5 and pin 6 are shorted, SATA 1.5Gb/s will be at SATAII mode. Please visit HITACHI's website for details: http://www.hitachigst.com/hdd/support/download...
User Manual
Page 28
... Windows® 7 / 7 64-bit users, you need for proper configuration. Set the "SATA Operation Mode" option to your SATA / SATAII HDDs with RAID functions, please follow the order from ASRock support CD. Please follow below procedures according to the OS you install Windows® 7 / 7 64-bit / VistaTM / VistaTM 64-bit on IDE HDDs and want to check the RAID installation guide in -1 driver. 28 STEP 2: Use "RAID Installation Guide" to set up to bottom side to the BIOS RAID installation guide part of...
... Windows® 7 / 7 64-bit users, you need for proper configuration. Set the "SATA Operation Mode" option to your SATA / SATAII HDDs with RAID functions, please follow the order from ASRock support CD. Please follow below procedures according to the OS you install Windows® 7 / 7 64-bit / VistaTM / VistaTM 64-bit on IDE HDDs and want to check the RAID installation guide in -1 driver. 28 STEP 2: Use "RAID Installation Guide" to set up to bottom side to the BIOS RAID installation guide part of...
User Manual
Page 32
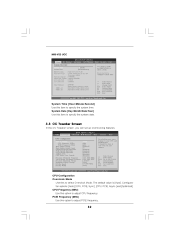
... MHZ Processor Maximum Voltage 1.43750 V [Auto] Multiplier/Voltage Change [x5 1000 MHz] HT Bus Speed [Auto] HT Bus Width Overclock Mode CPU Frequency (MHz) PCIE Frequency (MHz) Boot Failure Guard Boot Failure Guard Count CPU/LDT Spread Spectrum PCIE Spread Spectrum SATA Spread Spectrum ASRock UCC CPU Active Core Control BIOS SETUP UTILITY Advanced H/W Monitor Boot Security Exit Overclocking may cause damage to adjust PCIE frequency. 32 Enter F1 F9 F10 ESC Select Screen Select Item Go to select a field. N68-VS3 UCC OC Tweaker BIOS SETUP UTILITY Advanced H/W Monitor Boot Security...
... MHZ Processor Maximum Voltage 1.43750 V [Auto] Multiplier/Voltage Change [x5 1000 MHz] HT Bus Speed [Auto] HT Bus Width Overclock Mode CPU Frequency (MHz) PCIE Frequency (MHz) Boot Failure Guard Boot Failure Guard Count CPU/LDT Spread Spectrum PCIE Spread Spectrum SATA Spread Spectrum ASRock UCC CPU Active Core Control BIOS SETUP UTILITY Advanced H/W Monitor Boot Security Exit Overclocking may cause damage to adjust PCIE frequency. 32 Enter F1 F9 F10 ESC Select Screen Select Item Go to select a field. N68-VS3 UCC OC Tweaker BIOS SETUP UTILITY Advanced H/W Monitor Boot Security...
User Manual
Page 40
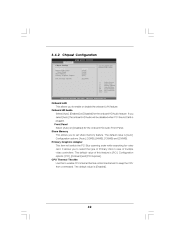
... controllers. Configuration options: [PCI], [Onboard] and [PCI Express]. Onboard LAN This allows you to select the type of Primary VGA in case of this to enable CPU internal thermal control mechanism to enable or disable the onboard LAN feature. 3 . 4 . 2 Chipset Configuration BIOS SETUP UTILITY Advanced Chipset Settings Onboard LAN Onboard HD Audio Front Panel Share Memory Primary Graphics Adapter CPU Thermal Throttle [Enabled] [Auto] [Auto] [Auto] [PCI] [Enabled] Select Screen Select Item Change Option General Help Load Defaults Save and Exit Exit Auto/Enable/Disable Onboard HD Audio...
... controllers. Configuration options: [PCI], [Onboard] and [PCI Express]. Onboard LAN This allows you to select the type of Primary VGA in case of this to enable CPU internal thermal control mechanism to enable or disable the onboard LAN feature. 3 . 4 . 2 Chipset Configuration BIOS SETUP UTILITY Advanced Chipset Settings Onboard LAN Onboard HD Audio Front Panel Share Memory Primary Graphics Adapter CPU Thermal Throttle [Enabled] [Auto] [Auto] [Auto] [PCI] [Enabled] Select Screen Select Item Change Option General Help Load Defaults Save and Exit Exit Auto/Enable/Disable Onboard HD Audio...
User Manual
Page 43
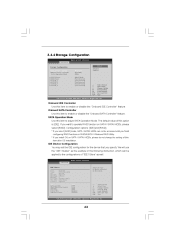
... Change Option General Help Load Defaults Save and Exit Exit v02.54 (C) Copyright 1985-2003, American Megatrends, Inc. 43 Onboard SATA Controller Use this item to enable or disable the "Onboard IDE Controller" feature. BIOS SETUP UTILITY Advanced IDE Master Device Vendor Size LBA Mode Block Mode PIO Mode Async DMA Ultra DMA S.M.A.R.T. :Hard Disk :MAXTOR 6L080J4 :80.0 GB :Supported :16Sectors :4 :MultiWord DMA-2 :Ultra DMA-6 :Supported [Auto] [Auto] [Auto] [Auto] [Auto] [Disabled] [Disabled] Select the type of this item to adjust SATA Operation Mode. 3.4.4 Storage Configuration BIOS...
... Change Option General Help Load Defaults Save and Exit Exit v02.54 (C) Copyright 1985-2003, American Megatrends, Inc. 43 Onboard SATA Controller Use this item to enable or disable the "Onboard IDE Controller" feature. BIOS SETUP UTILITY Advanced IDE Master Device Vendor Size LBA Mode Block Mode PIO Mode Async DMA Ultra DMA S.M.A.R.T. :Hard Disk :MAXTOR 6L080J4 :80.0 GB :Supported :16Sectors :4 :MultiWord DMA-2 :Ultra DMA-6 :Supported [Auto] [Auto] [Auto] [Auto] [Auto] [Disabled] [Disabled] Select the type of this item to adjust SATA Operation Mode. 3.4.4 Storage Configuration BIOS...
User Manual
Page 44
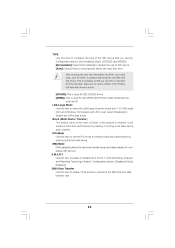
... the hard disk timing. S.M.A.R.T. TYPE Use this item is [Auto]. Configuration options: [Not Installed], [Auto], [CD/DVD], and [ARMD]. [Not Installed]: Select [Not Installed] to partition and format the new IDE hard disk drives. Configuration options: [Disabled], [Auto], [Enabled]. 32Bit Data Transfer Use this item to select the LBA/Large mode for IDE ARMD (ATAPI Removable Media Device), such as FDISK, to disable the use a disk utility, such as MO. LBA/Large Mode Use this item to enable 32-bit access to automatically detect the hard disk drive. Use...
... the hard disk timing. S.M.A.R.T. TYPE Use this item is [Auto]. Configuration options: [Not Installed], [Auto], [CD/DVD], and [ARMD]. [Not Installed]: Select [Not Installed] to partition and format the new IDE hard disk drives. Configuration options: [Disabled], [Auto], [Enabled]. 32Bit Data Transfer Use this item to select the LBA/Large mode for IDE ARMD (ATAPI Removable Media Device), such as FDISK, to disable the use a disk utility, such as MO. LBA/Large Mode Use this item to enable 32-bit access to automatically detect the hard disk drive. Use...
User Manual
Page 47
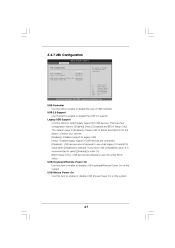
... to use under BIOS setup. There are connected. [Disabled] - Enables support for USB devices. If you have USB compatibility issue, it is recommended to select [Disabled] to enable or disable USB Mouse Power On on the system. 3.4.7 USB Configuration BIOS SETUP UTILITY Advanced USB Configuration USB Controller USB 2.0 Support Legacy USB Support USB Keyboard/Remote Power On USB Mouse Power On [Enabled] [Enabled] [Enabled] [Disabled] [Disabled] To enable or disable the onboard USB controllers. +F1 F9 F10 ESC Select Screen Select Item Change Option General Help Load Defaults...
... to use under BIOS setup. There are connected. [Disabled] - Enables support for USB devices. If you have USB compatibility issue, it is recommended to select [Disabled] to enable or disable USB Mouse Power On on the system. 3.4.7 USB Configuration BIOS SETUP UTILITY Advanced USB Configuration USB Controller USB 2.0 Support Legacy USB Support USB Keyboard/Remote Power On USB Mouse Power On [Enabled] [Enabled] [Enabled] [Disabled] [Disabled] To enable or disable the onboard USB controllers. +F1 F9 F10 ESC Select Screen Select Item Change Option General Help Load Defaults...
User Manual
Page 52
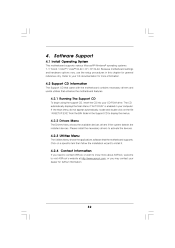
... The Support CD that came with the motherboard contains necessary drivers and useful utilities that the motherboard supports. The CD automatically displays the Main Menu if "AUTORUN" is enabled in this chapter for general reference only. or you need to contact ASRock or want to display the menus. 4.2.2 Drivers Menu The Drivers Menu shows the available devices drivers if the system detects the installed devices. Because motherboard settings and hardware options vary, use the setup procedures...
... The Support CD that came with the motherboard contains necessary drivers and useful utilities that the motherboard supports. The CD automatically displays the Main Menu if "AUTORUN" is enabled in this chapter for general reference only. or you need to contact ASRock or want to display the menus. 4.2.2 Drivers Menu The Drivers Menu shows the available devices drivers if the system detects the installed devices. Because motherboard settings and hardware options vary, use the setup procedures...
Quick Installation Guide
Page 2
... Panel Header (PANEL1, White) 17 Chassis Speaker Header (SPEAKER 1, White) 18 Print Port Header (LPT1, White) 19 Chassis Fan Connector (CHA_FAN1) 20 Serial Port Connector (COM1) 21 PCI Slot (PCI1) 22 PCI Express x16 Slot (PCIE1) 23 Front Panel Audio Header (HD_AUDIO1, Lime) 24 ATX 12V Power Connector (ATX12V1) 25 AM3 CPU Socket 26 ATX Power Connector (ATXPWR1) 2 ASRock N68-VGS3 UCC / N68-VS3 UCC Motherboard Motherboard Layout (N68-VGS3 UCC / N68-VS3 UCC) English 1 PS2_USB_PWR1 Jumper 2 CPU Fan Connector (CPU_FAN1) 3 USB_PWR2 Jumper 4 2 x 240-pin DDR3 DIMM Slots (Dual Channel: DDR3_A1...
... Panel Header (PANEL1, White) 17 Chassis Speaker Header (SPEAKER 1, White) 18 Print Port Header (LPT1, White) 19 Chassis Fan Connector (CHA_FAN1) 20 Serial Port Connector (COM1) 21 PCI Slot (PCI1) 22 PCI Express x16 Slot (PCIE1) 23 Front Panel Audio Header (HD_AUDIO1, Lime) 24 ATX 12V Power Connector (ATX12V1) 25 AM3 CPU Socket 26 ATX Power Connector (ATXPWR1) 2 ASRock N68-VGS3 UCC / N68-VS3 UCC Motherboard Motherboard Layout (N68-VGS3 UCC / N68-VS3 UCC) English 1 PS2_USB_PWR1 Jumper 2 CPU Fan Connector (CPU_FAN1) 3 USB_PWR2 Jumper 4 2 x 240-pin DDR3 DIMM Slots (Dual Channel: DDR3_A1...
Quick Installation Guide
Page 7
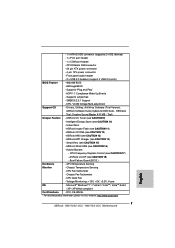
...2 x IDE devices) - 1 x Print port header - 1 x COM port header - ASRock Instant Flash (see CAUTION 9) - ASRock XFast USB (see CAUTION 17) - ACPI 1.1 Compliance Wake Up Events - Drivers, Utilities, AntiVirus Software (Trial Version), ASRock Software Suite (CyberLink DVD Suite - FCC, CE, WHQL * For detailed product information, please visit our website: http://www.asrock.com English 7 ASRock N68-VGS3 UCC / N68-VS3 UCC Motherboard AMI Legal BIOS - CPU Frequency Stepless Control (see CAUTION 16) - Hybrid Booster: - Chassis Fan Tachometer - Front panel audio...
...2 x IDE devices) - 1 x Print port header - 1 x COM port header - ASRock Instant Flash (see CAUTION 9) - ASRock XFast USB (see CAUTION 17) - ACPI 1.1 Compliance Wake Up Events - Drivers, Utilities, AntiVirus Software (Trial Version), ASRock Software Suite (CyberLink DVD Suite - FCC, CE, WHQL * For detailed product information, please visit our website: http://www.asrock.com English 7 ASRock N68-VGS3 UCC / N68-VS3 UCC Motherboard AMI Legal BIOS - CPU Frequency Stepless Control (see CAUTION 16) - Hybrid Booster: - Chassis Fan Tachometer - Front panel audio...
Quick Installation Guide
Page 9
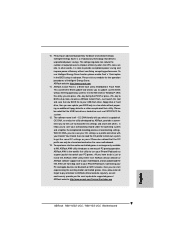
... new BIOS file to access ASRock Instant Flash. Just launch this utility, you can update your USB flash drive, floppy disk or hard drive, then you can only be noted that the OC profile can press key during the POST or press key to BIOS setup menu to your BIOS only in Flash ROM. Please be shared and worked on the same motherboard. 13. All you can reduce the number of . Connecting your PC and apple devices...
... new BIOS file to access ASRock Instant Flash. Just launch this utility, you can update your USB flash drive, floppy disk or hard drive, then you can only be noted that the OC profile can press key during the POST or press key to BIOS setup menu to your BIOS only in Flash ROM. Please be shared and worked on the same motherboard. 13. All you can reduce the number of . Connecting your PC and apple devices...

Quick Installation Guide
Page 15
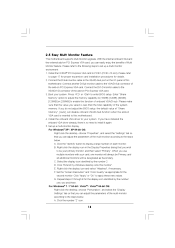
... memory. D. Repeat steps C through E for the second monitor. Click the number "2" icon. 15 ASRock N68-VGS3 UCC / N68-VS3 UCC Motherboard English Boot your card, one , two and three. Set up a multi monitor environment: 1. When you can easily enjoy the benefits of this monitor". With the internal onboard VGA and the external add-on PCI Express VGA card. 3. Connect the DVI-D monitor cable to apply these new values. Please make sure that you use multiple monitors...
... memory. D. Repeat steps C through E for the second monitor. Click the number "2" icon. 15 ASRock N68-VGS3 UCC / N68-VS3 UCC Motherboard English Boot your card, one , two and three. Set up a multi monitor environment: 1. When you can easily enjoy the benefits of this monitor". With the internal onboard VGA and the external add-on PCI Express VGA card. 3. Connect the DVI-D monitor cable to apply these new values. Please make sure that you use multiple monitors...
Quick Installation Guide
Page 20
... connect a power supply with RAID functions, please refer to install those required drivers. Failing to change the BIOS setting. ATX 12V Power Connector (4-pin ATX12V1) (see p.2 No. 10) Serial port Header (9-pin COM1) (see p.2 No.20) Please note that it is no need for detailed procedures: ..\ RAID Installation Guide English 20 ASRock N68-VGS3 UCC / N68-VS3 UCC Motherboard Therefore, the drivers you install can be auto-detected and listed on your SATA / SATAII HDDs without RAID functions, you just want to install Windows® 7 / 7 64-bit...
... connect a power supply with RAID functions, please refer to install those required drivers. Failing to change the BIOS setting. ATX 12V Power Connector (4-pin ATX12V1) (see p.2 No. 10) Serial port Header (9-pin COM1) (see p.2 No.20) Please note that it is no need for detailed procedures: ..\ RAID Installation Guide English 20 ASRock N68-VGS3 UCC / N68-VS3 UCC Motherboard Therefore, the drivers you install can be auto-detected and listed on your SATA / SATAII HDDs without RAID functions, you just want to install Windows® 7 / 7 64-bit...
Quick Installation Guide
Page 21
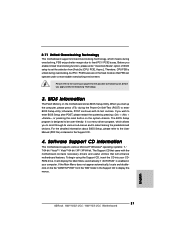
... the motherboard contains necessary drivers and useful utilities that will display the Main Menu automatically if "AUTORUN" is untied during overclocking, but PCI / PCIE buses are in your CDROM drive. Software Support CD information This motherboard supports various Microsoft® Windows® operating systems: 7 / 7 64-bit / VistaTM / VistaTM 64-bit / XP / XP 64-bit. When you enable Untied Overclocking function, please enter "Overclock Mode" option of BIOS setup to be user-friendly. If you apply Untied Overclocking Technology. 3. The Support CD...
... the motherboard contains necessary drivers and useful utilities that will display the Main Menu automatically if "AUTORUN" is untied during overclocking, but PCI / PCIE buses are in your CDROM drive. Software Support CD information This motherboard supports various Microsoft® Windows® operating systems: 7 / 7 64-bit / VistaTM / VistaTM 64-bit / XP / XP 64-bit. When you enable Untied Overclocking function, please enter "Overclock Mode" option of BIOS setup to be user-friendly. If you apply Untied Overclocking Technology. 3. The Support CD...
RAID Installation Guide
Page 7
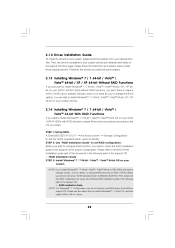
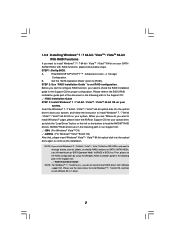
... ASRock Support CD into the optical drive to boot your system. B. If you install Windows® 7 / 7 64-bit / VistaTM / VistaTM 64-bit on IDE HDDs and want to install Windows® 7 / 7 64-bit / VistaTM / VistaTM 64-bit on your SATA / SATAII HDDs with RAID functions, please follow the instruction to install Windows® 7 / 7 64-bit / VistaTM / VistaTM 64-bit OS on your system, and follow below steps. Then, please set RAID configuration. STEP 1: Set Up BIOS. Enter BIOS SETUP UTILITY Advanced screen Storage Configuration. 1.3.2 Installing Windows...
... ASRock Support CD into the optical drive to boot your system. B. If you install Windows® 7 / 7 64-bit / VistaTM / VistaTM 64-bit on IDE HDDs and want to install Windows® 7 / 7 64-bit / VistaTM / VistaTM 64-bit on your SATA / SATAII HDDs with RAID functions, please follow the instruction to install Windows® 7 / 7 64-bit / VistaTM / VistaTM 64-bit OS on your system, and follow below steps. Then, please set RAID configuration. STEP 1: Set Up BIOS. Enter BIOS SETUP UTILITY Advanced screen Storage Configuration. 1.3.2 Installing Windows...
RAID Installation Guide
Page 11
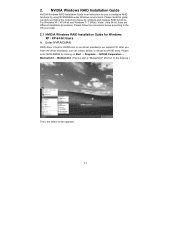
... enter NVRAIDMAN by using NVIDIAMAN under Windows environment. NVIDIA Windows RAID Installation Guide NVIDIA Windows RAID Installation Guide is an instruction for Windows XP / XP 64-bit Users A. Enter NVRAIDMAN RAID driver is also a "Mediashield" shortcut on the desktop.) Then, the below according to configure RAID functions by clicking on Start → Programs → NVIDIA Corporation → Mediashield → Mediashield. (There is built in NVIDIA ALL in one driver provided in our support CD...
... enter NVRAIDMAN by using NVIDIAMAN under Windows environment. NVIDIA Windows RAID Installation Guide NVIDIA Windows RAID Installation Guide is an instruction for Windows XP / XP 64-bit Users A. Enter NVRAIDMAN RAID driver is also a "Mediashield" shortcut on the desktop.) Then, the below according to configure RAID functions by clicking on Start → Programs → NVIDIA Corporation → Mediashield → Mediashield. (There is built in NVIDIA ALL in one driver provided in our support CD...


