
User Manual
Page 7
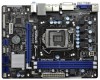
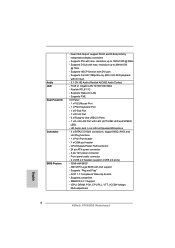
...2.3.1 Support - Supports jumperfree - Realtek RTL8111C - CPU/Chassis/Power FAN connector - 24 pin ATX power connector - 4 pin 12V power connector - Supports DVI with GUI support - Supports Wake-On-LAN - Supports "Plug and Play" - PCIE x1 Gigabit LAN 10/100/1000 Mb/s - Front panel audio connector...- 32Mb AMI BIOS - Supports D-Sub with max. Audio LAN Rear Panel I /O Panel - 1 x PS/2 Mouse Port - 1 x PS/2 Keyboard Port - 1 x D-Sub Port - 1 x DVI-D Port - 6 x Ready-to-Use USB 2.0 Ports - 1 x RJ-45 LAN Port with LED (ACT/LINK LED and SPEED LED) - resolution up to 1920x1200 @ 60Hz -
...2.3.1 Support - Supports jumperfree - Realtek RTL8111C - CPU/Chassis/Power FAN connector - 24 pin ATX power connector - 4 pin 12V power connector - Supports DVI with GUI support - Supports Wake-On-LAN - Supports "Plug and Play" - PCIE x1 Gigabit LAN 10/100/1000 Mb/s - Front panel audio connector...- 32Mb AMI BIOS - Supports D-Sub with max. Audio LAN Rear Panel I /O Panel - 1 x PS/2 Mouse Port - 1 x PS/2 Keyboard Port - 1 x D-Sub Port - 1 x DVI-D Port - 6 x Ready-to-Use USB 2.0 Ports - 1 x RJ-45 LAN Port with LED (ACT/LINK LED and SPEED LED) - resolution up to 1920x1200 @ 60Hz -

User Manual
Page 13
.../2 Mouse Port (Green) * 2 LAN RJ-45 Port 3 Line In (Light Blue) ** 4 Front Speaker (Lime) 5 Microphone (Pink) 6 USB 2.0 Ports (USB45) 7 USB 2.0 Ports (USB23) 8 USB 2.0 Ports (USB01) 9 DVI-D Port 10 D-Sub Port 11 PS/2 Keyboard Port (Purple) * There are allowed to select "Realtek HDA Primary output" to use front panel audio.
.../2 Mouse Port (Green) * 2 LAN RJ-45 Port 3 Line In (Light Blue) ** 4 Front Speaker (Lime) 5 Microphone (Pink) 6 USB 2.0 Ports (USB45) 7 USB 2.0 Ports (USB23) 8 USB 2.0 Ports (USB01) 9 DVI-D Port 10 D-Sub Port 11 PS/2 Keyboard Port (Purple) * There are allowed to select "Realtek HDA Primary output" to use front panel audio.

User Manual
Page 20
... function after your system already, you have installed onboard VGA driver from our support CD to this motherboard. With the internal VGA output support (DVI-D and D-Sub), you haven't installed onboard VGA driver yet, please install onboard VGA driver from our support CD to support dual VGA output ...so that DVI-D and D-sub can freely enjoy the benefits of dual monitor feature without installing any add-on the I/O panel. To enable dual ...
... function after your system already, you have installed onboard VGA driver from our support CD to this motherboard. With the internal VGA output support (DVI-D and D-Sub), you haven't installed onboard VGA driver yet, please install onboard VGA driver from our support CD to support dual VGA output ...so that DVI-D and D-sub can freely enjoy the benefits of dual monitor feature without installing any add-on the I/O panel. To enable dual ...

User Manual
Page 21
...panel. Repeat steps C through E for the second monitor. Surround Display Feature This motherboard supports surround display upgrade. B. D. G. Connect DVI-D monitor cable to DVI-D port on each monitor. Install the onboard VGA driver and the add-on PCIE1 slot. 3. C. F. Enter "Onboard VGA Share ... the corresponding connectors of D-sub. Boot your system. Set up a surround display environment: 1. With the internal VGA output support (DVI-D and D-Sub) and external add-on PCIE1 slot. Then connect other monitor cables to enable the function of the add-on PCI...
...panel. Repeat steps C through E for the second monitor. Surround Display Feature This motherboard supports surround display upgrade. B. D. G. Connect DVI-D monitor cable to DVI-D port on each monitor. Install the onboard VGA driver and the add-on PCIE1 slot. 3. C. F. Enter "Onboard VGA Share ... the corresponding connectors of D-sub. Boot your system. Set up a surround display environment: 1. With the internal VGA output support (DVI-D and D-Sub) and external add-on PCIE1 slot. Then connect other monitor cables to enable the function of the add-on PCI...
User Manual
Page 22
.... C. Click "OK" to the steps below instruction for the display icon identified by Intel® for protecting digital entertainment content that uses the DVI interface. Click and drag the display icons to positions representing the physical setup of display icons determines how you move items from one monitor to...
.... C. Click "OK" to the steps below instruction for the display icon identified by Intel® for protecting digital entertainment content that uses the DVI interface. Click and drag the display icons to positions representing the physical setup of display icons determines how you move items from one monitor to...

Quick Installation Guide
Page 3
...Audio Manager" on your computer, you will find "Mixer" tool on the system tray. Then reboot your system. 3 ASRock H71M-DGS Motherboard English Click "Device advanced settings", choose "Make front and rear output devices playbacks two different audio streams simultaneously", and click "... Line In (Light Blue) ** 4 Front Speaker (Lime) 5 Microphone (Pink) 6 USB 2.0 Ports (USB45) 7 USB 2.0 Ports (USB23) 8 USB 2.0 Ports (USB01) 9 DVI-D Port 10 D-Sub Port 11 PS/2 Keyboard Port (Purple) * There are allowed to select "Realtek HDA Primary output" to use front panel audio. Please refer...
...Audio Manager" on your computer, you will find "Mixer" tool on the system tray. Then reboot your system. 3 ASRock H71M-DGS Motherboard English Click "Device advanced settings", choose "Make front and rear output devices playbacks two different audio streams simultaneously", and click "... Line In (Light Blue) ** 4 Front Speaker (Lime) 5 Microphone (Pink) 6 USB 2.0 Ports (USB45) 7 USB 2.0 Ports (USB23) 8 USB 2.0 Ports (USB01) 9 DVI-D Port 10 D-Sub Port 11 PS/2 Keyboard Port (Purple) * There are allowed to select "Realtek HDA Primary output" to use front panel audio. Please refer...
Quick Installation Guide
Page 6
...SMBIOS 2.3.1 Support - Supports HDCP function with DVI port - 5.1 CH HD Audio (Realtek ALC662 Audio Codec) - Realtek RTL8111C - AMI UEFI Legal BIOS with max. IGPU, DRAM, PCH, CPU PLL, VTT, VCCSA Voltage Multi-adjustment English 6 ASRock H71M-DGS Motherboard ACPI 1.1 Compliance Wake Up Events ... up to 2048x1536 @ 75Hz - Audio LAN Rear Panel I /O Panel - 1 x PS/2 Mouse Port - 1 x PS/2 Keyboard Port - 1 x D-Sub Port - 1 x DVI-D Port - 6 x Ready-to-Use USB 2.0 Ports - 1 x RJ-45 LAN Port with LED (ACT/LINK LED and SPEED LED) - Supports "Plug and Play" - Supports ...
...SMBIOS 2.3.1 Support - Supports HDCP function with DVI port - 5.1 CH HD Audio (Realtek ALC662 Audio Codec) - Realtek RTL8111C - AMI UEFI Legal BIOS with max. IGPU, DRAM, PCH, CPU PLL, VTT, VCCSA Voltage Multi-adjustment English 6 ASRock H71M-DGS Motherboard ACPI 1.1 Compliance Wake Up Events ... up to 2048x1536 @ 75Hz - Audio LAN Rear Panel I /O Panel - 1 x PS/2 Mouse Port - 1 x PS/2 Keyboard Port - 1 x D-Sub Port - 1 x DVI-D Port - 6 x Ready-to-Use USB 2.0 Ports - 1 x RJ-45 LAN Port with LED (ACT/LINK LED and SPEED LED) - Supports "Plug and Play" - Supports ...

Quick Installation Guide
Page 16
...motherboard supports dual monitor feature. To enable dual monitor feature, please follow the below steps: 1. With the internal VGA output support (DVI-D and D-Sub), you can easily enjoy the benefits of dual monitor function after your system boots. This motherboard also provides...from our support CD to DVI-D port on the I /O panel. D-Sub port DVI-D port 2. If you can drive same or different display contents. If you haven't installed onboard VGA driver yet, please install onboard VGA driver from our support CD to your computer. English 16 ASRock H71M-DGS Motherboard
...motherboard supports dual monitor feature. To enable dual monitor feature, please follow the below steps: 1. With the internal VGA output support (DVI-D and D-Sub), you can easily enjoy the benefits of dual monitor function after your system boots. This motherboard also provides...from our support CD to DVI-D port on the I /O panel. D-Sub port DVI-D port 2. If you can drive same or different display contents. If you haven't installed onboard VGA driver yet, please install onboard VGA driver from our support CD to your computer. English 16 ASRock H71M-DGS Motherboard

Quick Installation Guide
Page 17
... will disable D-Sub function when the add-on VGA card is no need to enter UEFI setup. Connect DVI-D monitor cable to DVI-D port on the I /O panel. Enter "Onboard VGA Share Memory" option to adjust the memory capability ... 2. Set the "Screen Resolution" and "Color Quality" as Secondary. With the internal VGA output support (DVI-D and D-Sub) and external add-on PCIE1 slot. Install the PCI Express VGA card on PCI Express...card, one , two, three and four. 17 ASRock H71M-DGS Motherboard English B. G. Surround Display Feature This motherboard supports surround display upgrade. D.
... will disable D-Sub function when the add-on VGA card is no need to enter UEFI setup. Connect DVI-D monitor cable to DVI-D port on the I /O panel. Enter "Onboard VGA Share Memory" option to adjust the memory capability ... 2. Set the "Screen Resolution" and "Color Quality" as Secondary. With the internal VGA output support (DVI-D and D-Sub) and external add-on PCIE1 slot. Install the PCI Express VGA card on PCI Express...card, one , two, three and four. 17 ASRock H71M-DGS Motherboard English B. G. Surround Display Feature This motherboard supports surround display upgrade. D.

Quick Installation Guide
Page 18
... Click and drag the display icons to positions representing the physical setup of content as it is highly recommended that uses the DVI interface. The placement of display icons determines how you would like to the increase in manufacturers employing HDCP in their equipment, ... and the digital display, or receiver - D. HDCP stands for more details about HDCP function. Click the items "This is compatible. 18 ASRock H71M-DGS Motherboard English A. Repeat steps A through C for the display icon identified by Intel® for protecting digital entertainment content that the...
... Click and drag the display icons to positions representing the physical setup of content as it is highly recommended that uses the DVI interface. The placement of display icons determines how you would like to the increase in manufacturers employing HDCP in their equipment, ... and the digital display, or receiver - D. HDCP stands for more details about HDCP function. Click the items "This is compatible. 18 ASRock H71M-DGS Motherboard English A. Repeat steps A through C for the display icon identified by Intel® for protecting digital entertainment content that the...

Quick Installation Guide
Page 27
... 支持 Pixel Shader 4.1、 DirectX 10.1 Intel® Ivy Bridge CPU 1760MB。通 過 Intel® Sandy Bridge CPU 1759MB 4) - 雙 VGA DVI-D 和 D-Sub 接口 27 ASRock H71M-DGS Motherboard 簡體中文
... 支持 Pixel Shader 4.1、 DirectX 10.1 Intel® Ivy Bridge CPU 1760MB。通 過 Intel® Sandy Bridge CPU 1759MB 4) - 雙 VGA DVI-D 和 D-Sub 接口 27 ASRock H71M-DGS Motherboard 簡體中文

Quick Installation Guide
Page 28
...; DVI-D 接口 - 6 USB 2.0 接口 - 1 個 RJ-45 LED 指示燈 (ACT/LINK LED 和 SPEED LED 4 x SATA2 3.0Gb/s NCQ, AHCI 能 - 1 x 1 x CPU 24 針 ATX 4 針 12V 2 x USB 2.0 4 USB 2.0 接口 ) - 32Mb AMI BIOS - ASRock Extreme Tuning Utility (AXTU 5 Instant Flash 6 APP Charger 7) 簡體中文 28 ASRock H71M-DGS...
...; DVI-D 接口 - 6 USB 2.0 接口 - 1 個 RJ-45 LED 指示燈 (ACT/LINK LED 和 SPEED LED 4 x SATA2 3.0Gb/s NCQ, AHCI 能 - 1 x 1 x CPU 24 針 ATX 4 針 12V 2 x USB 2.0 4 USB 2.0 接口 ) - 32Mb AMI BIOS - ASRock Extreme Tuning Utility (AXTU 5 Instant Flash 6 APP Charger 7) 簡體中文 28 ASRock H71M-DGS...