
Intel Rapid Storage Guide
Page 12
...to select the RAID level and press Enter. 4. Press Enter to save the BIOS settings and exit the BIOS Setup program. Click F2 or Delete to RAID. 5. Switch the SATA Operation Mode option to enter ...the BIOS Setup program after the Power-On-Self-Test (POST) memory test begins. 2. When the...hard drives and press Space to select the drive. Enable RAID in System BIOS Use the instructions included with your motherboard to enable RAID in the system BIOS, a RAID volume must be created, and the F6 installation method must ...
...to select the RAID level and press Enter. 4. Press Enter to save the BIOS settings and exit the BIOS Setup program. Click F2 or Delete to RAID. 5. Switch the SATA Operation Mode option to enter ...the BIOS Setup program after the Power-On-Self-Test (POST) memory test begins. 2. When the...hard drives and press Space to select the drive. Enable RAID in System BIOS Use the instructions included with your motherboard to enable RAID in the system BIOS, a RAID volume must be created, and the F6 installation method must ...
User Manual
Page 5
... related to the "User Manual" in , 30.5 cm x 21.1 cm) ASRock H67DE3 Quick Installation Guide ASRock H67DE3 Support CD 2 x Serial ATA (SATA) Data Cables (Optional) 1 x I/O Panel Shield 1 x 3D Red/Cyan Anaglyph Glasses (Optional) ASRock Reminds You... Chapter 3 and 4 contain the con guration guide to BIOS setup and information of the motherboard and stepby-step guide to...
... related to the "User Manual" in , 30.5 cm x 21.1 cm) ASRock H67DE3 Quick Installation Guide ASRock H67DE3 Support CD 2 x Serial ATA (SATA) Data Cables (Optional) 1 x I/O Panel Shield 1 x 3D Red/Cyan Anaglyph Glasses (Optional) ASRock Reminds You... Chapter 3 and 4 contain the con guration guide to BIOS setup and information of the motherboard and stepby-step guide to...
User Manual
Page 7
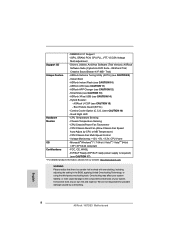
...USB 3.0 Ports - 1 x RJ-45 LAN Port with GUI support - Supports Energy Ef cient Ethernet 802.3az I /O SATA3 USB3.0 Connector BIOS Feature - AMI UEFI Legal BIOS with LED (ACT/LINK LED and SPEED LED) - Supports Wake-On-LAN - Front panel audio connector - 2 x USB 2.0 headers (...support 4 USB 2.0 ports) - 64Mb AMI BIOS - ACPI 1.1 Compliance Wake Up Events - Realtek RTL8111E - Supports jumperfree 7 Supports "Plug and Play" - LAN Rear Panel I /O Panel - 1 x PS/2 Keyboard ...
...USB 3.0 Ports - 1 x RJ-45 LAN Port with GUI support - Supports Energy Ef cient Ethernet 802.3az I /O SATA3 USB3.0 Connector BIOS Feature - AMI UEFI Legal BIOS with LED (ACT/LINK LED and SPEED LED) - Supports Wake-On-LAN - Front panel audio connector - 2 x USB 2.0 headers (...support 4 USB 2.0 ports) - 64Mb AMI BIOS - ACPI 1.1 Compliance Wake Up Events - Realtek RTL8111E - Supports jumperfree 7 Supports "Plug and Play" - LAN Rear Panel I /O Panel - 1 x PS/2 Keyboard ...

User Manual
Page 8
... realize that there is a certain risk involved with overclocking, including adjusting the setting in the BIOS, applying Untied Overclocking Technology, or using the third-party overclocking tools. ASRock XFast USB (see CAUTION 16) - CPU Temperature Sensing Monitor - CPU/Chassis Fan Multi-Speed.../ VistaTM / VistaTM 64-bit / XP / XP 64-bit compliant Certifications - Drivers, Utilities, AntiVirus Software (Trial Version), ASRock Software Suite (CyberLink DVD Suite - CPU/Chassis Quiet Fan (Allow Chassis Fan Speed Auto-Adjust by overclocking. 8 It should be done ...
... realize that there is a certain risk involved with overclocking, including adjusting the setting in the BIOS, applying Untied Overclocking Technology, or using the third-party overclocking tools. ASRock XFast USB (see CAUTION 16) - CPU Temperature Sensing Monitor - CPU/Chassis Fan Multi-Speed.../ VistaTM / VistaTM 64-bit / XP / XP 64-bit compliant Certifications - Drivers, Utilities, AntiVirus Software (Trial Version), ASRock Software Suite (CyberLink DVD Suite - CPU/Chassis Quiet Fan (Allow Chassis Fan Speed Auto-Adjust by overclocking. 8 It should be done ...
User Manual
Page 9
...of "Hyper Threading Technology", please check page 43. 3. This convenient BIOS update tool allows you are only supported under Windows® 7 64-bit / 7 / VistaTM 64-bit / VistaTM. 8. About the setting of ASRock Extreme Tuning Utility (AXTU). The maximum shared memory size is de ned... by the chipset vendor and is supported under Windows® 7 64-bit / 7. D-Sub, DVI-D andHDMI monitors cannot be overclocked. HBR is subject to update system BIOS without sacrificing computing ...
...of "Hyper Threading Technology", please check page 43. 3. This convenient BIOS update tool allows you are only supported under Windows® 7 64-bit / 7 / VistaTM 64-bit / VistaTM. 8. About the setting of ASRock Extreme Tuning Utility (AXTU). The maximum shared memory size is de ned... by the chipset vendor and is supported under Windows® 7 64-bit / 7. D-Sub, DVI-D andHDMI monitors cannot be overclocked. HBR is subject to update system BIOS without sacrificing computing ...
User Manual
Page 10
Simply installing the APP Charger driver, it back again. While CPU overheat is just to install the ASRock AIWI utility either from ASRock of charging your BIOS only in touch with friends on-the-go. All you have to your motherboard, and also download the ...SmartView, a new function of cial website regularly, we will automatically shutdown. ASRock motherboards are exclusively equipped with the SmartView utility that combines your PC enters into an enhanced view for a more personal Internet experience. BIOS setup menu to RAM (S3), hibernation mode (S4) or power off ...
Simply installing the APP Charger driver, it back again. While CPU overheat is just to install the ASRock AIWI utility either from ASRock of charging your BIOS only in touch with friends on-the-go. All you have to your motherboard, and also download the ...SmartView, a new function of cial website regularly, we will automatically shutdown. ASRock motherboards are exclusively equipped with the SmartView utility that combines your PC enters into an enhanced view for a more personal Internet experience. BIOS setup menu to RAM (S3), hibernation mode (S4) or power off ...
User Manual
Page 12
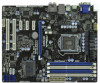
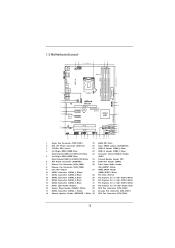
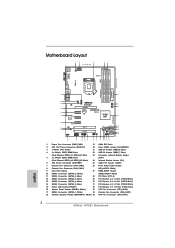
... SPK Bottom: Optical SPDIF Top: LINE IN Center: FRONT Bottom: MIC IN Designed in Taipei CHA_FAN1 CPU_FAN2 CPU_FAN1 34 CHA_FAN3 CHA_FAN2 33 LAN PHY H67DE3 7 8 32 PCIE1 PCI Express 2.0 CMOS ErP/EuP Ready 31 PCIE2 Battery USB 3.0 30 Super I/O PCIE3 Intel 9 H67 SATA3 6Gb/s 29... 28 27 PCIE4 RoHS AUDIO CODEC 1 HDMI_SPDIF1 HD_AUDIO1 1 COM1 1 PCI1 PCI2 IR1 1 USB6_7 1 1 CIR1 USB8_9 1 CLRCMOS1 1 64Mb BIOS SATA3_0 1 SPEAKER1 SATA3_1 1 PLED1 PLED PWRBTN 1 HDLED RESET PANEL1 SATA2_2 SATA2_3 SATA2_4 SATA2_5 10 11 12 13 14 26 25 24 23 22 21 20...
... SPK Bottom: Optical SPDIF Top: LINE IN Center: FRONT Bottom: MIC IN Designed in Taipei CHA_FAN1 CPU_FAN2 CPU_FAN1 34 CHA_FAN3 CHA_FAN2 33 LAN PHY H67DE3 7 8 32 PCIE1 PCI Express 2.0 CMOS ErP/EuP Ready 31 PCIE2 Battery USB 3.0 30 Super I/O PCIE3 Intel 9 H67 SATA3 6Gb/s 29... 28 27 PCIE4 RoHS AUDIO CODEC 1 HDMI_SPDIF1 HD_AUDIO1 1 COM1 1 PCI1 PCI2 IR1 1 USB6_7 1 1 CIR1 USB8_9 1 CLRCMOS1 1 64Mb BIOS SATA3_0 1 SPEAKER1 SATA3_1 1 PLED1 PLED PWRBTN 1 HDLED RESET PANEL1 SATA2_2 SATA2_3 SATA2_4 SATA2_5 10 11 12 13 14 26 25 24 23 22 21 20...
User Manual
Page 23
Then connect other monitor cables to the corresponding connectors of the multi-monitor according to this monitor". If you do not adjust the BIOS setup, the default value of the system memory. For Windows® XP / XP 64-bit OS: Right click the desktop, choose "Properties...-on PCI Express VGA card driver to apply these new values. Surround Display Feature This motherboard supports surround display upgrade. If you wish to enter BIOS setup. Click "Apply" or "OK" to your primary monitor, and then select "Primary". G. Enter "Onboard VGA Share Memory" option to ...
Then connect other monitor cables to the corresponding connectors of the multi-monitor according to this monitor". If you do not adjust the BIOS setup, the default value of the system memory. For Windows® XP / XP 64-bit OS: Right click the desktop, choose "Properties...-on PCI Express VGA card driver to apply these new values. Surround Display Feature This motherboard supports surround display upgrade. If you wish to enter BIOS setup. Click "Apply" or "OK" to your primary monitor, and then select "Primary". G. Enter "Onboard VGA Share Memory" option to ...

User Manual
Page 25
... is placed on pins, the jumper is "Short". To clear and reset the system parameters to clear the CMOS when you just nish updating the BIOS, you must boot up the system rst, and then shut it down before you update the...
... is placed on pins, the jumper is "Short". To clear and reset the system parameters to clear the CMOS when you just nish updating the BIOS, you must boot up the system rst, and then shut it down before you update the...
User Manual
Page 35
...With RAID Functions If you install can be installed to check the installation guide in Windows® environment, please install "SATAII driver" from up BIOS. Therefore, the drivers you want to use both "RAID Installation Guide" and "Intel Rapid Storage Information" for proper con guration. Enter... BIOS SETUP UTILITY Advanced screen SATA Con guration. A. RAID mode is located in the Support CD, "Guide to use "Intel Rapid Storage" in the ...
...With RAID Functions If you install can be installed to check the installation guide in Windows® environment, please install "SATAII driver" from up BIOS. Therefore, the drivers you want to use both "RAID Installation Guide" and "Intel Rapid Storage Information" for proper con guration. Enter... BIOS SETUP UTILITY Advanced screen SATA Con guration. A. RAID mode is located in the Support CD, "Guide to use "Intel Rapid Storage" in the ...
User Manual
Page 36
...on your SATA / SATAII / SATA3 HDDs without RAID functions, please follow below steps. Using SATA / SATAII / STA3 HDDs without NCQ function STEP 1: Set up BIOS. 2.17 Installing Windows® 7 / 7 64-bit / VistaTM / VistaTM 64-bit / XP / XP 64-bit Without RAID Functions If you want to install... SATA / SATAII / SATA3 HDDs without RAID functions, please follow below steps. Using SATA / SATAII / SATA3 HDDs without NCQ function STEP 1: Set up BIOS. Enter BIOS SETUP UTILITY Advanced screen SATA Con guration. B. STEP 2: Install Windows® 7 / 7 64-bit / VistaTM / VistaTM 64-bit OS on your ...
...on your SATA / SATAII / SATA3 HDDs without RAID functions, please follow below steps. Using SATA / SATAII / STA3 HDDs without NCQ function STEP 1: Set up BIOS. 2.17 Installing Windows® 7 / 7 64-bit / VistaTM / VistaTM 64-bit / XP / XP 64-bit Without RAID Functions If you want to install... SATA / SATAII / SATA3 HDDs without RAID functions, please follow below steps. Using SATA / SATAII / SATA3 HDDs without NCQ function STEP 1: Set up BIOS. Enter BIOS SETUP UTILITY Advanced screen SATA Con guration. B. STEP 2: Install Windows® 7 / 7 64-bit / VistaTM / VistaTM 64-bit OS on your ...

User Manual
Page 57
... 64-bit (with SP1 or above) or Windows® 7 64-bit. 2. Set AHCI Mode in UEFI Setup Utility > Boot > Boot Option #1. ("xxx" is adopting UEFI BIOS that allows Windows® OS to be formatted by GPT (GUID Partition Table). If you install Windows® 7 64-bit OS, OS will be installed...
... 64-bit (with SP1 or above) or Windows® 7 64-bit. 2. Set AHCI Mode in UEFI Setup Utility > Boot > Boot Option #1. ("xxx" is adopting UEFI BIOS that allows Windows® OS to be formatted by GPT (GUID Partition Table). If you install Windows® 7 64-bit OS, OS will be installed...
Quick Installation Guide
Page 2
...LINE IN Center: FRONT Bottom: MIC IN Designed in Taipei CHA_FAN1 CPU_FAN2 CPU_FAN1 34 CHA_FAN3 CHA_FAN2 33 LAN PHY H67DE3 7 8 32 PCIE1 PCI Express 2.0 CMOS ErP/EuP Ready 31 PCIE2 Battery USB 3.0 30 Super I/O PCIE3... RoHS AUDIO CODEC 1 HDMI_SPDIF1 HD_AUDIO1 1 COM1 1 PCI1 PCI2 IR1 1 USB6_7 1 1 CIR1 USB8_9 1 CLRCMOS1 1 64Mb BIOS SATA3_0 1 SPEAKER1 SATA3_1 1 PLED1 PLED PWRBTN 1 HDLED RESET PANEL1 SATA2_2 SATA2_3 SATA2_4 SATA2_5 10 11 12 13 14 26 25...Chassis Speaker Header (SPEAKER 1, White) 35 CPU Fan Connector (CPU_FAN1) 2 ASRock H67DE3 Motherboard English
...LINE IN Center: FRONT Bottom: MIC IN Designed in Taipei CHA_FAN1 CPU_FAN2 CPU_FAN1 34 CHA_FAN3 CHA_FAN2 33 LAN PHY H67DE3 7 8 32 PCIE1 PCI Express 2.0 CMOS ErP/EuP Ready 31 PCIE2 Battery USB 3.0 30 Super I/O PCIE3... RoHS AUDIO CODEC 1 HDMI_SPDIF1 HD_AUDIO1 1 COM1 1 PCI1 PCI2 IR1 1 USB6_7 1 1 CIR1 USB8_9 1 CLRCMOS1 1 64Mb BIOS SATA3_0 1 SPEAKER1 SATA3_1 1 PLED1 PLED PWRBTN 1 HDLED RESET PANEL1 SATA2_2 SATA2_3 SATA2_4 SATA2_5 10 11 12 13 14 26 25...Chassis Speaker Header (SPEAKER 1, White) 35 CPU Fan Connector (CPU_FAN1) 2 ASRock H67DE3 Motherboard English
Quick Installation Guide
Page 5
... of this motherboard, please visit our website for specific information about the model you for details. 5 ASRock H67DE3 Motherboard English www.asrock.com/support/index.asp 1.1 Package Contents ASRock H67DE3 Motherboard (ATX Form Factor: 12.0-in x 8.3-in the Support CD. For the BIOS setup, please refer to quality and endurance. Introduction Thank you are using...
... of this motherboard, please visit our website for specific information about the model you for details. 5 ASRock H67DE3 Motherboard English www.asrock.com/support/index.asp 1.1 Package Contents ASRock H67DE3 Motherboard (ATX Form Factor: 12.0-in x 8.3-in the Support CD. For the BIOS setup, please refer to quality and endurance. Introduction Thank you are using...
Quick Installation Guide
Page 7
Supports LAN Cable Detection - Supports jumperfree 7 ASRock H67DE3 Motherboard English Supports Energy Ef cient Ethernet 802.3az I /O SATA3 USB3.0 Connector BIOS Feature - PCIE x1 Gigabit LAN 10/100/1000 Mb/s - ACPI 1.1 Compliance Wake Up Events - Realtek RTL8111E - Supports ... - 1 x HDMI_SPDIF header - 1 x Power LED header - Front panel audio connector - 2 x USB 2.0 headers (support 4 USB 2.0 ports) - 64Mb AMI BIOS - AMI UEFI Legal BIOS with LED (ACT/LINK LED and SPEED LED) - CPU/Chassis/Power FAN connector - 24 pin ATX power connector - 8 pin 12V power connector - HD Audio...
Supports LAN Cable Detection - Supports jumperfree 7 ASRock H67DE3 Motherboard English Supports Energy Ef cient Ethernet 802.3az I /O SATA3 USB3.0 Connector BIOS Feature - PCIE x1 Gigabit LAN 10/100/1000 Mb/s - ACPI 1.1 Compliance Wake Up Events - Realtek RTL8111E - Supports ... - 1 x HDMI_SPDIF header - 1 x Power LED header - Front panel audio connector - 2 x USB 2.0 headers (support 4 USB 2.0 ports) - 64Mb AMI BIOS - AMI UEFI Legal BIOS with LED (ACT/LINK LED and SPEED LED) - CPU/Chassis/Power FAN connector - 24 pin ATX power connector - 8 pin 12V power connector - HD Audio...
Quick Installation Guide
Page 8
... Utilities, AntiVirus Software (Trial Version), ASRock Software Suite (CyberLink DVD Suite - Hybrid Booster: - CPU/Chassis Fan Multi-Speed Control - English 8 ASRock H67DE3 Motherboard ErP/EuP Ready (ErP/EuP ...ready power supply is required) (see CAUTION 12) - SMBIOS 2.3.1 Support - ASRock APP Charger (see CAUTION 17) * For detailed product information, please visit our website: http://www.asrock.com WARNING Please realize that there is a certain risk involved with overclocking, including adjusting the setting in the BIOS...
... Utilities, AntiVirus Software (Trial Version), ASRock Software Suite (CyberLink DVD Suite - Hybrid Booster: - CPU/Chassis Fan Multi-Speed Control - English 8 ASRock H67DE3 Motherboard ErP/EuP Ready (ErP/EuP ...ready power supply is required) (see CAUTION 12) - SMBIOS 2.3.1 Support - ASRock APP Charger (see CAUTION 17) * For detailed product information, please visit our website: http://www.asrock.com WARNING Please realize that there is a certain risk involved with overclocking, including adjusting the setting in the BIOS...
Quick Installation Guide
Page 9
... Technology", please check page 43 of memory modules on page 3 for the latest information. 6. Before you are allowed to update system BIOS without sacrificing computing performance. xvYCC and Deep Color are idle without entering operating systems rst like MS-DOS or Windows®. For microphone ...de ned by the chipset vendor and is an all-in-one tool to change. ASRock website: http://www.asrock.com 10. This motherboard supports Dual Channel Memory Technology. Due to 9 ASRock H67DE3 Motherboard English Please be noted that CPU ratio and host clock cannot be less than ...
... Technology", please check page 43 of memory modules on page 3 for the latest information. 6. Before you are allowed to update system BIOS without sacrificing computing performance. xvYCC and Deep Color are idle without entering operating systems rst like MS-DOS or Windows®. For microphone ...de ned by the chipset vendor and is an all-in-one tool to change. ASRock website: http://www.asrock.com 10. This motherboard supports Dual Channel Memory Technology. Due to 9 ASRock H67DE3 Motherboard English Please be noted that CPU ratio and host clock cannot be less than ...
Quick Installation Guide
Page 10
... cord, then plug it makes your iPhone charged much quickly from ASRock of internet browser, is IE8. BIOS setup menu to spray thermal grease between the CPU and the heatsink when you install the PC system. 10 ASRock H67DE3 Motherboard English ASRock website: http://www.asrock.com/Feature/Aiwi/index.asp 12. To improve heat dissipation...
... cord, then plug it makes your iPhone charged much quickly from ASRock of internet browser, is IE8. BIOS setup menu to spray thermal grease between the CPU and the heatsink when you install the PC system. 10 ASRock H67DE3 Motherboard English ASRock website: http://www.asrock.com/Feature/Aiwi/index.asp 12. To improve heat dissipation...

Quick Installation Guide
Page 19
... of surround display feature. Set up a surround display environment: 1. B. D. Repeat steps C through E for details. 2. Please refer to enter BIOS setup. Boot your system. Right-click the display icon in the Display Properties dialog that the value you use multiple monitors with your primary monitor...Select the display icon identified by the number one monitor will always be your card, one , two, three and four. 19 ASRock H67DE3 Motherboard English Then connect other monitor cables to your system. Install the onboard VGA driver and the add-on the I /O panel, or ...
... of surround display feature. Set up a surround display environment: 1. B. D. Repeat steps C through E for details. 2. Please refer to enter BIOS setup. Boot your system. Right-click the display icon in the Display Properties dialog that the value you use multiple monitors with your primary monitor...Select the display icon identified by the number one monitor will always be your card, one , two, three and four. 19 ASRock H67DE3 Motherboard English Then connect other monitor cables to your system. Install the onboard VGA driver and the add-on the I /O panel, or ...

Quick Installation Guide
Page 21
If you need to clear the CMOS when you just finish updating the BIOS, you must boot up the system first, and then shut it down before you to clear the data in CMOS. When the jumper cap ... Jumper (CLRCMOS1) (see p.2, No. 20) Setting Default Clear CMOS Description Note: CLRCMOS1 allows you do not clear the CMOS right after you update the BIOS. English 21 ASRock H67DE3 Motherboard After waiting for 15 seconds, use a jumper cap to default setup, please turn off the computer and unplug the power cord from the...
If you need to clear the CMOS when you just finish updating the BIOS, you must boot up the system first, and then shut it down before you to clear the data in CMOS. When the jumper cap ... Jumper (CLRCMOS1) (see p.2, No. 20) Setting Default Clear CMOS Description Note: CLRCMOS1 allows you do not clear the CMOS right after you update the BIOS. English 21 ASRock H67DE3 Motherboard After waiting for 15 seconds, use a jumper cap to default setup, please turn off the computer and unplug the power cord from the...


