
User Manual
Page 1
H61M-IDE User Manual Version 1.1 Published November 2013 Copyright©2013 ASRock INC. All rights reserved. 1
H61M-IDE User Manual Version 1.1 Published November 2013 Copyright©2013 ASRock INC. All rights reserved. 1

User Manual
Page 2
... following two conditions: (1) this device may not be liable for any interference received, including interference that may appear in this manual may or may not cause harmful interference, and (2) this manual, ASRock does not provide warranty of any kind, either expressed or implied, including but not limited to infringe. Products and corporate names...
... following two conditions: (1) this device may not be liable for any interference received, including interference that may appear in this manual may or may not cause harmful interference, and (2) this manual, ASRock does not provide warranty of any kind, either expressed or implied, including but not limited to infringe. Products and corporate names...
User Manual
Page 5
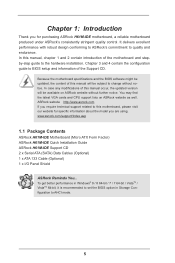
... and the BIOS software might be updated, the content of this motherboard, please visit our website for purchasing ASRock H61M-IDE motherboard, a reliable motherboard produced under ASRock's consistently stringent quality control. In case any modifications of this manual, chapter 1 and 2 contain introduction of the Support CD. Chapter 3 and 4 contain the configuration guide to BIOS setup...
... and the BIOS software might be updated, the content of this motherboard, please visit our website for purchasing ASRock H61M-IDE motherboard, a reliable motherboard produced under ASRock's consistently stringent quality control. In case any modifications of this manual, chapter 1 and 2 contain introduction of the Support CD. Chapter 3 and 4 contain the configuration guide to BIOS setup...

User Manual
Page 18
... Fastener slots pointing straight out Press Down (4 Places) If you need to spray thermal interface material between the CPU and the heatsink to the instruction manuals of your CPU fan and heatsink. Secure excess cable with tie-wrap to illustrate the installation of the heatsink for 1155-Pin CPU. Step 1. Place...
... Fastener slots pointing straight out Press Down (4 Places) If you need to spray thermal interface material between the CPU and the heatsink to the instruction manuals of your CPU fan and heatsink. Secure excess cable with tie-wrap to illustrate the installation of the heatsink for 1155-Pin CPU. Step 1. Place...

User Manual
Page 23
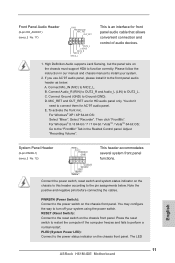
... in the Realtek Control panel. For Windows® 8 / 8 64-bit / 7 / 7 64-bit / VistaTM / VistaTM 64-bit OS: Go to the "FrontMic" Tab in our manual and chassis manual to turn off your system. 2. For Windows® XP / XP 64-bit OS: Select "Mixer". High Definition Audio supports Jack Sensing, but the panel...
... in the Realtek Control panel. For Windows® 8 / 8 64-bit / 7 / 7 64-bit / VistaTM / VistaTM 64-bit OS: Go to the "FrontMic" Tab in our manual and chassis manual to turn off your system. 2. For Windows® XP / XP 64-bit OS: Select "Mixer". High Definition Audio supports Jack Sensing, but the panel...

User Manual
Page 31
Short Duration Power Limit Use this item to change RAS# to CAS# Delay (tRCD) Auto/Manual setting. DRAM Configuration DRAM tCL Use this item to change CAS# Latency (tCL) Auto/Manual setting. The default value is [Auto]. GT OverClocking Support Use this item to configure short duration power limit in watts. The default...
Short Duration Power Limit Use this item to change RAS# to CAS# Delay (tRCD) Auto/Manual setting. DRAM Configuration DRAM tCL Use this item to change CAS# Latency (tCL) Auto/Manual setting. The default value is [Auto]. GT OverClocking Support Use this item to configure short duration power limit in watts. The default...

User Manual
Page 32
... default is [Auto]. DRAM tWTR Use this item to change ODT NOM (CHA) setting. DRAM tCWL Use this item to change Command Rate (CR) Auto/Manual setting. The default is [Auto]. The default is [Auto]. The default is [Auto]. The default is [Auto]. The default is [Auto]. Command Rate (CR) Use... change ODT WR (CHA) setting. The default is [Auto]. The default is [Auto]. DRAM tRAS Use this item to change RAS# Active Time (tRAS) Auto/Manual setting. DRAM tWR Use this item to change ODT NOM (CHB) setting. The default is [Auto]. DRAM tRRD Use this item to RAS Delay (tRRD...
... default is [Auto]. DRAM tWTR Use this item to change ODT NOM (CHA) setting. DRAM tCWL Use this item to change Command Rate (CR) Auto/Manual setting. The default is [Auto]. The default is [Auto]. The default is [Auto]. The default is [Auto]. The default is [Auto]. Command Rate (CR) Use... change ODT WR (CHA) setting. The default is [Auto]. The default is [Auto]. DRAM tRAS Use this item to change RAS# Active Time (tRAS) Auto/Manual setting. DRAM tWR Use this item to change ODT NOM (CHB) setting. The default is [Auto]. DRAM tRRD Use this item to RAS Delay (tRRD...

Quick Installation Guide
Page 4
... Installation Guide contains introduction of this motherboard, please visit our website for specific information about the model you for details. 4 ASRock H61M-IDE Motherboard English 1. It delivers excellent performance with robust design conforming to ASRock's commitment to the "User Manual" in our support CD for purchasing ASRock H61M-IDE motherboard, a reliable motherboard produced under ASRock's consistently stringent quality control.
... Installation Guide contains introduction of this motherboard, please visit our website for specific information about the model you for details. 4 ASRock H61M-IDE Motherboard English 1. It delivers excellent performance with robust design conforming to ASRock's commitment to the "User Manual" in our support CD for purchasing ASRock H61M-IDE motherboard, a reliable motherboard produced under ASRock's consistently stringent quality control.
Quick Installation Guide
Page 11
For Windows® 8 / 8 64-bit / 7 / 7 64-bit / VistaTM / VistaTM 64-bit OS: Go to the "FrontMic" Tab in our manual and chassis manual to install your system using the power switch. Press the reset switch to restart the computer if the computer freezes and fails to MIC2_L. Please ... the way to the power status indicator on the chassis front panel. PLED (System Power LED): Connect to turn off your system. 2. The LED 11 ASRock H61M-IDE Motherboard
For Windows® 8 / 8 64-bit / 7 / 7 64-bit / VistaTM / VistaTM 64-bit OS: Go to the "FrontMic" Tab in our manual and chassis manual to install your system using the power switch. Press the reset switch to restart the computer if the computer freezes and fails to MIC2_L. Please ... the way to the power status indicator on the chassis front panel. PLED (System Power LED): Connect to turn off your system. 2. The LED 11 ASRock H61M-IDE Motherboard
Quick Installation Guide
Page 14
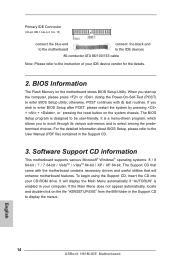
... your CD-ROM drive. When you start up the computer, please press or during the Power-On-Self-Test (POST) to the User Manual (PDF file) contained in the Support CD. 3. The BIOS Setup program is a menu-driven program, which allows you wish to display ...-friendly. If the Main Menu does not appear automatically, locate and double-click on the motherboard stores BIOS Setup Utility. English 14 ASRock H61M-IDE Motherboard otherwise, POST continues with the motherboard contains necessary drivers and useful utilities that will display the Main Menu automatically if "AUTORUN" ...
... your CD-ROM drive. When you start up the computer, please press or during the Power-On-Self-Test (POST) to the User Manual (PDF file) contained in the Support CD. 3. The BIOS Setup program is a menu-driven program, which allows you wish to display ...-friendly. If the Main Menu does not appear automatically, locate and double-click on the motherboard stores BIOS Setup Utility. English 14 ASRock H61M-IDE Motherboard otherwise, POST continues with the motherboard contains necessary drivers and useful utilities that will display the Main Menu automatically if "AUTORUN" ...
