
User Manual
Page 3
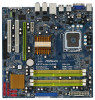
... Playback Support 11 1.5 Passed Full HD 1080p Blu-ray (BD) / HD-DVD Films in Our Lab Test 11 1.6 Motherboard Layout 12 1.7 ASRock GLAN_8CH I/O 13 1.8 ASRock DVI_DisplayPort Specifications 14 2 Installation 15 2.1 Screw Holes 15 2.2 Pre-installation Precautions 15 2.3 CPU Installation 16 2.4 Installation of Heatsink and CPU fan... 31 2.12 Hot Plug Function for SATA / SATAII HDDs 31 2.13 SATA / SATAII HDD Hot Plug Feature and Operation Guide 32 2.14 Driver Installation Guide 34 2.15 Installing Windows® 2000 / XP / XP 64-bit / VistaTM / VistaTM 64-bit Without RAID Functions 34 2....
... Playback Support 11 1.5 Passed Full HD 1080p Blu-ray (BD) / HD-DVD Films in Our Lab Test 11 1.6 Motherboard Layout 12 1.7 ASRock GLAN_8CH I/O 13 1.8 ASRock DVI_DisplayPort Specifications 14 2 Installation 15 2.1 Screw Holes 15 2.2 Pre-installation Precautions 15 2.3 CPU Installation 16 2.4 Installation of Heatsink and CPU fan... 31 2.12 Hot Plug Function for SATA / SATAII HDDs 31 2.13 SATA / SATAII HDD Hot Plug Feature and Operation Guide 32 2.14 Driver Installation Guide 34 2.15 Installing Windows® 2000 / XP / XP 64-bit / VistaTM / VistaTM 64-bit Without RAID Functions 34 2....

User Manual
Page 4
... 3.5.1 Boot Settings Configuration 53 3.7 Security Screen 54 3.8 Exit Screen 55 4 Software Support 56 4.1 Install Operating System 56 4.2 Support CD Information 56 4.2.1 Running Support CD 56 4.2.2 Drivers Menu 56 4.2.3 Utilities Menu 56 4.2.4 Contact Information 56 4
... 3.5.1 Boot Settings Configuration 53 3.7 Security Screen 54 3.8 Exit Screen 55 4 Software Support 56 4.1 Install Operating System 56 4.2 Support CD Information 56 4.2.1 Running Support CD 56 4.2.2 Drivers Menu 56 4.2.3 Utilities Menu 56 4.2.4 Contact Information 56 4
User Manual
Page 7
... Control (see CAUTION 12) - 8Mb AMI BIOS - ASRock U-COP (see CAUTION 13) - Rear Panel I/O Connector BIOS Feature Support CD Unique Feature Hardware Monitor ASRock GLAN_8CH I . ACPI 1.1 Compliance Wake Up Events - ASRock OC Tuner (see CAUTION 15) - HD Audio Jack:... Side Speaker/Rear Speaker/Central/Bass/ Line in header - AMBIOS 2.3.1 Support - Supports I /O - 1 x PS/2 Mouse Port - 1 x PS/2 Keyboard Port - 1 x VGA Port - 6 x Ready-to-Use USB 2.0 Ports - 1 x RJ-45 LAN Port - T. (Intelligent Overclocking Technology) - Drivers...
... Control (see CAUTION 12) - 8Mb AMI BIOS - ASRock U-COP (see CAUTION 13) - Rear Panel I/O Connector BIOS Feature Support CD Unique Feature Hardware Monitor ASRock GLAN_8CH I . ACPI 1.1 Compliance Wake Up Events - ASRock OC Tuner (see CAUTION 15) - HD Audio Jack:... Side Speaker/Rear Speaker/Central/Bass/ Line in header - AMBIOS 2.3.1 Support - Supports I /O - 1 x PS/2 Mouse Port - 1 x PS/2 Keyboard Port - 1 x VGA Port - 6 x Ready-to-Use USB 2.0 Ports - 1 x RJ-45 LAN Port - T. (Intelligent Overclocking Technology) - Drivers...
User Manual
Page 10
... Memory VGA Celeron 420 512MB x 2 Dual Channel (Premium) 512MB Single Channel (Basic) 256MB x 2 Dual Channel (Basic) DX10 with WDDM Driver * If you plan to use onboard VGA to submit Windows® VistaTM logo, please keep the default setting of "DVMT Mode Select" option under...174; VistaTM Premium 2008 and Basic Logo For system integrators and users who purchase this motherboard, please refer to Premium Discrete requirement at http://www.asrock.com * After June 1, 2008, all Windows® VistaTM systems are required to meet above minimum hardware requirements in order to submit Windows®...
... Memory VGA Celeron 420 512MB x 2 Dual Channel (Premium) 512MB Single Channel (Basic) 256MB x 2 Dual Channel (Basic) DX10 with WDDM Driver * If you plan to use onboard VGA to submit Windows® VistaTM logo, please keep the default setting of "DVMT Mode Select" option under...174; VistaTM Premium 2008 and Basic Logo For system integrators and users who purchase this motherboard, please refer to Premium Discrete requirement at http://www.asrock.com * After June 1, 2008, all Windows® VistaTM systems are required to meet above minimum hardware requirements in order to submit Windows®...

User Manual
Page 32
...IDE 1x4-pin conventional power connector interfaces, the IDE 1x4-pin conventional power connector interface is available on our website: www.asrock.com 2. The latest SATA / SATAII driver is definitely not able to support Hot Plug and will be processed. 2. Make sure to use the SATA power cable .... 5. Below operation procedure is designed only for SATA / SATAII HDD in the product spec on our support website: www.asrock.com 4. Please make sure the SATA / SATAII driver is installed into system properly. Before you process the Hot Plug: 1. Make sure your SATA / SATAII HDD can support...
...IDE 1x4-pin conventional power connector interfaces, the IDE 1x4-pin conventional power connector interface is available on our website: www.asrock.com 2. The latest SATA / SATAII driver is definitely not able to support Hot Plug and will be processed. 2. Make sure to use the SATA power cable .... 5. Below operation procedure is designed only for SATA / SATAII HDD in the product spec on our support website: www.asrock.com 4. Please make sure the SATA / SATAII driver is installed into system properly. Before you process the Hot Plug: 1. Make sure your SATA / SATAII HDD can support...
User Manual
Page 34
...HDDs without RAID functions, please follow the order from up , press key, and then a window for boot devices selection appears. Therefore, the drivers you install can be auto-detected and listed on your SATA / SATAII HDDs without RAID functions, please follow below steps. B. Insert the ...the boot device. Please insert a floppy diskette into your optical drive to [Enhanced], and then in it! STEP 2: Make a SATA / SATAII Driver Diskette. Then you install. Please follow below procedures according to the OS you will start to [AHCI]. B. Please select CD-ROM as ", please...
...HDDs without RAID functions, please follow the order from up , press key, and then a window for boot devices selection appears. Therefore, the drivers you install can be auto-detected and listed on your SATA / SATAII HDDs without RAID functions, please follow below steps. B. Insert the ...the boot device. Please insert a floppy diskette into your optical drive to [Enhanced], and then in it! STEP 2: Make a SATA / SATAII Driver Diskette. Then you install. Please follow below procedures according to the OS you will start to [AHCI]. B. Please select CD-ROM as ", please...
User Manual
Page 35
... Windows® VistaTM / VistaTM 64-bit optical disk into the optical drive again to continue the installation. 35 After reading the floppy disk, the driver will be presented. Using SATA / SATAII HDDs without RAID functions, please follow the instruction to install Windows?" Using SATA / SATAII HDDs with NCQ... / VistaTM 64-bit OS on your system. page, please insert the ASRock Support CD into your optical drive, and click the "Load Driver" button on the left on the bottom to install a thirdparty AHCI driver. Select the driver to install according to the mode you choose and the OS you can ...
... Windows® VistaTM / VistaTM 64-bit optical disk into the optical drive again to continue the installation. 35 After reading the floppy disk, the driver will be presented. Using SATA / SATAII HDDs without RAID functions, please follow the instruction to install Windows?" Using SATA / SATAII HDDs with NCQ... / VistaTM 64-bit OS on your system. page, please insert the ASRock Support CD into your optical drive, and click the "Load Driver" button on the left on the bottom to install a thirdparty AHCI driver. Select the driver to install according to the mode you choose and the OS you can ...

User Manual
Page 44
...of DRAM clocks for CH1 TRD Phase Adjust. The default value is [VGA1 + DVI]. 44 In DVMT mode, the graphics driver allocates memory as needed for the motherboard through efficient memory utilization. Boot Display Device This item allows you want to set share ... and [Maximum DVMT]. PAVP Mode Use this option to [62]. This item will not be used under Windows® VistaTM OS because the driver will intelligently detect physical memory available and allocate necessary video memory. Configuration options: Configuration options: [Auto], [0] to adjust PAVP mode. Configuration options:...
...of DRAM clocks for CH1 TRD Phase Adjust. The default value is [VGA1 + DVI]. 44 In DVMT mode, the graphics driver allocates memory as needed for the motherboard through efficient memory utilization. Boot Display Device This item allows you want to set share ... and [Maximum DVMT]. PAVP Mode Use this option to [62]. This item will not be used under Windows® VistaTM OS because the driver will intelligently detect physical memory available and allocate necessary video memory. Configuration options: Configuration options: [Auto], [0] to adjust PAVP mode. Configuration options:...

User Manual
Page 56
... Support CD Information The Support CD that came with the motherboard contains necessary drivers and useful utilities that the motherboard supports. or you need to contact ASRock or want to visit ASRock's website at http://www.asrock.com; Because motherboard settings and hardware options vary, use the setup procedures ... To begin using the support CD, insert the CD into your dealer for general reference only. Please install the necessary drivers to display the menus. 4.2.2 Drivers Menu The Drivers Menu shows the available devices drivers if the system detects installed devices.
... Support CD Information The Support CD that came with the motherboard contains necessary drivers and useful utilities that the motherboard supports. or you need to contact ASRock or want to visit ASRock's website at http://www.asrock.com; Because motherboard settings and hardware options vary, use the setup procedures ... To begin using the support CD, insert the CD into your dealer for general reference only. Please install the necessary drivers to display the menus. 4.2.2 Drivers Menu The Drivers Menu shows the available devices drivers if the system detects installed devices.


