User Manual
Page 5
... installation. Because the motherboard specifications and the BIOS software might be updated, the content of the Support CD. You may find the latest VGA cards and CPU support lists on ASRock website without notice. ASRock website http://www.asrock.com If you require technical support related to quality and endurance. www.asrock.com/support/index.asp 1.1 Package Contents ASRock G43Twins-FullHD Motherboard (Micro ATX Form Factor: 9.6-in x 9.6-in Floppy Drive One Serial ATA (SATA) Data Cable (Optional) One Serial ATA (SATA) HDD Power Cable (Optional...
... installation. Because the motherboard specifications and the BIOS software might be updated, the content of the Support CD. You may find the latest VGA cards and CPU support lists on ASRock website without notice. ASRock website http://www.asrock.com If you require technical support related to quality and endurance. www.asrock.com/support/index.asp 1.1 Package Contents ASRock G43Twins-FullHD Motherboard (Micro ATX Form Factor: 9.6-in x 9.6-in Floppy Drive One Serial ATA (SATA) Data Cable (Optional) One Serial ATA (SATA) HDD Power Cable (Optional...
User Manual
Page 7
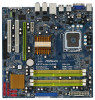
...COM port header - Supports Smart BIOS - CPU Quiet Fan 7 Rear Panel I/O Connector BIOS Feature Support CD Unique Feature Hardware Monitor ASRock GLAN_8CH I . AMI Legal BIOS - Supports jumperfree - Chassis Fan Tachometer - CPU/Chassis FAN connector - 24 pin ATX power connector - 4 pin 12V power connector - Drivers, Utilities, AntiVirus Software (Trial Version) - ASRock U-COP (see CAUTION 13) - CPU Temperature Sensing - Supports "Plug and Play" - Supports I /O - 1 x PS/2 Mouse Port - 1 x PS/2 Keyboard Port - 1 x VGA Port - 6 x Ready-to-Use USB 2.0 Ports - 1 x RJ-45 LAN Port - O. Boot...
...COM port header - Supports Smart BIOS - CPU Quiet Fan 7 Rear Panel I/O Connector BIOS Feature Support CD Unique Feature Hardware Monitor ASRock GLAN_8CH I . AMI Legal BIOS - Supports jumperfree - Chassis Fan Tachometer - CPU/Chassis FAN connector - 24 pin ATX power connector - 4 pin 12V power connector - Drivers, Utilities, AntiVirus Software (Trial Version) - ASRock U-COP (see CAUTION 13) - CPU Temperature Sensing - Supports "Plug and Play" - Supports I /O - 1 x PS/2 Mouse Port - 1 x PS/2 Keyboard Port - 1 x VGA Port - 6 x Ready-to-Use USB 2.0 Ports - 1 x RJ-45 LAN Port - O. Boot...
User Manual
Page 9
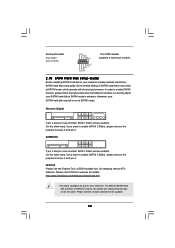
For microphone input, this motherboard supports 2-channel, 4channel, 6-channel, and 8-channel modes. You can also connect SATA hard disk to -use IDE mode under Windows® 2000 OS. WiFi/E header supports WiFi+AP function with ASRock WiFi-802.11g or WiFi-802.11n module, an easy-to SATAII connector directly. 11. It allows you to page11 for detailed setup. 9 ASRock website http://www.asrock.com 13. While CPU overheat is not recommended to...
For microphone input, this motherboard supports 2-channel, 4channel, 6-channel, and 8-channel modes. You can also connect SATA hard disk to -use IDE mode under Windows® 2000 OS. WiFi/E header supports WiFi+AP function with ASRock WiFi-802.11g or WiFi-802.11n module, an easy-to SATAII connector directly. 11. It allows you to page11 for detailed setup. 9 ASRock website http://www.asrock.com 13. While CPU overheat is not recommended to...
User Manual
Page 10
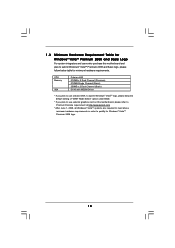
... follow below table for Windows® VistaTM Premium 2008 logo. 10 CPU Memory VGA Celeron 420 512MB x 2 Dual Channel (Premium) 512MB Single Channel (Basic) 256MB x 2 Dual Channel (Basic) DX10 with WDDM Driver * If you plan to use onboard VGA to submit Windows® VistaTM logo, please keep the default setting of "DVMT Mode Select" option under BIOS. * If you plan to use external graphics card on this motherboard and plan to qualify for...
... follow below table for Windows® VistaTM Premium 2008 logo. 10 CPU Memory VGA Celeron 420 512MB x 2 Dual Channel (Premium) 512MB Single Channel (Basic) 256MB x 2 Dual Channel (Basic) DX10 with WDDM Driver * If you plan to use onboard VGA to submit Windows® VistaTM logo, please keep the default setting of "DVMT Mode Select" option under BIOS. * If you plan to use external graphics card on this motherboard and plan to qualify for...

User Manual
Page 12
... Chassis Speaker Header (SPEAKER 1) 19 USB 2.0 Header (USB6_7, Blue) 20 Flash Memory 21 COM Port Header (COM1) 22 Floppy Connector (FLOPPY1) 23 WiFi/E Header (WIFI/E) 24 PCI Slots (PCI1 - 2) 25 Front Panel Audio Header (HD_AUDIO1) 26 Internal Audio Connector: CD1 (Black) 27 Infrared Module Header (IR1) 28 PCI Express 2.0 x16 Slot (PCIE2; White) 30 North Bridge Controller 31 FSB2 / FSB3 Jumpers 32 FSB1 Jumper 33 CPU Fan Connector (CPU_FAN1) 34 ATX 12V Connector (ATX12V1) 12 Green) 29 PCI Express x1 Slot (PCIE1; Yellow) 5 2 x 240-pin DDR2 DIMM Slots (Dual Channel...
... Chassis Speaker Header (SPEAKER 1) 19 USB 2.0 Header (USB6_7, Blue) 20 Flash Memory 21 COM Port Header (COM1) 22 Floppy Connector (FLOPPY1) 23 WiFi/E Header (WIFI/E) 24 PCI Slots (PCI1 - 2) 25 Front Panel Audio Header (HD_AUDIO1) 26 Internal Audio Connector: CD1 (Black) 27 Infrared Module Header (IR1) 28 PCI Express 2.0 x16 Slot (PCIE2; White) 30 North Bridge Controller 31 FSB2 / FSB3 Jumpers 32 FSB1 Jumper 33 CPU Fan Connector (CPU_FAN1) 34 ATX 12V Connector (ATX12V1) 12 Green) 29 PCI Express x1 Slot (PCIE1; Yellow) 5 2 x 240-pin DDR2 DIMM Slots (Dual Channel...

User Manual
Page 21
... this motherboard to support DVI-D and DisplayPort, please install ASRock DVI_DisplayPort Card on this slot. Before installing the expansion card, please make necessary hardware settings for PCI Express cards with the slot and press firmly until the card is completely seated on PCI Express VGA card to PCIE2 (PCIE x16 slot) and adjust the BIOS options "Primary Graphics Adapter" to [Onboard] and "Share Memory" to [Auto], then the onboard VGA will be enabled, and the primary screen will be onboard VGA. Remove the...
... this motherboard to support DVI-D and DisplayPort, please install ASRock DVI_DisplayPort Card on this slot. Before installing the expansion card, please make necessary hardware settings for PCI Express cards with the slot and press firmly until the card is completely seated on PCI Express VGA card to PCIE2 (PCIE x16 slot) and adjust the BIOS options "Primary Graphics Adapter" to [Onboard] and "Share Memory" to [Auto], then the onboard VGA will be enabled, and the primary screen will be onboard VGA. Remove the...

User Manual
Page 28
... Control panel. D. MIC_RET and OUT_RET are for front panel audio cable that allows convenient connection and control of "Playback" portion. Enter BIOS Setup Utility. F. Enter Windows system. For Windows® 2000 / XP / XP 64-bit OS: Click "Audio I/O", select "Connector Settings" , choose "Disable front panel jack detection", and save the change by clicking "OK". For Windows® 2000 / XP / XP 64-bit OS: Please select "Front Mic" as a CD-ROM, DVD-ROM, TV tuner card, or MPEG card...
... Control panel. D. MIC_RET and OUT_RET are for front panel audio cable that allows convenient connection and control of "Playback" portion. Enter BIOS Setup Utility. F. Enter Windows system. For Windows® 2000 / XP / XP 64-bit OS: Click "Audio I/O", select "Connector Settings" , choose "Disable front panel jack detection", and save the change by clicking "OK". For Windows® 2000 / XP / XP 64-bit OS: Please select "Front Mic" as a CD-ROM, DVD-ROM, TV tuner card, or MPEG card...
User Manual
Page 30
...://www.hitachigst.com/hdd/support/download.htm The above examples are shorted, SATA 1.5Gb/s will be enabled. For different SATAII hard disk products of SATAII hard disks may not be the same. Please visit the vendors' website for changing various ATA features. HITACHI Please use the Feature Tool, a DOS-bootable tool, for the updates. 30 Some default setting of different vendors, the jumper pin setting methods may fail...
...://www.hitachigst.com/hdd/support/download.htm The above examples are shorted, SATA 1.5Gb/s will be enabled. For different SATAII hard disk products of SATAII hard disks may not be the same. Please visit the vendors' website for changing various ATA features. HITACHI Please use the Feature Tool, a DOS-bootable tool, for the updates. 30 Some default setting of different vendors, the jumper pin setting methods may fail...
User Manual
Page 34
... boot device. 2.14 Driver Installation Guide To install the drivers to your system, please insert the support CD to your SATA / SATAII HDDs without RAID functions, please follow below steps. Therefore, the drivers you install. Please select CD-ROM as ", please set the option to [AHCI]. A. Enter BIOS SETUP UTILITY Advanced screen IDE Configuration. Set "SATAII Configuration" to generate Serial ATA driver diskette [YN]?", press . E. Please follow below procedures according to the OS you install can be auto-detected and listed...
... boot device. 2.14 Driver Installation Guide To install the drivers to your system, please insert the support CD to your SATA / SATAII HDDs without RAID functions, please follow below steps. Therefore, the drivers you install. Please select CD-ROM as ", please set the option to [AHCI]. A. Enter BIOS SETUP UTILITY Advanced screen IDE Configuration. Set "SATAII Configuration" to generate Serial ATA driver diskette [YN]?", press . E. Please follow below procedures according to the OS you install can be auto-detected and listed...
User Manual
Page 35
... [AHCI]. Intel® AHCI drivers are in the following path in the option "Configure SATAII as ", please set the option to [IDE]. After reading the floppy disk, the driver will be presented. Using SATA / SATAII HDDs without RAID functions, please follow the instruction to install Windows® VistaTM / VistaTM 64-bit OS on the bottom to install Windows?" B. Windows XP)" for Windows® XP 64-bit. Using SATA / SATAII HDDs with NCQ function STEP 1: Set Up BIOS. Enter BIOS SETUP UTILITY Advanced screen IDE Configuration. When...
... [AHCI]. Intel® AHCI drivers are in the following path in the option "Configure SATAII as ", please set the option to [IDE]. After reading the floppy disk, the driver will be presented. Using SATA / SATAII HDDs without RAID functions, please follow the instruction to install Windows® VistaTM / VistaTM 64-bit OS on the bottom to install Windows?" B. Windows XP)" for Windows® XP 64-bit. Using SATA / SATAII HDDs with NCQ function STEP 1: Set Up BIOS. Enter BIOS SETUP UTILITY Advanced screen IDE Configuration. When...

User Manual
Page 41
... value of this motherboard is an enhancement to execute code. Set to keep the CPU from being used by Vanderpool Technology. CPU Frequency (MHz) Use this option to adjust PCIE frequency. An IA-32 processor with an Intel Pentium® 4 processor that supports Hyper-Threading technology and an operating system that includes optimization for better system stability. PCIE Frequency (MHz) Use this option to adjust CPU frequency. Boot Failure Guard Enable or disable the feature of...
... value of this motherboard is an enhancement to execute code. Set to keep the CPU from being used by Vanderpool Technology. CPU Frequency (MHz) Use this option to adjust PCIE frequency. An IA-32 processor with an Intel Pentium® 4 processor that supports Hyper-Threading technology and an operating system that includes optimization for better system stability. PCIE Frequency (MHz) Use this option to adjust CPU frequency. Boot Failure Guard Enable or disable the feature of...

User Manual
Page 42
... frequency and its corresponding memory support frequency. Memory Remap Feature Use this function may select [333MHz (DDR2 667)], [400MHz (DDR2 800)] or [533MHz (DDR2 1066)] for DDR2 memory modules, or select [400MHz (DDR3 800)] or [533MHz (DDR3 1066)] for memory compatibility when it is [Disabled]. DRAM Frequency If [Auto] is Intel's new power saving technology. Please set to [Disable] if above issue occurs. 3.4.2 Chipset Configuration BIOS SETUP UTILITY Advanced Chipset Configuration Memory Remap Feature [Disabled] DRAM Frequency [Auto] Flexibility Option [Disabled...
... frequency and its corresponding memory support frequency. Memory Remap Feature Use this function may select [333MHz (DDR2 667)], [400MHz (DDR2 800)] or [533MHz (DDR2 1066)] for DDR2 memory modules, or select [400MHz (DDR3 800)] or [533MHz (DDR3 1066)] for memory compatibility when it is [Disabled]. DRAM Frequency If [Auto] is Intel's new power saving technology. Please set to [Disable] if above issue occurs. 3.4.2 Chipset Configuration BIOS SETUP UTILITY Advanced Chipset Configuration Memory Remap Feature [Disabled] DRAM Frequency [Auto] Flexibility Option [Disabled...

User Manual
Page 44
... default value is the new graphics feature in this option to use Blu-ray (BD) / HD-DVD playback function, please set this item if you set share memory feature. Configuration options: [Disabled] and [Lite]. Configuration options: [VGA1 + DVI], [VGA1] and [VGA1 + DisplayPort]. PAVP Mode Use this option to set DVMT Mode Select as needed for running graphics applications and is the encryption of DRAM clocks for the motherboard through efficient memory utilization. PAVP is [PCI]. Boot Display Device...
... default value is the new graphics feature in this option to use Blu-ray (BD) / HD-DVD playback function, please set this item if you set share memory feature. Configuration options: [Disabled] and [Lite]. Configuration options: [VGA1 + DVI], [VGA1] and [VGA1 + DisplayPort]. PAVP Mode Use this option to set DVMT Mode Select as needed for running graphics applications and is the encryption of DRAM clocks for the motherboard through efficient memory utilization. PAVP is [PCI]. Boot Display Device...

User Manual
Page 45
...], [2.50V], [2.56V], [2.62V], [2.67V] and [2.73V]. OnBoard Lan This allows you select [Auto], the onboard HD Audio will be disabled when PCI Sound Card is [Auto]. Configuration options: [Auto] and [Manual]. The default value of this feature is [Auto]. The default value of this feature is [Auto]. VTT Voltage Use this to select NB Core Voltage. Configuration options: [Auto], [Low], [Middle], [High] and [Highest]. GLTREF Voltage Use this to enable or disable the "OnBoard Lan" feature. Configuration options: [Auto], [0.67 x Vtt], [0.65 x Vtt], [0.63 x Vtt...
...], [2.50V], [2.56V], [2.62V], [2.67V] and [2.73V]. OnBoard Lan This allows you select [Auto], the onboard HD Audio will be disabled when PCI Sound Card is [Auto]. Configuration options: [Auto] and [Manual]. The default value of this feature is [Auto]. The default value of this feature is [Auto]. VTT Voltage Use this to select NB Core Voltage. Configuration options: [Auto], [Low], [Middle], [High] and [Highest]. GLTREF Voltage Use this to enable or disable the "OnBoard Lan" feature. Configuration options: [Auto], [0.67 x Vtt], [0.65 x Vtt], [0.63 x Vtt...

User Manual
Page 47
...ACPI HPET Table. Configuration options: [Enabled] and [Disabled]. ACPI HPET Table Use this item to submit Windows® VistaTM certification. 3.4.4 IDE Configuration BIOS SETUP UTILITY Advanced IDE Configuration SATAII Configuration Configure SATAII as ", you plan to [AHCI] or [IDE] mode. If native OS (Windows 2000 / XP) is enabled. Then in the option "Configure SATAII as OnBoard IDE Controller [Enhanced] [IDE] [Enabled] Options Disabled Compatible Enhanced SATAII 1 SATAII 2 SATAII 3 SATAII 4 SATAII 5 SATAII 6 IDE1 Master IDE1 Slave AHCI CD/DVD Boot Time out [Hard Disk...
...ACPI HPET Table. Configuration options: [Enabled] and [Disabled]. ACPI HPET Table Use this item to submit Windows® VistaTM certification. 3.4.4 IDE Configuration BIOS SETUP UTILITY Advanced IDE Configuration SATAII Configuration Configure SATAII as ", you plan to [AHCI] or [IDE] mode. If native OS (Windows 2000 / XP) is enabled. Then in the option "Configure SATAII as OnBoard IDE Controller [Enhanced] [IDE] [Enabled] Options Disabled Compatible Enhanced SATAII 1 SATAII 2 SATAII 3 SATAII 4 SATAII 5 SATAII 6 IDE1 Master IDE1 Slave AHCI CD/DVD Boot Time out [Hard Disk...

User Manual
Page 49
... options: [Disabled], [Auto], [Enabled]. 32-Bit Data Transfer Use this item to maximize the IDE hard disk data transfer rate. 3.4.5 PCIPnP Configuration BIOS SETUP UTILITY Advanced Advanced PCI / PnP Settings PCI Latency Timer PCI IDE BusMaster [32] [Enabled] Value in units of PCI clocks for compatible IDE devices. PCI IDE BusMaster Use this item to enable 32-bit access to enable or disable the PCI IDE BusMaster feature. 49 S.M.A.R.T. PCI Latency Timer The default value is recommended to enable or disable the S.M.A.R.T. (Self-Monitoring, Analysis, and Reporting Technology...
... options: [Disabled], [Auto], [Enabled]. 32-Bit Data Transfer Use this item to maximize the IDE hard disk data transfer rate. 3.4.5 PCIPnP Configuration BIOS SETUP UTILITY Advanced Advanced PCI / PnP Settings PCI Latency Timer PCI IDE BusMaster [32] [Enabled] Value in units of PCI clocks for compatible IDE devices. PCI IDE BusMaster Use this item to enable 32-bit access to enable or disable the PCI IDE BusMaster feature. 49 S.M.A.R.T. PCI Latency Timer The default value is recommended to enable or disable the S.M.A.R.T. (Self-Monitoring, Analysis, and Reporting Technology...

User Manual
Page 50
... / IRQ3]. OnBoard Floppy Controller Use this section, you may configure the type of floppy drive connected to the system. +F1 F9 F10 ESC Select Screen Select Item Change Option General Help Load Defaults Save and Exit Exit v02.54 (C) Copyright 1985-2005, American Megatrends, Inc. 3.4.7 Super IO Configuration BIOS SETUP UTILITY Advanced Configure Super IO Chipset OnBoard Floppy Controller Serial Port Address Infrared Port Address [Enabled] [3F8 / IRQ4] [Disabled] Allow BIOS to set the address for the onboard serial port or disable it . Configuration options: [Disabled], [2F8...
... / IRQ3]. OnBoard Floppy Controller Use this section, you may configure the type of floppy drive connected to the system. +F1 F9 F10 ESC Select Screen Select Item Change Option General Help Load Defaults Save and Exit Exit v02.54 (C) Copyright 1985-2005, American Megatrends, Inc. 3.4.7 Super IO Configuration BIOS SETUP UTILITY Advanced Configure Super IO Chipset OnBoard Floppy Controller Serial Port Address Infrared Port Address [Enabled] [3F8 / IRQ4] [Disabled] Allow BIOS to set the address for the onboard serial port or disable it . Configuration options: [Disabled], [2F8...

User Manual
Page 51
...for legacy USB. [Auto] - Enables support for the details of USB controller. There are connected. [Disabled] - Please refer to enable or disable the USB 2.0 support. 3.4.8 USB Configuration BIOS SETUP UTILITY Advanced USB Configuration USB Controller USB 2.0 Support Legacy USB Support [Enabled] [Enabled] [BIOS Setup Only] To enable or disable the onboard USB controllers. +F1 F9 F10 ESC Select Screen Select Item Change Option General Help Load Defaults Save and Exit Exit v02.54 (C) Copyright 1985-2005, American Megatrends, Inc. USB 2.0 Support Use this option to enter OS. [BIOS...
...for legacy USB. [Auto] - Enables support for the details of USB controller. There are connected. [Disabled] - Please refer to enable or disable the USB 2.0 support. 3.4.8 USB Configuration BIOS SETUP UTILITY Advanced USB Configuration USB Controller USB 2.0 Support Legacy USB Support [Enabled] [Enabled] [BIOS Setup Only] To enable or disable the onboard USB controllers. +F1 F9 F10 ESC Select Screen Select Item Change Option General Help Load Defaults Save and Exit Exit v02.54 (C) Copyright 1985-2005, American Megatrends, Inc. USB 2.0 Support Use this option to enter OS. [BIOS...
User Manual
Page 54
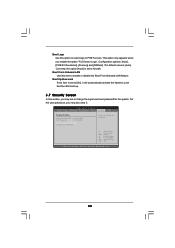
...this item is [Auto]. Configuration options: [Auto], [PCIE2.0 Revolution], [Scenery] and [ASRock]. For the user password, you may set to Aircraft. Boot Logo Use this item to enable or disable the Boot From Onboard LAN feature. Boot Up Num-Lock If this section, you enable the option "Full Screen Logo". The default value is set to [On], it . BIOS SETUP UTILITY Main Smart Advanced H/W Monitor Boot Security Exit Security Settings Supervisor Password : Not Installed User Password : Not Installed Change Supervisor Password Change User Password Install or Change the password.
...this item is [Auto]. Configuration options: [Auto], [PCIE2.0 Revolution], [Scenery] and [ASRock]. For the user password, you may set to Aircraft. Boot Logo Use this item to enable or disable the Boot From Onboard LAN feature. Boot Up Num-Lock If this section, you enable the option "Full Screen Logo". The default value is set to [On], it . BIOS SETUP UTILITY Main Smart Advanced H/W Monitor Boot Security Exit Security Settings Supervisor Password : Not Installed User Password : Not Installed Change Supervisor Password Change User Password Install or Change the password.

User Manual
Page 56
... motherboard features. 4.2.1 Running The Support CD To begin using the support CD, insert the CD into your CD-ROM drive. The CD automatically displays the Main Menu if "AUTORUN" is enabled in this chapter for further information. 56 Chapter 4: Software Support 4.1 Install Operating System This motherboard supports various Microsoft® Windows® operating systems: 2000 / XP / XP 64-bit / VistaTM / VistaTM 64-bit. Because motherboard settings and hardware options vary, use the setup...
... motherboard features. 4.2.1 Running The Support CD To begin using the support CD, insert the CD into your CD-ROM drive. The CD automatically displays the Main Menu if "AUTORUN" is enabled in this chapter for further information. 56 Chapter 4: Software Support 4.1 Install Operating System This motherboard supports various Microsoft® Windows® operating systems: 2000 / XP / XP 64-bit / VistaTM / VistaTM 64-bit. Because motherboard settings and hardware options vary, use the setup...


