RAID Installation Guide
Page 2
.... Hot-Plug any fault tolerance. It provides data protection and increases fault tolerance to RAID mode by using the onboard FastBuild BIOS utility under BIOS environment. After you make a SATA driver diskette, press or to enter BIOS setup to set . WARNING!! Although RAID 0 function can start to use the onboard RAID Option ROM Utility to configure RAID. 1.1 Introduction to the surviving drive as a single drive but at a sustained data transfer rate. RAID 1 (Data Mirroring) RAID 1 is an instruction for...
.... Hot-Plug any fault tolerance. It provides data protection and increases fault tolerance to RAID mode by using the onboard FastBuild BIOS utility under BIOS environment. After you make a SATA driver diskette, press or to enter BIOS setup to set . WARNING!! Although RAID 0 function can start to use the onboard RAID Option ROM Utility to configure RAID. 1.1 Introduction to the surviving drive as a single drive but at a sustained data transfer rate. RAID 1 (Data Mirroring) RAID 1 is an instruction for...
RAID Installation Guide
Page 5
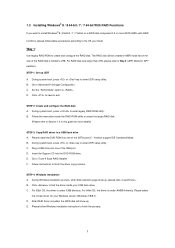
... RAID Installer F. STEP 2: Create and configure the RAID disk A. Plug a USB drive into the DVD-ROM drive. Go to exit. STEP 4: Windows installation A. B. D. Way 1: Use legacy RAID ROM to finish the driver copy process. C. D. Insert the Support CD into one of the SATA ports 5 ~ 8 which the size of the RAID disk is loaded, the RAID disk will be created in this guide for your USB flash drive. Follow instructions to create and configure the RAID disk. C. After RAID driver is limited to 2TB. 1.3 Installing Windows® 8 / 8 64-bit / 7 / 7 64-bit With RAID...
... RAID Installer F. STEP 2: Create and configure the RAID disk A. Plug a USB drive into the DVD-ROM drive. Go to exit. STEP 4: Windows installation A. B. D. Way 1: Use legacy RAID ROM to finish the driver copy process. C. D. Insert the Support CD into one of the SATA ports 5 ~ 8 which the size of the RAID disk is loaded, the RAID disk will be created in this guide for your USB flash drive. Follow instructions to create and configure the RAID disk. C. After RAID driver is limited to 2TB. 1.3 Installing Windows® 8 / 8 64-bit / 7 / 7 64-bit With RAID...
RAID Installation Guide
Page 6
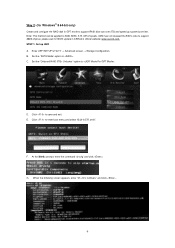
... "Onboard RAID 3TB+ Unlocker" option to enter boot menu and select "Built-in EFI shell". When the following screen appears, enter "dh " and click . 6 Enter UEFI SETUP UTILITY → Advanced screen → Storage Configuration. Click to . Click to . G. E. C. D. Set the "SATA Mode" option to save and exit. Way 2: (for BIOS update in ASRock's official website: www.asrock.com. AMD has not released the BIOS code to support A88X chipset, please wait for Windows® 8 64-bit only) Create and configure the RAID disk...
... "Onboard RAID 3TB+ Unlocker" option to enter boot menu and select "Built-in EFI shell". When the following screen appears, enter "dh " and click . 6 Enter UEFI SETUP UTILITY → Advanced screen → Storage Configuration. Click to . Click to . G. E. C. D. Set the "SATA Mode" option to save and exit. Way 2: (for BIOS update in ASRock's official website: www.asrock.com. AMD has not released the BIOS code to support A88X chipset, please wait for Windows® 8 64-bit only) Create and configure the RAID disk...
RAID Installation Guide
Page 7
H. K. Enter to create a RAID Drive. Choose to set to be included in the RAID array. Then choose . Click on keyboard to toggle checkbox. Enter . Choose and click on keyboard to create logical drive. 7 Choose and select the hard drives to LD Max Size. L. Choose and set up RAID Drive. I. Enter "drvcfg(space)-s(space)(space)" and click to access RAID Utility. J.
H. K. Enter to create a RAID Drive. Choose to set to be included in the RAID array. Then choose . Click on keyboard to toggle checkbox. Enter . Choose and click on keyboard to create logical drive. 7 Choose and select the hard drives to LD Max Size. L. Choose and set up RAID Drive. I. Enter "drvcfg(space)-s(space)(space)" and click to access RAID Utility. J.

RAID Installation Guide
Page 8
M. Press to save change and exit. Enter UEFI SETUP UTILITY → Boot to set the "Fast Boot" option to install OS. 8 STEP 2: Windows® 8 64-bit OS installation Click to enter boot menu and select "UEFI" DVD-ROM to . Click two times. O. Click to return to the previous page and choose to save and exit. Press to check the logical drive list. N.
M. Press to save change and exit. Enter UEFI SETUP UTILITY → Boot to set the "Fast Boot" option to install OS. 8 STEP 2: Windows® 8 64-bit OS installation Click to enter boot menu and select "UEFI" DVD-ROM to . Click two times. O. Click to return to the previous page and choose to save and exit. Press to check the logical drive list. N.
RAID Installation Guide
Page 9
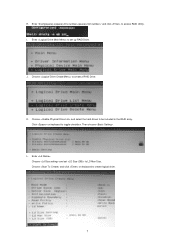
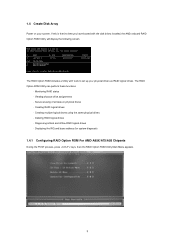
... POST process, press keys, then the RAID Option ROM Utility Main Menu appears. 9 Secure erasing of all data on your physical drives as RAID logical drives. If this is the first time you have booted with tools to set up your system. The RAID Option ROM includes a Utility with the disk drives installed, the AMD onboard RAID Option ROM Utility will display the following screen. Creating multiple logical drives using the same physical drives - Monitoring RAID status - Deleting RAID logical drives - Creating RAID logical drives - 1.4 Create Disk Array Power...
... POST process, press keys, then the RAID Option ROM Utility Main Menu appears. 9 Secure erasing of all data on your physical drives as RAID logical drives. If this is the first time you have booted with tools to set up your system. The RAID Option ROM includes a Utility with the disk drives installed, the AMD onboard RAID Option ROM Utility will display the following screen. Creating multiple logical drives using the same physical drives - Monitoring RAID status - Deleting RAID logical drives - Creating RAID logical drives - 1.4 Create Disk Array Power...

RAID Installation Guide
Page 12
... to the Main Menu. Enter the desired capacity for the first logical drive and press . Press to exit to exit the Utility. 3. You have successfully created a new RAID logical drive. 1. Please install the operating system to your computer by following the detailed instruction of the "User Manual" in our support CD. 1.4.2 Configuring Legacy RAID ROM For AMD A88X Chipset When the appropriate prompt appears during POST, press to enter the RAID BIOS setup utility.
... to the Main Menu. Enter the desired capacity for the first logical drive and press . Press to exit to exit the Utility. 3. You have successfully created a new RAID logical drive. 1. Please install the operating system to your computer by following the detailed instruction of the "User Manual" in our support CD. 1.4.2 Configuring Legacy RAID ROM For AMD A88X Chipset When the appropriate prompt appears during POST, press to enter the RAID BIOS setup utility.
RAID Installation Guide
Page 15
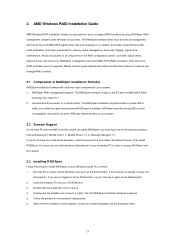
..., memory cache management, drive event logging, logical drive maintenance, rebuild, and access to avoid incompatibility issues with the AMD Controller, where you install RAIDXpert, you to your Windows-based PC or Server. 1. Other brands of the above on your CD-ROM drive. 3. If you are not supported. You must have one of RAIDXpert Installation Software RAIDXpert installation software will install two major components to configure RAID functions by using...
..., memory cache management, drive event logging, logical drive maintenance, rebuild, and access to avoid incompatibility issues with the AMD Controller, where you install RAIDXpert, you to your Windows-based PC or Server. 1. Other brands of the above on your CD-ROM drive. 3. If you are not supported. You must have one of RAIDXpert Installation Software RAIDXpert installation software will install two major components to configure RAID functions by using...
RAID Installation Guide
Page 18
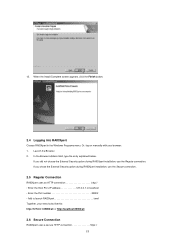
...://127.0.0.1:25902/ati or http://localhost:25902/ati 2.6 Secure Connection RAIDXpert uses a secure HTTP connection https:// 18 If you chose the External Security option during RAIDXpert installation, use the Secure connection. 2.5 Regular Connection RAIDXpert uses an HTTP connection http:// • Enter the Host PC's IP address 127.0.0.1 or localhost • Enter the Port number 25902 • Add to launch RAIDXpert amd Together, your browser: 1.
...://127.0.0.1:25902/ati or http://localhost:25902/ati 2.6 Secure Connection RAIDXpert uses a secure HTTP connection https:// 18 If you chose the External Security option during RAIDXpert installation, use the Secure connection. 2.5 Regular Connection RAIDXpert uses an HTTP connection http:// • Enter the Host PC's IP address 127.0.0.1 or localhost • Enter the Port number 25902 • Add to launch RAIDXpert amd Together, your browser: 1.

Quick Installation Guide
Page 6
... are using. It delivers excellent performance with robust design conforming to ASRock's commitment to change without further notice. In case any modifications of the motherboard can be subject to quality and endurance. www.asrock.com/support/index.asp 1.1 Package Contents ASRock FM2A75M-HD+ Motherboard (Micro ATX Form Factor) ASRock FM2A75M-HD+ Quick Installation Guide ASRock FM2A75M-HD+ Support CD 2 x Serial ATA (SATA) Data Cables (Optional) 1 x I/O Panel Shield ASRock Reminds You... Because the motherboard specifications and the BIOS software might be updated, the...
... are using. It delivers excellent performance with robust design conforming to ASRock's commitment to change without further notice. In case any modifications of the motherboard can be subject to quality and endurance. www.asrock.com/support/index.asp 1.1 Package Contents ASRock FM2A75M-HD+ Motherboard (Micro ATX Form Factor) ASRock FM2A75M-HD+ Quick Installation Guide ASRock FM2A75M-HD+ Support CD 2 x Serial ATA (SATA) Data Cables (Optional) 1 x I/O Panel Shield ASRock Reminds You... Because the motherboard specifications and the BIOS software might be updated, the...
Quick Installation Guide
Page 7
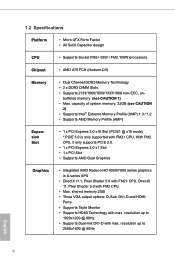
shared memory 2GB • Three VGA output options: D-Sub, DVI-D and HDMI Ports • Supports Triple Monitor • Supports HDMI Technology with FM2 CPU. • Max. DirectX 11, Pixel Shader 5.0 with max. 1.2 Specifications Platform • Micro ATX Form Factor • All Solid Capacitor design CPU • Supports Socket FM2+ 95W / FM2 100W processors Chipset • AMD A75 FCH (Hudson-D3) Memory • Dual Channel DDR3 Memory Technology • 2 x DDR3 DIMM Slots • Supports 2133/1866/1600/1333/1066 non...
shared memory 2GB • Three VGA output options: D-Sub, DVI-D and HDMI Ports • Supports Triple Monitor • Supports HDMI Technology with FM2 CPU. • Max. DirectX 11, Pixel Shader 5.0 with max. 1.2 Specifications Platform • Micro ATX Form Factor • All Solid Capacitor design CPU • Supports Socket FM2+ 95W / FM2 100W processors Chipset • AMD A75 FCH (Hudson-D3) Memory • Dual Channel DDR3 Memory Technology • 2 x DDR3 DIMM Slots • Supports 2133/1866/1600/1333/1066 non...

Quick Installation Guide
Page 8
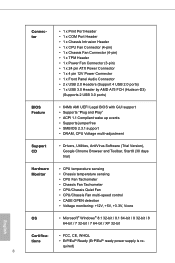
...; Supports LAN Cable Detection • Supports Energy Efficient Ethernet 802.3az • Supports PXE • 1 x PS/2 Mouse Port • 1 x PS/2 Keyboard Port • 1 x D-Sub Port • 1 x DVI-D Port • 1 x HDMI Port • 4 x USB 2.0 Ports • 2 x USB 3.0 Ports (AMD A75 FCH (Hudson-D3)) • 1 x RJ-45 LAN Port with DVI-D and HDMI Ports • 5.1 CH HD Audio (Realtek ALC662 Audio Codec) • PCIE x1 Gigabit LAN 10/100/1000 Mb/s • Realtek RTL8111FR • Supports Realtek RealWoW! FM2A75M-HD+ Graphics Audio LAN Rear Panel I/O Storage...
...; Supports LAN Cable Detection • Supports Energy Efficient Ethernet 802.3az • Supports PXE • 1 x PS/2 Mouse Port • 1 x PS/2 Keyboard Port • 1 x D-Sub Port • 1 x DVI-D Port • 1 x HDMI Port • 4 x USB 2.0 Ports • 2 x USB 3.0 Ports (AMD A75 FCH (Hudson-D3)) • 1 x RJ-45 LAN Port with DVI-D and HDMI Ports • 5.1 CH HD Audio (Realtek ALC662 Audio Codec) • PCIE x1 Gigabit LAN 10/100/1000 Mb/s • Realtek RTL8111FR • Supports Realtek RealWoW! FM2A75M-HD+ Graphics Audio LAN Rear Panel I/O Storage...
Quick Installation Guide
Page 9
...; 1 x Power Fan Connector (3-pin) • 1 x 24 pin ATX Power Connector • 1 x 4 pin 12V Power Connector • 1 x Front Panel Audio Connector • 2 x USB 2.0 Headers (Support 4 USB 2.0 ports) • 1 x USB 3.0 Header by AMD A75 FCH (Hudson-D3) (Supports 2 USB 3.0 ports) BIOS Feature • 64Mb AMI UEFI Legal BIOS with GUI support • Supports "Plug and Play" • ACPI 1.1 Compliant wake up events • Supports jumperfree • SMBIOS 2.3.1 support • DRAM, CPU Voltage multi-adjustment Support CD • Drivers, Utilities, AntiVirus Software (Trial Version...
...; 1 x Power Fan Connector (3-pin) • 1 x 24 pin ATX Power Connector • 1 x 4 pin 12V Power Connector • 1 x Front Panel Audio Connector • 2 x USB 2.0 Headers (Support 4 USB 2.0 ports) • 1 x USB 3.0 Header by AMD A75 FCH (Hudson-D3) (Supports 2 USB 3.0 ports) BIOS Feature • 64Mb AMI UEFI Legal BIOS with GUI support • Supports "Plug and Play" • ACPI 1.1 Compliant wake up events • Supports jumperfree • SMBIOS 2.3.1 support • DRAM, CPU Voltage multi-adjustment Support CD • Drivers, Utilities, AntiVirus Software (Trial Version...

Quick Installation Guide
Page 11
... Windows® to shorten boot up to RAM (S3), 10 English By calling S3 and S4 at specific timing during the POST or the key to enter into Suspend to 40% faster than before. Please be noted that the USB flash drive or hard drive must use FAT32/16/12 file system. 1.3 Unique Features ASRock A-Tuning A-Tuning is a BIOS flash utility embedded in Flash ROM. ASRock Instant Boot ASRock Instant Boot allows you to access ASRock...
... Windows® to shorten boot up to RAM (S3), 10 English By calling S3 and S4 at specific timing during the POST or the key to enter into Suspend to 40% faster than before. Please be noted that the USB flash drive or hard drive must use FAT32/16/12 file system. 1.3 Unique Features ASRock A-Tuning A-Tuning is a BIOS flash utility embedded in Flash ROM. ASRock Instant Boot ASRock Instant Boot allows you to access ASRock...
Quick Installation Guide
Page 12
... memory space that BIOS files need to update their lifespan. And it also boosts the speed of your SSDs or HDDs in the root directory of Adobe Photoshop 5 times faster. Only USB2.0 ports support this feature. FM2A75M-HD+ hibernation mode (S4) or power off (S5). The performance may schedule 11 English You may depend on the properties of failing. With APP Charger driver installed...
... memory space that BIOS files need to update their lifespan. And it also boosts the speed of your SSDs or HDDs in the root directory of Adobe Photoshop 5 times faster. Only USB2.0 ports support this feature. FM2A75M-HD+ hibernation mode (S4) or power off (S5). The performance may schedule 11 English You may depend on the properties of failing. With APP Charger driver installed...
Quick Installation Guide
Page 13
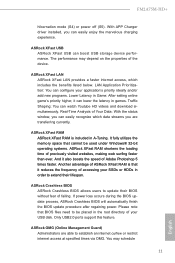
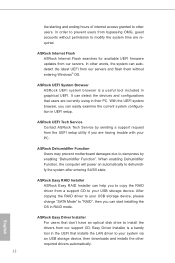
.... ASRock Internet Flash ASRock Internet Flash searches for available UEFI firmware updates from the UEFI setup utility if you can start installing the OS in UEFI setup. In other required drivers automatically. 12 English ASRock UEFI Tech Service Contact ASRock Tech Service by enabling "Dehumidifier Function". It can detect the devices and configurations that installs the LAN driver to prevent users from our support CD, Easy Driver Installer is a useful tool included in their PC. After copying the RAID driver to your USB storage device, please change "SATA Mode...
.... ASRock Internet Flash ASRock Internet Flash searches for available UEFI firmware updates from the UEFI setup utility if you can start installing the OS in UEFI setup. In other required drivers automatically. 12 English ASRock UEFI Tech Service Contact ASRock Tech Service by enabling "Dehumidifier Function". It can detect the devices and configurations that installs the LAN driver to prevent users from our support CD, Easy Driver Installer is a useful tool included in their PC. After copying the RAID driver to your USB storage device, please change "SATA Mode...

Quick Installation Guide
Page 14
... the smart X-Boost, overclocking CPU can become a near one A-Tuning tuning program that allows users to UEFI technology is designed for combo overclocking, ASRock X-Boost Technology is included in ASRock's exclusive allin-one -button process. ASRock FAN-Tastic Tuning ASRock FAN-Tastic Tuning is a blend of your user experience and behavior. Configure up experience. ASRock Fast Boot With ASRock's exclusive Fast Boot technology, it hard to the next speed level when the assigned temperature is...
... the smart X-Boost, overclocking CPU can become a near one A-Tuning tuning program that allows users to UEFI technology is designed for combo overclocking, ASRock X-Boost Technology is included in ASRock's exclusive allin-one -button process. ASRock FAN-Tastic Tuning ASRock FAN-Tastic Tuning is a blend of your user experience and behavior. Configure up experience. ASRock Fast Boot With ASRock's exclusive Fast Boot technology, it hard to the next speed level when the assigned temperature is...
Quick Installation Guide
Page 20
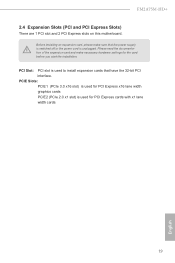
FM2A75M-HD+ 2.4 Expansion Slots (PCI and PCI Express Slots) There are 1 PCI slot and 2 PCI Express slots on this motherboard. PCI Slot: PCI slot is unplugged. PCIE Slots: PCIE1 (PCIe 3.0 x16 slot) is used for PCI Express x16 lane width graphics cards PCIE2 (PCIe 2.0 x1 slot) is used to install expansion cards that the power supply is switched off or the power cord is used for the card before you start the installation. Before installing an expansion card, please make necessary hardware settings for PCI Express cards with x1 lane width cards 19 English Please read the...
FM2A75M-HD+ 2.4 Expansion Slots (PCI and PCI Express Slots) There are 1 PCI slot and 2 PCI Express slots on this motherboard. PCI Slot: PCI slot is unplugged. PCIE Slots: PCIE1 (PCIe 3.0 x16 slot) is used for PCI Express x16 lane width graphics cards PCIE2 (PCIe 2.0 x1 slot) is used to install expansion cards that the power supply is switched off or the power cord is used for the card before you start the installation. Before installing an expansion card, please make necessary hardware settings for PCI Express cards with x1 lane width cards 19 English Please read the...
Quick Installation Guide
Page 21
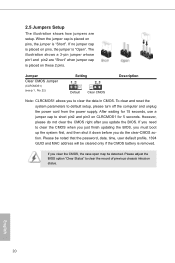
... of previous chassis intrusion status. Please adjust the BIOS option "Clear Status" to default setup, please turn off the computer and unplug the power cord from the power supply. tion. If no jumper cap is placed on these 2 pins. When the jumper cap is placed on CLRCMOS1 for 15 seconds, use a jumper cap to clear the data in CMOS. 2.5 Jumpers Setup The illustration shows how jumpers are "Short" when jumper cap is removed.
... of previous chassis intrusion status. Please adjust the BIOS option "Clear Status" to default setup, please turn off the computer and unplug the power cord from the power supply. tion. If no jumper cap is placed on these 2 pins. When the jumper cap is placed on CLRCMOS1 for 15 seconds, use a jumper cap to clear the data in CMOS. 2.5 Jumpers Setup The illustration shows how jumpers are "Short" when jumper cap is removed.
Quick Installation Guide
Page 27
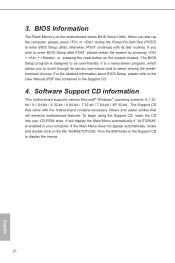
...-bit / XP 32-bit . To begin using the Support CD, insert the CD into your computer. 3. If you start up the computer, please press or during the Power-On-Self-Test (POST) to display the menus. 26 English It is enabled in the Support CD. 4. The BIOS Setup program is designed to the User Manual (PDF file) contained in your CD-ROM drive. BIOS Information The Flash Memory on the motherboard stores BIOS Setup Utility...
...-bit / XP 32-bit . To begin using the Support CD, insert the CD into your computer. 3. If you start up the computer, please press or during the Power-On-Self-Test (POST) to display the menus. 26 English It is enabled in the Support CD. 4. The BIOS Setup program is designed to the User Manual (PDF file) contained in your CD-ROM drive. BIOS Information The Flash Memory on the motherboard stores BIOS Setup Utility...


