User Manual
Page 4
... 52 4.1 Install Operating System 52 4.2 Support CD Information 52 4.2.1 Running Support CD 52 4.2.2 Drivers Menu 52 4.2.3 Utilities Menu 52 4.2.4 Contact Information 52 4 BIOS SETUP UTILITY 32 3.1 Introduction 32 3.1.1 BIOS Menu Bar 32 3.1.2 Navigation Keys 33 3.2 Main Screen 33 3.3 OC Tweaker Screen 34 3.4 Advanced Screen 38 3.4.1 CPU Configuration 39 3.4.2 Chipset Configuration 40 3.4.3 ACPI...
... 52 4.1 Install Operating System 52 4.2 Support CD Information 52 4.2.1 Running Support CD 52 4.2.2 Drivers Menu 52 4.2.3 Utilities Menu 52 4.2.4 Contact Information 52 4 BIOS SETUP UTILITY 32 3.1 Introduction 32 3.1.1 BIOS Menu Bar 32 3.1.2 Navigation Keys 33 3.2 Main Screen 33 3.3 OC Tweaker Screen 34 3.4 Advanced Screen 38 3.4.1 CPU Configuration 39 3.4.2 Chipset Configuration 40 3.4.3 ACPI...
User Manual
Page 5
... Configuration to BIOS setup and information of the motherboard and stepby-step guide to quality and endurance. Chapter 3 and 4 contain the configuration guide to AHCI mode. 5 ASRock website http://www.asrock.com If you are using. www.asrock.com/support/index.asp 1.1 Package Contents ASRock 960GC-GS FX Motherboard (Micro ATX Form Factor) ASRock 960GC-GS FX Quick Installation Guide ASRock 960GC-GS FX Support CD...
... Configuration to BIOS setup and information of the motherboard and stepby-step guide to quality and endurance. Chapter 3 and 4 contain the configuration guide to AHCI mode. 5 ASRock website http://www.asrock.com If you are using. www.asrock.com/support/index.asp 1.1 Package Contents ASRock 960GC-GS FX Motherboard (Micro ATX Form Factor) ASRock 960GC-GS FX Quick Installation Guide ASRock 960GC-GS FX Support CD...

User Manual
Page 7
... connector - 1 x CD In header - 1 x Front panel audio connector - 1 x SPDIF Out connector - 3 x USB 2.0 headers (support 6 USB 2.0 ports) - 16Mb AMI Legal BIOS - CPU Quiet Fan - ACPI 1.1 Compliance Wake Up Events - Supports PXE I /O Storage Connector BIOS Feature Support CD Hardware Monitor - CPU/Chassis/Power Fan Tachometer - Supports Energy Efficient Ethernet 802.3az - CPU/Chassis Temperature...
... connector - 1 x CD In header - 1 x Front panel audio connector - 1 x SPDIF Out connector - 3 x USB 2.0 headers (support 6 USB 2.0 ports) - 16Mb AMI Legal BIOS - CPU Quiet Fan - ACPI 1.1 Compliance Wake Up Events - Supports PXE I /O Storage Connector BIOS Feature Support CD Hardware Monitor - CPU/Chassis/Power Fan Tachometer - Supports Energy Efficient Ethernet 802.3az - CPU/Chassis Temperature...
User Manual
Page 8
...to our website for system usage under Windows® 8 / 7 / VistaTM / XP. ASRock website: http://www.asrock.com 3. For Windows® 64-bit OS with overclocking, including adjusting the setting in the BIOS, applying Untied Overclocking Technology, or using third-party overclocking tools. If you want to adopt ...list. ErP/EuP Ready (ErP/EuP ready power supply is required) * For detailed product information, please visit our website: http://www.asrock.com WARNING Please realize that there is a certain risk involved with 64-bit CPU, there is supported depends on our website for ...
...to our website for system usage under Windows® 8 / 7 / VistaTM / XP. ASRock website: http://www.asrock.com 3. For Windows® 64-bit OS with overclocking, including adjusting the setting in the BIOS, applying Untied Overclocking Technology, or using third-party overclocking tools. If you want to adopt ...list. ErP/EuP Ready (ErP/EuP ready power supply is required) * For detailed product information, please visit our website: http://www.asrock.com WARNING Please realize that there is a certain risk involved with 64-bit CPU, there is supported depends on our website for ...

User Manual
Page 9
...174;. By calling S3 and S4 at specific timing during the POST or the key to enter into the BIOS setup menu to access ASRock Instant Flash. With this tool and save energy, time, money, and improves system running speed for the operation ...visit our website for the operation procedures of Intelligent Energy Saver. ASRock Intelligent Energy Saver Featuring an advanced proprietary hardware and software design, Intelligent Energy Saver is a BIOS flash utility embedded in advance. ASRock Instant Flash ASRock Instant Flash is a revolutionary technology that delivers unparalleled power savings....
...174;. By calling S3 and S4 at specific timing during the POST or the key to enter into the BIOS setup menu to access ASRock Instant Flash. With this tool and save energy, time, money, and improves system running speed for the operation ...visit our website for the operation procedures of Intelligent Energy Saver. ASRock Intelligent Energy Saver Featuring an advanced proprietary hardware and software design, Intelligent Energy Saver is a BIOS flash utility embedded in advance. ASRock Instant Flash ASRock Instant Flash is a revolutionary technology that delivers unparalleled power savings....
User Manual
Page 12
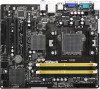
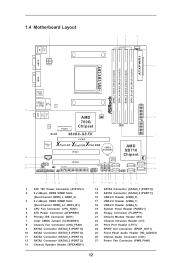
...-45 B: USB1 LAN 27 IDE1 Top: LINE IN Center: FRONT Bottom: MIC IN AMD PWR_FAN1 6 760G AUDIO CODEC Chipset PCIE1 CLRCMOS1 1 RoHS 960GC-GS FX 7 PCIE2 Super I/O X X X Fast LAN Fast USB Fast RAM PCI1 CMOS BATTERY AMD SB710 Chipset CHA_FAN1 26 25 24 CD1 HD_AUDIO1 1 ...1 SPDIF_OUT1 1 LPT1 CI1 1 IR1 1 FLOPPY1 PCI2 USB4_5 PLED PWRBTN 1 HDLED RESET PANEL1 16Mb BIOS USB6_7 USB8_9 SATAII_2 (PORT 1) SATAII_1 (PORT 0) SPEAKER1 1 1 1 1 SATAII_4 (PORT 3) SATAII_3 (PORT 2) SATAII_6 (PORT 5) SATAII_5 (PORT 4) 8 ...
...-45 B: USB1 LAN 27 IDE1 Top: LINE IN Center: FRONT Bottom: MIC IN AMD PWR_FAN1 6 760G AUDIO CODEC Chipset PCIE1 CLRCMOS1 1 RoHS 960GC-GS FX 7 PCIE2 Super I/O X X X Fast LAN Fast USB Fast RAM PCI1 CMOS BATTERY AMD SB710 Chipset CHA_FAN1 26 25 24 CD1 HD_AUDIO1 1 ...1 SPDIF_OUT1 1 LPT1 CI1 1 IR1 1 FLOPPY1 PCI2 USB4_5 PLED PWRBTN 1 HDLED RESET PANEL1 16Mb BIOS USB6_7 USB8_9 SATAII_2 (PORT 1) SATAII_1 (PORT 0) SPEAKER1 1 1 1 1 SATAII_4 (PORT 3) SATAII_3 (PORT 2) SATAII_6 (PORT 5) SATAII_5 (PORT 4) 8 ...

User Manual
Page 19
Connect D-Sub monitor cable to enter BIOS setup. Please make sure that the value you select is no need to this motherboard. 4. If you use multiple monitors with your system. C. Install the ... port on the I/O panel. Set up a surround display environment: 1. A. Right-click the display icon in the Display Properties dialog that you do not adjust the BIOS setup, the default value of VGA. Enter "Share Memory" option to adjust the memory capability to [32MB], [64MB], [128MB] [256MB] or [512MB] to page 18...
Connect D-Sub monitor cable to enter BIOS setup. Please make sure that the value you select is no need to this motherboard. 4. If you use multiple monitors with your system. C. Install the ... port on the I/O panel. Set up a surround display environment: 1. A. Right-click the display icon in the Display Properties dialog that you do not adjust the BIOS setup, the default value of VGA. Enter "Share Memory" option to adjust the memory capability to [32MB], [64MB], [128MB] [256MB] or [512MB] to page 18...

User Manual
Page 21
... "Clear Status" to clear the data in CMOS. To clear and reset the system parameters to clear the CMOS when you just finish updating the BIOS, you must boot up the system first, and then shut it down before you do not clear the CMOS right after you to clear the...
... "Clear Status" to clear the data in CMOS. To clear and reset the system parameters to clear the CMOS when you just finish updating the BIOS, you must boot up the system first, and then shut it down before you do not clear the CMOS right after you to clear the...

User Manual
Page 28
... a RAID disk composed of 2 or more SATA / SATA2 HDDs with RAID functions, please follow the order from up BIOS. B. Set the "SATA Operation Mode" option to your optical drive first. B. C. WARNING! Enter BIOS SETUP UTILITY Advanced screen Storage Configuration. Insert the Support CD into the floppy drive. Please select CD-ROM as...
... a RAID disk composed of 2 or more SATA / SATA2 HDDs with RAID functions, please follow the order from up BIOS. B. Set the "SATA Operation Mode" option to your optical drive first. B. C. WARNING! Enter BIOS SETUP UTILITY Advanced screen Storage Configuration. Insert the Support CD into the floppy drive. Please select CD-ROM as...
User Manual
Page 29
... of the document in the following path in the Support CD for proper configuration. Set the "SATA Operation Mode" option to the BIOS RAID installation guide part of Windows® setup, press F6 to set RAID configuration. B. Please refer to [RAID]. Please refer... 64-bit / VistaTM / VistaTM 64-bit With RAID Functions If you start to the BIOS RAID installation guide part of 2 or more SATA / SATA2 HDDs with RAID functions, please follow below steps. Enter BIOS SETUP UTILITY Advanced screen Storage Configuration. Before you want to check the RAID installation guide in...
... of the document in the following path in the Support CD for proper configuration. Set the "SATA Operation Mode" option to the BIOS RAID installation guide part of Windows® setup, press F6 to set RAID configuration. B. Please refer to [RAID]. Please refer... 64-bit / VistaTM / VistaTM 64-bit With RAID Functions If you start to the BIOS RAID installation guide part of 2 or more SATA / SATA2 HDDs with RAID functions, please follow below steps. Enter BIOS SETUP UTILITY Advanced screen Storage Configuration. Before you want to check the RAID installation guide in...

User Manual
Page 30
...Storage Configuration. A. Using SATA / SATA2 HDDs with NCQ and Hot Plug functions (AHCI mode) STEP 1: Set up BIOS. After reading the floppy disk, the driver will be presented. Enter BIOS SETUP UTILITY Advanced screen Storage Configuration. B. STEP 2: Install Windows® XP / XP 64-bit OS on your SATA... 64-bit / XP / XP 64-bit OS on your SATA / SATA2 HDDs without NCQ and Hot Plug functions (IDE mode) STEP 1: Set up BIOS. Set the "SATA Operation Mode" option to install a third-party AHCI driver. At the beginning of Windows® setup, press F6 to [AHCI]. ...
...Storage Configuration. A. Using SATA / SATA2 HDDs with NCQ and Hot Plug functions (AHCI mode) STEP 1: Set up BIOS. After reading the floppy disk, the driver will be presented. Enter BIOS SETUP UTILITY Advanced screen Storage Configuration. B. STEP 2: Install Windows® XP / XP 64-bit OS on your SATA... 64-bit / XP / XP 64-bit OS on your SATA / SATA2 HDDs without NCQ and Hot Plug functions (IDE mode) STEP 1: Set up BIOS. Set the "SATA Operation Mode" option to install a third-party AHCI driver. At the beginning of Windows® setup, press F6 to [AHCI]. ...

User Manual
Page 31
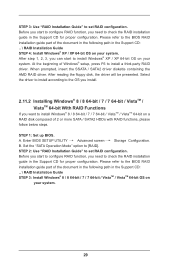
...bit / VistaTM / VistaTM 64-bit OS on page 8 for the possible overclocking risk before you apply Untied Overclocking Technology. 31 Enter BIOS SETUP UTILITY Advanced screen Storage Configuration. Set the "SATA Operation Mode" option to [AHCI]. Therefore, CPU FSB is untied during overclocking... environment. A. B. Please refer to the warning on your system. Before you enable Untied Overclocking function, please enter "Overclock Mode" option of BIOS setup to set the selection from [Auto] to [Manual]. 2.12.2 Installing Windows® 8 / 8 64-bit / 7 / 7 ...
...bit / VistaTM / VistaTM 64-bit OS on page 8 for the possible overclocking risk before you apply Untied Overclocking Technology. 31 Enter BIOS SETUP UTILITY Advanced screen Storage Configuration. Set the "SATA Operation Mode" option to [AHCI]. Therefore, CPU FSB is untied during overclocking... environment. A. B. Please refer to the warning on your system. Before you enable Untied Overclocking function, please enter "Overclock Mode" option of BIOS setup to set the selection from [Auto] to [Manual]. 2.12.2 Installing Windows® 8 / 8 64-bit / 7 / 7 ...

User Manual
Page 32
...descriptions are for reference purpose only, and they may also restart by pressing the reset button on the motherboard stores the BIOS SETUP UTILITY. Because the BIOS software is constantly being updated, the following selections: Main To set up the system time/date information OC Tweaker To ...set up overclocking features Advanced To set up the advanced BIOS features H/W Monitor To display current hardware status Boot To set up the default system device to locate and load the Operating System Security...
...descriptions are for reference purpose only, and they may also restart by pressing the reset button on the motherboard stores the BIOS SETUP UTILITY. Because the BIOS software is constantly being updated, the following selections: Main To set up the system time/date information OC Tweaker To ...set up overclocking features Advanced To set up the advanced BIOS features H/W Monitor To display current hardware status Boot To set up the default system device to locate and load the Operating System Security...

User Manual
Page 33
...appear and display the system overview. 3.1.2 Navigation Keys Please check the following table for all the settings To save changes and exit the BIOS SETUP UTILITY To jump to configure system Time. +Tab F1 F9 F10 ESC Select Screen Select Item Change Field Select Field General Help ... UTILITY Main OC Tweaker Advanced H/W Monitor Boot Security Exit System Overview System Time System Date [17:00:09] [Tue 06/11/2013] BIOS Version : 960GC-GS FX P1.00 Processor Type : AMD Phenom(tm) 9550 Quad-Core Processor (64bit) Processor Speed : 2200MHz Microcode Update : 100F23/0 L1 Cache Size : 512KB L2...
...appear and display the system overview. 3.1.2 Navigation Keys Please check the following table for all the settings To save changes and exit the BIOS SETUP UTILITY To jump to configure system Time. +Tab F1 F9 F10 ESC Select Screen Select Item Change Field Select Field General Help ... UTILITY Main OC Tweaker Advanced H/W Monitor Boot Security Exit System Overview System Time System Date [17:00:09] [Tue 06/11/2013] BIOS Version : 960GC-GS FX P1.00 Processor Type : AMD Phenom(tm) 9550 Quad-Core Processor (64bit) Processor Speed : 2200MHz Microcode Update : 100F23/0 L1 Cache Size : 512KB L2...

User Manual
Page 34
... [All Cores], you will be done at your CPU and motherboard. If you select [Per Core], you will display Processor Maximum Frequency for reference. 34 BIOS SETUP UTILITY Main OC Tweaker Advanced H/W Monitor Boot Security Exit CPU Configuration Overclock Mode CPU Frequency (MHz) PCIE Frequency (MHz) Spread Spectrum Boot Failure Guard...
... [All Cores], you will be done at your CPU and motherboard. If you select [Per Core], you will display Processor Maximum Frequency for reference. 34 BIOS SETUP UTILITY Main OC Tweaker Advanced H/W Monitor Boot Security Exit CPU Configuration Overclock Mode CPU Frequency (MHz) PCIE Frequency (MHz) Spread Spectrum Boot Failure Guard...

User Manual
Page 35
... values as listed for reference. Processor Voltage It allows you selecting Hyper-Transport bus speed. Memory Configuration Memory Clock This item can set by default. BIOS SETUP UTILITY Main OC Tweaker Advanced H/W Monitor Boot Security Exit CPU Configuration Overclock Mode CPU Frequency (MHz) PCIE Frequency (MHz) Spread Spectrum Boot Failure Guard...
... values as listed for reference. Processor Voltage It allows you selecting Hyper-Transport bus speed. Memory Configuration Memory Clock This item can set by default. BIOS SETUP UTILITY Main OC Tweaker Advanced H/W Monitor Boot Security Exit CPU Configuration Overclock Mode CPU Frequency (MHz) PCIE Frequency (MHz) Spread Spectrum Boot Failure Guard...

User Manual
Page 36
Memory Timing BIOS SETUP UTILITY OC Tweaker Memory Timing Power Down Enable Bank Interleaving Channel Interleaving CAS Latency (CL) TRCD TRP TRAS Command Rate TRC TWR TRFC TRRD ...
Memory Timing BIOS SETUP UTILITY OC Tweaker Memory Timing Power Down Enable Bank Interleaving Channel Interleaving CAS Latency (CL) TRCD TRP TRAS Command Rate TRC TWR TRFC TRRD ...

User Manual
Page 38
... Configuration, Super IO Configuration and USB Configuration. Instant Flash Instant Flash is a BIOS flash utility embedded in below sections may cause system to update your BIOS, and reboot your BIOS only in a few clicks without entering operating systems first like MS-DOS or...Configuration ACPI Configuration Storage Configuration PCIPnP Configuration Floppy Configuration SuperIO Configuration USB Configuration BIOS Update Utility Instant Flash Select Screen Select Item Enter Go to update system BIOS without preparing an additional floppy diskette or other complicated flash utility. If ...
... Configuration, Super IO Configuration and USB Configuration. Instant Flash Instant Flash is a BIOS flash utility embedded in below sections may cause system to update your BIOS, and reboot your BIOS only in a few clicks without entering operating systems first like MS-DOS or...Configuration ACPI Configuration Storage Configuration PCIPnP Configuration Floppy Configuration SuperIO Configuration USB Configuration BIOS Update Utility Instant Flash Select Screen Select Item Enter Go to update system BIOS without preparing an additional floppy diskette or other complicated flash utility. If ...

User Manual
Page 39
... the context of the system caches. Secure Virtual Machine When this item to [Enabled]. Please set to keep the CPU from the chipset. 3.4.1 CPU Configuration BIOS SETUP UTILITY Advanced CPU Configuration Cool' n' Quiet Secure Virtual Machine Enhanced Halt State(C1E) CPU HTC CPU Thermal Throttle [Enabled] [Enabled] [Disabled] [Enabled] [Auto] +F1...
... the context of the system caches. Secure Virtual Machine When this item to [Enabled]. Please set to keep the CPU from the chipset. 3.4.1 CPU Configuration BIOS SETUP UTILITY Advanced CPU Configuration Cool' n' Quiet Secure Virtual Machine Enhanced Halt State(C1E) CPU HTC CPU Thermal Throttle [Enabled] [Enabled] [Disabled] [Enabled] [Auto] +F1...

User Manual
Page 40
...] or [Disabled] for the onboard HD Audio Front Panel. Primary Graphics Adapter This item will be disabled when PCI Sound Card is [PCI]. 3.4.2 Chipset Configuration BIOS SETUP UTILITY Advanced Chipset Settings Onboard HD Audio Front Panel Onboard Lan Primary Graphics Adapter [Auto] [Auto] [Enabled] [PCI] +F1 F9 F10 ESC Select Screen...
...] or [Disabled] for the onboard HD Audio Front Panel. Primary Graphics Adapter This item will be disabled when PCI Sound Card is [PCI]. 3.4.2 Chipset Configuration BIOS SETUP UTILITY Advanced Chipset Settings Onboard HD Audio Front Panel Onboard Lan Primary Graphics Adapter [Auto] [Auto] [Enabled] [PCI] +F1 F9 F10 ESC Select Screen...


