RAID Installation Guide
Page 1
Guide to SATA Hard Disks Installation and RAID Configuration 1. Guide to RAID Configurations 4 2.1 Introduction of RAID 4 2.2 RAID Configuration Precautions 6 2.3 BIOS Configuration Utility 7 2.3.1 Enter BIOS Configuration Utility 7 2.3.2 Create Disk Array 8 1 Guide to SATA Hard Disks Installation 2 1.1 Serial ATA (SATA) Hard Disks Installation 2 1.2 Making a SATA Driver Diskette 3 2.
Guide to SATA Hard Disks Installation and RAID Configuration 1. Guide to RAID Configurations 4 2.1 Introduction of RAID 4 2.2 RAID Configuration Precautions 6 2.3 BIOS Configuration Utility 7 2.3.1 Enter BIOS Configuration Utility 7 2.3.2 Create Disk Array 8 1 Guide to SATA Hard Disks Installation 2 1.1 Serial ATA (SATA) Hard Disks Installation 2 1.2 Making a SATA Driver Diskette 3 2.
RAID Installation Guide
Page 3
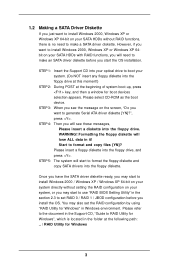
... POST at the following path: .. \ RAID Utility for Windows" in Windows environment. You may start the OS installation. Start to make an SATA driver diskette before you install the OS. Please insert a floppy diskette into the floppy diskette. However, if you want to install Windows 2000 / Windows XP...floppy drive. STEP 1: Insert the Support CD into your optical drive to RAID Utility for Windows", which is no need to make a SATA driver diskette. Please select CD-ROM as the boot device. Formatting the floppy diskette will see the message on the screen, "D o you want...
... POST at the following path: .. \ RAID Utility for Windows" in Windows environment. You may start the OS installation. Start to make an SATA driver diskette before you install the OS. Please insert a floppy diskette into the floppy diskette. However, if you want to install Windows 2000 / Windows XP...floppy drive. STEP 1: Insert the Support CD into your optical drive to RAID Utility for Windows", which is no need to make a SATA driver diskette. Please select CD-ROM as the boot device. Formatting the floppy diskette will see the message on the screen, "D o you want...
RAID Utility for Windows Guide
Page 1
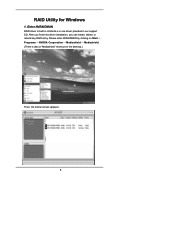
After you finish the driver installation, you can create, delete, or rebuild any RAID array. RAID Utility for Windows 1. Enter NVRAIDMAN RAID driver is also a "Mediashield" shortcut on the desktop.) Then, the below screen appears. 1 Please enter NVRAIDMAN by clicking on Start Programs NVIDIA Corporation Mediashield Mediashield. (There is built in nVidia ALL in one driver provided in our support CD.
After you finish the driver installation, you can create, delete, or rebuild any RAID array. RAID Utility for Windows 1. Enter NVRAIDMAN RAID driver is also a "Mediashield" shortcut on the desktop.) Then, the below screen appears. 1 Please enter NVRAIDMAN by clicking on Start Programs NVIDIA Corporation Mediashield Mediashield. (There is built in nVidia ALL in one driver provided in our support CD.

User Manual
Page 3
... 9 1.4 Motherboard Layout 10 1.5 HD 8CH I/O 11 2 . Contents 1 . Introduction 5 1.1 Package Contents 5 1.2 Specifications 6 1.3 Minimum Hardware Requirement Table for SATA / SATAII HDDs .... 23 2.11 Driver Installation Guide 23 2.12 HDMR Card and Driver Installation 24 2.13 Installing Windows® 2000 / XP / XP 64-bit / VistaTM Without RAID Functions 24 2.14 Installing Windows® 2000 / XP...
... 9 1.4 Motherboard Layout 10 1.5 HD 8CH I/O 11 2 . Contents 1 . Introduction 5 1.1 Package Contents 5 1.2 Specifications 6 1.3 Minimum Hardware Requirement Table for SATA / SATAII HDDs .... 23 2.11 Driver Installation Guide 23 2.12 HDMR Card and Driver Installation 24 2.13 Installing Windows® 2000 / XP / XP 64-bit / VistaTM Without RAID Functions 24 2.14 Installing Windows® 2000 / XP...

User Manual
Page 4
3.3.7 Super IO Configuration 36 3.3.8 USB Configuration 38 3.4 Hardware Health Event Monitoring Screen 38 3.5 Boot Screen 39 3.5.1 Boot Settings Configuration 39 3.6 Security Screen 40 3.7 Exit Screen 41 4 . Software Support 42 4.1 Install Operating System 42 4.2 Support CD Information 42 4.2.1 Running Support CD 42 4.2.2 Drivers Menu 42 4.2.3 Utilities Menu 42 4.2.4 Contact Information 42 APPENDIX: AMD's Cool 'n' QuietTM Technology ...... 43 4
3.3.7 Super IO Configuration 36 3.3.8 USB Configuration 38 3.4 Hardware Health Event Monitoring Screen 38 3.5 Boot Screen 39 3.5.1 Boot Settings Configuration 39 3.6 Security Screen 40 3.7 Exit Screen 41 4 . Software Support 42 4.1 Install Operating System 42 4.2 Support CD Information 42 4.2.1 Running Support CD 42 4.2.2 Drivers Menu 42 4.2.3 Utilities Menu 42 4.2.4 Contact Information 42 APPENDIX: AMD's Cool 'n' QuietTM Technology ...... 43 4

User Manual
Page 7
... 0, RAID 1, JBOD) and "Hot Plug" functions (see CAUTION 7) - 2 x ATA133 IDE connectors (support 4 x IDE devices) - 1 x Floppy connector - 1 x IR header - 1 x Game header - 1 x COM port header - SMBIOS 2.3.1 Support - Drivers, Utilities, AntiVirus Software (Trial Version) - CPU Temperature Sensing -
... 0, RAID 1, JBOD) and "Hot Plug" functions (see CAUTION 7) - 2 x ATA133 IDE connectors (support 4 x IDE devices) - 1 x Floppy connector - 1 x IR header - 1 x Game header - 1 x COM port header - SMBIOS 2.3.1 Support - Drivers, Utilities, AntiVirus Software (Trial Version) - CPU Temperature Sensing -

User Manual
Page 8
.... You can support AMD's Cool 'n' QuietTM technology, please check AMD's website for proper installation. 4. ASRock website http://www.asrock.com 8 CAUTION! 1. This motherboard supports Dual Channel Memory Technology. Before you are allowed to downgrade the... SATAII hard disk to SATA hard disk (from SATAII 3Gb/s down to SATA 1.5Gb/s), and connect it to the SATAII connector. Power Management for proper connection. 7. Microsoft® Windows® VistaTM driver...
.... You can support AMD's Cool 'n' QuietTM technology, please check AMD's website for proper installation. 4. ASRock website http://www.asrock.com 8 CAUTION! 1. This motherboard supports Dual Channel Memory Technology. Before you are allowed to downgrade the... SATAII hard disk to SATA hard disk (from SATAII 3Gb/s down to SATA 1.5Gb/s), and connect it to the SATAII connector. Power Management for proper connection. 7. Microsoft® Windows® VistaTM driver...

User Manual
Page 16
...Align the card connector with the slot and press firmly until the card is completely seated on 939NF4G-VSTA motherboard. Replace the system cover. 2.5 Easy Multi Monitor Feature This motherboard supports Multi Monitor upgrade.... less than the total capability of BIOS to adjust the memory capability to insert an ASRock HDMR card with x16 lane width graphics cards. Before installing the expansion card, please ... slot; Installing an expansion card Step 1. If you can install VGA cards and VGA card drivers to use . Step 6. Remove the system unit cover (if your motherboard is shared with...
...Align the card connector with the slot and press firmly until the card is completely seated on 939NF4G-VSTA motherboard. Replace the system cover. 2.5 Easy Multi Monitor Feature This motherboard supports Multi Monitor upgrade.... less than the total capability of BIOS to adjust the memory capability to insert an ASRock HDMR card with x16 lane width graphics cards. Before installing the expansion card, please ... slot; Installing an expansion card Step 1. If you can install VGA cards and VGA card drivers to use . Step 6. Remove the system unit cover (if your motherboard is shared with...

User Manual
Page 23
... insert the support CD to insert and remove the SATA / SATAII HDDs while the system is still power-on and in working condition. Therefore, the drivers you to your optical drive first. STEP 1: Install the SATA / SATAII hard disks into the SATA / SATAII HDD. If the SATA / SATAII HDDs are... for the action to insert and remove the SATA / SATAII HDDs while the system is still power-on and in working condition. 2.11 Driver Installation Guide To install the drivers to your chassis. If SATA / SATAII HDDs are NOT set for RAID configuration, it is called "Hot Swap" for SATA / SATAII...
... insert the support CD to insert and remove the SATA / SATAII HDDs while the system is still power-on and in working condition. Therefore, the drivers you to your optical drive first. STEP 1: Install the SATA / SATAII hard disks into the SATA / SATAII HDD. If the SATA / SATAII HDDs are... for the action to insert and remove the SATA / SATAII HDDs while the system is still power-on and in working condition. 2.11 Driver Installation Guide To install the drivers to your chassis. If SATA / SATAII HDDs are NOT set for RAID configuration, it is called "Hot Swap" for SATA / SATAII...

User Manual
Page 24
...2000 to your system, your disk is no SP4 included in the future, you plan to use HDMR card function on this motherboard. Insert the ASRock Support CD into floppy drive A: 24 Please select CD- C. Reboot your system. 2.13 Installing Windows® 2000 / Windows® XP /...at the beginning of making a SP4 disk: http://www.microsoft.com/Windows2000/downloads/servicepacks/sp4/ spdeploy.htm#the_integrated_installation_fmay STEP 1: Make a SATA / SATAII Driver Diskette. If you want to install Windows® 2000, Windows® XP or Windows® XP 64-bit on your SATA / SATAII HDDs ...
...2000 to your system, your disk is no SP4 included in the future, you plan to use HDMR card function on this motherboard. Insert the ASRock Support CD into floppy drive A: 24 Please select CD- C. Reboot your system. 2.13 Installing Windows® 2000 / Windows® XP /...at the beginning of making a SP4 disk: http://www.microsoft.com/Windows2000/downloads/servicepacks/sp4/ spdeploy.htm#the_integrated_installation_fmay STEP 1: Make a SATA / SATAII Driver Diskette. If you want to install Windows® 2000, Windows® XP or Windows® XP 64-bit on your SATA / SATAII HDDs ...
User Manual
Page 25
...start Please insert a floppy diskette into the floppy diskette. STEP 3: Use "RAID Installation Guide" to install a third-party SCSI or RAID driver. Before you can operate under a more stable overclocking environment. 25 STEP 2: Set Up BIOS. Please refer to the document in the Support ... configuration by using "RAID Utility for proper configuration. When prompted, insert a floppy disk containing the nVidia® RAID driver. After reading the floppy disk, the driver will start to [RAID]. Then, please set the selection from [non-RAID] to install Windows® 2000 / Windows...
...start Please insert a floppy diskette into the floppy diskette. STEP 3: Use "RAID Installation Guide" to install a third-party SCSI or RAID driver. Before you can operate under a more stable overclocking environment. 25 STEP 2: Set Up BIOS. Please refer to the document in the Support ... configuration by using "RAID Utility for proper configuration. When prompted, insert a floppy disk containing the nVidia® RAID driver. After reading the floppy disk, the driver will start to [RAID]. Then, please set the selection from [non-RAID] to install Windows® 2000 / Windows...

User Manual
Page 42
...Information The Support CD that came with the motherboard contains necessary drivers and useful utilities that the motherboard supports. or you need to contact ASRock or want to visit ASRock's website at http://www.asrock.com; If the Main Menu did not appear automatically, locate ... OS documentation for general reference only. Please install the necessary drivers to display the menus. 4.2.2 Drivers Menu The Drivers Menu shows the available devices drivers including ASRock Express GbL PCI Express LAN card driver if the system detects the installed devices. Because motherboard settings and...
...Information The Support CD that came with the motherboard contains necessary drivers and useful utilities that the motherboard supports. or you need to contact ASRock or want to visit ASRock's website at http://www.asrock.com; If the Main Menu did not appear automatically, locate ... OS documentation for general reference only. Please install the necessary drivers to display the menus. 4.2.2 Drivers Menu The Drivers Menu shows the available devices drivers including ASRock Express GbL PCI Express LAN card driver if the system detects the installed devices. Because motherboard settings and...

User Manual
Page 43
From the Power schemes combo list box, select Minimal Power Management. 6. Click OK to install "AMD Processor Driver" from the "Support CD" first. When using Windows® 2000/XP operating system, please follow the instruction below to Classic View. (for Windows® XP ...
From the Power schemes combo list box, select Minimal Power Management. 6. Click OK to install "AMD Processor Driver" from the "Support CD" first. When using Windows® 2000/XP operating system, please follow the instruction below to Classic View. (for Windows® XP ...

Quick Installation Guide
Page 6
...) - 1 x Floppy connector - 1 x IR header - 1 x Game header - 1 x COM port header - ACPI 1.1 Compliance Wake Up Events - Supports jumperfree - Drivers, Utilities, AntiVirus Software (Trial Version) - CPU Temperature Sensing - CPU Quiet Fan - FCC, CE, Microsoft® WHQL Certificated English 6 ASRock 939NF4G-VSTA Motherboard SMBIOS 2.3.1 Support - CPU Fan Tachometer - Chassis Temperature Sensing - Connector BIOS Feature Support CD Hardware Monitor...
...) - 1 x Floppy connector - 1 x IR header - 1 x Game header - 1 x COM port header - ACPI 1.1 Compliance Wake Up Events - Supports jumperfree - Drivers, Utilities, AntiVirus Software (Trial Version) - CPU Temperature Sensing - CPU Quiet Fan - FCC, CE, Microsoft® WHQL Certificated English 6 ASRock 939NF4G-VSTA Motherboard SMBIOS 2.3.1 Support - CPU Fan Tachometer - Chassis Temperature Sensing - Connector BIOS Feature Support CD Hardware Monitor...

Quick Installation Guide
Page 7
... 2.0 works fine under Windows system. ASRock website http://www.asrock.com 7 ASRock 939NF4G-VSTA Motherboard English For power-saving's sake, it is not ready yet. Please read "Untied Overclocking Technology" on page 20 for Microsoft® Windows® VistaTM driver and related information. Frequencies other than the...channel, and 8-channel modes. Besides, you install the PC system. 6. Power Management for details. 2. Microsoft® Windows® VistaTM driver is strongly recommended to SATA 1.5Gb/s), and connect it is detected, the system will update it back again.
... 2.0 works fine under Windows system. ASRock website http://www.asrock.com 7 ASRock 939NF4G-VSTA Motherboard English For power-saving's sake, it is not ready yet. Please read "Untied Overclocking Technology" on page 20 for Microsoft® Windows® VistaTM driver and related information. Frequencies other than the...channel, and 8-channel modes. Besides, you install the PC system. 6. Power Management for details. 2. Microsoft® Windows® VistaTM driver is strongly recommended to SATA 1.5Gb/s), and connect it is detected, the system will update it back again.

Quick Installation Guide
Page 12
...the power cord is used for the card before you can only choose either PCIE2 slot or HDMR slot to enjoy multi-monitors. 12 ASRock 939NF4G-VSTA Motherboard English Remove the system unit cover (if your motherboard is shared with PCIE2 slot; Fasten the card to the chassis with x16 ... is used for later use. After setting up BIOS, you can install VGA cards and VGA card drivers to use . Step 6. PCIE2 (PCIE x1 slot) is [Auto], which will disable onboard VGA function when installing VGA card. Step 4. With the internal onboard VGA and the external add-on 939NF4G-VSTA motherboard.
...the power cord is used for the card before you can only choose either PCIE2 slot or HDMR slot to enjoy multi-monitors. 12 ASRock 939NF4G-VSTA Motherboard English Remove the system unit cover (if your motherboard is shared with PCIE2 slot; Fasten the card to the chassis with x16 ... is used for later use. After setting up BIOS, you can install VGA cards and VGA card drivers to use . Step 6. PCIE2 (PCIE x1 slot) is [Auto], which will disable onboard VGA function when installing VGA card. Step 4. With the internal onboard VGA and the external add-on 939NF4G-VSTA motherboard.

Quick Installation Guide
Page 18
...STEP 1: Install the SATA / SATAII hard disks into the SATA / SATAII HDD. STEP 2: Connect the SATA power cable to install those required drivers. 2.8 Serial ATA (SATA) / Serial ATAII (SATAII) Hard Disks Installation This motherboard adopts nVidia® nForce 410 MCP southbridge chipset that it ... is Hot Swap Function? What is Hot Plug Function? Therefore, the drivers you to your system can work properly. 18 ASRock 939NF4G-VSTA Motherboard English You may install SATA / SATAII hard disks on the support CD driver page. STEP 4: Connect the other end of the SATA data cable ...
...STEP 1: Install the SATA / SATAII hard disks into the SATA / SATAII HDD. STEP 2: Connect the SATA power cable to install those required drivers. 2.8 Serial ATA (SATA) / Serial ATAII (SATAII) Hard Disks Installation This motherboard adopts nVidia® nForce 410 MCP southbridge chipset that it ... is Hot Swap Function? What is Hot Plug Function? Therefore, the drivers you to your system can work properly. 18 ASRock 939NF4G-VSTA Motherboard English You may install SATA / SATAII hard disks on the support CD driver page. STEP 4: Connect the other end of the SATA data cable ...

Quick Installation Guide
Page 19
...completely seated on your SATA / SATAII HDDs without RAID functions, you don't have to make a SATA / SATAII driver diskette. Insert the ASRock Support CD into floppy drive A: 19 ASRock 939NF4G-VSTA Motherboard English ROM as the boot device. When you see these messages, Please insert a blank formatted diskette into your... You can start to install Windows® 2000, Windows® XP or Windows® XP 64-bit on the screen, "Generate Serial ATA driver diskette [YN]?", press . If you want to install Windows® 2000, Windows® XP or Windows® XP 64-bit on the slot...
...completely seated on your SATA / SATAII HDDs without RAID functions, you don't have to make a SATA / SATAII driver diskette. Insert the ASRock Support CD into floppy drive A: 19 ASRock 939NF4G-VSTA Motherboard English ROM as the boot device. When you see these messages, Please insert a blank formatted diskette into your... You can start to install Windows® 2000, Windows® XP or Windows® XP 64-bit on the screen, "Generate Serial ATA driver diskette [YN]?", press . If you want to install Windows® 2000, Windows® XP or Windows® XP 64-bit on the slot...

Quick Installation Guide
Page 20
...in Windows® environment. B. Set the "SATAII Operation Mode" option from [Auto] to [CPU, PCIE, Async.]. English 20 ASRock 939NF4G-VSTA Motherboard The system will be presented. Before you start to the mode you choose and the OS you enable Untied Overclocking function, ...Utility for Windows Guide" in the Support CD for proper configuration. When prompted, insert a floppy disk containing the nVidia® RAID driver. Then, please set RAID configuration. E. Enter BIOS SETUP UTILITY Advanced screen IDE Configuration. At the beginning of BIOS setup to set...
...in Windows® environment. B. Set the "SATAII Operation Mode" option from [Auto] to [CPU, PCIE, Async.]. English 20 ASRock 939NF4G-VSTA Motherboard The system will be presented. Before you start to the mode you choose and the OS you enable Untied Overclocking function, ...Utility for Windows Guide" in the Support CD for proper configuration. When prompted, insert a floppy disk containing the nVidia® RAID driver. Then, please set RAID configuration. E. Enter BIOS SETUP UTILITY Advanced screen IDE Configuration. At the beginning of BIOS setup to set...
Quick Installation Guide
Page 21
... is a menu-driven program, which allows you start up the computer, please press during the Power-On-Self-Test (POST) to display the menus. 21 ASRock 939NF4G-VSTA Motherboard English The Support CD that will display the Main Menu automatically if "AUTORUN" is designed to select among the predetermined choices. If the Main...The Flash Memory on the file "ASSETUP. EXE" from the "BIN" folder in your CD-ROM drive. otherwise, POST continues with the motherboard contains necessary drivers and useful utilities that came with its various sub-menus and to be user-friendly. 3.
... is a menu-driven program, which allows you start up the computer, please press during the Power-On-Self-Test (POST) to display the menus. 21 ASRock 939NF4G-VSTA Motherboard English The Support CD that will display the Main Menu automatically if "AUTORUN" is designed to select among the predetermined choices. If the Main...The Flash Memory on the file "ASSETUP. EXE" from the "BIN" folder in your CD-ROM drive. otherwise, POST continues with the motherboard contains necessary drivers and useful utilities that came with its various sub-menus and to be user-friendly. 3.


