
User Manual
Page 6
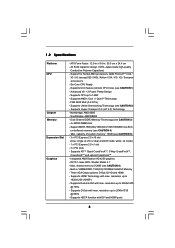
...max. resolution up to 2048x1536 @ 85Hz - ATX Form Factor: 12.0-in x 9.6-in 128MB DDR3 1333(OC)/1200MHz SidePort Memory - Support for Socket AM3 processors: AMD PhenomTM II X4 / X3 / X2 (except 920 / 940) / Athlon II X4 / X3 / X2 / Sempron processors... Polymer Capacitors) - Advanced V8 + 2 Power Phase Design - Supports HDCP function with max. Supports CPU up to 140W - Northbridge: AMD 880G - 1.2 Specifications Platform CPU Chipset Memory Expansion Slot Graphics - resolution up to 2560x1600 @ 75Hz - Integrated AMD Radeon HD 4250 graphics - DX10...
...max. resolution up to 2048x1536 @ 85Hz - ATX Form Factor: 12.0-in x 9.6-in 128MB DDR3 1333(OC)/1200MHz SidePort Memory - Support for Socket AM3 processors: AMD PhenomTM II X4 / X3 / X2 (except 920 / 940) / Athlon II X4 / X3 / X2 / Sempron processors... Polymer Capacitors) - Advanced V8 + 2 Power Phase Design - Supports HDCP function with max. Supports CPU up to 140W - Northbridge: AMD 880G - 1.2 Specifications Platform CPU Chipset Memory Expansion Slot Graphics - resolution up to 2560x1600 @ 75Hz - Integrated AMD Radeon HD 4250 graphics - DX10...
User Manual
Page 11
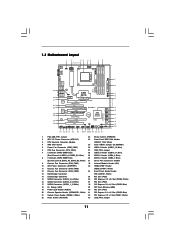
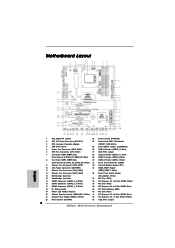
...IN NEC MPD720200 PCIE2 Sideport memory 128MB PCI Express 2.0 Super I/O RoHS PCI1 Six-Core CPU Ready 8Mb BIOS NEC USB 3.0 PCIE3 880G Extreme3 PCI2 ErP/EuP Ready CMOS BATTERY AMD SB850 Chipset AUDIO CODEC PCIE4 Designed in Taipei PCI3 HD_AUDIO1 COM1 IR1 1 1 1 1 HDMI_SPDIF1... Switch (PWRBTN) 2 ATX 12V Power Connector (ATX12V1) 24 Front Panel IEEE 1394 Header 3 CPU Heatsink Retention Module (FRONT_1394, White) 4 AM3 CPU Socket 25 Clear CMOS Jumper (CLRCMOS1) 5 Power Fan Connector (PWR_FAN1) 26 USB 2.0 Header (USB12_13, Blue) 6 CPU Fan Connector (CPU_FAN1) 27 USB_PW3...
...IN NEC MPD720200 PCIE2 Sideport memory 128MB PCI Express 2.0 Super I/O RoHS PCI1 Six-Core CPU Ready 8Mb BIOS NEC USB 3.0 PCIE3 880G Extreme3 PCI2 ErP/EuP Ready CMOS BATTERY AMD SB850 Chipset AUDIO CODEC PCIE4 Designed in Taipei PCI3 HD_AUDIO1 COM1 IR1 1 1 1 1 HDMI_SPDIF1... Switch (PWRBTN) 2 ATX 12V Power Connector (ATX12V1) 24 Front Panel IEEE 1394 Header 3 CPU Heatsink Retention Module (FRONT_1394, White) 4 AM3 CPU Socket 25 Clear CMOS Jumper (CLRCMOS1) 5 Power Fan Connector (PWR_FAN1) 26 USB 2.0 Header (USB12_13, Blue) 6 CPU Fan Connector (CPU_FAN1) 27 USB_PW3...

User Manual
Page 14
...-tighten the screws! Doing so may cause severe damage to the chassis, please do not touch the ICs. 4. Installation This is detached from the wall socket before you install motherboard components or change any component, ensure that the power is switched off or the power cord is an ATX form factor...
...-tighten the screws! Doing so may cause severe damage to the chassis, please do not touch the ICs. 4. Installation This is detached from the wall socket before you install motherboard components or change any component, ensure that the power is switched off or the power cord is an ATX form factor...
User Manual
Page 15
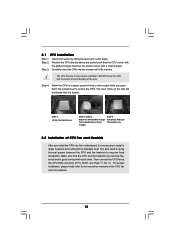
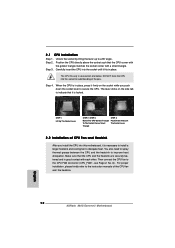
...this motherboard, it is necessary to install a larger heatsink and cooling fan to indicate that the CPU corner with the golden triangle matches the socket corner with each other. Then connect the CPU fan to improve heat dissipation. DO NOT force the CPU into the... small triangle. For proper installation, please kindly refer to avoid bending of CPU Fan and Heatsink After you push down the socket lever to a 90o angle. 2.1 CPU Installation Step 1. Unlock the socket by lifting the lever up to secure the CPU. When the CPU is locked. Position the CPU directly above the...
...this motherboard, it is necessary to install a larger heatsink and cooling fan to indicate that the CPU corner with the golden triangle matches the socket corner with each other. Then connect the CPU fan to improve heat dissipation. DO NOT force the CPU into the... small triangle. For proper installation, please kindly refer to avoid bending of CPU Fan and Heatsink After you push down the socket lever to a 90o angle. 2.1 CPU Installation Step 1. Unlock the socket by lifting the lever up to secure the CPU. When the CPU is locked. Position the CPU directly above the...
Quick Installation Guide
Page 2
...Switch (PWRBTN) 2 ATX 12V Power Connector (ATX12V1) 24 Front Panel IEEE 1394 Header 3 CPU Heatsink Retention Module (FRONT_1394, White) 4 AM3 CPU Socket 25 Clear CMOS Jumper (CLRCMOS1) 5 Power Fan Connector (PWR_FAN1) 26 USB 2.0 Header (USB12_13, Blue) 6 CPU Fan Connector (CPU_FAN1) 27 ...(PCI1) 20 Chassis Speaker Header (SPEAKER 1, White) 41 PCI Express 2.0 x16 Slot (PCIE2; White) 22 Reset Switch (RSTBTN) 43 USB_PW2 Jumper 2 ASRock 880G Extreme3 Motherboard Blue) 29 USB 2.0 Header (USB8_9, Blue) 8 2 x 240-pin DDR3 DIMM Slots 30 USB 2.0 Header (USB6_7, Blue) (Dual Channel ...
...Switch (PWRBTN) 2 ATX 12V Power Connector (ATX12V1) 24 Front Panel IEEE 1394 Header 3 CPU Heatsink Retention Module (FRONT_1394, White) 4 AM3 CPU Socket 25 Clear CMOS Jumper (CLRCMOS1) 5 Power Fan Connector (PWR_FAN1) 26 USB 2.0 Header (USB12_13, Blue) 6 CPU Fan Connector (CPU_FAN1) 27 ...(PCI1) 20 Chassis Speaker Header (SPEAKER 1, White) 41 PCI Express 2.0 x16 Slot (PCIE2; White) 22 Reset Switch (RSTBTN) 43 USB_PW2 Jumper 2 ASRock 880G Extreme3 Motherboard Blue) 29 USB 2.0 Header (USB8_9, Blue) 8 2 x 240-pin DDR3 DIMM Slots 30 USB 2.0 Header (USB6_7, Blue) (Dual Channel ...
Quick Installation Guide
Page 6
... Platform CPU Chipset Memory Expansion Slot Graphics - Supports Hyper-Transport 3.0 (HT 3.0) Technology - Supports HDMI Technology with DVI and HDMI ports 6 ASRock 880G Extreme3 Motherboard English Supports CPU up to 140W - capacity of system memory: 16GB (see CAUTION 2) - Built-in , 30.5 cm x 24.4... - Supports AMD's Cool 'n' QuietTM Technology - FSB 2600 MHz (5.2 GT/s) - Southbridge: AMD SB850 - Max. Supports D-Sub with max. Support for Socket AM3 processors: AMD PhenomTM II X4 / X3 / X2 (except 920 / 940) / Athlon II X4 / X3 / X2 / Sempron processors - Support...
... Platform CPU Chipset Memory Expansion Slot Graphics - Supports Hyper-Transport 3.0 (HT 3.0) Technology - Supports HDMI Technology with DVI and HDMI ports 6 ASRock 880G Extreme3 Motherboard English Supports CPU up to 140W - capacity of system memory: 16GB (see CAUTION 2) - Built-in , 30.5 cm x 24.4... - Supports AMD's Cool 'n' QuietTM Technology - FSB 2600 MHz (5.2 GT/s) - Southbridge: AMD SB850 - Max. Supports D-Sub with max. Support for Socket AM3 processors: AMD PhenomTM II X4 / X3 / X2 (except 920 / 940) / Athlon II X4 / X3 / X2 / Sempron processors - Support...
Quick Installation Guide
Page 11
...bag that the motherboard fits into it on the carpet or the like. Failure to do so may damage the motherboard. 11 ASRock 880G Extreme3 Motherboard English Hold components by the edges and do not over-tighten the screws! Whenever you handle components. 3. Pre-installation Precautions ... the screw holes to secure the motherboard to ensure that comes with the component. 5. 2. Installation This is detached from the wall socket before you install the motherboard, study the configuration of your motherboard directly on a grounded antistatic pad or in , 30.5 cm x 24.4 ...
...bag that the motherboard fits into it on the carpet or the like. Failure to do so may damage the motherboard. 11 ASRock 880G Extreme3 Motherboard English Hold components by the edges and do not over-tighten the screws! Whenever you handle components. 3. Pre-installation Precautions ... the screw holes to secure the motherboard to ensure that comes with the component. 5. 2. Installation This is detached from the wall socket before you install the motherboard, study the configuration of your motherboard directly on a grounded antistatic pad or in , 30.5 cm x 24.4 ...
Quick Installation Guide
Page 12
... pins. You also need to spray thermal grease between the CPU and the heatsink to indicate that it is locked. English 12 ASRock 880G Extreme3 Motherboard Step 3. Step 4. Lever 90° Up STEP 1: Lift Up The Socket Lever CPU Golden Triangle Socker Corner Small Triangle STEP 2 / STEP 3: Match The CPU Golden Triangle To The...
... pins. You also need to spray thermal grease between the CPU and the heatsink to indicate that it is locked. English 12 ASRock 880G Extreme3 Motherboard Step 3. Step 4. Lever 90° Up STEP 1: Lift Up The Socket Lever CPU Golden Triangle Socker Corner Small Triangle STEP 2 / STEP 3: Match The CPU Golden Triangle To The...