
RAID Installation Guide
Page 3
...CD-ROM as the boot device. STEP 3: When you see these messages, Please insert a diskette into the floppy drive at this moment!) STEP 2: During POST at the following path: .. \ VIA RAID Tool 3 You may start to install Windows 2000 / Windows XP on your system directly without setting the ...RAID 0 / RAID 1 / JBOD configuration before you start to use "VT8237 SATA RAID BIOS" to format and copy files [YN]? WARNING! STEP 1: Insert the ASRock Support CD into the floppy drive, and press . Formatting the floppy diskette will start to make an SATA driver diskette before you install the OS...
...CD-ROM as the boot device. STEP 3: When you see these messages, Please insert a diskette into the floppy drive at this moment!) STEP 2: During POST at the following path: .. \ VIA RAID Tool 3 You may start to install Windows 2000 / Windows XP on your system directly without setting the ...RAID 0 / RAID 1 / JBOD configuration before you start to use "VT8237 SATA RAID BIOS" to format and copy files [YN]? WARNING! STEP 1: Insert the ASRock Support CD into the floppy drive, and press . Formatting the floppy diskette will start to make an SATA driver diskette before you install the OS...

User Manual
Page 22
STEP 3: When you see these messages, Please insert a diskette into the floppy drive at this moment!) STEP 2: During POST at the beginning of system boot-up, press key, and then a window for proper configuration. Once you have the SATA driver diskette ready, you may ... will need to install Windows 2000 or Windows XP on your system. (Do NOT insert any floppy diskette into the floppy drive. STEP 1: Insert the ASRock Support CD into your optical drive to format and copy files [YN]?
STEP 3: When you see these messages, Please insert a diskette into the floppy drive at this moment!) STEP 2: During POST at the beginning of system boot-up, press key, and then a window for proper configuration. Once you have the SATA driver diskette ready, you may ... will need to install Windows 2000 or Windows XP on your system. (Do NOT insert any floppy diskette into the floppy drive. STEP 1: Insert the ASRock Support CD into your optical drive to format and copy files [YN]?

User Manual
Page 23
If you see on your system. Please press during the Power-On-Self-Test (POST) to enter the BIOS SETUP UTILITY, otherwise, POST will continue with the following BIOS setup screens and descriptions are for reference purpose only, and they may run the BIOS SETUP UTILITY when you ... device to choose among the selections on the system chassis. You may not exactly match what you wish to enter the BIOS SETUP UTILITY after POST, restart the system by pressing + + , or by turning the system off and then back on the motherboard stores the BIOS SETUP UTILITY. BIOS SETUP UTILITY...
If you see on your system. Please press during the Power-On-Self-Test (POST) to enter the BIOS SETUP UTILITY, otherwise, POST will continue with the following BIOS setup screens and descriptions are for reference purpose only, and they may run the BIOS SETUP UTILITY when you ... device to choose among the selections on the system chassis. You may not exactly match what you wish to enter the BIOS SETUP UTILITY after POST, restart the system by pressing + + , or by turning the system off and then back on the motherboard stores the BIOS SETUP UTILITY. BIOS SETUP UTILITY...
Quick Installation Guide
Page 19
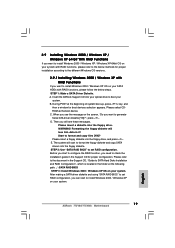
... RAID configuration, you can start to configure the RAID function, you need to check the installation guide in the Support CD for proper configuration. During POST at the following path: .. \ SATA RAID BIOS STEP 3: Install Windows 2000 / Windows XP OS on your system. After making a SATA driver ... CD into the floppy drive, and press . Start to install Windows 2000 / Windows XP on your system. 19 ASRock 775V88/775V88+ Motherboard English Formatting the floppy diskette will start to boot your system. Please insert a floppy diskette into your optical drive to format...
... RAID configuration, you can start to configure the RAID function, you need to check the installation guide in the Support CD for proper configuration. During POST at the following path: .. \ SATA RAID BIOS STEP 3: Install Windows 2000 / Windows XP OS on your system. After making a SATA driver ... CD into the floppy drive, and press . Start to install Windows 2000 / Windows XP on your system. 19 ASRock 775V88/775V88+ Motherboard English Formatting the floppy diskette will start to boot your system. Please insert a floppy diskette into your optical drive to format...
Quick Installation Guide
Page 22
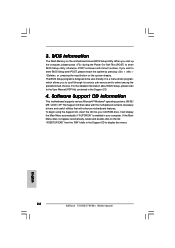
When you start up the computer, please press during the Power-On-Self-Test (POST) to display the menus. 22 ASRock 775V88/775V88+ Motherboard English To begin using the Support CD, insert the CD into your computer. BIOS Information The Flash Memory on the system chassis. The Support ...
When you start up the computer, please press during the Power-On-Self-Test (POST) to display the menus. 22 ASRock 775V88/775V88+ Motherboard English To begin using the Support CD, insert the CD into your computer. BIOS Information The Flash Memory on the system chassis. The Support ...

User Manual
Page 22
...Guide to SATA Hard Disks Installation and RAID Configuration", which is located in the Support CD for boot devices selection appears. STEP 1: Insert the ASRock Support CD into your optical drive to boot your system. (Do NOT insert any floppy diskette into the floppy drive. STEP 5: The system...may start the OS installation. STEP 3: When you see these messages, Please insert a diskette into the floppy drive at this moment!) STEP 2: During POST at the beginning of system boot-up, press key, and then a window for proper configuration. Please refer to the document in the Support CD,...
...Guide to SATA Hard Disks Installation and RAID Configuration", which is located in the Support CD for boot devices selection appears. STEP 1: Insert the ASRock Support CD into your optical drive to boot your system. (Do NOT insert any floppy diskette into the floppy drive. STEP 5: The system...may start the OS installation. STEP 3: When you see these messages, Please insert a diskette into the floppy drive at this moment!) STEP 2: During POST at the beginning of system boot-up, press key, and then a window for proper configuration. Please refer to the document in the Support CD,...

User Manual
Page 23
... to locate and load the Operating System Security To set up the computer. Please press during the Power-On-Self-Test (POST) to enter the BIOS SETUP UTILITY, otherwise, POST will continue with the following BIOS setup screens and descriptions are for reference purpose only, and they may not exactly match what... with its test routines. BIOS SETUP UTILITY 3.1 Introduction This section explains how to use the BIOS SETUP UTILITY to enter the BIOS SETUP UTILITY after POST, restart the system by pressing + + , or by turning the system off and then back on.
... to locate and load the Operating System Security To set up the computer. Please press during the Power-On-Self-Test (POST) to enter the BIOS SETUP UTILITY, otherwise, POST will continue with the following BIOS setup screens and descriptions are for reference purpose only, and they may not exactly match what... with its test routines. BIOS SETUP UTILITY 3.1 Introduction This section explains how to use the BIOS SETUP UTILITY to enter the BIOS SETUP UTILITY after POST, restart the system by pressing + + , or by turning the system off and then back on.


