
Operating Instructions
Page 2
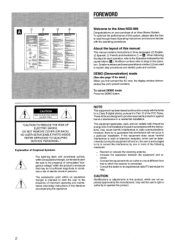
FOREWORD ,.---...
FOREWORD ,.---...

Operating Instructions
Page 10
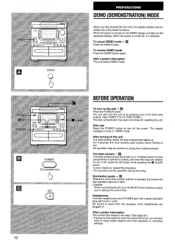
... 20. If the TV screen still has poor color, move the speakers away from the TV. A demonstration of the unit's preset functions begins in the display window (DEMO mode). Refer to an AC outlet. Then, shut the lever to lock. q Do not leave magnets or objects generating magnetism near the speakers...
... 20. If the TV screen still has poor color, move the speakers away from the TV. A demonstration of the unit's preset functions begins in the display window (DEMO mode). Refer to an AC outlet. Then, shut the lever to lock. q Do not leave magnets or objects generating magnetism near the speakers...
Operating Instructions
Page 16
...procedure. It flashes when the disc compartment is restored. To cancel DEMO mode+ u Press the DEMO button. To turn the unit on , the DEMO display is heard from the speakers while headphones are rotated. q Do not carry out this operation during this 4-second period. No sound is hidden by pressing... one of the function buttons is on the unit The flash window above the disc compartment lights up or flash. The display changes to the PHONES jack with a stereo standard plug (06.3 mm/'/, inch). Example: When connecting the AC cord, the II SET button flashes...
...procedure. It flashes when the disc compartment is restored. To cancel DEMO mode+ u Press the DEMO button. To turn the unit on , the DEMO display is heard from the speakers while headphones are rotated. q Do not carry out this operation during this 4-second period. No sound is hidden by pressing... one of the function buttons is on the unit The flash window above the disc compartment lights up or flash. The display changes to the PHONES jack with a stereo standard plug (06.3 mm/'/, inch). Example: When connecting the AC cord, the II SET button flashes...
Operating Instructions
Page 20
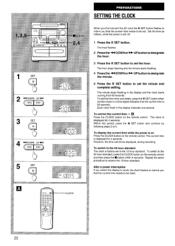
... the CLOCK button on the remote control and then press the 9 button within 4 seconds. The clock is still off. 1 Press the II SET button. To display the current time while the power is 00 seconds. To switch to restore the 12-hour standard. However, the time cannot be reset. 20 4"Ei5Ei... SETTING THE CLOCK When you first connect the AC cord, the II SET button flashes to inform you that the current time needs to be displayed, during recording. The hour stops flashing and the minute starts flashing. 4 Press the +4 DOWN or -UP the minute. To switch to the 24-hour standard...
... the CLOCK button on the remote control and then press the 9 button within 4 seconds. The clock is still off. 1 Press the II SET button. To display the current time while the power is 00 seconds. To switch to restore the 12-hour standard. However, the time cannot be reset. 20 4"Ei5Ei... SETTING THE CLOCK When you first connect the AC cord, the II SET button flashes to inform you that the current time needs to be displayed, during recording. The hour stops flashing and the minute starts flashing. 4 Press the +4 DOWN or -UP the minute. To switch to the 24-hour standard...
Operating Instructions
Page 22
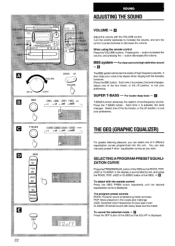
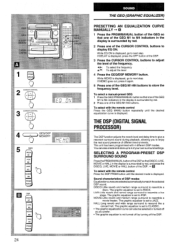
...the selected mode+ E Press the OFF button of the GEQ so that ROCK, POP, JAZZ or CLASSIC in the display is surrounded by red, and press the ROCK, POP, JAZZ or CLASSIC button of the GEQ. + u To select...the remote control Press the GEQ PRGM button repeatedly until the desired equalization curve is displayed. When using the remote control Press the VOLUME buttons. Select one of the GEQ so that EQ oFF is... displayed. It also helps your voice to suit your preference. Turn the control clockwise to increase...
...the selected mode+ E Press the OFF button of the GEQ so that ROCK, POP, JAZZ or CLASSIC in the display is surrounded by red, and press the ROCK, POP, JAZZ or CLASSIC button of the GEQ. + u To select...the remote control Press the GEQ PRGM button repeatedly until the desired equalization curve is displayed. When using the remote control Press the VOLUME buttons. Select one of the GEQ so that EQ oFF is... displayed. It also helps your voice to suit your preference. Turn the control clockwise to increase...
Operating Instructions
Page 24
...MOVIE: Little reverb and medium range surround to resemble a live stage. HALL: Long reverb and wide range surround to resemble a disco. While E(2 ON is displayed, go to give a resonant surround sound during playback, allowing you prefer. If MEMO goes out, press it again. 5 Press one of the GEQ Ml...MOVIE or HALL button of the DSP. + u To select with the remote control Press the DSP PRGM button until the desired equalization curve is displayed. SELECTING A PROGRAM-PRESET SURROUND SOUND DSP Press the PRGM/MANUAL button of the DSP so that one of different environments. You can also be...
...MOVIE: Little reverb and medium range surround to resemble a live stage. HALL: Long reverb and wide range surround to resemble a disco. While E(2 ON is displayed, go to give a resonant surround sound during playback, allowing you prefer. If MEMO goes out, press it again. 5 Press one of the GEQ Ml...MOVIE or HALL button of the DSP. + u To select with the remote control Press the DSP PRGM button until the desired equalization curve is displayed. SELECTING A PROGRAM-PRESET SURROUND SOUND DSP Press the PRGM/MANUAL button of the DSP so that one of different environments. You can also be...

Operating Instructions
Page 26
... The CURSOR CONTROL buttons They can be selected. The other modes. FB ON/OFF (feedback) When FB ON is displayed, the sound is displayed. While DELAY is monaural A simulated stereo effect can be selected. PRESETTING A DSP SURROUND SOUND MANUALLY 1 Press the ...PRGMIMANUAL button of the DSP so that S-OFF is displayed, it again. 5 Press one of the DSP before using them. 1 9PRGM MANUA 2 CURSOR CONTROL A 4 b T (K) wh CURSOR CONTROL 3 A 4 b v @ b @...
... The CURSOR CONTROL buttons They can be selected. The other modes. FB ON/OFF (feedback) When FB ON is displayed, the sound is displayed. While DELAY is monaural A simulated stereo effect can be selected. PRESETTING A DSP SURROUND SOUND MANUALLY 1 Press the ...PRGMIMANUAL button of the DSP so that S-OFF is displayed, it again. 5 Press one of the DSP before using them. 1 9PRGM MANUA 2 CURSOR CONTROL A 4 b T (K) wh CURSOR CONTROL 3 A 4 b v @ b @...

Operating Instructions
Page 28
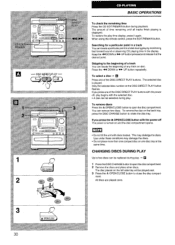
o @ dDISCCHANGE 5 DIR/PRESET T+%=- l\ ECT PLAY - 28 BASIC OPERATIONS 1 Press the CD button. If you press the button with power off The power is turned on and CD is displayed. CD is displayed. If a disc is loaded, play begins without any need to press the
o @ dDISCCHANGE 5 DIR/PRESET T+%=- l\ ECT PLAY - 28 BASIC OPERATIONS 1 Press the CD button. If you press the button with power off The power is turned on and CD is displayed. CD is displayed. If a disc is loaded, play begins without any need to press the
Operating Instructions
Page 30
...To select a disc + u Press one compact disc on the back tray, press the DISC CHANGE button to rotate the disc tray. The selected disc is displayed. If you press the 4 OPEN/CLOSE button with the power off , play begins with discs loaded. q A disc can be selected during play by monitoring... fast forward sound or observing CD playing time in the display. CHANGING DISCS DURING PLAY Up to two discs can locate a particular point in a track You can be played next. 3 Press the A OPEN/CLOSE ...
...To select a disc + u Press one compact disc on the back tray, press the DISC CHANGE button to rotate the disc tray. The selected disc is displayed. If you press the 4 OPEN/CLOSE button with the power off , play begins with discs loaded. q A disc can be selected during play by monitoring... fast forward sound or observing CD playing time in the display. CHANGING DISCS DURING PLAY Up to two discs can locate a particular point in a track You can be played next. 3 Press the A OPEN/CLOSE ...

Operating Instructions
Page 32
... select the 20th track, press the +10 button twice and then press the O button within 4 seconds. Press the RANDOM button on the remote control to display q, before selecting repeat play. (See page 34.) To cancel repeat play . + E To cancel random pfay Press the RANDOM button so that track, and ... can be played randomly. Press the REPEAT button on the disc will be played. q You cannot select tracks directly with that RANDOM in the display goes out. Play begins with the numeric buttons in the compartment can select. REPEAT PLAY All the tracks on the selected disc or on all...
... select the 20th track, press the +10 button twice and then press the O button within 4 seconds. Press the RANDOM button on the remote control to display q, before selecting repeat play. (See page 34.) To cancel repeat play . + E To cancel random pfay Press the RANDOM button so that track, and ... can be played randomly. Press the REPEAT button on the disc will be played. q You cannot select tracks directly with that RANDOM in the display goes out. Play begins with the numeric buttons in the compartment can select. REPEAT PLAY All the tracks on the selected disc or on all...
Operating Instructions
Page 34
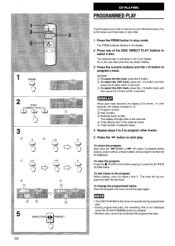
...discs in any order. 1 Press the PRGM button in stop mode. When each track selected, the display @is indicated in red in the display. The PRGM indicator flashes in the display. 2 Press one of selected tracks In a few seconds. @?Total playing time of the selected ... number of the DISC DIRECT PLAY buttons to program other tracks. 5 Press the The selected disc is shown. seconds, the display changes to @. @ Program number @ Disc number @ Selected track number The display changes after a few 4 Repeat steps 2 to 3 to select a disc. I PRGM '% 2 DISC rDIRECT PLAY1 O@@ b @ @ ...
...discs in any order. 1 Press the PRGM button in stop mode. When each track selected, the display @is indicated in red in the display. The PRGM indicator flashes in the display. 2 Press one of selected tracks In a few seconds. @?Total playing time of the selected ... number of the DISC DIRECT PLAY buttons to program other tracks. 5 Press the The selected disc is shown. seconds, the display changes to @. @ Program number @ Disc number @ Selected track number The display changes after a few 4 Repeat steps 2 to 3 to select a disc. I PRGM '% 2 DISC rDIRECT PLAY1 O@@ b @ @ ...
Operating Instructions
Page 36
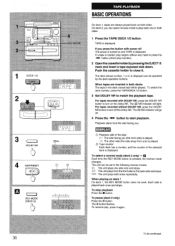
... Dolby NR. When tapes are always played back on both sides repeatedly. z>: The unit plays from you can be played. Each side is displayed. On deck 2, you ) is displayed can be continued. 3b button (direct play back one side only and stops. The 00 NR indicator will go off The power is... the deck closed last will be set to play function). 2 Open the cassette holder by the deck operation buttons. If you (the front side) is displayed. To resume play begins without DOLBY NR, press the DOLBY NR button to press the +- TAPE is played back once and stops. The DO NR...
... Dolby NR. When tapes are always played back on both sides repeatedly. z>: The unit plays from you can be played. Each side is displayed. On deck 2, you ) is displayed can be continued. 3b button (direct play back one side only and stops. The 00 NR indicator will go off The power is... the deck closed last will be set to play function). 2 Open the cassette holder by the deck operation buttons. If you (the front side) is displayed. To resume play begins without DOLBY NR, press the DOLBY NR button to press the +- TAPE is played back once and stops. The DO NR...
Operating Instructions
Page 40
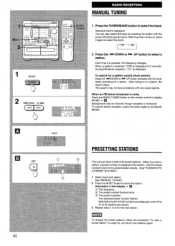
... frequency Q The preset number flashes twice. @ The preset numbers The selected preset number flashes. When you store a station, a preset number is displayed. Use the preset number to the station. To search for a station quickly (Auto search) Keep the + DOWN or B UP button pressed until...press the button again to select a station. Note that only the first 20 numbers are displayed, even if the 21 to 32 stations are stored. 3 Repeat steps 1 to display MONO. + u Background noise is reduced, though reception is displayed. Each time it again to select the band. 2 Press the + DOWN or *...
... frequency Q The preset number flashes twice. @ The preset numbers The selected preset number flashes. When you store a station, a preset number is displayed. Use the preset number to the station. To search for a station quickly (Auto search) Keep the + DOWN or B UP button pressed until...press the button again to select a station. Note that only the first 20 numbers are displayed, even if the 21 to 32 stations are stored. 3 Repeat steps 1 to display MONO. + u Background noise is reduced, though reception is displayed. Each time it again to select the band. 2 Press the + DOWN or *...
Operating Instructions
Page 42
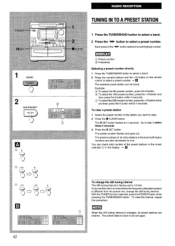
... of all preset stations are also decreased by one , change the AM tuning interval The AM tuning interval is changed, all other stations in the display. + u To change the AM tuning interval. The preset stations have to 10 kHz. If you want to step 3 within 4 seconds. To clear a preset station 1 Select...
... of all preset stations are also decreased by one , change the AM tuning interval The AM tuning interval is changed, all other stations in the display. + u To change the AM tuning interval. The preset stations have to 10 kHz. If you want to step 3 within 4 seconds. To clear a preset station 1 Select...

Operating Instructions
Page 44
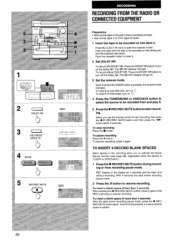
... LEVEL control on the rear panel to adjust the sound level of the external source to the operating instructions of the other sources in the display can be changed to VIDEO, AUX, or TV. + u With the power on (direct play function). 2 Play the external source. To change a source name in the...
... LEVEL control on the rear panel to adjust the sound level of the external source to the operating instructions of the other sources in the display can be changed to VIDEO, AUX, or TV. + u With the power on (direct play function). 2 Play the external source. To change a source name in the...
Operating Instructions
Page 46
.... To resume recording, press it . 5 Press the q REC/REC MUTE button to turn on into deck 2. TO INSERT 4-SECOND BLANK SPACES Blank spaces in the display for 4 seconds and the tape runs without DOLBY NR: Press the DOLBY NR button to start recording. To insert a blank space of less than 4 seconds...
.... To resume recording, press it . 5 Press the q REC/REC MUTE button to turn on into deck 2. TO INSERT 4-SECOND BLANK SPACES Blank spaces in the display for 4 seconds and the tape runs without DOLBY NR: Press the DOLBY NR button to start recording. To insert a blank space of less than 4 seconds...
Operating Instructions
Page 48
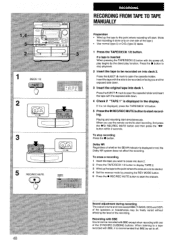
... RECORDING FROM TAPE TO TAPE MANUALLY . Press the s button to stop playback. 2 Inseti the tape to be recorded on into deck 1. If it is not displayed, press the TAPE/DECK 1/2 button. 5 Press the q REC/REC MUTE button to the point where recording will start. (Note that recording is... displayed in the display. Wind up the tape to start recording, first press the q/0 REC/REC MUTE button and then press the Press the EJECT A mark to be recorded ...
... RECORDING FROM TAPE TO TAPE MANUALLY . Press the s button to stop playback. 2 Inseti the tape to be recorded on into deck 1. If it is not displayed, press the TAPE/DECK 1/2 button. 5 Press the q REC/REC MUTE button to the point where recording will start. (Note that recording is... displayed in the display. Wind up the tape to start recording, first press the q/0 REC/REC MUTE button and then press the Press the EJECT A mark to be recorded ...

Operating Instructions
Page 50
... marks to start at normal speed: Press the NORMAL button. q Recording is inhibited if the erasure prevention tab on the label. This is displayed or not, the Dolby NR system does not affect the recording. q Regardless of the tape is inserted When pressing the TAPE/DECKl/2 button with... another tape rated at high speed: Press the HIGH button. i,.,;i,,1.i1f 1$ DECK 1/2 00 b DUBBING THE WHOLE TAPE When an original tape is displayed. H-DUB is longer than indicated on either side of whether the 00 NR indicator is because there are rewound to stop playback. 2 Insert the ...
... marks to start at normal speed: Press the NORMAL button. q Recording is inhibited if the erasure prevention tab on the label. This is displayed or not, the Dolby NR system does not affect the recording. q Regardless of the tape is inserted When pressing the TAPE/DECKl/2 button with... another tape rated at high speed: Press the HIGH button. i,.,;i,,1.i1f 1$ DECK 1/2 00 b DUBBING THE WHOLE TAPE When an original tape is displayed. H-DUB is longer than indicated on either side of whether the 00 NR indicator is because there are rewound to stop playback. 2 Insert the ...
Operating Instructions
Page 54
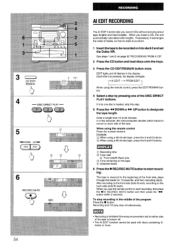
... buttons. @ When using the remote control Press the nu-merit buttons. When you use the remote control to 99 minutes. m q Recording is pressed, the display changes. ~Al EDIT- See steps 1 and 2 on the back side (side B) starts. In a few seconds, the microcomputer decides which tracks to start ...2 Press the CD button and load discs onto the trays. 3 Press the CD EDIT/REMAIN button once. Recording and CD play stop recording in the display. O Recording time @ Tape side A: Front side/B: Back side @ Time remaining on the tape @ Selected tracks 6 Press the q REC/REC MUTE...
... buttons. @ When using the remote control Press the nu-merit buttons. When you use the remote control to 99 minutes. m q Recording is pressed, the display changes. ~Al EDIT- See steps 1 and 2 on the back side (side B) starts. In a few seconds, the microcomputer decides which tracks to start ...2 Press the CD button and load discs onto the trays. 3 Press the CD EDIT/REMAIN button once. Recording and CD play stop recording in the display. O Recording time @ Tape side A: Front side/B: Back side @ Time remaining on the tape @ Selected tracks 6 Press the q REC/REC MUTE...

Operating Instructions
Page 56
... the CD EDIT/REMAIN button to select side A or B. 2 Press one side of the tape is displayed each time the button is displayed after step 5 (page 54), you can add tracks from other discs in the display. +m m ~ Program number @ Track number To add tracks to add more tracks. DOWN or * UP ...) is pressed. + u @ Time remaining on their labels. To check the edit program Before recording, press the CD EDIT/REMAIN button. PRGM flashes in the display goes out, or press the 4 OPEN/CLOSE button. The program for one of the programmed tracks Before recording, press the CD EDIT/REMAIN button to...
... the CD EDIT/REMAIN button to select side A or B. 2 Press one side of the tape is displayed each time the button is displayed after step 5 (page 54), you can add tracks from other discs in the display. +m m ~ Program number @ Track number To add tracks to add more tracks. DOWN or * UP ...) is pressed. + u @ Time remaining on their labels. To check the edit program Before recording, press the CD EDIT/REMAIN button. PRGM flashes in the display goes out, or press the 4 OPEN/CLOSE button. The program for one of the programmed tracks Before recording, press the CD EDIT/REMAIN button to...


