
Operating Instructions
Page 2
FOREWORD ,.---...
FOREWORD ,.---...
Operating Instructions
Page 4
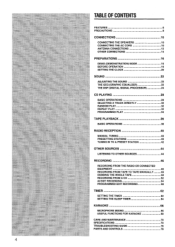
... CORD 10 ANTENNA CONNECTIONS 12 OTHER CONNECTIONS l4 PREPARATIONS 16 DEMO (DEMONSTRATION) MODE 18 BEFORE OPERATION l6 SETTING THE CLOCK 2O SOUND 22 ADJUSTING THE SOUND 1 22 THE GEQ (GRAPHIC EQUALIZER 22 THE DSP (DIGITAL SIGNAL PROCESSOR 24 CD PLAYING 28 BASIC OPERATIONS 28 SELECTING A TRACK DIRECTLY 32 RANDOM PLAY 32 REPEAT PLAY 32 PROGRAMMED PLAY 34 TAPE PLAYBACK 36 BASIC OPERATIONS 36 RADIO RECEPTION 4O MANUAL TUNING 4O PRESETTING STATIONS 4O TUNING INTO A PRESET STATION 42 OTHER SOURCES 44 LISTENING TO OTHER SOURCES 44 RECORDING...
... CORD 10 ANTENNA CONNECTIONS 12 OTHER CONNECTIONS l4 PREPARATIONS 16 DEMO (DEMONSTRATION) MODE 18 BEFORE OPERATION l6 SETTING THE CLOCK 2O SOUND 22 ADJUSTING THE SOUND 1 22 THE GEQ (GRAPHIC EQUALIZER 22 THE DSP (DIGITAL SIGNAL PROCESSOR 24 CD PLAYING 28 BASIC OPERATIONS 28 SELECTING A TRACK DIRECTLY 32 RANDOM PLAY 32 REPEAT PLAY 32 PROGRAMMED PLAY 34 TAPE PLAYBACK 36 BASIC OPERATIONS 36 RADIO RECEPTION 4O MANUAL TUNING 4O PRESETTING STATIONS 4O TUNING INTO A PRESET STATION 42 OTHER SOURCES 44 LISTENING TO OTHER SOURCES 44 RECORDING...
Operating Instructions
Page 6
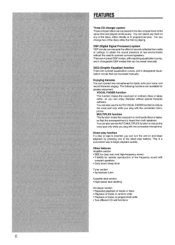
... with compact speakers. Enjoying Karaoke You can turn the unit on multi audio discs or tapes, so that can be placed inthe disc compartment at the same time and played continuously. q Daily event /sleep timer Tuner section q Synthesizer tuner Cassette deck section q High-speed tape dubbing CD player section q Repeated playback of tracks or discs q Playback of tracks in random order q Playback of low frequency sound with the connected microphone. FEATURES ~ Three CD changer system Three compact discscan be preset manually.
... with compact speakers. Enjoying Karaoke You can turn the unit on multi audio discs or tapes, so that can be placed inthe disc compartment at the same time and played continuously. q Daily event /sleep timer Tuner section q Synthesizer tuner Cassette deck section q High-speed tape dubbing CD player section q Repeated playback of tracks or discs q Playback of tracks in random order q Playback of low frequency sound with the connected microphone. FEATURES ~ Three CD changer system Three compact discscan be preset manually.
Operating Instructions
Page 8
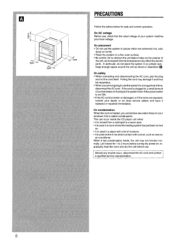
..., dusty or humid. q it replaced or repaired immediately. When it has condensation inside the CD player unit when: q it is broken or damaged, or if the wires are exposed, contact your dealer or an Aiwa service station and have it is not ON. or, gradually heat the room and dry the unit before turning the power on flowing to a warm...
..., dusty or humid. q it replaced or repaired immediately. When it has condensation inside the CD player unit when: q it is broken or damaged, or if the wires are exposed, contact your dealer or an Aiwa service station and have it is not ON. or, gradually heat the room and dry the unit before turning the power on flowing to a warm...

Operating Instructions
Page 10
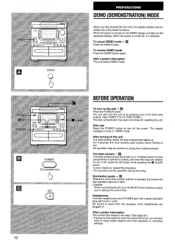
.... Refer to the @ and @ L terminals. If setting up with the unit. m q The speaker systems are magnetically shielded. Connect the right speaker to the@ and @ R terminals, and the left speaker to "DEMO (DEMONSTRATION) MODE" on again 15-30 minutes later. Connect the AC cord to an AC outlet. This demonstration can be set. A demonstration of the unit's preset functions begins in the display window (DEMO mode).
.... Refer to the @ and @ L terminals. If setting up with the unit. m q The speaker systems are magnetically shielded. Connect the right speaker to the@ and @ R terminals, and the left speaker to "DEMO (DEMONSTRATION) MODE" on again 15-30 minutes later. Connect the AC cord to an AC outlet. This demonstration can be set. A demonstration of the unit's preset functions begins in the display window (DEMO mode).
Operating Instructions
Page 14
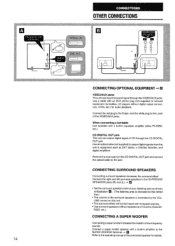
... to the SUPER WOOFER terminal. + u Refer to the jack. Use an optical cable (not supplied) to output digital signals from the CD DIGITAL OUT jack and connect the optical cable to the operating manual of 16 ohms (Aiwa SX- UME control on this unit to equipment such as shown in equalizer amplifier (Aiwa PX-E850, etc.). Connect the red plug to the R jack, and the white plug to the SURROUND SPEAKERS ja~ks (R) and (L). + ' q Set the surround speakers behind...
... to the SUPER WOOFER terminal. + u Refer to the jack. Use an optical cable (not supplied) to output digital signals from the CD DIGITAL OUT jack and connect the optical cable to the operating manual of 16 ohms (Aiwa SX- UME control on this unit to equipment such as shown in equalizer amplifier (Aiwa PX-E850, etc.). Connect the red plug to the R jack, and the white plug to the SURROUND SPEAKERS ja~ks (R) and (L). + ' q Set the surround speakers behind...
Operating Instructions
Page 16
... enters DEMO mode. The flash window + u The flash window shows the power is on ~of the direct play buttons. (See "DIRECT PLAY FUNCTIONS.) The disc compartment may open and close for resetting the unit. Illumination guide + u Whenever on . After use Press the POWER button to turn it back on by the operation display. To turn it off the power. Example: When connecting the AC cord, the II SET button flashes to reset preset stations and timer playback or recording settings. After a power interruption...
... enters DEMO mode. The flash window + u The flash window shows the power is on ~of the direct play buttons. (See "DIRECT PLAY FUNCTIONS.) The disc compartment may open and close for resetting the unit. Illumination guide + u Whenever on . After use Press the POWER button to turn it back on by the operation display. To turn it off the power. Example: When connecting the AC cord, the II SET button flashes to reset preset stations and timer playback or recording settings. After a power interruption...
Operating Instructions
Page 18
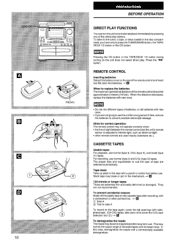
Press the Pressing the CD button or the TAPE/DECK 1/2 button during turning on and starl playback immediately by pressing one of the direct play . BEFORE OPERA TION DIRECT PLAY FUNCTIONS You can turn the unit on the unit does not select direct play buttons. To listen to the tuner, a tape, or discs loaded in the disc compartment, you have only to press the TUNEFUBAND button, the TAPE/ DECK 1/2 button or the CD button.
Press the Pressing the CD button or the TAPE/DECK 1/2 button during turning on and starl playback immediately by pressing one of the direct play . BEFORE OPERA TION DIRECT PLAY FUNCTIONS You can turn the unit on the unit does not select direct play buttons. To listen to the tuner, a tape, or discs loaded in the disc compartment, you have only to press the TUNEFUBAND button, the TAPE/ DECK 1/2 button or the CD button.
Operating Instructions
Page 20
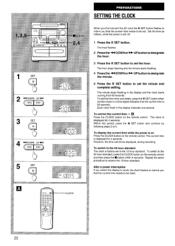
... seconds. Repeat the same procedure to restore the 12-hour standard. button to designate 5 Press the II SET button to set . 4"Ei5Ei!5 b CLOCK SETTING THE CLOCK When you first connect the AC cord, the II SET button flashes to inform you that the current time is on Press the CLOCK button on the remote control. The current time is still off. 1 Press the II SET button. The clock is factory-set the hour...
... seconds. Repeat the same procedure to restore the 12-hour standard. button to designate 5 Press the II SET button to set . 4"Ei5Ei!5 b CLOCK SETTING THE CLOCK When you first connect the AC cord, the II SET button flashes to inform you that the current time is on Press the CLOCK button on the remote control. The current time is still off. 1 Press the II SET button. The clock is factory-set the hour...
Operating Instructions
Page 22
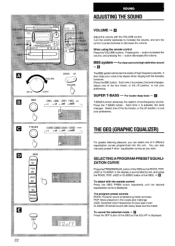
... changes. It also helps your preference. Press the T-BASS button. Each time it is displayed. You can also manually preset 4 other equalization cutwes as you can select one of the four levels, or the off position, to suit your voice to decrease the volume. Press the BBE button. When using the remote control Press the VOLUME buttons. SELECTING A PROGRAM-PRESET EQUALIZATION CURVE Press the PRGM/MANUAL button of 4 different equalization curves programmed...
... changes. It also helps your preference. Press the T-BASS button. Each time it is displayed. You can also manually preset 4 other equalization cutwes as you can select one of the four levels, or the off position, to suit your voice to decrease the volume. Press the BBE button. When using the remote control Press the VOLUME buttons. SELECTING A PROGRAM-PRESET EQUALIZATION CURVE Press the PRGM/MANUAL button of 4 different equalization curves programmed...
Operating Instructions
Page 24
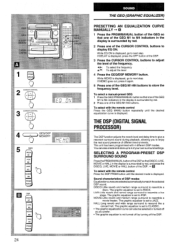
... (DIGITAL SIGNAL PROCESSOR) The DSP function adjusts the reverb level and delay time to display EQ ON. If DELAY is displayed. To select a manual-preset GEQ 1 Press the GEQ PRGM/MANUAL button so that DISCO, LIVE, MOVIE or HALL in the display is surrounded by red, and press the DISCO, LIVE, MOVIE or HALL button of the CURSOR CONTROL buttons to give a resonant surround sound during playback, allowing...
... (DIGITAL SIGNAL PROCESSOR) The DSP function adjusts the reverb level and delay time to display EQ ON. If DELAY is displayed. To select a manual-preset GEQ 1 Press the GEQ PRGM/MANUAL button so that DISCO, LIVE, MOVIE or HALL in the display is surrounded by red, and press the DISCO, LIVE, MOVIE or HALL button of the CURSOR CONTROL buttons to give a resonant surround sound during playback, allowing...

Operating Instructions
Page 26
... CURSOR CONTROL buttons to adjust the reverb time and delay time. 4/>: To select elements for DSP sound + @ A/T: To adjust the level or switch the position DELAY (delav time) Increasing the number in GEQ Ml -M4 is automatically selected with the remote control Press the DSP MANU button until the desired mode is surrounded by selecting the LIVE and MOVIE modes. The equalization curve stored in the display increases...
... CURSOR CONTROL buttons to adjust the reverb time and delay time. 4/>: To select elements for DSP sound + @ A/T: To adjust the level or switch the position DELAY (delav time) Increasing the number in GEQ Ml -M4 is automatically selected with the remote control Press the DSP MANU button until the desired mode is surrounded by selecting the LIVE and MOVIE modes. The equalization curve stored in the display increases...
Operating Instructions
Page 36
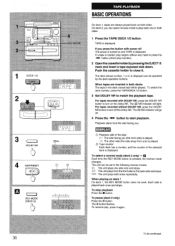
... and stops. button (direct play back one side only and stops. To switch the deck number, press the TAPE/DECK 1/2 button. 3 Set DOLBY NR to the backside and stops. (=1: The unit plays both sides. Push the cassette holder to start playback. When tapes are always played back on and TAPE is pressed, the reverse mode changes. To pause (deck 2 only) Press the II button. For tapes recorded with power off The power is turned on...
... and stops. button (direct play back one side only and stops. To switch the deck number, press the TAPE/DECK 1/2 button. 3 Set DOLBY NR to the backside and stops. (=1: The unit plays both sides. Push the cassette holder to start playback. When tapes are always played back on and TAPE is pressed, the reverse mode changes. To pause (deck 2 only) Press the II button. For tapes recorded with power off The power is turned on...
Operating Instructions
Page 38
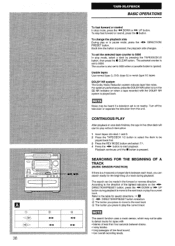
... sound. The search can search easily for search directions. @ u @ ~- The counter is also set to play the current track. For optimum performance, press the DOLBY NR button to turn the 00 NR indicator on the + ® DIRECTION/PRESET button, press the + DOWN or * UP button during playback. Turn off the television or separate the television from this unit. Usable tapes Use normal (type I The search function uses a music...
... sound. The search can search easily for search directions. @ u @ ~- The counter is also set to play the current track. For optimum performance, press the DOLBY NR button to turn the 00 NR indicator on the + ® DIRECTION/PRESET button, press the + DOWN or * UP button during playback. Turn off the television or separate the television from this unit. Usable tapes Use normal (type I The search function uses a music...
Operating Instructions
Page 46
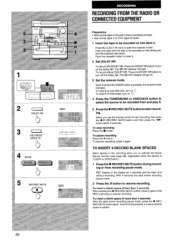
... mode changes. Press the EJECT A mark to resume recording.. Each time the REV MODE button is blinking to resume recording. To record on one side only, turn on first facing you use the remote control to start . To insert a blank space of more than 4 seconds After pressing the q REC/REC MUTE button, press it is pressed, a4-second blank space is TUNER or VIDEO/AUX...
... mode changes. Press the EJECT A mark to resume recording.. Each time the REV MODE button is blinking to resume recording. To record on one side only, turn on first facing you use the remote control to start . To insert a blank space of more than 4 seconds After pressing the q REC/REC MUTE button, press it is pressed, a4-second blank space is TUNER or VIDEO/AUX...
Operating Instructions
Page 48
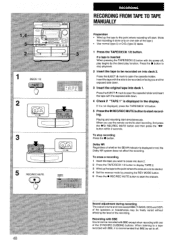
... tape with the power off, play begins by the direct play function. Playing and recording starl simultaneously. /,!,, k!3 !1!!, II nice u -JJ 48 RECORDING FROM TAPE TO TAPE MANUALLY . If it is displayed in the display. Press the EJECT A mark to start recording, first press the q/0 REC/REC MUTE button and then press the Wind up the tape to the point where recording will start recording. Press the s button to stop playback. 2 Inseti the tape...
... tape with the power off, play begins by the direct play function. Playing and recording starl simultaneously. /,!,, k!3 !1!!, II nice u -JJ 48 RECORDING FROM TAPE TO TAPE MANUALLY . If it is displayed in the display. Press the EJECT A mark to start recording, first press the q/0 REC/REC MUTE button and then press the Wind up the tape to the point where recording will start recording. Press the s button to stop playback. 2 Inseti the tape...
Operating Instructions
Page 52
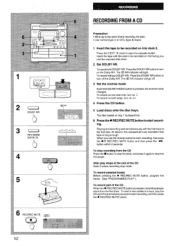
... open the cassette holder. Playing and recording start recording, and then press the q REC/REC MUTE button. To stop mode. To record selected tracks Before pressing the q REC/REC MUTE button, program the tracks. (See "PROGRAMMED PLAY.) To record part of the CD Deck 2 enters recording stop recording from the first track. q Use normal (type I) or CrOz (type II) tapes. 1 Insert the tape to start simultaneously with the side to turn off . 3 Set the reverse mode. To start recording...
... open the cassette holder. Playing and recording start recording, and then press the q REC/REC MUTE button. To stop mode. To record selected tracks Before pressing the q REC/REC MUTE button, program the tracks. (See "PROGRAMMED PLAY.) To record part of the CD Deck 2 enters recording stop recording from the first track. q Use normal (type I) or CrOz (type II) tapes. 1 Insert the tape to start simultaneously with the side to turn off . 3 Set the reverse mode. To start recording...

Operating Instructions
Page 62
... the remote control to select timer playback mode or timer recording mode. Timer recording mode The II SET button lights, and TIMER and one of the source names flash alternately in the display goes out, another operation may start. 2 Press the If the II SET button is set timer recording from the radio or the connected equipment. If TIMER in the display goes out, press the TIMER button again. @ Within 4 seconds, press the II SET button. Preparation Make sure the clock...
... the remote control to select timer playback mode or timer recording mode. Timer recording mode The II SET button lights, and TIMER and one of the source names flash alternately in the display goes out, another operation may start. 2 Press the If the II SET button is set timer recording from the radio or the connected equipment. If TIMER in the display goes out, press the TIMER button again. @ Within 4 seconds, press the II SET button. Preparation Make sure the clock...
Operating Instructions
Page 64
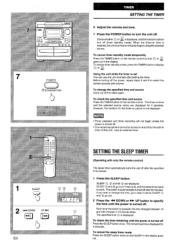
... button. SElllNG THE SLEEP TIMER (Operating with only the remote control) The sleep timer automatically turns the unit off after setting the timer. To check the specified time and source Press the TIMER button on and play begins using the selected source. q Connected equipment cannot be turned on the remote control so that SLEEP in 10-minute steps. The specified time @ is turned off. To cancel timer standby mode temporarily Press the TIMER button...
... button. SElllNG THE SLEEP TIMER (Operating with only the remote control) The sleep timer automatically turns the unit off after setting the timer. To check the specified time and source Press the TIMER button on and play begins using the selected source. q Connected equipment cannot be turned on the remote control so that SLEEP in 10-minute steps. The specified time @ is turned off. To cancel timer standby mode temporarily Press the TIMER button...
Operating Instructions
Page 66
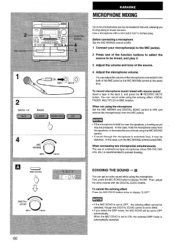
Use a microphone with a mini (D3.5 mm/'/s inches) plug, Before connecting a microphone Set the MIC MIXING control to MIN. 1 Connect your microphone(s) to the MIC jack(s). 2 Press one of the function buttons to select the source to the both of the microphones connected to be mixed, and play it may be distorted, In this case, turn the MIC MIXING control toward MIN. You can adjust the volume of...
Use a microphone with a mini (D3.5 mm/'/s inches) plug, Before connecting a microphone Set the MIC MIXING control to MIN. 1 Connect your microphone(s) to the MIC jack(s). 2 Press one of the function buttons to select the source to the both of the microphones connected to be mixed, and play it may be distorted, In this case, turn the MIC MIXING control toward MIN. You can adjust the volume of...


