Getting Started Guide
Page 4
...to a Front Panel Port 33 Connecting to the Console Port 35 Automatic Setup 38 Using 3Com Network Supervisor 38 Connecting to the Console Port 38 Methods of Managing a Switch 41 Command Line Interface Management 41 Web Interface Management 42 SNMP Management 42 Setting Up Command...Interface Management 44 Pre-requisites 44 Web Management Over the Network 44 Setting Up SNMP Management 45 Pre-requisites 45 Default Users and Passwords 46 Changing Default Passwords 46 4 PROBLEM SOLVING Solving Problems Indicated by LEDs 48 Solving Hardware Problems 49 Solving Communication Problems 50 Solving Software...
...to a Front Panel Port 33 Connecting to the Console Port 35 Automatic Setup 38 Using 3Com Network Supervisor 38 Connecting to the Console Port 38 Methods of Managing a Switch 41 Command Line Interface Management 41 Web Interface Management 42 SNMP Management 42 Setting Up Command...Interface Management 44 Pre-requisites 44 Web Management Over the Network 44 Setting Up SNMP Management 45 Pre-requisites 45 Default Users and Passwords 46 Changing Default Passwords 46 4 PROBLEM SOLVING Solving Problems Indicated by LEDs 48 Solving Hardware Problems 49 Solving Communication Problems 50 Solving Software...
Getting Started Guide
Page 29
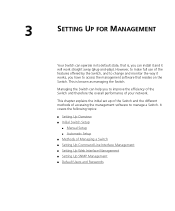
... Line Interface Management ■ Setting Up Web Interface Management ■ Setting Up SNMP Management ■ Default Users and Passwords This is , you can help you have to access the management software that is known as managing the Switch. However, to change and monitor the way it will work straight away (plug-and-play...
... Line Interface Management ■ Setting Up Web Interface Management ■ Setting Up SNMP Management ■ Default Users and Passwords This is , you can help you have to access the management software that is known as managing the Switch. However, to change and monitor the way it will work straight away (plug-and-play...
Getting Started Guide
Page 30
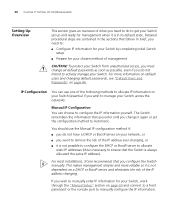
...IP information yourself. The Switch remembers the information that you configure the Switch manually. If you wish to manually enter IP information for your Switch across the network). For most installations, 3Com recommends that you enter until you change all default passwords as soon as it ... reliable as possible, even if you do to get your Switch set the configuration method to Automatic. This makes management simpler and more information on default users and changing default passwords, see "Default Users and Passwords" on page 33 and connect to a front panel port or...
...IP information yourself. The Switch remembers the information that you configure the Switch manually. If you wish to manually enter IP information for your Switch across the network). For most installations, 3Com recommends that you enter until you change all default passwords as soon as it ... reliable as possible, even if you do to get your Switch set the configuration method to Automatic. This makes management simpler and more information on default users and changing default passwords, see "Default Users and Passwords" on page 33 and connect to a front panel port or...

Getting Started Guide
Page 34
... interface. 1 Power-up of your user name and press Return at one minute then re-enter the default IP address. 3 At the login and password prompts, enter admin as your Switch is now complete and the Switch is automatically assigned to one minute. 2 Open a suitable Web browser and enter 169.254.100.100 in...
... interface. 1 Power-up of your user name and press Return at one minute then re-enter the default IP address. 3 At the login and password prompts, enter admin as your Switch is now complete and the Switch is automatically assigned to one minute. 2 Open a suitable Web browser and enter 169.254.100.100 in...

Getting Started Guide
Page 36
... a connection to prevent it starts. 2 At the login and password prompts, enter admin as shown in the example in Figure 9. Setting Up the Switch with IP Information You are now ready to manually set to match the default settings for the Switch, which are: ■ 19,200 baud ■ 8 data bits ... 36 CHAPTER 3: SETTING UP FOR MANAGEMENT b Tighten the retaining screws on the cable to its console port. The settings should be set up the Switch with IP information using the command line interface. 1 The command line interface login sequence begins as soon as a COM port) on your workstation. 2...
... a connection to prevent it starts. 2 At the login and password prompts, enter admin as shown in the example in Figure 9. Setting Up the Switch with IP Information You are now ready to manually set to match the default settings for the Switch, which are: ■ 19,200 baud ■ 8 data bits ... 36 CHAPTER 3: SETTING UP FOR MANAGEMENT b Tighten the retaining screws on the cable to its console port. The settings should be set up the Switch with IP information using the command line interface. 1 The command line interface login sequence begins as soon as a COM port) on your workstation. 2...

Getting Started Guide
Page 40
...network connection is not available, it starts. 3 At the login and password prompts, enter admin as the Switch detects a connection to its console port. If you have logged on ...interface login sequence begins as soon as your Switch to the network using the command line interface. 1 Connect your user name and press Return at the password prompt. Figure 11 Example top-level command ...the automatically allocated IP information using an Ethernet cable. If this address is made the Switch begins the automatic IP configuration process. At the Select IP interfaces prompt enter all. ...
...network connection is not available, it starts. 3 At the login and password prompts, enter admin as the Switch detects a connection to its console port. If you have logged on ...interface login sequence begins as soon as your Switch to the network using the command line interface. 1 Connect your user name and press Return at the password prompt. Figure 11 Example top-level command ...the automatically allocated IP information using an Ethernet cable. If this address is made the Switch begins the automatic IP configuration process. At the Select IP interfaces prompt enter all. ...

Getting Started Guide
Page 43
... command at the DOS prompt in the following format: c:\ ping xxx.xxx.xxx.xxx (where xxx.xxx.xxx.xxx is the IP address of the Switch) If you get an error message, check that you wish to manage in the following format: >telnet xxx.xxx.xxx.xxx (where xxx.xxx.xxx... being managed and/or configured through the CLI via the DOS prompt, enter the IP address of your choice if you have already modified the default passwords). Setting Up Command Line Interface Management 43 Setting Up Command Line Interface Management This section describes how you can set up command line interface management...
... command at the DOS prompt in the following format: c:\ ping xxx.xxx.xxx.xxx (where xxx.xxx.xxx.xxx is the IP address of the Switch) If you get an error message, check that you wish to manage in the following format: >telnet xxx.xxx.xxx.xxx (where xxx.xxx.xxx... being managed and/or configured through the CLI via the DOS prompt, enter the IP address of your choice if you have already modified the default passwords). Setting Up Command Line Interface Management 43 Setting Up Command Line Interface Management This section describes how you can set up command line interface management...
Getting Started Guide
Page 45
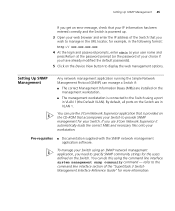
... press Return at the password prompt (or the password of the "SuperStack 3 Switch Management Interface Reference Guide" for more information. refer to provide SNMP management for your Switch. You can use 3Com Network Supervisor it automatically loads the correct MIBs and necessary files onto your choice if you have already modified the default passwords). 5 Click on the CD...
... press Return at the password prompt (or the password of the "SuperStack 3 Switch Management Interface Reference Guide" for more information. refer to provide SNMP management for your Switch. You can use 3Com Network Supervisor it automatically loads the correct MIBs and necessary files onto your choice if you have already modified the default passwords). 5 Click on the CD...
Getting Started Guide
Page 46
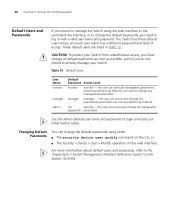
... special/security features (no password) to login and carry out initial Switch setup. For more information about default users and passwords, refer to the "Superstack 3 Switch Management Interface Reference Guide" on the web interface. These default users are listed in with a valid user name and password. 46 CHAPTER 3: SETTING UP FOR MANAGEMENT Default Users and Passwords If you intend to...
... special/security features (no password) to login and carry out initial Switch setup. For more information about default users and passwords, refer to the "Superstack 3 Switch Management Interface Reference Guide" on the web interface. These default users are listed in with a valid user name and password. 46 CHAPTER 3: SETTING UP FOR MANAGEMENT Default Users and Passwords If you intend to...
Getting Started Guide
Page 73
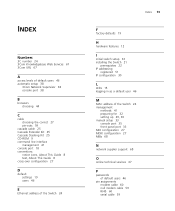
INDEX Numbers 3C number 24 3Com Knowledgebase Web Services 67 3Com URL 67 A access levels of default users 46 automatic setup 38 3Com Network Supervisor 38 console port 38 B browsers choosing 44 C cable choosing the correct 27 pin-outs 59 cascade cable 25 Cascade Extender Kit 25 ... 46 M MAC address of the Switch 24 management methods 41 preparing for 32 setting up 29, 30 manual setup 33 console port 35 front panel port 33 MDI configuration 27 MDIX configuration 27 MIBs 68 N network supplier support 68 O online technical services 67 P passwords of default users 46 pin assignments modem cable ...
INDEX Numbers 3C number 24 3Com Knowledgebase Web Services 67 3Com URL 67 A access levels of default users 46 automatic setup 38 3Com Network Supervisor 38 console port 38 B browsers choosing 44 C cable choosing the correct 27 pin-outs 59 cascade cable 25 Cascade Extender Kit 25 ... 46 M MAC address of the Switch 24 management methods 41 preparing for 32 setting up 29, 30 manual setup 33 console port 35 front panel port 33 MDI configuration 27 MDIX configuration 27 MIBs 68 N network supplier support 68 O online technical services 67 P passwords of default users 46 pin assignments modem cable ...


