Owner's Manual
Page 6
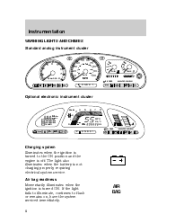
... LIGHTS AND CHIMES Standard analog instrument cluster 50 60 80 3 2 4 40 5 6 7 100 70 80 90 140 F 1/2 30 20 10 0 P 40 60 120 E FUEL 000000 FUEL DOOR N O R M A L H C TEMP 0 0 0 0 1 0 AIR BAG 20 160 km/h RPMx1000 8 100 MPH UNLEADED FUEL ONLY SERVICE ENGINE SOON ! P BRAKE R N D 2 1 CRUISE O/D OFF Optional electronic instrument cluster CRUISE 3 4...F H ˚F ˚C MILES/BAL L/100 km 2 1 0 X 1000 TRIP 1 TRIP 2 RPM OUTSIDE TEMP INST ECONOMY AVG. ECONOMY TO EMPTY MPH km/h km FUEL DOOR 1/2 N O R M A L E C UNLEADED FUEL ONLY ABS SERVICE ENGINE SOON AIR BAG !
... LIGHTS AND CHIMES Standard analog instrument cluster 50 60 80 3 2 4 40 5 6 7 100 70 80 90 140 F 1/2 30 20 10 0 P 40 60 120 E FUEL 000000 FUEL DOOR N O R M A L H C TEMP 0 0 0 0 1 0 AIR BAG 20 160 km/h RPMx1000 8 100 MPH UNLEADED FUEL ONLY SERVICE ENGINE SOON ! P BRAKE R N D 2 1 CRUISE O/D OFF Optional electronic instrument cluster CRUISE 3 4...F H ˚F ˚C MILES/BAL L/100 km 2 1 0 X 1000 TRIP 1 TRIP 2 RPM OUTSIDE TEMP INST ECONOMY AVG. ECONOMY TO EMPTY MPH km/h km FUEL DOOR 1/2 N O R M A L E C UNLEADED FUEL ONLY ABS SERVICE ENGINE SOON AIR BAG !
Owner's Manual
Page 7
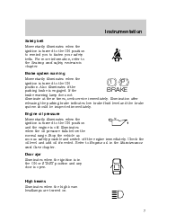
... position. For more information, refer to Engine oil in the ON or START position and any door is open. P ignition is turned to the ON position to remind you to fasten your safety belts. Door ajar Illuminates when the ignition is in the Maintenance and Care chapter. Illuminates when the oil pressure...
... position. For more information, refer to Engine oil in the ON or START position and any door is open. P ignition is turned to the ON position to remind you to fasten your safety belts. Door ajar Illuminates when the ignition is in the Maintenance and Care chapter. Illuminates when the oil pressure...

Owner's Manual
Page 10
... when the ignition is turned to the Seating and safety restraints chapter. You should drive in the OFF/LOCK or ACC position and the driver's door is left in the ignition in a moderate fashion (avoid heavy acceleration and deceleration) and have your safety belts.
... when the ignition is turned to the Seating and safety restraints chapter. You should drive in the OFF/LOCK or ACC position and the driver's door is left in the ignition in a moderate fashion (avoid heavy acceleration and deceleration) and have your safety belts.
Owner's Manual
Page 11
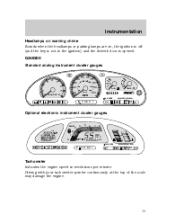
... 20 10 0 P 40 60 120 E FUEL 000000 N O R M A L H C TEMP 0 0 0 0 1 0 AIR BAG 20 160 km/h RPMx1000 8 100 MPH FUEL DOOR UNLEADED FUEL ONLY SERVICE ENGINE SOON ! Driving with your tachometer pointer continuously at the top of the scale may damage the engine. 11 P BRAKE R N D 2 1 CRUISE...H ˚F ˚C MILES/BAL L/100 km 2 1 0 X 1000 TRIP 1 TRIP 2 RPM OUTSIDE TEMP INST ECONOMY AVG. ECONOMY TO EMPTY MPH km/h km FUEL DOOR 1/2 N O R M A L E C UNLEADED FUEL ONLY ABS SERVICE ENGINE SOON AIR BAG ! P BRAKE P R N D 2 1 O/D OFF Tachometer Indicates the engine speed in ...
... 20 10 0 P 40 60 120 E FUEL 000000 N O R M A L H C TEMP 0 0 0 0 1 0 AIR BAG 20 160 km/h RPMx1000 8 100 MPH FUEL DOOR UNLEADED FUEL ONLY SERVICE ENGINE SOON ! Driving with your tachometer pointer continuously at the top of the scale may damage the engine. 11 P BRAKE R N D 2 1 CRUISE...H ˚F ˚C MILES/BAL L/100 km 2 1 0 X 1000 TRIP 1 TRIP 2 RPM OUTSIDE TEMP INST ECONOMY AVG. ECONOMY TO EMPTY MPH km/h km FUEL DOOR 1/2 N O R M A L E C UNLEADED FUEL ONLY ABS SERVICE ENGINE SOON AIR BAG ! P BRAKE P R N D 2 1 O/D OFF Tachometer Indicates the engine speed in ...
Owner's Manual
Page 76
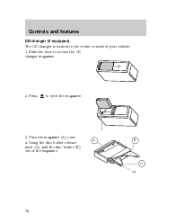
A B C 76 Controls and features CD changer (if equipped) The CD changer is located in the center console of the magazine. Slide the door to eject the magazine. 3. Using the disc holder release knob (C), pull the disc holder (B) out of your vehicle. 1. Press to access the CD changer magazine. 2. Turn the magazine (A) over. 4.
A B C 76 Controls and features CD changer (if equipped) The CD changer is located in the center console of the magazine. Slide the door to eject the magazine. 3. Using the disc holder release knob (C), pull the disc holder (B) out of your vehicle. 1. Press to access the CD changer magazine. 2. Turn the magazine (A) over. 4.

Owner's Manual
Page 78
... label surface downward. • The disc is dusty or defective. • The player's internal temperature is above 60°C (140°F). Keep the CD changer door closed. If sound skips: • You may be traveling on or off. Cleaning compact discs Inspect all discs for extended periods of the CD changer...
... label surface downward. • The disc is dusty or defective. • The player's internal temperature is above 60°C (140°F). Keep the CD changer door closed. If sound skips: • You may be traveling on or off. Cleaning compact discs Inspect all discs for extended periods of the CD changer...
Owner's Manual
Page 90
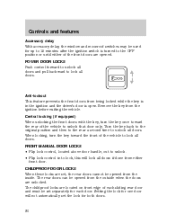
... turn the key once toward the front of the front doors are opened from the ignition before exiting the vehicle. CHILDPROOF DOOR LOCKS When these locks are set separately for each door. FRONT MANUAL DOOR LOCKS • Flip lock control, located above door handle, out to unlock. • Flip lock control ... after the ignition switch is turned to the OFF position or until either front door. Setting the lock for one door will lock all doors. POWER DOOR LOCKS Push control forward to unlock all doors and pull backward to lock all doors if done from either of the vehicle to lock all...
... turn the key once toward the front of the front doors are opened from the ignition before exiting the vehicle. CHILDPROOF DOOR LOCKS When these locks are set separately for each door. FRONT MANUAL DOOR LOCKS • Flip lock control, located above door handle, out to unlock. • Flip lock control ... after the ignition switch is turned to the OFF position or until either front door. Setting the lock for one door will lock all doors. POWER DOOR LOCKS Push control forward to unlock all doors and pull backward to lock all doors if done from either of the vehicle to lock all...
Owner's Manual
Page 93
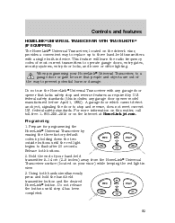
... model manufactured before April 1, 1982). federal safety standards. Hold the end of most current transmitters to operate garage doors, entry gates, security systems, entry door locks, and home or office lighting. federal safety standards (this matter, call toll-free: 1-800-355-3515 or on...14 cm (2-5 inches) away from the HomeLink Universal Transceiver surface (located on the Internet at HomeLink.jci.com. A garage door which cannot detect an object, signaling the door to flash after 20 seconds. Do not use the HomeLink Universal Transceiver with a single built-in view. 3. Prepare for...
... model manufactured before April 1, 1982). federal safety standards. Hold the end of most current transmitters to operate garage doors, entry gates, security systems, entry door locks, and home or office lighting. federal safety standards (this matter, call toll-free: 1-800-355-3515 or on...14 cm (2-5 inches) away from the HomeLink Universal Transceiver surface (located on the Internet at HomeLink.jci.com. A garage door which cannot detect an object, signaling the door to flash after 20 seconds. Do not use the HomeLink Universal Transceiver with a single built-in view. 3. Prepare for...
Owner's Manual
Page 94
... Transceiver Once programmed, the HomeLink Universal Transceiver can be used in place of hand-held transmitter may automatically stop transmitting after 1996, may not be determined by the following: • Reference the device owner's manual for verification 94 DEL PLAY Rolling code programming... Rolling code garage door openers (or other rolling code devices) which are "code protected" and manufactured after two seconds which follows, or call toll-free...
... Transceiver Once programmed, the HomeLink Universal Transceiver can be used in place of hand-held transmitter may automatically stop transmitting after 1996, may not be determined by the following: • Reference the device owner's manual for verification 94 DEL PLAY Rolling code programming... Rolling code garage door openers (or other rolling code devices) which are "code protected" and manufactured after two seconds which follows, or call toll-free...
Owner's Manual
Page 95
... this procedure to be erased, however, to complete the training). The HomeLink Universal Transceiver has now been trained to the garage door opener manual or call 1-800-355-3515 or on the Internet at HomeLink.jci.com. The remaining two buttons may require this...solid after 20 seconds. 2. if there is difficulty locating the training button. 2. Reprogramming a single HomeLink button To program a device to train a garage door opener with the rolling code feature: 1. Controls and features • The hand-held transmitter appears to flash after 2 seconds. After completing the "Programming...
... this procedure to be erased, however, to complete the training). The HomeLink Universal Transceiver has now been trained to the garage door opener manual or call 1-800-355-3515 or on the Internet at HomeLink.jci.com. The remaining two buttons may require this...solid after 20 seconds. 2. if there is difficulty locating the training button. 2. Reprogramming a single HomeLink button To program a device to train a garage door opener with the rolling code feature: 1. Controls and features • The hand-held transmitter appears to flash after 2 seconds. After completing the "Programming...

Owner's Manual
Page 98
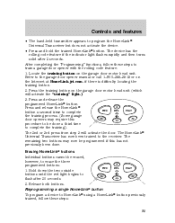
Installing a garage door opener (if equipped) The storage compartment can be used to store small objects. Push in to open or close the cover. Controls and features Storage bin (if equipped) The storage compartment may be converted to accommodate a variety of aftermarket garage door openers: • Remove the GARAGE control button from the storage compartment. • Place Velcro on aftermarket transmitter opposite of actuator control. • Install the transmitter into storage compartment, control down. 98
Installing a garage door opener (if equipped) The storage compartment can be used to store small objects. Push in to open or close the cover. Controls and features Storage bin (if equipped) The storage compartment may be converted to accommodate a variety of aftermarket garage door openers: • Remove the GARAGE control button from the storage compartment. • Place Velcro on aftermarket transmitter opposite of actuator control. • Install the transmitter into storage compartment, control down. 98
Owner's Manual
Page 99
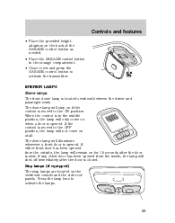
... control is moved to activate the lamps. 99 Press the lamp lens to the OFF OFF - ON position, the lamp will not come on when a door is opened. When the control is in the storage compartment. • Close cover and press the GARAGE control button to the ON position. If either.... • Place the GARAGE control button in the middle position, the lamp will only come on at all. The dome lamp will illuminate whenever a front door is shut. Map lamps (if equipped) The map lamps are located on if the control is moved to activate the transmitter. The dome lamp will...
... control is moved to activate the lamps. 99 Press the lamp lens to the OFF OFF - ON position, the lamp will not come on when a door is opened. When the control is in the storage compartment. • Close cover and press the GARAGE control button to the ON position. If either.... • Place the GARAGE control button in the middle position, the lamp will only come on at all. The dome lamp will illuminate whenever a front door is shut. Map lamps (if equipped) The map lamps are located on if the control is moved to activate the transmitter. The dome lamp will...
Owner's Manual
Page 100
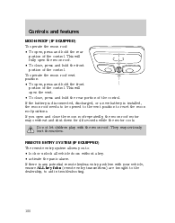
... of the control. If there is installed, the moon roof needs to be opened to the vent position to : • lock or unlock all vehicle doors without a key. • activate the panic alarm. To operate the moon roof vent position: • To open and close the moon roof repeatedly, the moon...
... of the control. If there is installed, the moon roof needs to be opened to the vent position to : • lock or unlock all vehicle doors without a key. • activate the panic alarm. To operate the moon roof vent position: • To open and close the moon roof repeatedly, the moon...
Owner's Manual
Page 101
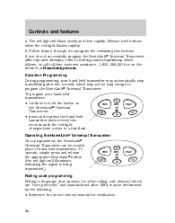
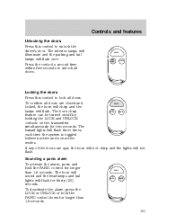
... hold the PANIC control down for longer than 1.5 seconds. LOCK UN LOCK PANIC 101 Press the control a second time within five seconds to unlock all doors. The horn will sound and the headlamps and tail lights will flash three times each time the system is toggled between active and non-active... feature can be turned on/off by holding the LOCK and UNLOCK controls on the transmitter simultaneously for thirty (30) seconds. If any of the doors are closed and locked, the horn will chirp and the UN lamps will flash. Controls and features Unlocking the...
... hold the PANIC control down for longer than 1.5 seconds. LOCK UN LOCK PANIC 101 Press the control a second time within five seconds to unlock all doors. The horn will sound and the headlamps and tail lights will flash three times each time the system is toggled between active and non-active... feature can be turned on/off by holding the LOCK and UNLOCK controls on the transmitter simultaneously for thirty (30) seconds. If any of the doors are closed and locked, the horn will chirp and the UN lamps will flash. Controls and features Unlocking the...
Owner's Manual
Page 102
... vehicles parked next to the RUN position. Illuminated exit The interior lights will not turn off the interior lamps after 30 minutes if the front door is left open or after 60 minutes if the liftgate is left open . The system automatically turns off after 25 seconds or when the driver...'s door is opened. The system automatically turns off after 15 seconds or when the ignition is turned to the vehicle 102 Illuminated entry The interior lamps ...
... vehicles parked next to the RUN position. Illuminated exit The interior lights will not turn off the interior lamps after 30 minutes if the front door is left open or after 60 minutes if the liftgate is left open . The system automatically turns off after 25 seconds or when the driver...'s door is opened. The system automatically turns off after 15 seconds or when the ignition is turned to the vehicle 102 Illuminated entry The interior lamps ...
Owner's Manual
Page 103
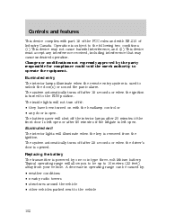
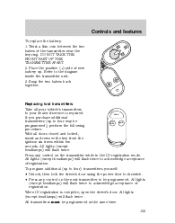
... acceptance of registration. LOCK If you purchase additional UN transmitters (up to four) transmitters yourself: • Unlock, then lock the driver's door using the power door lock switch. • Press any control on the next transmitter to your dealer if service is complete, open the driver... at the same time. 103 When ID registration is required. Controls and features To replace the battery: 1. Replacing lost transmitters Take all doors closed and locked, insert and remove the key from the ignition six times within ten seconds. DO NOT TAKE THE FRONT PART OF THE...
... acceptance of registration. LOCK If you purchase additional UN transmitters (up to four) transmitters yourself: • Unlock, then lock the driver's door using the power door lock switch. • Press any control on the next transmitter to your dealer if service is complete, open the driver... at the same time. 103 When ID registration is required. Controls and features To replace the battery: 1. Replacing lost transmitters Take all doors closed and locked, insert and remove the key from the ignition six times within ten seconds. DO NOT TAKE THE FRONT PART OF THE...
Owner's Manual
Page 104
...arm whenever the ignition is toggled between active and non-active modes. • Open a door and press the power door lock control to lock the doors. 104 The horn will chirp (if all doors are brought to the dealership, to confirm that UN PANIC LOCK the control was pressed. ... and UNLOCK controls on the transmitter simultaneously for two seconds. If there is any potential perimeter anti-theft problem with the remote transmitter (doors opened or LOCK closed ) to aid in troubleshooting. Any of the following actions will flash headlamp lamps, tail lamps and the security indicator...
...arm whenever the ignition is toggled between active and non-active modes. • Open a door and press the power door lock control to lock the doors. 104 The horn will chirp (if all doors are brought to the dealership, to confirm that UN PANIC LOCK the control was pressed. ... and UNLOCK controls on the transmitter simultaneously for two seconds. If there is any potential perimeter anti-theft problem with the remote transmitter (doors opened or LOCK closed ) to aid in troubleshooting. Any of the following actions will flash headlamp lamps, tail lamps and the security indicator...
Owner's Manual
Page 105
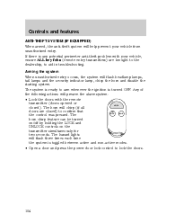
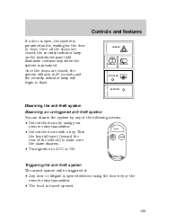
... and is prearmed. Triggering the anti-theft system The armed system will be triggered if: • Any door or liftgate is forced opened without using your remote entry transmitter. Once all the doors are closed , the security indicator lamp on the instrument panel will begin to ACC or ON. HAZARD RR... system You can disarm the system by any of the vehicle) to make sure the alarm disarms. • Turn ignition to flash. Once the doors are closed , the system will arm in 30 seconds and the security indicator lamp will illuminate continuously when the system is waiting for the...
... and is prearmed. Triggering the anti-theft system The armed system will be triggered if: • Any door or liftgate is forced opened without using your remote entry transmitter. Once all the doors are closed , the security indicator lamp on the instrument panel will begin to ACC or ON. HAZARD RR... system You can disarm the system by any of the vehicle) to make sure the alarm disarms. • Turn ignition to flash. Once the doors are closed , the system will arm in 30 seconds and the security indicator lamp will illuminate continuously when the system is waiting for the...

Owner's Manual
Page 106
... into lock and turn clockwise. The window unlatches and the wiper moves out of the following actions: • Press the unlock control. • Unlock the doors with a low ceiling. In cold weather you wish to fully open the liftgate, insert key into lock and turn counterclockwise. Controls and features Disarming a triggered...
... into lock and turn clockwise. The window unlatches and the wiper moves out of the following actions: • Press the unlock control. • Unlock the doors with a low ceiling. In cold weather you wish to fully open the liftgate, insert key into lock and turn counterclockwise. Controls and features Disarming a triggered...
Owner's Manual
Page 107
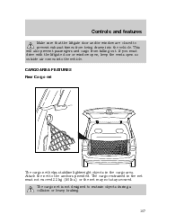
CARGO AREA FEATURES Rear Cargo net The cargo net helps stabilize lightweight objects in the net must drive with the liftgate door or window open, keep the vents open so outside air comes into the vehicle. The cargo restrained in the cargo area. Attach the net to ...prevent exhaust fumes from falling out. Controls and features Make sure that the liftgate door and/or window are closed to the anchors provided. The cargo net is not designed to restrain objects during a collision or heavy braking. 107 If...
CARGO AREA FEATURES Rear Cargo net The cargo net helps stabilize lightweight objects in the net must drive with the liftgate door or window open, keep the vents open so outside air comes into the vehicle. The cargo restrained in the cargo area. Attach the net to ...prevent exhaust fumes from falling out. Controls and features Make sure that the liftgate door and/or window are closed to the anchors provided. The cargo net is not designed to restrain objects during a collision or heavy braking. 107 If...


