Owner's Manual
Page 25
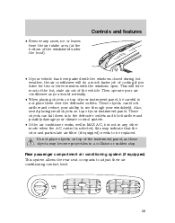
... is selected, this may become projectiles in any snow, ice or leaves from the air intake area (at the bottom of the windshield under the hood). • If your instrument panel, be replaced. This will do a much faster job of the instrument panel, as you drive for two or three minutes...
... is selected, this may become projectiles in any snow, ice or leaves from the air intake area (at the bottom of the windshield under the hood). • If your instrument panel, be replaced. This will do a much faster job of the instrument panel, as you drive for two or three minutes...
Owner's Manual
Page 105
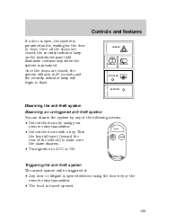
... (toward the PANIC LOCK rear of the following actions: • Unlock the doors by using the door key or the remote entry transmitter. • The hood is forced opened. 105 LOCK • Unlock the doors with a key. HAZARD RR WASH RR WIPER RR DEFOG SECURITY Disarming the anti-theft system Disarming...
... (toward the PANIC LOCK rear of the following actions: • Unlock the doors by using the door key or the remote entry transmitter. • The hood is forced opened. 105 LOCK • Unlock the doors with a key. HAZARD RR WASH RR WIPER RR DEFOG SECURITY Disarming the anti-theft system Disarming...
Owner's Manual
Page 185
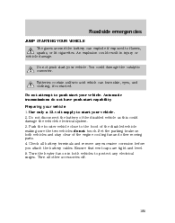
... VEHICLE The gases around the battery can burn skin, eyes, and clothing, if contacted. Batteries contain sulfuric acid which can explode if exposed to the hood of the disabled vehicle making sure the two vehicles do not have push-start your vehicle. Do not disconnect the battery of the engine cooling...
... VEHICLE The gases around the battery can burn skin, eyes, and clothing, if contacted. Batteries contain sulfuric acid which can explode if exposed to the hood of the disabled vehicle making sure the two vehicles do not have push-start your vehicle. Do not disconnect the battery of the engine cooling...
Owner's Manual
Page 192
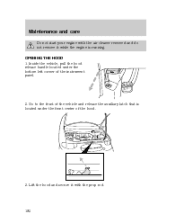
Go to the front of the vehicle and release the auxiliary latch that is running. Lift the hood and secure it with the air cleaner removed and do not remove it while the engine is located under the bottom left corner of the hood. 3. Maintenance and care Do not start your engine with the prop rod. 192 OPENING THE HOOD 1. Inside the vehicle, pull the hood release handle located under the front center of the instrument panel. 2.
Go to the front of the vehicle and release the auxiliary latch that is running. Lift the hood and secure it with the air cleaner removed and do not remove it while the engine is located under the bottom left corner of the hood. 3. Maintenance and care Do not start your engine with the prop rod. 192 OPENING THE HOOD 1. Inside the vehicle, pull the hood release handle located under the front center of the instrument panel. 2.
Owner's Manual
Page 194
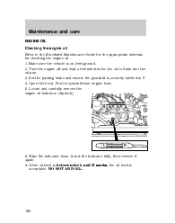
... latched in P. 4. Maintenance and care ENGINE OIL Checking the engine oil Refer to drain into the oil pan. 3. Protect yourself from engine heat. 5. Open the hood. Make sure the vehicle is on level ground. 2. Locate and carefully remove the engine oil indicator (dipstick). Wipe the indicator clean.
... latched in P. 4. Maintenance and care ENGINE OIL Checking the engine oil Refer to drain into the oil pan. 3. Protect yourself from engine heat. 5. Open the hood. Make sure the vehicle is on level ground. 2. Locate and carefully remove the engine oil indicator (dipstick). Wipe the indicator clean.
Owner's Manual
Page 209
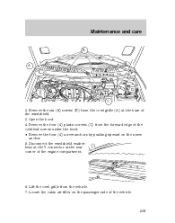
Disconnect the windshield washer hose at the Y connector at the base of the cowl leaf screen under the hood. • Remove the four (4) screw anchors by pushing upward on the passenger side of the engine compartment. 6. Remove the four (4) plastic screws (C) from the vehicle. 7. Locate the cabin air filter on the screw anchor. 5. Maintenance and care B A C 2. Lift the cowl grille from the forward edge of the windshield. 3. Open the hood. 4. Remove the six (6) screws (B) from the cowl grille (A) at the rear corner of the vehicle. 209
Disconnect the windshield washer hose at the Y connector at the base of the cowl leaf screen under the hood. • Remove the four (4) screw anchors by pushing upward on the passenger side of the engine compartment. 6. Remove the four (4) plastic screws (C) from the vehicle. 7. Locate the cabin air filter on the screw anchor. 5. Maintenance and care B A C 2. Lift the cowl grille from the forward edge of the windshield. 3. Open the hood. 4. Remove the six (6) screws (B) from the cowl grille (A) at the rear corner of the vehicle. 209
Owner's Manual
Page 211
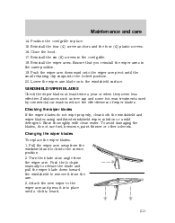
... at an angle from the wiper arm. Reinstall the wiper arms. Ensure that you reinstall the wiper arms in the cowl grille. 18. Close the hood. 17. Rinse thoroughly with clean water. Attach the new wiper to remove it into the locked position. 20. Push the wiper arm downward onto the...
... at an angle from the wiper arm. Reinstall the wiper arms. Ensure that you reinstall the wiper arms in the cowl grille. 18. Close the hood. 17. Rinse thoroughly with clean water. Attach the new wiper to remove it into the locked position. 20. Push the wiper arm downward onto the...
Owner's Manual
Page 226
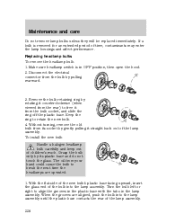
... the headlamp bulb: 1. The oil from the rear) to align the grooves in the plastic base with the tabs in OFF position, then open the hood. 2. Disconnect the electrical connector from the bulb socket, and slide the ring off the plastic base. Maintenance and care Do not remove lamp bulbs unless...
... the headlamp bulb: 1. The oil from the rear) to align the grooves in the plastic base with the tabs in OFF position, then open the hood. 2. Disconnect the electrical connector from the bulb socket, and slide the ring off the plastic base. Maintenance and care Do not remove lamp bulbs unless...
Owner's Manual
Page 230
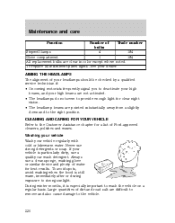
... from a slightly down and to deactivate your high beams, and your vehicle regularly with cold or lukewarm water. To avoid spots, avoid washing when the hood is especially important to strong sunlight. During winter months, it is still warm, immediately after or during exposure to wash the vehicle on a regular basis...
... from a slightly down and to deactivate your high beams, and your vehicle regularly with cold or lukewarm water. To avoid spots, avoid washing when the hood is especially important to strong sunlight. During winter months, it is still warm, immediately after or during exposure to wash the vehicle on a regular basis...
Owner's Manual
Page 236
... C6AZ-19542-AB Ford specification ESA-M6C25-A and DOT 3 Door weatherstrips Engine coolant Engine oil Motorcraft SAE 5W-30 Super Premium Motor Oil Door latch, hood Multi-Purpose Grease latch,auxiliary hood latch, door and liftgate hinges, striker plates, seat tracks, fuel filler door hinge.
... C6AZ-19542-AB Ford specification ESA-M6C25-A and DOT 3 Door weatherstrips Engine coolant Engine oil Motorcraft SAE 5W-30 Super Premium Motor Oil Door latch, hood Multi-Purpose Grease latch,auxiliary hood latch, door and liftgate hinges, striker plates, seat tracks, fuel filler door hinge.
Owner's Manual
Page 251
... Bed mats Bedliners Car/truck covers Cargo liners, interior Carpet floor mats Cleaners, waxes and polishes Flat splash guards Front end covers (full and mini) Hood deflectors Locking gas cap Lubricants and oils Molded splash guards Molded vinyl floor mats Rallye bars Rear air deflectors Rear decklid spoilers Side window air...
... Bed mats Bedliners Car/truck covers Cargo liners, interior Carpet floor mats Cleaners, waxes and polishes Flat splash guards Front end covers (full and mini) Hood deflectors Locking gas cap Lubricants and oils Molded splash guards Molded vinyl floor mats Rallye bars Rear air deflectors Rear decklid spoilers Side window air...
Owner's Manual
Page 257
... lights ...19 flash to pass ...20 high beam ...7,20 turning on and off ...19 warning chime ...11 Heating ...21 heating and air conditioning system ...21 Hood ...192 Ignition ...237,238 positions of the ignition ...81 Infant seats (see Safety seats) 137 Inspection/maintenance (I/M) testing ...224 Instrument panel cleaning ...233 cluster ...6 lighting...
... lights ...19 flash to pass ...20 high beam ...7,20 turning on and off ...19 warning chime ...11 Heating ...21 heating and air conditioning system ...21 Hood ...192 Ignition ...237,238 positions of the ignition ...81 Infant seats (see Safety seats) 137 Inspection/maintenance (I/M) testing ...224 Instrument panel cleaning ...233 cluster ...6 lighting...
Owner's Manual
Page 264
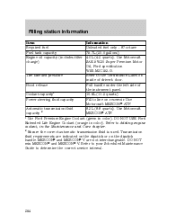
... station information Item Information Required fuel Unleaded fuel only - 87 octane Fuel tank capacity 75.7L (20.0 gallons) Engine oil capacity (includes filter 4.0L (4.2 quarts). Hood release Pull handle under the left side of driver's door.
... station information Item Information Required fuel Unleaded fuel only - 87 octane Fuel tank capacity 75.7L (20.0 gallons) Engine oil capacity (includes filter 4.0L (4.2 quarts). Hood release Pull handle under the left side of driver's door.
Owner Guide 1st Printing
Page 65
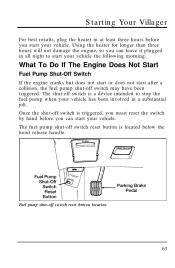
... the following morning. The shut-off switch reset button is a device intended to start your vehicle has been involved in a substantial jolt. Starting Your Villager For best results, plug the heater in at least three hours before you start your vehicle. The fuel pump shut-off switch is located below... the hood release handle. Fuel pump shut-off switch may have been triggered. Using the heater for longer than three hours will not damage the engine, ...
... the following morning. The shut-off switch reset button is a device intended to start your vehicle has been involved in a substantial jolt. Starting Your Villager For best results, plug the heater in at least three hours before you start your vehicle. The fuel pump shut-off switch is located below... the hood release handle. Fuel pump shut-off switch may have been triggered. Using the heater for longer than three hours will not damage the engine, ...

Owner Guide 1st Printing
Page 148
... anti-theft system The armed system will be triggered if: s any door is opened 150 The remote keyless entry system is opened or unlocked s the hood is armed and you remain in the lock. This will trigger when a door is designed to lock the doors. Disarming an untriggered anti-theft system...
... anti-theft system The armed system will be triggered if: s any door is opened 150 The remote keyless entry system is opened or unlocked s the hood is armed and you remain in the lock. This will trigger when a door is designed to lock the doors. Disarming an untriggered anti-theft system...

Owner Guide 1st Printing
Page 252
... batteries in doubt, call for preparing your starting system, so you need to use a 12-volt jumper system. You will damage your vehicle to the hood of the disabled vehicle. If in series or a 24-volt generator set). 2.
... batteries in doubt, call for preparing your starting system, so you need to use a 12-volt jumper system. You will damage your vehicle to the hood of the disabled vehicle. If in series or a 24-volt generator set). 2.

Owner Guide 1st Printing
Page 284
... not exceed the total weight capacity of the vehicle or of the Federal Communications Commission (FCC) 47 CFR Parts 2 and 15. Accessories Travel Equipment Aero Hood Deflector Bike Rack Adaptor (Attaches to Base Roof Rack) Four Season Base Roof Rack Multi Sport Removable Rack Multi Sport Bike Adaptor Multi Sport Ski...
... not exceed the total weight capacity of the vehicle or of the Federal Communications Commission (FCC) 47 CFR Parts 2 and 15. Accessories Travel Equipment Aero Hood Deflector Bike Rack Adaptor (Attaches to Base Roof Rack) Four Season Base Roof Rack Multi Sport Removable Rack Multi Sport Bike Adaptor Multi Sport Ski...

Owner Guide 1st Printing
Page 291
... ignition after you turn off : WARNING Set the parking brake and make sure that could get caught in moving unexpectedly. Servicing Your Villager If you plan to work under the hood while the engine is on: Set the parking brake fully and make sure the gearshift is securely latched in P (Park). s If...
... ignition after you turn off : WARNING Set the parking brake and make sure that could get caught in moving unexpectedly. Servicing Your Villager If you plan to work under the hood while the engine is on: Set the parking brake fully and make sure the gearshift is securely latched in P (Park). s If...
Owner Guide 1st Printing
Page 292
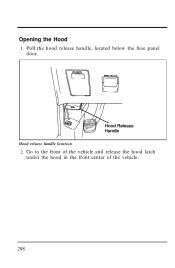
Hood release handle location 2. Opening the Hood 1. Go to the front of the vehicle and release the hood latch under the hood in the front center of the vehicle. 298 Pull the hood release handle, located below the fuse panel door.
Hood release handle location 2. Opening the Hood 1. Go to the front of the vehicle and release the hood latch under the hood in the front center of the vehicle. 298 Pull the hood release handle, located below the fuse panel door.

Owner Guide 1st Printing
Page 293
Lift the hood and release the prop rod from its retaining clip. The hood latch and prop rod 299 Place the end of the prop rod in the prop rod hole provided on the underside of the hood. Servicing Your Villager 3.
Lift the hood and release the prop rod from its retaining clip. The hood latch and prop rod 299 Place the end of the prop rod in the prop rod hole provided on the underside of the hood. Servicing Your Villager 3.
