Owner's Manual
Page 208
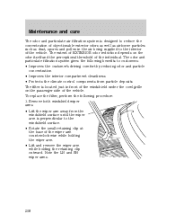
... the concentration of objectionable exterior odors as well as airborne particles such as dust, spores and pollen in front of the windshield under the cowl grille on the odor itself and the perceptional threshold of the wiper arm counterclockwise while holding the wiper arm. • Lift and remove the wiper arm...
... the concentration of objectionable exterior odors as well as airborne particles such as dust, spores and pollen in front of the windshield under the cowl grille on the odor itself and the perceptional threshold of the wiper arm counterclockwise while holding the wiper arm. • Lift and remove the wiper arm...
Owner's Manual
Page 209
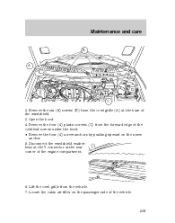
Remove the six (6) screws (B) from the forward edge of the cowl leaf screen under the hood. • Remove the four (4) screw anchors by pushing upward on the passenger side of the vehicle. 209 Locate the cabin air filter on the screw anchor. 5. Remove the four (4) plastic screws (C) from the cowl grille (A) at the rear corner of the windshield. 3. Disconnect the windshield washer hose at the Y connector at the base of the engine compartment. 6. Maintenance and care B A C 2. Open the hood. 4. Lift the cowl grille from the vehicle. 7.
Remove the six (6) screws (B) from the forward edge of the cowl leaf screen under the hood. • Remove the four (4) screw anchors by pushing upward on the passenger side of the vehicle. 209 Locate the cabin air filter on the screw anchor. 5. Remove the four (4) plastic screws (C) from the cowl grille (A) at the rear corner of the windshield. 3. Disconnect the windshield washer hose at the Y connector at the base of the engine compartment. 6. Maintenance and care B A C 2. Open the hood. 4. Lift the cowl grille from the vehicle. 7.
Owner's Manual
Page 211
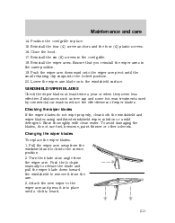
Position the cowl grille in the same position. 19. Reinstall the wiper arms. Ensure that you reinstall the wiper arms in place. 15. Lower the wiper arm blade onto ... pull the wiper blade down toward the windshield to the wiper arm and press it from the arm. 3. Reinstall the six (6) screws in the cowl grille. 18. Reinstall the four (4) screw anchors and the four (4) plastic screws. 16. Push the wiper arm downward onto the wiper arm pivot until a click is...
Position the cowl grille in the same position. 19. Reinstall the wiper arms. Ensure that you reinstall the wiper arms in place. 15. Lower the wiper arm blade onto ... pull the wiper blade down toward the windshield to the wiper arm and press it from the arm. 3. Reinstall the six (6) screws in the cowl grille. 18. Reinstall the four (4) screw anchors and the four (4) plastic screws. 16. Push the wiper arm downward onto the wiper arm pivot until a click is...

Owner Guide 1st Printing
Page 117
Instrument Panel Controls Autolamp thumbwheel location 4. The photodiode controls the autolamp; The autolamp will be illuminated. 117 if it is covered, the photodiode reacts as if it is nighttime, and the headlamps will automatically turn the lamps on top of the photodiode located in the top right side of the instrument panel speaker grille. NOTE: Be sure that you do not put anything on and off. Move the thumbwheel all the way to the right.
Instrument Panel Controls Autolamp thumbwheel location 4. The photodiode controls the autolamp; The autolamp will be illuminated. 117 if it is covered, the photodiode reacts as if it is nighttime, and the headlamps will automatically turn the lamps on top of the photodiode located in the top right side of the instrument panel speaker grille. NOTE: Be sure that you do not put anything on and off. Move the thumbwheel all the way to the right.