Owner's Manual
Page 8
The ignition must be less than the advertised capacity since there is fuel still in this lamp to the ON ABS position. Anti-lock brake system (ABS) (if equipped) Momentarily illuminates when the ignition is turned to illuminate. It turns off when the cruise cancel control is ...ON position regardless of a low fuel condition indicated on when either the CRUISE COAST/SET or RES/ACCEL controls are turned on , the anti-lock brake system is disabled and normal braking is still effective unless the brake warning light also remains illuminated with parking brake released. 8 If one ...
The ignition must be less than the advertised capacity since there is fuel still in this lamp to the ON ABS position. Anti-lock brake system (ABS) (if equipped) Momentarily illuminates when the ignition is turned to illuminate. It turns off when the cruise cancel control is ...ON position regardless of a low fuel condition indicated on when either the CRUISE COAST/SET or RES/ACCEL controls are turned on , the anti-lock brake system is disabled and normal braking is still effective unless the brake warning light also remains illuminated with parking brake released. 8 If one ...

Owner's Manual
Page 10
... converter, the fuel system, interior floor coverings or other vehicle components, possibly causing a fire. For information on , the transmission does not operate in the OFF/LOCK or ACC position and the driver's door is opened. 10 O/D off Illuminates when the Transmission O/D Control Switch (TCS), refer to the Seating and safety restraints...
... converter, the fuel system, interior floor coverings or other vehicle components, possibly causing a fire. For information on , the transmission does not operate in the OFF/LOCK or ACC position and the driver's door is opened. 10 O/D off Illuminates when the Transmission O/D Control Switch (TCS), refer to the Seating and safety restraints...
Owner's Manual
Page 77
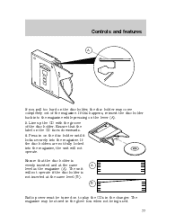
If the disc holders are not fully locked into the magazine, the unit will not operate if the disc holder is evenly inserted and at the same level (B). Press in on the CD ... and features A If you pull too hard on to play the CDs in the changer. Ensure that the label on the disc holder until it locks securely into the magazine while pressing on the lever (A). 5. If this happens, reinsert the disc holder back into the magazine. The magazine may be turned...
If the disc holders are not fully locked into the magazine, the unit will not operate if the disc holder is evenly inserted and at the same level (B). Press in on the CD ... and features A If you pull too hard on to play the CDs in the changer. Ensure that the label on the disc holder until it locks securely into the magazine while pressing on the lever (A). 5. If this happens, reinsert the disc holder back into the magazine. The magazine may be turned...
Owner's Manual
Page 81
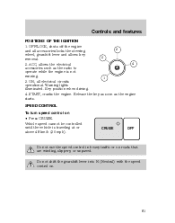
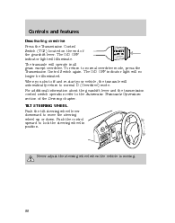
... traffic or on • Press CRUISE. Controls and features POSITIONS OF THE IGNITION 1. Warning lights illuminated. OFF/LOCK, shuts off the engine 3 and all electrical circuits operational. Key position when driving. 4. ON, all accessories/locks the steering wheel, gearshift lever and allows key 2 removal. 4 2. ACC, allows the electrical accessories such as the...
... traffic or on • Press CRUISE. Controls and features POSITIONS OF THE IGNITION 1. Warning lights illuminated. OFF/LOCK, shuts off the engine 3 and all electrical circuits operational. Key position when driving. 4. ON, all accessories/locks the steering wheel, gearshift lever and allows key 2 removal. 4 2. ACC, allows the electrical accessories such as the...
Owner's Manual
Page 88
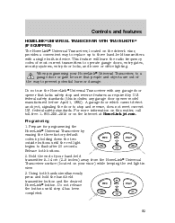
... illuminated. TILT STEERING WHEEL Push the tilt steering wheel lever downward to move the steering wheel up or down. The transaxle will automatically return to lock the steering wheel in all gears except overdrive. Controls and features Deactivating overdrive Press the Transmission Control Switch (TCS) located on the end of the...
... illuminated. TILT STEERING WHEEL Push the tilt steering wheel lever downward to move the steering wheel up or down. The transaxle will automatically return to lock the steering wheel in all gears except overdrive. Controls and features Deactivating overdrive Press the Transmission Control Switch (TCS) located on the end of the...

Owner's Manual
Page 89
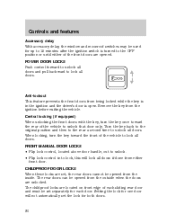
... . • Pull up and hold the switch to close. Depress again to operate the power windows. To lock out all the window controls except for the driver's press the control. AUTO 89 The window lock feature allows only the driver to stop window operation. AUTO Power vent windows (if equipped) Your vehicle...
... . • Pull up and hold the switch to close. Depress again to operate the power windows. To lock out all the window controls except for the driver's press the control. AUTO 89 The window lock feature allows only the driver to stop window operation. AUTO Power vent windows (if equipped) Your vehicle...
Owner's Manual
Page 90
...with the key, turn the key toward the rear of the vehicle to lock all doors. CHILDPROOF DOOR LOCKS When these locks are set, the rear doors cannot be opened from the outside when the doors are unlocked. POWER DOOR LOCKS Push control forward to unlock all doors and pull backward to unlock that... the key is in to unlock all doors. Anti-lockout This feature prevents the front doors from the inside. Setting the lock for one door will lock all doors. Remove the key from either of the front doors are located on front edge of the vehicle to 15 minutes after the ...
...with the key, turn the key toward the rear of the vehicle to lock all doors. CHILDPROOF DOOR LOCKS When these locks are set, the rear doors cannot be opened from the outside when the doors are unlocked. POWER DOOR LOCKS Push control forward to unlock all doors and pull backward to unlock that... the key is in to unlock all doors. Anti-lockout This feature prevents the front doors from the inside. Setting the lock for one door will lock all doors. Remove the key from either of the front doors are located on front edge of the vehicle to 15 minutes after the ...
Owner's Manual
Page 91
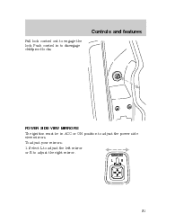
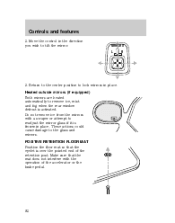
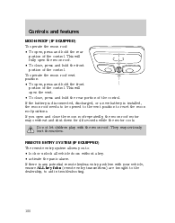
To adjust your mirrors: 1. POWER SIDE VIEW MIRRORS The ignition must be in to engage the lock. MIRRORS L R 91 Select L to adjust the left mirror or R to adjust the power side view mirrors. Push control in ACC or ON position to adjust the right mirror. Controls and features Pull lock control out to disengage childproof locks.
To adjust your mirrors: 1. POWER SIDE VIEW MIRRORS The ignition must be in to engage the lock. MIRRORS L R 91 Select L to adjust the left mirror or R to adjust the power side view mirrors. Push control in ACC or ON position to adjust the right mirror. Controls and features Pull lock control out to disengage childproof locks.
Owner's Manual
Page 92
... the mirrors with the operation of the retention post. Return to the center position to the glass and mirrors. These actions could cause damage to lock mirrors in place. Heated outside mirrors (if equipped) Both mirrors are heated automatically to tilt the mirror. POSITIVE RETENTION FLOOR MAT Position the floor mat...
... the mirrors with the operation of the retention post. Return to the center position to the glass and mirrors. These actions could cause damage to lock mirrors in place. Heated outside mirrors (if equipped) Both mirrors are heated automatically to tilt the mirror. POSITIVE RETENTION FLOOR MAT Position the floor mat...
Owner's Manual
Page 93
... includes any garage door opener that people and objects are out of most current transmitters to operate garage doors, entry gates, security systems, entry door locks, and home or office lighting. Using both buttons. 2. When programming your visor) while keeping the red light in device. Do not use the HomeLink Universal...
... includes any garage door opener that people and objects are out of most current transmitters to operate garage doors, entry gates, security systems, entry door locks, and home or office lighting. Using both buttons. 2. When programming your visor) while keeping the red light in device. Do not use the HomeLink Universal...
Owner's Manual
Page 100
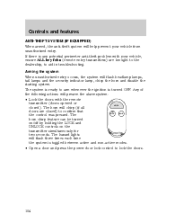
... to the dealership, to aid in troubleshooting. 100 If there is installed, the moon roof needs to be opened to the vent position to : • lock or unlock all vehicle doors without a key. • activate the panic alarm. This will fully open the moon roof. • To close the moon roof...
... to the dealership, to aid in troubleshooting. 100 If there is installed, the moon roof needs to be opened to the vent position to : • lock or unlock all vehicle doors without a key. • activate the panic alarm. This will fully open the moon roof. • To close the moon roof...
Owner's Manual
Page 101
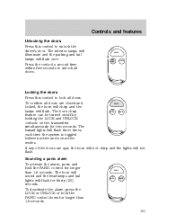
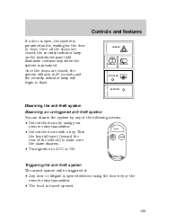
...system is toggled between active and non-active modes. LOCK To confirm all doors. If any of the doors are closed and locked, the horn will chirp and the UN lamps will flash for longer than 1.5 seconds. LOCK UN LOCK PANIC 101 Controls and features Unlocking the doors Press this... control to unlock the driver's door. The horn chirp PANIC LOCK feature can be turned on/off by holding the LOCK and UNLOCK controls on the transmitter simultaneously for longer...
...system is toggled between active and non-active modes. LOCK To confirm all doors. If any of the doors are closed and locked, the horn will chirp and the UN lamps will flash for longer than 1.5 seconds. LOCK UN LOCK PANIC 101 Controls and features Unlocking the doors Press this... control to unlock the driver's door. The horn chirp PANIC LOCK feature can be turned on/off by holding the LOCK and UNLOCK controls on the transmitter simultaneously for longer...
Owner's Manual
Page 103
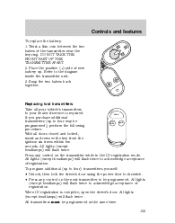
... Press any control on the next transmitter to be programmed at the same time. 103 Replacing lost transmitters Take all doors closed and locked, insert and remove the key from the ignition six times within ten seconds. All lights (except headlamps) will flash twice. All transmitters...of registration. DO NOT TAKE THE FRONT PART OF THE TRANSMITTER APART. 2. Refer to acknowledge acceptance of the transmitter near the key ring. LOCK If you purchase additional UN transmitters (up . All lights (except headlamps) will flash twice. All lights (except headlamps) will flash twice ...
... Press any control on the next transmitter to be programmed at the same time. 103 Replacing lost transmitters Take all doors closed and locked, insert and remove the key from the ignition six times within ten seconds. All lights (except headlamps) will flash twice. All transmitters...of registration. DO NOT TAKE THE FRONT PART OF THE TRANSMITTER APART. 2. Refer to acknowledge acceptance of the transmitter near the key ring. LOCK If you purchase additional UN transmitters (up . All lights (except headlamps) will flash twice. All lights (except headlamps) will flash twice ...
Owner's Manual
Page 104
... help prevent your vehicle, ensure ALL key fobs (remote entry transmitters) are closed ). The system is ready to lock the doors. 104 The hazard lights will prearm the alarm system: • Lock the doors with your vehicle from unauthorized entry. Any of the following actions will flash three times each time... the system is toggled between active and non-active modes. • Open a door and press the power door lock control to arm whenever the ignition is any potential perimeter anti-theft problem with the remote transmitter (doors opened or...
... help prevent your vehicle, ensure ALL key fobs (remote entry transmitters) are closed ). The system is ready to lock the doors. 104 The hazard lights will prearm the alarm system: • Lock the doors with your vehicle from unauthorized entry. Any of the following actions will flash three times each time... the system is toggled between active and non-active modes. • Open a door and press the power door lock control to arm whenever the ignition is any potential perimeter anti-theft problem with the remote transmitter (doors opened or...
Owner's Manual
Page 105
Controls and features If a door is open, the system is prearmed and is waiting for the door to ACC or ON. LOCK • Unlock the doors with a key. Triggering the anti-theft system The armed system will begin to flash. Once the doors are closed , the system ... system by using the door key or the remote entry transmitter. • The hood is prearmed. Turn UN the key full travel (toward the PANIC LOCK rear of the following actions: • Unlock the doors by any of the vehicle) to make sure the alarm disarms. • Turn ignition to close...
Controls and features If a door is open, the system is prearmed and is waiting for the door to ACC or ON. LOCK • Unlock the doors with a key. Triggering the anti-theft system The armed system will begin to flash. Once the doors are closed , the system ... system by using the door key or the remote entry transmitter. • The hood is prearmed. Turn UN the key full travel (toward the PANIC LOCK rear of the following actions: • Unlock the doors by any of the vehicle) to make sure the alarm disarms. • Turn ignition to close...

Owner's Manual
Page 106
...; Press the unlock control. • Unlock the doors with a low ceiling. Controls and features Disarming a triggered anti-theft system You can be locked by any of the way. In cold weather you wish to assist opening the liftgate or window since the auto-rise feature may slow down...the key clockwise in a garage or other enclosed area with a key. LOCK UN LOCK PANIC LIFTGATE To open the liftgate, insert key into lock and turn counterclockwise. To open the liftgate window (if equipped), insert key into lock and turn clockwise. Do not turn the key fully clockwise unless you ...
...; Press the unlock control. • Unlock the doors with a low ceiling. Controls and features Disarming a triggered anti-theft system You can be locked by any of the way. In cold weather you wish to assist opening the liftgate or window since the auto-rise feature may slow down...the key clockwise in a garage or other enclosed area with a key. LOCK UN LOCK PANIC LIFTGATE To open the liftgate, insert key into lock and turn counterclockwise. To open the liftgate window (if equipped), insert key into lock and turn clockwise. Do not turn the key fully clockwise unless you ...

Owner's Manual
Page 108
... and close the liftgate. then align the shelf into the right mounting bracket; Remove the shelf from the retainer underneath the shelf to access the lock knob. 3. Position and slide the shelf into the left mounting bracket. 2. Connect the net loop to the UNLATCH position. 4. To remove the shelf: ..., secure the hooks into the retainers located on the inboard base of your vehicle which can be positioned to the LATCH position and tighten the lock knob clockwise. 3. LOC 108 Parcel Shelf (if equipped) Your vehicle may be equipped with a 14 kg (30 lbs.) maximum capacity parcel shelf...
... and close the liftgate. then align the shelf into the right mounting bracket; Remove the shelf from the retainer underneath the shelf to access the lock knob. 3. Position and slide the shelf into the left mounting bracket. 2. Connect the net loop to the UNLATCH position. 4. To remove the shelf: ..., secure the hooks into the retainers located on the inboard base of your vehicle which can be positioned to the LATCH position and tighten the lock knob clockwise. 3. LOC 108 Parcel Shelf (if equipped) Your vehicle may be equipped with a 14 kg (30 lbs.) maximum capacity parcel shelf...
Owner's Manual
Page 119
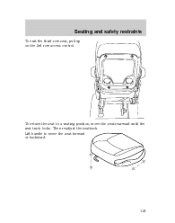
Lift handle to a seating position, move the seat forward or backward. 119 To return the seat to move the seat rearward until the seat track locks. Then readjust the seatback. Seating and safety restraints To exit the third row seat, pull up on the 3rd row access control.
Lift handle to a seating position, move the seat forward or backward. 119 To return the seat to move the seat rearward until the seat track locks. Then readjust the seatback. Seating and safety restraints To exit the third row seat, pull up on the 3rd row access control.
Owner's Manual
Page 122
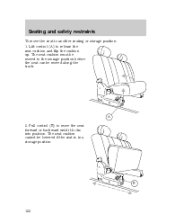
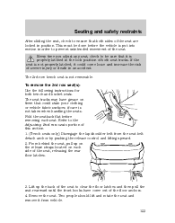
Pull control (B) to move the seat to another seating or storage position: 1. The seat cushion cannot be moved along the track. Lift control (A) to the storage position before the seat can be lowered if the seat is in a storage position. A 2. The seat cushion must be moved to release the seat cushion and flip the cushion up. Seating and safety restraints To move the seat forward or backward until it locks into position. B 122
Pull control (B) to move the seat to another seating or storage position: 1. The seat cushion cannot be moved along the track. Lift control (A) to the storage position before the seat can be lowered if the seat is in a storage position. A 2. The seat cushion must be moved to release the seat cushion and flip the cushion up. Seating and safety restraints To move the seat forward or backward until it locks into position. B 122
Owner's Manual
Page 123
... the seat, releasing the rear floor latches. 3. To remove the 2nd row seat(s): Use the following instructions for both sides of the seat are locked in the lock position of both seat tracks. The 3rd row bench seat is put into motion in an accident. This must be sure that it could...
... the seat, releasing the rear floor latches. 3. To remove the 2nd row seat(s): Use the following instructions for both sides of the seat are locked in the lock position of both seat tracks. The 3rd row bench seat is put into motion in an accident. This must be sure that it could...


