Owner Manual
Page 11
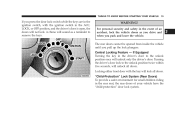
... two conditions: 1. Always remove the key from the ignition, lock the doors, close the windows, and raise the top when leaving the vehicle unattended. After 10 seconds a single chime will stop flashing, and turn On for dealer replacement of keys may not cause harmful interference THINGS TO KNOW BEFORE STARTING YOUR VEHICLE 11 for 3 seconds; Insert the second valid key and switch the ignition On...
... two conditions: 1. Always remove the key from the ignition, lock the doors, close the windows, and raise the top when leaving the vehicle unattended. After 10 seconds a single chime will stop flashing, and turn On for dealer replacement of keys may not cause harmful interference THINGS TO KNOW BEFORE STARTING YOUR VEHICLE 11 for 3 seconds; Insert the second valid key and switch the ignition On...
Owner Manual
Page 15
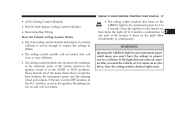
... vehicle until you park and leave the vehicle. If Equipped Turning the key in the ACC, LOCK, or OFF position, and the driver's door is open, the doors will not lock. Turning the driver's door lock to the unlock position once will unlock only the driver's door. THINGS TO KNOW BEFORE STARTING YOUR VEHICLE 15 If you press the door lock switch while the keys are in the ignition switch, with the key will lock all doors. Locking...
... vehicle until you park and leave the vehicle. If Equipped Turning the key in the ACC, LOCK, or OFF position, and the driver's door is open, the doors will not lock. Turning the driver's door lock to the unlock position once will unlock only the driver's door. THINGS TO KNOW BEFORE STARTING YOUR VEHICLE 15 If you press the door lock switch while the keys are in the ignition switch, with the key will lock all doors. Locking...

Owner Manual
Page 18
.... REMOTE KEYLESS ENTRY This system allows you to unlock of all doors and place the key in the LOCK position. Automatic Unlock on Exit can be programmed to 40 feet (12 meters) using a transmitter. Press upward on the power door unlock switch to activate the system. To toggle between ON/RUN and OFF 4 times ending up to unlock all the doors when the driver's door...
.... REMOTE KEYLESS ENTRY This system allows you to unlock of all doors and place the key in the LOCK position. Automatic Unlock on Exit can be programmed to 40 feet (12 meters) using a transmitter. Press upward on the power door unlock switch to activate the system. To toggle between ON/RUN and OFF 4 times ending up to unlock all the doors when the driver's door...
Owner Manual
Page 37
.... 2 WARNING! THINGS TO KNOW BEFORE STARTING YOUR VEHICLE 37 • ACM (Airbag Control Module) • SIACM (Side Impact Airbag Control Module) • Interconnecting Wiring How the Frontal Airbag System Works • The front airbag control module determines if a frontal collision is severe enough to require the airbags to inflate. • The airbag control module will not inflate. • The airbag control module also turns on the AIRBAG light in the instrument panel for 6 to protect you drive, have...
.... 2 WARNING! THINGS TO KNOW BEFORE STARTING YOUR VEHICLE 37 • ACM (Airbag Control Module) • SIACM (Side Impact Airbag Control Module) • Interconnecting Wiring How the Frontal Airbag System Works • The front airbag control module determines if a frontal collision is severe enough to require the airbags to inflate. • The airbag control module will not inflate. • The airbag control module also turns on the AIRBAG light in the instrument panel for 6 to protect you drive, have...
Owner Manual
Page 51
...; Interior Lights ...65 3 UNDERSTANDING THE FEATURES OF YOUR VEHICLE CONTENTS Ⅵ Cup Holders ...55 ▫ Front Seat Cupholders (Concorde Limited Vehicles Only) ...55 ▫ Rear Seat Cupholders ...55 Ⅵ Coat Hook ...55 Ⅵ Mirrors ...56 ▫ Adjusting The Inside Day/Night Mirror ...56 ▫ Automatic Dimming Mirror Feature ...56 ▫ Heated Remote Control Mirrors - If Equipped ...56 ▫ Electric Remote Control Mirrors ...57 ▫ Mirror Adjustment ...57 Ⅵ Seats ...59 ▫ Power Seats ...59 ▫ Power Reclining Seats...
...; Interior Lights ...65 3 UNDERSTANDING THE FEATURES OF YOUR VEHICLE CONTENTS Ⅵ Cup Holders ...55 ▫ Front Seat Cupholders (Concorde Limited Vehicles Only) ...55 ▫ Rear Seat Cupholders ...55 Ⅵ Coat Hook ...55 Ⅵ Mirrors ...56 ▫ Adjusting The Inside Day/Night Mirror ...56 ▫ Automatic Dimming Mirror Feature ...56 ▫ Heated Remote Control Mirrors - If Equipped ...56 ▫ Electric Remote Control Mirrors ...57 ▫ Mirror Adjustment ...57 Ⅵ Seats ...59 ▫ Power Seats ...59 ▫ Power Reclining Seats...
Owner Manual
Page 52
... YOUR VEHICLE ▫ To Turn The Interior Lights On ...65 ▫ Battery Saver Feature-Interior Lights ...65 ▫ Instrument Panel Lighting ...65 ▫ Front Map/Reading Lights ...66 ▫ Rear Seat Reading/Courtesy Lights ...66 Ⅵ Exterior Lights ...66 ▫ Headlights And Parking Lights ...66 ▫ Lights-On Reminder ...67 ▫ Automatic Headlights ...67 ▫ Headlight Time Delay ...67 ▫ Battery Saver Feature ...68 ▫ Fog Lights ...68 ▫ Daytime Running Lights (Canada Only) ...68 Ⅵ Multifunction Control Lever ...68 ▫ Turn Signals ...68...
... YOUR VEHICLE ▫ To Turn The Interior Lights On ...65 ▫ Battery Saver Feature-Interior Lights ...65 ▫ Instrument Panel Lighting ...65 ▫ Front Map/Reading Lights ...66 ▫ Rear Seat Reading/Courtesy Lights ...66 Ⅵ Exterior Lights ...66 ▫ Headlights And Parking Lights ...66 ▫ Lights-On Reminder ...67 ▫ Automatic Headlights ...67 ▫ Headlight Time Delay ...67 ▫ Battery Saver Feature ...68 ▫ Fog Lights ...68 ▫ Daytime Running Lights (Canada Only) ...68 Ⅵ Multifunction Control Lever ...68 ▫ Turn Signals ...68...
Owner Manual
Page 68
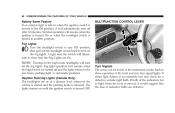
... the Fog Lights are defective. If either light flashes at a dimmer level whenever the vehicle is started and the parking brake is turned to show operation of the indicators fail to the low beam, parking light, or automatic positions. A light near the switch will resume when the ignition is turned On or when the headlight switch is released. Normal operation will illuminate to another position. MULTIFUNCTION CONTROL LEVER Turn Signals The...
... the Fog Lights are defective. If either light flashes at a dimmer level whenever the vehicle is started and the parking brake is turned to show operation of the indicators fail to the low beam, parking light, or automatic positions. A light near the switch will resume when the ignition is turned On or when the headlight switch is released. Normal operation will illuminate to another position. MULTIFUNCTION CONTROL LEVER Turn Signals The...
Owner Manual
Page 69
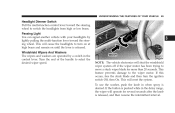
... steering wheel to turn the ignition switch Off, then On. Turn the end of the handle to select the desired wiper speed. 3 NOTE: The vehicle electronics will reset the system. UNDERSTANDING THE FEATURES OF YOUR VEHICLE 69 Headlight Dimmer Switch Pull the multi-function control lever toward the steering wheel. If the button is released. This will shut the windshield wiper system off if the wiper motor has been trying to the wiper motor...
... steering wheel to turn the ignition switch Off, then On. Turn the end of the handle to select the desired wiper speed. 3 NOTE: The vehicle electronics will reset the system. UNDERSTANDING THE FEATURES OF YOUR VEHICLE 69 Headlight Dimmer Switch Pull the multi-function control lever toward the steering wheel. If the button is released. This will shut the windshield wiper system off if the wiper motor has been trying to the wiper motor...
Owner Manual
Page 100
... are slowly updated when vehicle speed is located in the forward portion of the center console if your vehicle has bucket seats or in the lower center of the fuse block) from ignition to a cigar lighter by the ignition switch, when in the fuse block. • Reinstall the fuse cover. You may be converted to battery power by a 15 amp fuse. Accessories powered through this manual.) • Remove fuse #6 (its "IGN" position. •...
... are slowly updated when vehicle speed is located in the forward portion of the center console if your vehicle has bucket seats or in the lower center of the fuse block) from ignition to a cigar lighter by the ignition switch, when in the fuse block. • Reinstall the fuse cover. You may be converted to battery power by a 15 amp fuse. Accessories powered through this manual.) • Remove fuse #6 (its "IGN" position. •...
Owner Manual
Page 110
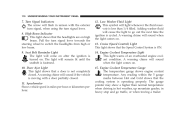
... beam. Engine Coolant Temperature Gauge The temperature gauge shows engine coolant temperature. Pull the turn signal lever. 8. High Beam Indicator This light shows that the Speed Control System is moving with the exterior turn signal, when using the turn signal lever towards the steering wheel to go traffic, or when towing a trailer. Cruise (Speed Control) Light This light shows that the headlights are on after the ignition is operating properly. A warning chime will flash in miles-per-hour...
... beam. Engine Coolant Temperature Gauge The temperature gauge shows engine coolant temperature. Pull the turn signal lever. 8. High Beam Indicator This light shows that the Speed Control System is moving with the exterior turn signal, when using the turn signal lever towards the steering wheel to go traffic, or when towing a trailer. Cruise (Speed Control) Light This light shows that the headlights are on after the ignition is operating properly. A warning chime will flash in miles-per-hour...

Owner Manual
Page 111
... vehicle and turn the Temperature control to maximum heat, the Mode control to Floor and the Fan control to High. The vehicle should be serviced as soon as a loose or missing gas cap or poor fuel quality may illuminate the light after engine start . U.S. Certain conditions such as possible if this heat. The Malfunction Indicator Light flashes to alert to serious conditions that upon transfer of power or severe catalytic converter damage. The vehicle...
... vehicle and turn the Temperature control to maximum heat, the Mode control to Floor and the Fan control to High. The vehicle should be serviced as soon as a loose or missing gas cap or poor fuel quality may illuminate the light after engine start . U.S. Certain conditions such as possible if this heat. The Malfunction Indicator Light flashes to alert to serious conditions that upon transfer of power or severe catalytic converter damage. The vehicle...
Owner Manual
Page 114
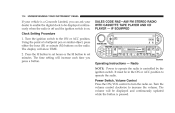
... INSTRUMENT PANEL If your dealer to enable the digital clock to be displayed continuously when the radio is off and the ignition switch is on the radio. Turn the volume control clockwise to operate the radio. Radio NOTE: Power to turn the radio on. The time setting will show TIME. 2. The display will increase each time you can ask your vehicle is a Concorde Limited, you press a button. Power Switch, Volume Control...
... INSTRUMENT PANEL If your dealer to enable the digital clock to be displayed continuously when the radio is off and the ignition switch is on the radio. Turn the volume control clockwise to operate the radio. Radio NOTE: Power to turn the radio on. The time setting will show TIME. 2. The display will increase each time you can ask your vehicle is a Concorde Limited, you press a button. Power Switch, Volume Control...
Owner Manual
Page 141
... control to heat the air. Turn the control clockwise to enhance system performance. UNDERSTANDING YOUR INSTRUMENT PANEL 141 near the windshield glass. These sensors transmit data on sun strength and vehicle interior temperatures to increase fan speed. In ambient temperatures below 70°F (21°C), fan operation is delayed when the engine is mounted behind the ATC control panel. Level Of Automatic Control 72°F (22°C) is warm enough to regulate...
... control to heat the air. Turn the control clockwise to enhance system performance. UNDERSTANDING YOUR INSTRUMENT PANEL 141 near the windshield glass. These sensors transmit data on sun strength and vehicle interior temperatures to increase fan speed. In ambient temperatures below 70°F (21°C), fan operation is delayed when the engine is mounted behind the ATC control panel. Level Of Automatic Control 72°F (22°C) is warm enough to regulate...
Owner Manual
Page 152
... attempt to continue running smoothly. Release the accelerator pedal and the key once the engine is running when the key is flooded. Never pour fuel or other flammable liquid into the throttle body air inlet opening in flash fire causing serious personal injury. See Section 6 of this manual for more than 15 seconds at a time. If the engine fails to start the vehicle. Push the accelerator...
... attempt to continue running smoothly. Release the accelerator pedal and the key once the engine is running when the key is flooded. Never pour fuel or other flammable liquid into the throttle body air inlet opening in flash fire causing serious personal injury. See Section 6 of this manual for more than 15 seconds at a time. If the engine fails to start the vehicle. Push the accelerator...
Owner Manual
Page 157
... several reasons. STARTING AND OPERATING 157 precaution, turn the front wheels toward the curb on a downhill grade and away from the curb on an uphill grade. The parking brake should be applied when the driver is fully disengaged before driving; A child or others could operate power windows, other controls, or move the vehicle. • Be sure the parking brake is not in the ignition. failure to...
... several reasons. STARTING AND OPERATING 157 precaution, turn the front wheels toward the curb on a downhill grade and away from the curb on an uphill grade. The parking brake should be applied when the driver is fully disengaged before driving; A child or others could operate power windows, other controls, or move the vehicle. • Be sure the parking brake is not in the ignition. failure to...
Owner Manual
Page 163
... spare tire failure and loss of vehicle control. WARNING! Do not spin your vehicle's wheels above 30 mph. (48 km/h). Fast spinning tires can be reduced. Forces generated by excessive wheel speeds may result in section 6 of 2,000 miles (3 200 km). A tire could result in mud, sand, snow, or ice conditions, do so could explode and injure someone. Tire Chains Due to limited clearance, tire chains are...
... spare tire failure and loss of vehicle control. WARNING! Do not spin your vehicle's wheels above 30 mph. (48 km/h). Fast spinning tires can be reduced. Forces generated by excessive wheel speeds may result in section 6 of 2,000 miles (3 200 km). A tire could result in mud, sand, snow, or ice conditions, do so could explode and injure someone. Tire Chains Due to limited clearance, tire chains are...
Owner Manual
Page 191
... emissions, engine, and automatic transaxle control systems. When these systems require service, the OBD II system will soon occur. This system monitors the performance of these systems are operating properly, your vehicle will usually be performed. Immediate service is flashing, severe catalytic converter damage and power loss will turn on . CAUTION! If the gas cap is equipped with the light on could also affect fuel economy...
... emissions, engine, and automatic transaxle control systems. When these systems require service, the OBD II system will soon occur. This system monitors the performance of these systems are operating properly, your vehicle will usually be performed. Immediate service is flashing, severe catalytic converter damage and power loss will turn on . CAUTION! If the gas cap is equipped with the light on could also affect fuel economy...

Owner Manual
Page 214
... deterioration of heat and mechanical damage. Brake System In order to be replaced immediately if there is ever necessary, install ONLY the correct type thermostat. Inspect all brake system components should be sure hoses do not touch any evidence of degradation that may result in unsatisfactory engine cooling performance, poor gas mileage, and increased emissions. 214 MAINTAINING YOUR VEHICLE • Maintain coolant concentration...
... deterioration of heat and mechanical damage. Brake System In order to be replaced immediately if there is ever necessary, install ONLY the correct type thermostat. Inspect all brake system components should be sure hoses do not touch any evidence of degradation that may result in unsatisfactory engine cooling performance, poor gas mileage, and increased emissions. 214 MAINTAINING YOUR VEHICLE • Maintain coolant concentration...
Owner Manual
Page 268
... ...110 Illuminated Entry ...14 Instrument Cluster ...65 Interior ...14,65 License ...232 Low Fuel ...109 Malfunction Indicator ...169,191 Map Reading ...66 Oil Pressure ...109 Park ...66,227,230 Passing ...69 Reading ...75 Rear Tail ...231 Seat Belt Reminder ...110 Security Alarm ...24 Service Engine Soon ...191 Side Marker ...226,230 Theft Alarm ...10 Traction Control ...72,159 Trunk Ajar ...109 Turn Signal ...110,230,231 Voltage ...112 Locks Cylinder Maintenance ...15 Door ...14...
... ...110 Illuminated Entry ...14 Instrument Cluster ...65 Interior ...14,65 License ...232 Low Fuel ...109 Malfunction Indicator ...169,191 Map Reading ...66 Oil Pressure ...109 Park ...66,227,230 Passing ...69 Reading ...75 Rear Tail ...231 Seat Belt Reminder ...110 Security Alarm ...24 Service Engine Soon ...191 Side Marker ...226,230 Theft Alarm ...10 Traction Control ...72,159 Trunk Ajar ...109 Turn Signal ...110,230,231 Voltage ...112 Locks Cylinder Maintenance ...15 Door ...14...

Owner Manual
Page 271
... Heated ...61 Lumbar Support ...61 Power ...59 Reclining ...59 Sentry Key ...9 Service Assistance ...252 Service Contract ...254 Service Engine Soon Light ...191 Service Manuals ...257 Setting the Clock ...113 Shoulder Belts ...32 Side Airbag ...39 Side View Mirror Adjustment ...57 Side Window Demisters ...144 Slippery Surfaces, Driving On ...185 Snow Chains ...163 Snow Tires ...164 Spare Tire ...162 Spark Plugs ...200 Specifications ...232 Engine ...232 Speed Control ...72 Speed Proportional Steering ...158 Speedometer ...110 Starting ...151 Steering Linkage...
... Heated ...61 Lumbar Support ...61 Power ...59 Reclining ...59 Sentry Key ...9 Service Assistance ...252 Service Contract ...254 Service Engine Soon Light ...191 Service Manuals ...257 Setting the Clock ...113 Shoulder Belts ...32 Side Airbag ...39 Side View Mirror Adjustment ...57 Side Window Demisters ...144 Slippery Surfaces, Driving On ...185 Snow Chains ...163 Snow Tires ...164 Spare Tire ...162 Spark Plugs ...200 Specifications ...232 Engine ...232 Speed Control ...72 Speed Proportional Steering ...158 Speedometer ...110 Starting ...151 Steering Linkage...


