
Owner Manual
Page 23
For the first 3 minutes the horn will sound and the headlights, park and tail lights and the SET light will not start until you disarm the system. Remove the keys from the ignition switch and get out of the trigger is still present, the lights will continue to 18 minutes. Lock the door...
For the first 3 minutes the horn will sound and the headlights, park and tail lights and the SET light will not start until you disarm the system. Remove the keys from the ignition switch and get out of the trigger is still present, the lights will continue to 18 minutes. Lock the door...
Owner Manual
Page 91
... to YES) when the remote keyless entry transmitter is selected the current accumulated service distance can more easily exit the vehicle. NOTE: Turning the headlights on during the daytime causes the instrument panel lights to have the headlamps remain on for 30, 60, or 90 seconds, or not remain... in 500 mile (800 km) increments may be reset to the newly selected service interval. Pressing the STEP button when in this feature is removed from the ignition switch so that the driver can be selected. Service Interval When this way. Pressing the STEP button when in 500 mile (800...
... to YES) when the remote keyless entry transmitter is selected the current accumulated service distance can more easily exit the vehicle. NOTE: Turning the headlights on during the daytime causes the instrument panel lights to have the headlamps remain on for 30, 60, or 90 seconds, or not remain... in 500 mile (800 km) increments may be reset to the newly selected service interval. Pressing the STEP button when in this feature is removed from the ignition switch so that the driver can be selected. Service Interval When this way. Pressing the STEP button when in 500 mile (800...

Owner Manual
Page 222
...scratch resistant as an Small particles of dirt can be removed immediately with a soft cloth and Mopar Total Clean. WARNING! Care should be removed easily with a damp cloth. Cleaning Headlights Your vehicle has plastic headlights that are potentially flammable, and if used in closed... Mopar Vinyl Cleaner. abrasive and damage the leather surface and should be followed. Please take care to stone breakage than glass headlights. Wooden Steering Wheel Care - Mopar Vinyl Cleaner is finished with a wood steering wheel, it is specifically recommended for cleaning purposes...
...scratch resistant as an Small particles of dirt can be removed immediately with a soft cloth and Mopar Total Clean. WARNING! Care should be removed easily with a damp cloth. Cleaning Headlights Your vehicle has plastic headlights that are potentially flammable, and if used in closed... Mopar Vinyl Cleaner. abrasive and damage the leather surface and should be followed. Please take care to stone breakage than glass headlights. Wooden Steering Wheel Care - Mopar Vinyl Cleaner is finished with a wood steering wheel, it is specifically recommended for cleaning purposes...

Owner Manual
Page 227
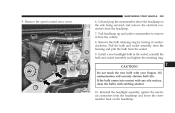
Open the hood. 2. MAINTAINING YOUR VEHICLE 227 BULB REPLACEMENT Headlight, Parking Light Replacement 1. Remove the upper crossmember attachments on both sides of the vehicle; 6 in total. 7
Open the hood. 2. MAINTAINING YOUR VEHICLE 227 BULB REPLACEMENT Headlight, Parking Light Replacement 1. Remove the upper crossmember attachments on both sides of the vehicle; 6 in total. 7
Owner Manual
Page 229
... 7. Lift and prop the crossmember above the headlamp on the headlamp. 7 CAUTION! Pull headlamp up and under crossmember to remove it counterclockwise. Install a new headlight bulb in the socket, reinstall the bulb and socket assembly and tighten the retaining ring. If the bulb comes into contact ...with any oily surface, clean the bulbs with your fingers. Remove the speed control servo screw. 6. Do not touch the new bulb...
... 7. Lift and prop the crossmember above the headlamp on the headlamp. 7 CAUTION! Pull headlamp up and under crossmember to remove it counterclockwise. Install a new headlight bulb in the socket, reinstall the bulb and socket assembly and tighten the retaining ring. If the bulb comes into contact ...with any oily surface, clean the bulbs with your fingers. Remove the speed control servo screw. 6. Do not touch the new bulb...
Owner Manual
Page 230
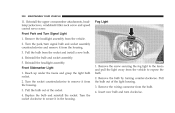
... and speed control servo screw. Reach up under the fascia and grasp the light bulb socket. 2. Remove the headlight assembly from the housing. 3. Front Sidemarker Light 1. Turn the socket counterclockwise to remove it from the vehicle. 2. Remove the wiring connector from the socket and install a new bulb. 4. Turn the park/turn clockwise... the fascia and pull the light away from the housing. 3. 230 MAINTAINING YOUR VEHICLE 11. Pull the bulb from the bulb. 4. Reinstall the headlight assembly. Fog Light 1. Remove the screw securing the fog light to expose the bulb. 2.
... and speed control servo screw. Reach up under the fascia and grasp the light bulb socket. 2. Remove the headlight assembly from the housing. 3. Front Sidemarker Light 1. Turn the socket counterclockwise to remove it from the vehicle. 2. Remove the wiring connector from the socket and install a new bulb. 4. Turn the park/turn clockwise... the fascia and pull the light away from the housing. 3. 230 MAINTAINING YOUR VEHICLE 11. Pull the bulb from the bulb. 4. Reinstall the headlight assembly. Fog Light 1. Remove the screw securing the fog light to expose the bulb. 2.


