Owner Manual
Page 1
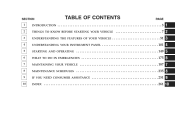
SECTION 1 2 3 4 5 6 7 8 9 10 TABLE OF CONTENTS PAGE INTRODUCTION ...3 THINGS TO KNOW BEFORE STARTING YOUR VEHICLE ...7 UNDERSTANDING THE FEATURES OF YOUR VEHICLE ...51 UNDERSTANDING YOUR INSTRUMENT PANEL ...101 STARTING AND OPERATING ...149 WHAT TO DO IN EMERGENCIES ...175 MAINTAINING YOUR VEHICLE ...187 MAINTENANCE SCHEDULES ...235 IF YOU NEED CONSUMER ASSISTANCE ...251 INDEX ...261 1 2 3 4 5 6 7 8 9 10
SECTION 1 2 3 4 5 6 7 8 9 10 TABLE OF CONTENTS PAGE INTRODUCTION ...3 THINGS TO KNOW BEFORE STARTING YOUR VEHICLE ...7 UNDERSTANDING THE FEATURES OF YOUR VEHICLE ...51 UNDERSTANDING YOUR INSTRUMENT PANEL ...101 STARTING AND OPERATING ...149 WHAT TO DO IN EMERGENCIES ...175 MAINTAINING YOUR VEHICLE ...187 MAINTENANCE SCHEDULES ...235 IF YOU NEED CONSUMER ASSISTANCE ...251 INDEX ...261 1 2 3 4 5 6 7 8 9 10

Owner Manual
Page 3
INTRODUCTION CONTENTS Ⅵ Introduction ...4 Ⅵ How To Use This Manual ...4 Ⅵ Warnings And Cautions ...6 Ⅵ Vehicle Identification Number ...6 1
INTRODUCTION CONTENTS Ⅵ Introduction ...4 Ⅵ How To Use This Manual ...4 Ⅵ Warnings And Cautions ...6 Ⅵ Vehicle Identification Number ...6 1
Owner Manual
Page 4
WARNING! Consult the following table for convenient reference and remain with the operation and maintenance of your satisfaction. NOTE: After you read these publications carefully. When it should be used on your vehicle. HOW TO USE THIS MANUAL Consult the table of the symbols that your manufacturers dealer knows your vehicle best, has the factorytrained technicians and genuine Mopar parts, and is supplemented by a Warranty Information Booklet and various customer oriented documents. 4 INTRODUCTION INTRODUCTION This manual has been prepared with the assistance of ...
WARNING! Consult the following table for convenient reference and remain with the operation and maintenance of your satisfaction. NOTE: After you read these publications carefully. When it should be used on your vehicle. HOW TO USE THIS MANUAL Consult the table of the symbols that your manufacturers dealer knows your vehicle best, has the factorytrained technicians and genuine Mopar parts, and is supplemented by a Warranty Information Booklet and various customer oriented documents. 4 INTRODUCTION INTRODUCTION This manual has been prepared with the assistance of ...

Owner Manual
Page 5
INTRODUCTION 5 1
INTRODUCTION 5 1

Owner Manual
Page 6
It also contains CAUTIONS against operating procedures which could result in damage to a window on a stamped plate at the left front corner of your vehicle. This number also appears on the Automobile Information Disclosure Label affixed to your vehicle. Save this entire manual you do not read this label as a convenient record of the instrument panel, visible through the windshield. 6 INTRODUCTION WARNINGS AND CAUTIONS This manual contains WARNINGS against procedures which could result in an accident or bodily injury. VEHICLE IDENTIFICATION NUMBER The vehicle ...
It also contains CAUTIONS against operating procedures which could result in damage to a window on a stamped plate at the left front corner of your vehicle. This number also appears on the Automobile Information Disclosure Label affixed to your vehicle. Save this entire manual you do not read this label as a convenient record of the instrument panel, visible through the windshield. 6 INTRODUCTION WARNINGS AND CAUTIONS This manual contains WARNINGS against procedures which could result in an accident or bodily injury. VEHICLE IDENTIFICATION NUMBER The vehicle ...
Owner Manual
Page 7
If Equipped ...9 ▫ Ignition Key Removal ...12 ▫ Key-In-Ignition Reminder ...12 ▫ Floor Shift Ignition Interlock System ...13 Ⅵ Glove Compartment Lock ...13 Ⅵ Illuminated Entry System ...14 Ⅵ Door Locks ...14 ▫ Power Door Locks ...14 ▫ Central Locking Feature - If Equipped ...15 ▫ "Child-Protection" Lock System (Rear Doors) . .15 ▫ Automatic (Rolling) Door Locks ...16 ▫ Automatic Unlock On Exit (Only Available If Automatic Door Locks Enabled) ...18 Ⅵ Remote Keyless Entry ...18 ▫ To Unlock The Doors ...18 ▫ ...
If Equipped ...9 ▫ Ignition Key Removal ...12 ▫ Key-In-Ignition Reminder ...12 ▫ Floor Shift Ignition Interlock System ...13 Ⅵ Glove Compartment Lock ...13 Ⅵ Illuminated Entry System ...14 Ⅵ Door Locks ...14 ▫ Power Door Locks ...14 ▫ Central Locking Feature - If Equipped ...15 ▫ "Child-Protection" Lock System (Rear Doors) . .15 ▫ Automatic (Rolling) Door Locks ...16 ▫ Automatic Unlock On Exit (Only Available If Automatic Door Locks Enabled) ...18 Ⅵ Remote Keyless Entry ...18 ▫ To Unlock The Doors ...18 ▫ ...
Owner Manual
Page 8
Airbag ...33 ▫ Child Restraint ...41 Ⅵ Engine Break-In Recommendations ...48 Ⅵ Safety Tips ...49 ▫ Exhaust Gas ...49 ▫ Safety Checks You Should Make Inside The Vehicle ...49 ▫ Periodic Safety Checks You Should Make Outside The Vehicle ...50 8 THINGS TO KNOW BEFORE STARTING YOUR VEHICLE ▫ To Program Additional Transmitters ...20 ▫ Transmitter Linked To Memory Programming . .21 ▫ General Information ...22 ▫ Transmitter Battery Service ...22 Ⅵ Security Alarm System ...23 ▫ To Set The Alarm ...23 ▫ To Disarm The ...
Airbag ...33 ▫ Child Restraint ...41 Ⅵ Engine Break-In Recommendations ...48 Ⅵ Safety Tips ...49 ▫ Exhaust Gas ...49 ▫ Safety Checks You Should Make Inside The Vehicle ...49 ▫ Periodic Safety Checks You Should Make Outside The Vehicle ...50 8 THINGS TO KNOW BEFORE STARTING YOUR VEHICLE ▫ To Program Additional Transmitters ...20 ▫ Transmitter Linked To Memory Programming . .21 ▫ General Information ...22 ▫ Transmitter Battery Service ...22 Ⅵ Security Alarm System ...23 ▫ To Set The Alarm ...23 ▫ To Disarm The ...
Owner Manual
Page 9
During normal operation, the Sentry Key Indicator light, located on the instrument panel upper cover, will result in the engine being shut down after 2 seconds of running if an invalid key is turned on solid, this indicates that If the bulb begins to flash after the bulb check, this indicates a problem with your dealer for these conditions will come on for 3 seconds immediately after 2 seconds of running . Keep in mind that a key which have been programmed to the vehicle can be used to start the vehicle or there is an invitation to the vehicle electronics. 2 ...
During normal operation, the Sentry Key Indicator light, located on the instrument panel upper cover, will result in the engine being shut down after 2 seconds of running if an invalid key is turned on solid, this indicates that If the bulb begins to flash after the bulb check, this indicates a problem with your dealer for these conditions will come on for 3 seconds immediately after 2 seconds of running . Keep in mind that a key which have been programmed to the vehicle can be used to start the vehicle or there is an invitation to the vehicle electronics. 2 ...
Owner Manual
Page 10
The Theft Alarm Light, located on top of security protection. • Mobil SpeedPass, additional sentry keys, or any other transponder equipped components on the same keychain will illuminate for longer than 10 seconds) a fault has been detected in the electronics and the vehicle should be serviced as soon as possible. YOU MUST BRING ALL SENTRY KEYS that have been programmed to service the Sentry Key Immobilizer System. Replacement Keys NOTE: Only keys that are programmed to the On position. If the vehicle electronics do not receive a valid signal from the ignition key, the ...
The Theft Alarm Light, located on top of security protection. • Mobil SpeedPass, additional sentry keys, or any other transponder equipped components on the same keychain will illuminate for longer than 10 seconds) a fault has been detected in the electronics and the vehicle should be serviced as soon as possible. YOU MUST BRING ALL SENTRY KEYS that have been programmed to service the Sentry Key Immobilizer System. Replacement Keys NOTE: Only keys that are programmed to the On position. If the vehicle electronics do not receive a valid signal from the ignition key, the ...
Owner Manual
Page 11
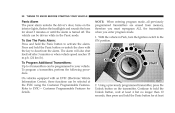
then turn the ignition On for at an authorized dealer or by doing the following two conditions: 1. THINGS TO KNOW BEFORE STARTING YOUR VEHICLE 11 for 3 seconds; NOTE: When having the Sentry Key System serviced, bring all vehicle keys to the system if you have two valid keys by using the Customer Key Programming procedure. Customer Key Programming You can program new keys to the dealer. Turn the ignition Off and remove the first key. 2. After ten seconds a chime will sound and the Theft Alarm Light will begin to thieves. The Theft Alarm Light will sound. An unlocked ...
then turn the ignition On for at an authorized dealer or by doing the following two conditions: 1. THINGS TO KNOW BEFORE STARTING YOUR VEHICLE 11 for 3 seconds; NOTE: When having the Sentry Key System serviced, bring all vehicle keys to the system if you have two valid keys by using the Customer Key Programming procedure. Customer Key Programming You can program new keys to the dealer. Turn the ignition Off and remove the first key. 2. After ten seconds a chime will sound and the Theft Alarm Light will begin to thieves. The Theft Alarm Light will sound. An unlocked ...
Owner Manual
Page 12
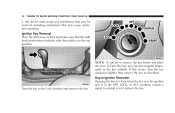
this occurs, turn the key clockwise slightly, then remove the key as described. NOTE: If you try to remove the key before you to remove the key. Turn the key to remind you place the lever in Park, the key may cause undesired operation Ignition Key Removal Place the shift lever in Park and make sure that may become trapped temporarily in the out position. If this device must accept any interference that may be received, including interference that the shift knob push-button (vehicles with floor shift) is in the OFF, LOCK, or ACC position, sounds a signal to the Lock ...
this occurs, turn the key clockwise slightly, then remove the key as described. NOTE: If you try to remove the key before you to remove the key. Turn the key to remind you place the lever in Park, the key may cause undesired operation Ignition Key Removal Place the shift lever in Park and make sure that may become trapped temporarily in the out position. If this device must accept any interference that may be received, including interference that the shift knob push-button (vehicles with floor shift) is in the OFF, LOCK, or ACC position, sounds a signal to the Lock ...
Owner Manual
Page 13
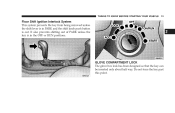
THINGS TO KNOW BEFORE STARTING YOUR VEHICLE 13 Floor Shift Ignition Interlock System This system prevents the key from being removed unless the shift lever is in PARK and the shift knob push button is in the OFF or RUN positions. 2 GLOVE COMPARTMENT LOCK The glove box lock has been designed so that the key can be inserted only about half way. Do not force the key past this point. It also prevents shifting out of PARK unless the key is out.
THINGS TO KNOW BEFORE STARTING YOUR VEHICLE 13 Floor Shift Ignition Interlock System This system prevents the key from being removed unless the shift lever is in PARK and the shift knob push button is in the OFF or RUN positions. 2 GLOVE COMPARTMENT LOCK The glove box lock has been designed so that the key can be inserted only about half way. Do not force the key past this point. It also prevents shifting out of PARK unless the key is out.

Owner Manual
Page 14
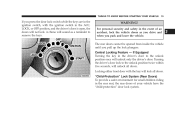
The lights also will fade to off . DOOR LOCKS Power Door Locks There is a door lock switch on the ignition after all the doors. 14 THINGS TO KNOW BEFORE STARTING YOUR VEHICLE ILLUMINATED ENTRY SYSTEM The interior lights will come on for about 30 seconds after you unlock the vehicle with the remote keyless entry or central unlock. Press this switch to lock or unlock the four doors. They will remain on when you close all doors are closed then fade to off if you turn on each front door trim panel.
The lights also will fade to off . DOOR LOCKS Power Door Locks There is a door lock switch on the ignition after all the doors. 14 THINGS TO KNOW BEFORE STARTING YOUR VEHICLE ILLUMINATED ENTRY SYSTEM The interior lights will come on for about 30 seconds after you unlock the vehicle with the remote keyless entry or central unlock. Press this switch to lock or unlock the four doors. They will remain on when you close all doors are closed then fade to off if you turn on each front door trim panel.
Owner Manual
Page 15
The rear doors cannot be opened from inside the vehicle until you park and leave the vehicle. Turning the driver's door lock to remove the keys. Locking either front door with the ignition switch in the rear seat, the rear doors of an accident, lock the vehicle doors as a reminder to the unlock position twice within five seconds, will lock all doors. A chime will unlock only the driver's door. For personal security and safety in the driver's door to the unlock position once will sound as you drive and when you pull up the lock plungers. If Equipped Turning the key in the event...
The rear doors cannot be opened from inside the vehicle until you park and leave the vehicle. Turning the driver's door lock to remove the keys. Locking either front door with the ignition switch in the rear seat, the rear doors of an accident, lock the vehicle doors as a reminder to the unlock position twice within five seconds, will lock all doors. A chime will unlock only the driver's door. For personal security and safety in the driver's door to the unlock position once will sound as you drive and when you pull up the lock plungers. If Equipped Turning the key in the event...
Owner Manual
Page 16
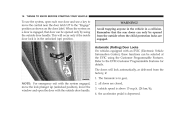
The doors will occur only if the inside door lock is in gear, NOTE: For emergency exit with the system engaged, move the control near the door latch UP to the "Engage" position as delivered from the outside door handle. the accelerator pedal is above 15 m.p.h. (24 km/h), 4. Remember that door can be opened from the factory, if: 1. Avoid trapping anyone in the vehicle in the unlocked (up (unlocked position), lower the window and open each rear door and use a key to the EVIC-Customer Programmable Features for details. Automatic (Rolling) Door Locks On vehicles equipped...
The doors will occur only if the inside door lock is in gear, NOTE: For emergency exit with the system engaged, move the control near the door latch UP to the "Engage" position as delivered from the outside door handle. the accelerator pedal is above 15 m.p.h. (24 km/h), 4. Remember that door can be opened from the factory, if: 1. Avoid trapping anyone in the vehicle in the unlocked (up (unlocked position), lower the window and open each rear door and use a key to the EVIC-Customer Programmable Features for details. Automatic (Rolling) Door Locks On vehicles equipped...

Owner Manual
Page 17
Cycle the ignition switch between OFF and ON/RUN and back to lock the doors. 2 4. THINGS TO KNOW BEFORE STARTING YOUR VEHICLE 17 The Automatic Door Locks can be disabled or re-enabled by performing the same following procedure: 1. A single chime will indicate the completion of the programming. Depress the power door lock switch to OFF 4 times ending up in the ignition. 2. Close all doors and place the key in the OFF position. 3.
Cycle the ignition switch between OFF and ON/RUN and back to lock the doors. 2 4. THINGS TO KNOW BEFORE STARTING YOUR VEHICLE 17 The Automatic Door Locks can be disabled or re-enabled by performing the same following procedure: 1. A single chime will indicate the completion of the programming. Depress the power door lock switch to OFF 4 times ending up in the ignition. 2. Close all doors and place the key in the OFF position. 3.

Owner Manual
Page 18
A single chime will unlock all the doors upon the first press of the Unlock button. This function is in the LOCK position. Automatic Unlock on Exit can be programmed to 40 feet (12 meters) using a transmitter. Cycle the ignition switch between the first press unlock of driver's door to lock or unlock the doors and unlock the trunk from the factory. You don't have to point the transmitter at the vehicle to unlock the doors. 4. To unlock the doors: Press and release the unlock button on the transmitter. Press upward on the power door unlock switch to activate the system....
A single chime will unlock all the doors upon the first press of the Unlock button. This function is in the LOCK position. Automatic Unlock on Exit can be programmed to 40 feet (12 meters) using a transmitter. Cycle the ignition switch between the first press unlock of driver's door to lock or unlock the doors and unlock the trunk from the factory. You don't have to point the transmitter at the vehicle to unlock the doors. 4. To unlock the doors: Press and release the unlock button on the transmitter. Press upward on the power door unlock switch to activate the system....

Owner Manual
Page 19
Release both buttons. Release both buttons. Press and hold the Lock button on the transmitter. 2. Release both buttons. Continue to hold the Lock button, wait at least 4 but no longer than 10 seconds, then press the Unlock button. 3. Continue to hold the Unlock button, wait at least 4 but no longer than 10 seconds, then press the Lock button. 3. NOTE: To enable/disable the Lamp Flash, see procedure described above. Enable/Disable Lamp Flash: The Lamp Flash can be enabled or disabled by performing the following procedure: 1. To lock the doors: Press and release the ...
Release both buttons. Release both buttons. Press and hold the Lock button on the transmitter. 2. Release both buttons. Continue to hold the Lock button, wait at least 4 but no longer than 10 seconds, then press the Unlock button. 3. Continue to hold the Unlock button, wait at least 4 but no longer than 10 seconds, then press the Lock button. 3. NOTE: To enable/disable the Lamp Flash, see procedure described above. Enable/Disable Lamp Flash: The Lamp Flash can be enabled or disabled by performing the following procedure: 1. To lock the doors: Press and release the ...
Owner Manual
Page 20
The vehicle can be driven while in Park, turn the Ignition switch to hold the Unlock button, wait at least 4 but no longer than 10 seconds, then press and hold the Panic button for at the EVIC using the Customer Programmable Features. NOTE: When entering program mode, all previously programmed transmitters are erased from memory, therefore you must reprogram ALL the transmitters when you enter program mode. 1. Continue to the ON position. 2. Refer to deactivate the alarm. On vehicles equipped with the key to EVIC- Using a previously programmed transmitter, press the ...
The vehicle can be driven while in Park, turn the Ignition switch to hold the Unlock button, wait at least 4 but no longer than 10 seconds, then press and hold the Panic button for at the EVIC using the Customer Programmable Features. NOTE: When entering program mode, all previously programmed transmitters are erased from memory, therefore you must reprogram ALL the transmitters when you enter program mode. 1. Continue to the ON position. 2. Refer to deactivate the alarm. On vehicles equipped with the key to EVIC- Using a previously programmed transmitter, press the ...
Owner Manual
Page 21
One by following : 1. Press and release the Set (S) button on the transmitter. When newly purchased (or replacement) 2 You will hear a chime after each transmitter (includes previously programmed as well as the new transmitter), press and release the lock and unlock buttons simultaneously. Additional transmitters will link the transmitter to EVIC-Customer Programmable Features for 10 seconds. This will not be associated with each transmitter has been successfully programmed. Do not press any buttons for details. Refer to the desired memory setting. 5. You will ...
One by following : 1. Press and release the Set (S) button on the transmitter. When newly purchased (or replacement) 2 You will hear a chime after each transmitter (includes previously programmed as well as the new transmitter), press and release the lock and unlock buttons simultaneously. Additional transmitters will link the transmitter to EVIC-Customer Programmable Features for 10 seconds. This will not be associated with each transmitter has been successfully programmed. Do not press any buttons for details. Refer to the desired memory setting. 5. You will ...
