
Owner Manual
Page 3
INTRODUCTION CONTENTS Ⅵ Introduction ...4 Ⅵ How To Use This Manual ...4 Ⅵ Warnings And Cautions ...6 Ⅵ Vehicle Identification Number ...6 1
INTRODUCTION CONTENTS Ⅵ Introduction ...4 Ⅵ How To Use This Manual ...4 Ⅵ Warnings And Cautions ...6 Ⅵ Vehicle Identification Number ...6 1
Owner Manual
Page 4
...components contain or emit chemicals known to the State of California to read the manual, it should be stored in the vehicle for a description of all subjects. It is interested in this manual, contains a complete listing of the symbols that your manufacturers dealer knows your vehicle... or throughout this owner's manual: NOTE: After you desire. HOW TO USE THIS MANUAL Consult the table of your satisfaction. Consult the following table for convenient reference and remain with the operation and ...
...components contain or emit chemicals known to the State of California to read the manual, it should be stored in the vehicle for a description of all subjects. It is interested in this manual, contains a complete listing of the symbols that your manufacturers dealer knows your vehicle... or throughout this owner's manual: NOTE: After you desire. HOW TO USE THIS MANUAL Consult the table of your satisfaction. Consult the following table for convenient reference and remain with the operation and ...

Owner Manual
Page 6
... and Cautions. If you do not read this label as a convenient record of the instrument panel, visible through the windshield. 6 INTRODUCTION WARNINGS AND CAUTIONS This manual contains WARNINGS against procedures which could result in an accident or bodily injury. VEHICLE IDENTIFICATION NUMBER The vehicle identification number (VIN) is on a stamped plate...
... and Cautions. If you do not read this label as a convenient record of the instrument panel, visible through the windshield. 6 INTRODUCTION WARNINGS AND CAUTIONS This manual contains WARNINGS against procedures which could result in an accident or bodily injury. VEHICLE IDENTIFICATION NUMBER The vehicle identification number (VIN) is on a stamped plate...
Owner Manual
Page 8
... ▫ Transmitter Battery Service ...22 Ⅵ Security Alarm System ...23 ▫ To Set The Alarm ...23 ▫ To Disarm The System ...24 ▫ Security System Manual Override ...24 Ⅵ Power Windows ...25 Ⅵ Remote Trunk Lid Release ...25 Ⅵ Trunk Safety Warning ...26 ▫ Trunk Emergency Release ...26 Ⅵ Occupant Restraints...
... ▫ Transmitter Battery Service ...22 Ⅵ Security Alarm System ...23 ▫ To Set The Alarm ...23 ▫ To Disarm The System ...24 ▫ Security System Manual Override ...24 Ⅵ Power Windows ...25 Ⅵ Remote Trunk Lid Release ...25 Ⅵ Trunk Safety Warning ...26 ▫ Trunk Emergency Release ...26 Ⅵ Occupant Restraints...
Owner Manual
Page 24
... the system is fully armed. After 16 seconds the SET light will flash rapidly for tampering. To disarm the system: Unlock a front door using the manual lock control. This shows that the system is a problem in the trunk circuit. Check the vehicle for 16 seconds. Security System... Manual Override The system will not arm if you unlock a front door using either the key or the Keyless Entry Transmitter. Tamper Alert If the horn ...
... the system is fully armed. After 16 seconds the SET light will flash rapidly for tampering. To disarm the system: Unlock a front door using the manual lock control. This shows that the system is a problem in the trunk circuit. Check the vehicle for 16 seconds. Security System... Manual Override The system will not arm if you unlock a front door using either the key or the Keyless Entry Transmitter. Tamper Alert If the horn ...
Owner Manual
Page 34
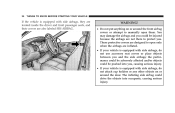
...; If your vehicle is equipped with side airbags, they are located inside the driver and front passenger seats, and their covers are not there to manually open only when the airbags are inflated. • If your vehicle is equipped with side airbags, do not use accessory seat covers or place objects...
...; If your vehicle is equipped with side airbags, they are located inside the driver and front passenger seats, and their covers are not there to manually open only when the airbags are inflated. • If your vehicle is equipped with side airbags, do not use accessory seat covers or place objects...
Owner Manual
Page 41
... require that you have the right seat for your protection in the rear seat rather than the front. 2 WARNING! Always check the child seat owner's manual to ensure you could be buckled up in a rear seat. THINGS TO KNOW BEFORE STARTING YOUR VEHICLE 41 Airbag Light You will want to have...
... require that you have the right seat for your protection in the rear seat rather than the front. 2 WARNING! Always check the child seat owner's manual to ensure you could be buckled up in a rear seat. THINGS TO KNOW BEFORE STARTING YOUR VEHICLE 41 Airbag Light You will want to have...
Owner Manual
Page 48
... to the child. 48 THINGS TO KNOW BEFORE STARTING YOUR VEHICLE 3. A new engine may consume some oil during its first few thousand miles of this manual. While cruising, brief full-throttle acceleration, within the limits of the child restraint to the anchor (B) and remove slack in pet harnesses or pet carriers...
... to the child. 48 THINGS TO KNOW BEFORE STARTING YOUR VEHICLE 3. A new engine may consume some oil during its first few thousand miles of this manual. While cruising, brief full-throttle acceleration, within the limits of the child restraint to the anchor (B) and remove slack in pet harnesses or pet carriers...
Owner Manual
Page 54
54 UNDERSTANDING THE FEATURES OF YOUR VEHICLE ▫ C/T Button ...98 ▫ Compass/Temperature Display ...98 ▫ Automatic Compass Calibration ...98 ▫ Manual Compass Calibration ...98 ▫ Outside Temperature ...100 Ⅵ Electrcal Power Outlet ...100
54 UNDERSTANDING THE FEATURES OF YOUR VEHICLE ▫ C/T Button ...98 ▫ Compass/Temperature Display ...98 ▫ Automatic Compass Calibration ...98 ▫ Manual Compass Calibration ...98 ▫ Outside Temperature ...100 Ⅵ Electrcal Power Outlet ...100

Owner Manual
Page 65
... after 15 minutes. This can be helpful when driving with your forward vision. UNDERSTANDING THE FEATURES OF YOUR VEHICLE 65 WARNING! When the lights are manually switched on when a door is not fully latched, it could have a "fade to the second detent.
... after 15 minutes. This can be helpful when driving with your forward vision. UNDERSTANDING THE FEATURES OF YOUR VEHICLE 65 WARNING! When the lights are manually switched on when a door is not fully latched, it could have a "fade to the second detent.

Owner Manual
Page 67
... is also on in the automatic mode. To turn off the headlights within 45 seconds. For vehicles equipped with Electronic Vehicle Information Center (EVIC), this manual.) To activate the delay, turn off the ignition while the headlights are left . Automatic Headlights This system automatically turns your headlights will sound when the...
... is also on in the automatic mode. To turn off the headlights within 45 seconds. For vehicles equipped with Electronic Vehicle Information Center (EVIC), this manual.) To activate the delay, turn off the ignition while the headlights are left . Automatic Headlights This system automatically turns your headlights will sound when the...

Owner Manual
Page 79
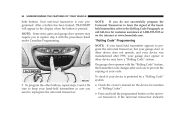
... have difficulty in the vehicle and firmly press and release the garage door button. Your garage door opener should now recognize your garage door opener manual, or call 1-800-355-3515 or, on the Internet, at www.homelink.com. 2. Locate the training button on after 2 seconds, the .... Press and release the button a second time to start step 3. 3. You may vary by a "Rolling Code" system: • Check the owner's manual for the device for mention of "Rolling Codes". • Press and hold the training button on the Universal Transceiver. If the Universal Transceiver indicator light...
... have difficulty in the vehicle and firmly press and release the garage door button. Your garage door opener should now recognize your garage door opener manual, or call 1-800-355-3515 or, on the Internet, at www.homelink.com. 2. Locate the training button on after 2 seconds, the .... Press and release the button a second time to start step 3. 3. You may vary by a "Rolling Code" system: • Check the owner's manual for the device for mention of "Rolling Codes". • Press and hold the training button on the Universal Transceiver. If the Universal Transceiver indicator light...
Owner Manual
Page 84
... the "Rolling Code" feature, the transmitter code changes after 1996, your code. NOTE: If you need to reprogram the universal transceiver. • Check the owner's manual for the device for customer assistance at 1-800-355-3515 or on the universal transceiver. If the universal transceiver indicator To program the other device...
... the "Rolling Code" feature, the transmitter code changes after 1996, your code. NOTE: If you need to reprogram the universal transceiver. • Check the owner's manual for the device for customer assistance at 1-800-355-3515 or on the universal transceiver. If the universal transceiver indicator To program the other device...
Owner Manual
Page 85
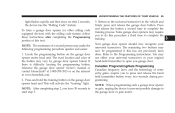
... done. You may make the following programming procedure quicker and easier. 1. If there is difficulty locating the programming button, reference the garage door opener owner's manual or contact HomeLink at 1-800-355-3515 or on the garage door opener head unit This will activate the "training" light. Refer to the...
... done. You may make the following programming procedure quicker and easier. 1. If there is difficulty locating the programming button, reference the garage door opener owner's manual or contact HomeLink at 1-800-355-3515 or on the garage door opener head unit This will activate the "training" light. Refer to the...

Owner Manual
Page 87
If the sun roof is a greater risk of being thrown from a vehicle with an open sun roof. You could also be opened manually. Injury may result. IF EQUIPPED The sun roof controls are properly secured too. In an accident, there is open or vent position, press and hold ...
If the sun roof is a greater risk of being thrown from a vehicle with an open sun roof. You could also be opened manually. Injury may result. IF EQUIPPED The sun roof controls are properly secured too. In an accident, there is open or vent position, press and hold ...
Owner Manual
Page 94
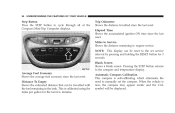
... need to the compass and temperature display. When the vehicle is calibrated using the miles per gallon for 3 seconds. Pressing the STEP button returns to manually set service interval by pressing and holding the RESET button for the last few minutes. This is new, the compass may appear erratic and the...
... need to the compass and temperature display. When the vehicle is calibrated using the miles per gallon for 3 seconds. Pressing the STEP button returns to manually set service interval by pressing and holding the RESET button for the last few minutes. This is new, the compass may appear erratic and the...

Owner Manual
Page 95
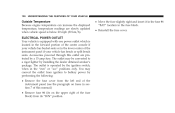
Manual Compass Calibration If the compass appears erratic and the CAL symbol does not appear, you must be set according to change the display between magnetic ... from large metal objects or power lines. To Put Into a Calibration Mode Turn on the ignition and set before manually calibrating the compass (see variance map). If this occurs, the compass variance must manually put the compass into the "Calibration" mode. Compass Variance is great enough to cause the compass to "Compass...
Manual Compass Calibration If the compass appears erratic and the CAL symbol does not appear, you must be set according to change the display between magnetic ... from large metal objects or power lines. To Put Into a Calibration Mode Turn on the ignition and set before manually calibrating the compass (see variance map). If this occurs, the compass variance must manually put the compass into the "Calibration" mode. Compass Variance is great enough to cause the compass to "Compass...

Owner Manual
Page 98
... CAL symbol will turn off and the compass will be on the display. The number displayed is the difference between magnetic North and geographic North. Manual Compass Calibration If the compass appears erratic and the CAL light does not appear, you must calibrate the compass. Press and hold the RESET button...
... CAL symbol will turn off and the compass will be on the display. The number displayed is the difference between magnetic North and geographic North. Manual Compass Calibration If the compass appears erratic and the CAL light does not appear, you must calibrate the compass. Press and hold the RESET button...

Owner Manual
Page 99
NOTE: To ensure proper compass calibration, make sure the compass variance is properly set before manually calibrating the compass (see variance map). 3 UNDERSTANDING THE FEATURES OF YOUR VEHICLE 99 scroll through numbers 1 through 15. Press the RESET button after selecting the proper zone to return to the normal compass/temperature display.
NOTE: To ensure proper compass calibration, make sure the compass variance is properly set before manually calibrating the compass (see variance map). 3 UNDERSTANDING THE FEATURES OF YOUR VEHICLE 99 scroll through numbers 1 through 15. Press the RESET button after selecting the proper zone to return to the normal compass/temperature display.
Owner Manual
Page 100
... the paragraph on fuses in section 7 of this outlet are slowly updated when vehicle speed is below 20 mph (30 km/h). Accessories powered through this manual.) • Remove fuse #6 (its "IGN" position. • Move the fuse slightly right and insert it in the fuse #6 "BAT" location in the fuse block. •...
... the paragraph on fuses in section 7 of this outlet are slowly updated when vehicle speed is below 20 mph (30 km/h). Accessories powered through this manual.) • Remove fuse #6 (its "IGN" position. • Move the fuse slightly right and insert it in the fuse #6 "BAT" location in the fuse block. •...


