Owner Manual
Page 1
SECTION 1 2 3 4 5 6 7 8 9 10 TABLE OF CONTENTS PAGE INTRODUCTION ...3 THINGS TO KNOW BEFORE STARTING YOUR VEHICLE ...7 UNDERSTANDING THE FEATURES OF YOUR VEHICLE ...51 UNDERSTANDING YOUR INSTRUMENT PANEL ...101 STARTING AND OPERATING ...149 WHAT TO DO IN EMERGENCIES ...175 MAINTAINING YOUR VEHICLE ...187 MAINTENANCE SCHEDULES ...235 IF YOU NEED CONSUMER ASSISTANCE ...251 INDEX ...261 1 2 3 4 5 6 7 8 9 10
SECTION 1 2 3 4 5 6 7 8 9 10 TABLE OF CONTENTS PAGE INTRODUCTION ...3 THINGS TO KNOW BEFORE STARTING YOUR VEHICLE ...7 UNDERSTANDING THE FEATURES OF YOUR VEHICLE ...51 UNDERSTANDING YOUR INSTRUMENT PANEL ...101 STARTING AND OPERATING ...149 WHAT TO DO IN EMERGENCIES ...175 MAINTAINING YOUR VEHICLE ...187 MAINTENANCE SCHEDULES ...235 IF YOU NEED CONSUMER ASSISTANCE ...251 INDEX ...261 1 2 3 4 5 6 7 8 9 10
Owner Manual
Page 7
... Interlock System ...13 Ⅵ Glove Compartment Lock ...13 Ⅵ Illuminated Entry System ...14 Ⅵ Door Locks ...14 ▫ Power Door Locks ...14 ▫ Central Locking Feature -
... Interlock System ...13 Ⅵ Glove Compartment Lock ...13 Ⅵ Illuminated Entry System ...14 Ⅵ Door Locks ...14 ▫ Power Door Locks ...14 ▫ Central Locking Feature -
Owner Manual
Page 15
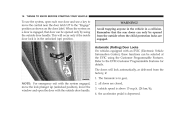
... with the ignition switch in the ACC, LOCK, or OFF position, and the driver's door is open, the doors will unlock all doors. Central Locking Feature - THINGS TO KNOW BEFORE STARTING YOUR VEHICLE 15 If you press the door lock switch while the keys are in the ignition switch, with the...
... with the ignition switch in the ACC, LOCK, or OFF position, and the driver's door is open, the doors will unlock all doors. Central Locking Feature - THINGS TO KNOW BEFORE STARTING YOUR VEHICLE 15 If you press the door lock switch while the keys are in the ignition switch, with the...
Owner Manual
Page 16
...vehicle in gear, NOTE: For emergency exit with the system engaged, move the control near the door latch UP to the EVIC-Customer Programmable Features for details. The doors will occur only if the inside door lock is in the unlocked (up (unlocked position), lower the window and ... a key to move the lock plunger up ) position. The transaxle is engaged, that the rear doors can be opened only by using the Customer Programmable Features. the accelerator pedal is above 15 m.p.h. (24 km/h), 4. This will lock automatically, as shown on a door is in a collision. Refer to the "Engage...
...vehicle in gear, NOTE: For emergency exit with the system engaged, move the control near the door latch UP to the EVIC-Customer Programmable Features for details. The doors will occur only if the inside door lock is in the unlocked (up (unlocked position), lower the window and ... a key to move the lock plunger up ) position. The transaxle is engaged, that the rear doors can be opened only by using the Customer Programmable Features. the accelerator pedal is above 15 m.p.h. (24 km/h), 4. This will lock automatically, as shown on a door is in a collision. Refer to the "Engage...

Owner Manual
Page 18
.... Press upward on the transmitter. 18 THINGS TO KNOW BEFORE STARTING YOUR VEHICLE Automatic Unlock on Exit (Only Available if Automatic Door Locks Enabled) This feature will indicate the completion of the programming. Automatic Unlock on Exit can be programmed to unlock the doors. 4. Cycle the ignition switch between the first...
.... Press upward on the transmitter. 18 THINGS TO KNOW BEFORE STARTING YOUR VEHICLE Automatic Unlock on Exit (Only Available if Automatic Door Locks Enabled) This feature will indicate the completion of the programming. Automatic Unlock on Exit can be programmed to unlock the doors. 4. Cycle the ignition switch between the first...

Owner Manual
Page 19
... hold the Unlock button on the transmitter. 2. Continue to lock all doors. Release both buttons. Release both buttons. Enable/Disable Horn chirp: The horn chirp feature can be enabled or disabled by performing the following procedure: 1. Press and hold the Lock button, wait at least 4 but no longer than 10 seconds...
... hold the Unlock button on the transmitter. 2. Continue to lock all doors. Release both buttons. Release both buttons. Enable/Disable Horn chirp: The horn chirp feature can be enabled or disabled by performing the following procedure: 1. Press and hold the Lock button, wait at least 4 but no longer than 10 seconds...
Owner Manual
Page 20
... 4 but no longer than 10 seconds, then press and hold the Panic button for at the EVIC using the Customer Programmable Features. The alarm will also shut itself off . Customer Programmable Features for about 3 minutes or until the alarm is turned off after 3 minutes or when vehicle speed reaches 15 m.p.h. (24 km...
... 4 but no longer than 10 seconds, then press and hold the Panic button for at the EVIC using the Customer Programmable Features. The alarm will also shut itself off . Customer Programmable Features for about 3 minutes or until the alarm is turned off after 3 minutes or when vehicle speed reaches 15 m.p.h. (24 km...
Owner Manual
Page 21
... the desired memory setting. 5. NOTE: Your transmitters may be selected at the EVIC using the Customer Programmable Features. You will have 30 seconds to the desired stations. 3. You will hear a chime to EVIC-Customer Programmable Features for 10 seconds. A chime will link the transmitter to the Lock position. Program the radio preset...
... the desired memory setting. 5. NOTE: Your transmitters may be selected at the EVIC using the Customer Programmable Features. You will have 30 seconds to the desired stations. 3. You will hear a chime to EVIC-Customer Programmable Features for 10 seconds. A chime will link the transmitter to the Lock position. Program the radio preset...

Owner Manual
Page 25
... control all door windows. Press the window switch past the detent, release, and the window will operate. 2 The driver's window switch has an Auto Down feature. The window lock switch on the driver's door allows you want the window to disable the window control on the other doors.
... control all door windows. Press the window switch past the detent, release, and the window will operate. 2 The driver's window switch has an Auto Down feature. The window lock switch on the driver's door allows you want the window to disable the window control on the other doors.
Owner Manual
Page 27
... provide protection from home or on your own street. THINGS TO KNOW BEFORE STARTING YOUR VEHICLE 27 OCCUPANT RESTRAINTS Some of the most important safety features in your vehicle are an excellent driver, even on short trips. You can strike the interior of your vehicle or other passengers, or you and...
... provide protection from home or on your own street. THINGS TO KNOW BEFORE STARTING YOUR VEHICLE 27 OCCUPANT RESTRAINTS Some of the most important safety features in your vehicle are an excellent driver, even on short trips. You can strike the interior of your vehicle or other passengers, or you and...
Owner Manual
Page 28
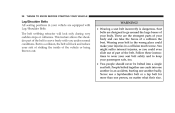
... safe, too. • Two people should never be belted into one another badly. People belted together can take the forces of a collision the best. This feature allows the shoulder part of the belt to move freely with Lap/Shoulder Belts. Wearing your belt in the wrong place could even slide out...
... safe, too. • Two people should never be belted into one another badly. People belted together can take the forces of a collision the best. This feature allows the shoulder part of the belt to move freely with Lap/Shoulder Belts. Wearing your belt in the wrong place could even slide out...
Owner Manual
Page 44
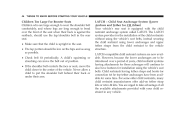
... are long enough to bend over a period of years, child restraint systems having tether straps and hooks for connection tot he top tether anchorages have features for installation using lower anchorages and upper tether straps from the child restraint to the vehicle structure. 44 THINGS TO KNOW BEFORE STARTING YOUR VEHICLE...
... are long enough to bend over a period of years, child restraint systems having tether straps and hooks for connection tot he top tether anchorages have features for installation using lower anchorages and upper tether straps from the child restraint to the vehicle structure. 44 THINGS TO KNOW BEFORE STARTING YOUR VEHICLE...
Owner Manual
Page 51
... ▫ Head Restraints ...63 Ⅵ To Open And Close The Hood ...64 Ⅵ Interior Lights ...65 3 Exit Feature ...60 ▫ Lumbar Support ...61 ▫ Heated Seats- If Equipped ...56 ▫ Electric Remote Control Mirrors ...57 ▫ Mirror Adjustment ...... ▫ Power Seats ...59 ▫ Power Reclining Seats ...59 ▫ Driver's Seat Glide -To - UNDERSTANDING THE FEATURES OF YOUR VEHICLE CONTENTS Ⅵ Cup Holders ...55 ▫ Front Seat Cupholders (Concorde Limited Vehicles Only) ...55 ▫ Rear Seat Cupholders ...55 Ⅵ Coat Hook ...55 Ⅵ Mirrors ...56 &#...
... ▫ Head Restraints ...63 Ⅵ To Open And Close The Hood ...64 Ⅵ Interior Lights ...65 3 Exit Feature ...60 ▫ Lumbar Support ...61 ▫ Heated Seats- If Equipped ...56 ▫ Electric Remote Control Mirrors ...57 ▫ Mirror Adjustment ...... ▫ Power Seats ...59 ▫ Power Reclining Seats ...59 ▫ Driver's Seat Glide -To - UNDERSTANDING THE FEATURES OF YOUR VEHICLE CONTENTS Ⅵ Cup Holders ...55 ▫ Front Seat Cupholders (Concorde Limited Vehicles Only) ...55 ▫ Rear Seat Cupholders ...55 Ⅵ Coat Hook ...55 Ⅵ Mirrors ...56 &#...
Owner Manual
Page 52
... YOUR VEHICLE ▫ To Turn The Interior Lights On ...65 ▫ Battery Saver Feature-Interior Lights ...65 ▫ Instrument Panel Lighting ...65 ▫ Front Map/Reading Lights ...66 ▫ Rear Seat Reading/Courtesy Lights ...66 Ⅵ ......66 ▫ Headlights And Parking Lights ...66 ▫ Lights-On Reminder ...67 ▫ Automatic Headlights ...67 ▫ Headlight Time Delay ...67 ▫ Battery Saver Feature ...68 ▫ Fog Lights ...68 ▫ Daytime Running Lights (Canada Only) ...68 Ⅵ Multifunction Control Lever ...68 ▫ Turn Signals ...68 ▫ Headlight...
... YOUR VEHICLE ▫ To Turn The Interior Lights On ...65 ▫ Battery Saver Feature-Interior Lights ...65 ▫ Instrument Panel Lighting ...65 ▫ Front Map/Reading Lights ...66 ▫ Rear Seat Reading/Courtesy Lights ...66 Ⅵ ......66 ▫ Headlights And Parking Lights ...66 ▫ Lights-On Reminder ...67 ▫ Automatic Headlights ...67 ▫ Headlight Time Delay ...67 ▫ Battery Saver Feature ...68 ▫ Fog Lights ...68 ▫ Daytime Running Lights (Canada Only) ...68 Ⅵ Multifunction Control Lever ...68 ▫ Turn Signals ...68 ▫ Headlight...
Owner Manual
Page 53
...88 ▫ Sun Roof Maintenance ...88 Ⅵ Electronic Vehicle Information Center (EVIC) - If Equipped ...88 ▫ Customer Programmable Features ...89 ▫ Compass/Temperature/Trip Computer ...93 ▫ Trip Computer ...93 Ⅵ Overhead Travel Information Center - If Equipped...Operation ...86 ▫ Reprogramming a Single Universal Transceiver Button ...86 ▫ Security ...86 Ⅵ Power Sun Roof - UNDERSTANDING THE FEATURES OF YOUR VEHICLE 53 ▫ Programming The Universal Transceiver ...77 ▫ "Rolling Code" Programming ...78 ▫ Canadian Programming/Gate...
...88 ▫ Sun Roof Maintenance ...88 Ⅵ Electronic Vehicle Information Center (EVIC) - If Equipped ...88 ▫ Customer Programmable Features ...89 ▫ Compass/Temperature/Trip Computer ...93 ▫ Trip Computer ...93 Ⅵ Overhead Travel Information Center - If Equipped...Operation ...86 ▫ Reprogramming a Single Universal Transceiver Button ...86 ▫ Security ...86 Ⅵ Power Sun Roof - UNDERSTANDING THE FEATURES OF YOUR VEHICLE 53 ▫ Programming The Universal Transceiver ...77 ▫ "Rolling Code" Programming ...78 ▫ Canadian Programming/Gate...
Owner Manual
Page 54
54 UNDERSTANDING THE FEATURES OF YOUR VEHICLE ▫ C/T Button ...98 ▫ Compass/Temperature Display ...98 ▫ Automatic Compass Calibration ...98 ▫ Manual Compass Calibration ...98 ▫ Outside Temperature ...100 Ⅵ Electrcal Power Outlet ...100
54 UNDERSTANDING THE FEATURES OF YOUR VEHICLE ▫ C/T Button ...98 ▫ Compass/Temperature Display ...98 ▫ Automatic Compass Calibration ...98 ▫ Manual Compass Calibration ...98 ▫ Outside Temperature ...100 Ⅵ Electrcal Power Outlet ...100
Owner Manual
Page 55
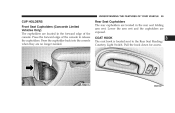
... Reading/ Courtesy Light Switch. Rear Seat Cupholders The rear cupholders are exposed. Pull the hook down for access. 3 UNDERSTANDING THE FEATURES OF YOUR VEHICLE 55 CUP HOLDERS Front Seat Cupholders (Concorde Limited Vehicles Only) The cupholders are no longer needed. COAT HOOK The coat hook is located next to release the cupholders...
... Reading/ Courtesy Light Switch. Rear Seat Cupholders The rear cupholders are exposed. Pull the hook down for access. 3 UNDERSTANDING THE FEATURES OF YOUR VEHICLE 55 CUP HOLDERS Front Seat Cupholders (Concorde Limited Vehicles Only) The cupholders are no longer needed. COAT HOOK The coat hook is located next to release the cupholders...

Owner Manual
Page 56
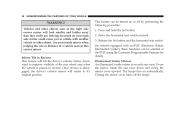
Push in the button on the rear window defrost. If Equipped These mirrors are heated to activate the dimming feature. This feature is activated, the heated remote control mirrors will be automatically dimmed as well. A two point pivot system allows for annoying headlight...NOTE: On vehicles equipped with the automatic dimming mirror feature, and when the dimming feature is activated whenever you . A green light in the ON position. NOTE: This feature is on the view through the rear window. 56 UNDERSTANDING THE FEATURES OF YOUR VEHICLE MIRRORS Adjusting The Inside Day/Night Mirror...
Push in the button on the rear window defrost. If Equipped These mirrors are heated to activate the dimming feature. This feature is activated, the heated remote control mirrors will be automatically dimmed as well. A two point pivot system allows for annoying headlight...NOTE: On vehicles equipped with the automatic dimming mirror feature, and when the dimming feature is activated whenever you . A green light in the ON position. NOTE: This feature is on the view through the rear window. 56 UNDERSTANDING THE FEATURES OF YOUR VEHICLE MIRRORS Adjusting The Inside Day/Night Mirror...

Owner Manual
Page 57
... follows. Press the L or R button located on the inside mirror. Driver's Side Adjust the outside mirror so you can be controlled by the Memory Seat Feature. This type of mirror will give a much wider view to the rear, and especially of the lane next to your vehicle. 3 Tilt the mirror control... up or down, or side to side to adjust the view in the neutral (center) position to prevent accidental changing of your vehicle. UNDERSTANDING THE FEATURES OF YOUR VEHICLE 57 Electric Remote Control Mirrors NOTE: Pre selected power mirror positions (for Left or Right mirror selection.
... follows. Press the L or R button located on the inside mirror. Driver's Side Adjust the outside mirror so you can be controlled by the Memory Seat Feature. This type of mirror will give a much wider view to the rear, and especially of the lane next to your vehicle. 3 Tilt the mirror control... up or down, or side to side to adjust the view in the neutral (center) position to prevent accidental changing of your vehicle. UNDERSTANDING THE FEATURES OF YOUR VEHICLE 57 Electric Remote Control Mirrors NOTE: Pre selected power mirror positions (for Left or Right mirror selection.
Owner Manual
Page 58
...improve visibility of a vehicle seen in this convex mirror. Closing the mirror cover turns off by performing the following procedure: 1. This feature can be turned on your inside mirror when judging the size or distance of the rear wheel area when the vehicle is disengaged, the...will return to collide with an EVIC (Electronic Vehicle Information Center), these functions can be selected at the EVIC using the Customer Programmable Features for details. Illuminated Vanity Mirrors An illuminated vanity mirror is on automatically. Use your right side mirror could cause you to it's ...
...improve visibility of a vehicle seen in this convex mirror. Closing the mirror cover turns off by performing the following procedure: 1. This feature can be turned on your inside mirror when judging the size or distance of the rear wheel area when the vehicle is disengaged, the...will return to collide with an EVIC (Electronic Vehicle Information Center), these functions can be selected at the EVIC using the Customer Programmable Features for details. Illuminated Vanity Mirrors An illuminated vanity mirror is on automatically. Use your right side mirror could cause you to it's ...
