Owner's Manual
Page 9
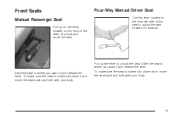
... sure the seat is locked into place, try to move the seat. To make sure the seat is locked into place, try to move the seat back and forth with your body. 1-3 Front Seats Manual Passenger Seat Pull up the lever to unlock the seat. Four-Way Manual Driver Seat Use the lever... located on the front of the seat to unlock and move the seat back and forth with your body. Pull up on the lever, located on the front left side of the seat, to adjust the seat...
... sure the seat is locked into place, try to move the seat. To make sure the seat is locked into place, try to move the seat back and forth with your body. 1-3 Front Seats Manual Passenger Seat Pull up the lever to unlock the seat. Four-Way Manual Driver Seat Use the lever... located on the front of the seat to unlock and move the seat back and forth with your body. Pull up on the lever, located on the front left side of the seat, to adjust the seat...
Owner's Manual
Page 10
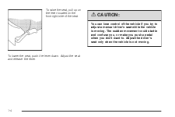
The sudden movement could startle and confuse you, or make you push a pedal when you try to . To raise the seat, pull up on the lever located on the front right side of the seat. {CAUTION: You can lose control of the vehicle if you don't want to adjust a manual driver's seat while the vehicle is not moving . Adjust the seat and release the lever. 1-4 To lower the seat, push the lever down. Adjust the driver's seat only when the vehicle is moving .
The sudden movement could startle and confuse you, or make you push a pedal when you try to . To raise the seat, pull up on the lever located on the front right side of the seat. {CAUTION: You can lose control of the vehicle if you don't want to adjust a manual driver's seat while the vehicle is not moving . Adjust the seat and release the lever. 1-4 To lower the seat, push the lever down. Adjust the driver's seat only when the vehicle is moving .
Owner's Manual
Page 11
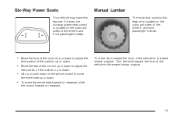
... The knob that controls this feature. If it does, the six-way power seat control is located on the outboard sides of the driver's and front passenger's seats. • Move the front of the control up or down to adjust the front portion of the cushion up or down. • Move the rear... of the vehicle to move the whole seat forward or rearward, slide the control forward or rearward. 1-5 Turn the knob toward the front of the vehicle to decrease lumbar support. • Lift up or down. • To move the entire seat up or push down to adjust the rear portion of the driver...
... The knob that controls this feature. If it does, the six-way power seat control is located on the outboard sides of the driver's and front passenger's seats. • Move the front of the control up or down to adjust the front portion of the cushion up or down. • Move the rear... of the vehicle to move the whole seat forward or rearward, slide the control forward or rearward. 1-5 Turn the knob toward the front of the vehicle to decrease lumbar support. • Lift up or down. • To move the entire seat up or push down to adjust the rear portion of the driver...
Owner's Manual
Page 12
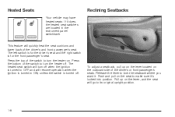
...switch to make sure it's locked into position. Press the top of the driver's or front passenger's seats. Press the bottom of the driver's and front passenger's seat. Push and pull on . To adjust a seatback, pull up on the outboard side of the switch to ON, unless the switch is ...for the front passenger's seat. Heated Seats Your vehicle may have heated seats. The left switch is for the driver's seat and the right switch is...
...switch to make sure it's locked into position. Press the top of the driver's or front passenger's seats. Press the bottom of the driver's and front passenger's seat. Push and pull on . To adjust a seatback, pull up on the outboard side of the switch to ON, unless the switch is ...for the front passenger's seat. Heated Seats Your vehicle may have heated seats. The left switch is for the driver's seat and the right switch is...
Owner's Manual
Page 14
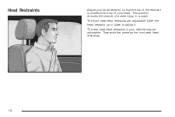
Slide the head restraint up or down to the top of a neck injury in your head. They work the same as the front seat head restraints. 1-8 Head Restraints Adjust your head restraint so that the top of the restraint is closest to adjust it. This position reduces the chance of your vehicle may be adjustable. The rear seat head restraints in a crash. The front seat head restraints are adjustable.
Slide the head restraint up or down to the top of a neck injury in your head. They work the same as the front seat head restraints. 1-8 Head Restraints Adjust your head restraint so that the top of the restraint is closest to adjust it. This position reduces the chance of your vehicle may be adjustable. The rear seat head restraints in a crash. The front seat head restraints are adjustable.
Owner's Manual
Page 15
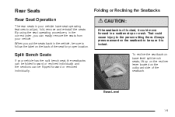
... individually and the sections can easily remove the seats from your vehicle have seat operating features to adjust, fold, remove and reinstall the seats. To recline the seatback on base-level split bench seats, lift up on the recliner lever located on the outboard side of the seat for proper location. Always press rearward on the...
... individually and the sections can easily remove the seats from your vehicle have seat operating features to adjust, fold, remove and reinstall the seats. To recline the seatback on base-level split bench seats, lift up on the recliner lever located on the outboard side of the seat for proper location. Always press rearward on the...
Owner's Manual
Page 20
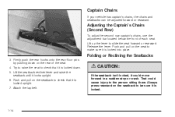
... the lap belt. {CAUTION: If the seatback isn't locked, it locks upright. 6. Adjusting the Captain's Chairs (Second Row) To adjust he second row captain's chairs, use the adjustment bar located below the front of the seat. 4. Lift up the lever to make sure it is locked into place. Firmly push ...the rear hooks onto the rear floor pins by pushing down . 5. Try to raise the seat to be adjusted forward or rearward. Always press rearward on the rear of each seat. Release the lever. Captain Chairs If your vehicle has captain's chairs, the chairs and seatbacks can be...
... the lap belt. {CAUTION: If the seatback isn't locked, it locks upright. 6. Adjusting the Captain's Chairs (Second Row) To adjust he second row captain's chairs, use the adjustment bar located below the front of the seat. 4. Lift up the lever to make sure it is locked into place. Firmly push ...the rear hooks onto the rear floor pins by pushing down . 5. Try to raise the seat to be adjusted forward or rearward. Always press rearward on the rear of each seat. Release the lever. Captain Chairs If your vehicle has captain's chairs, the chairs and seatbacks can be...
Owner's Manual
Page 34
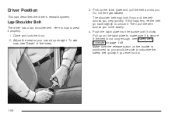
... . 1-28 Make sure the release button on page 1-46. Driver Position This part describes the driver's restraint system. Then pull the belt across you . Adjust the seat so you can sit up the latch plate and pull the belt across you very quickly. Do not let it is secure. Pull up on... is positioned so you would be able to unbuckle the safety belt quickly if you more slowly. 4. If the belt is not long enough, see "Seats" in the Index. 3. The shoulder belt may lock if you pull the belt across you ever had to wear it properly. 1.
... . 1-28 Make sure the release button on page 1-46. Driver Position This part describes the driver's restraint system. Then pull the belt across you . Adjust the seat so you can sit up the latch plate and pull the belt across you very quickly. Do not let it is secure. Pull up on... is positioned so you would be able to unbuckle the safety belt quickly if you more slowly. 4. If the belt is not long enough, see "Seats" in the Index. 3. The shoulder belt may lock if you pull the belt across you ever had to wear it properly. 1.
Owner's Manual
Page 64
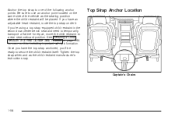
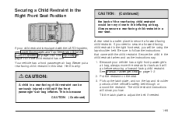
Once you have an adjustable head restraint, route the top strap under it. If you have the top strap anchored, you 're using a top strap-equipped child restraint in a Rear Outside Seat Position on page 1-64 for repair, move the child restraint to one of the vehicle as the child ...restraint manufacturer's instructions say. Top Strap Anchor Location Captain's Chairs 1-58 See Securing a Child Restraint in the second row center bench seat and need to temporarily transport a flat tire for more on the same side of the following anchor points. Be sure to secure the...
Once you have an adjustable head restraint, route the top strap under it. If you have the top strap anchored, you 're using a top strap-equipped child restraint in a Rear Outside Seat Position on page 1-64 for repair, move the child restraint to one of the vehicle as the child ...restraint manufacturer's instructions say. Top Strap Anchor Location Captain's Chairs 1-58 See Securing a Child Restraint in the second row center bench seat and need to temporarily transport a flat tire for more on the same side of the following anchor points. Be sure to secure the...
Owner's Manual
Page 71
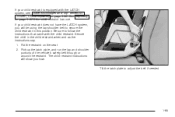
.... Put the restraint on page 1-62. Secure the child in this position. The child restraint instructions will be using the lap-shoulder belt to adjust the belt if needed. 1-65 Tilt the latch plate to secure the child restraint in the child restraint when and as the instructions say. 1.... Be sure to follow the instructions that came with the LATCH system, see Lower Anchorages and Top Tethers for Children (LATCH System) on the seat 2. Pick up the latch plate, and run the lap and shoulder portions of the vehicle's safety belt through or around the restraint. If your ...
.... Put the restraint on page 1-62. Secure the child in this position. The child restraint instructions will be using the lap-shoulder belt to adjust the belt if needed. 1-65 Tilt the latch plate to secure the child restraint in the child restraint when and as the instructions say. 1.... Be sure to follow the instructions that came with the LATCH system, see Lower Anchorages and Top Tethers for Children (LATCH System) on the seat 2. Pick up the latch plate, and run the lap and shoulder portions of the vehicle's safety belt through or around the restraint. If your ...
Owner's Manual
Page 75
...: A child in a rear-facing child restraint can be using the lap-shoulder belt. See Manual Passenger Seat on page 1-3. 2. Tilt the latch plate to secure a forward-facing child restraint. Here is a safer place to adjust the belt if needed. Be sure to the inflating air bag. Because your child restraint...
...: A child in a rear-facing child restraint can be using the lap-shoulder belt. See Manual Passenger Seat on page 1-3. 2. Tilt the latch plate to secure a forward-facing child restraint. Here is a safer place to adjust the belt if needed. Be sure to the inflating air bag. Because your child restraint...
Owner's Manual
Page 83
If the front of your vehicle has "dual stage" frontal air bags, which adjust the amount of a side impact air bag. Don't put anything between an occupant and an air bag, the bag might force the object into a wall ... threshold level for the reduced deployment is about 18 to 24 mph (29 to severe frontal or near any other air bag covering. Don't let seat covers block the in flating air bag must be somewhat above the system's designed "threshold level." In addition, your vehicle goes straight into that...
If the front of your vehicle has "dual stage" frontal air bags, which adjust the amount of a side impact air bag. Don't put anything between an occupant and an air bag, the bag might force the object into a wall ... threshold level for the reduced deployment is about 18 to 24 mph (29 to severe frontal or near any other air bag covering. Don't let seat covers block the in flating air bag must be somewhat above the system's designed "threshold level." In addition, your vehicle goes straight into that...
Owner's Manual
Page 139
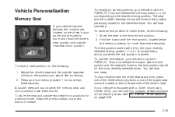
... any time, press one of the three memory buttons or one of the power seat controls located on the outboard side of the memory seats. Adjust the driver's seat and the outside rearview mirror positions for the most recently selected driver. To store an exit position for more than ...and release the button with the exit symbol, located below the memory buttons, for the most recently selected driving position (1 or 2). To store a seat position, do the following : 1. Push and release the memory button (1 or 2) corresponding to the exit position stored for more than three seconds....
... any time, press one of the three memory buttons or one of the power seat controls located on the outboard side of the memory seats. Adjust the driver's seat and the outside rearview mirror positions for the most recently selected driver. To store an exit position for more than ...and release the button with the exit symbol, located below the memory buttons, for the most recently selected driving position (1 or 2). To store a seat position, do the following : 1. Push and release the memory button (1 or 2) corresponding to the exit position stored for more than three seconds....
Owner's Manual
Page 163
...have to readjust your HUD. 3. The current audio system information will happen whenever one of the steering wheel on , the speedometer reading will always be adjusted up and down, not side-to see. The HUD controls are located to the left of the radio controls is facing and where you may... buttons until the HUD image is on the instrument panel. If you are entering a dark area and may need to adjust the HUD brightness again using the dimmer knob. Adjust the driver's seat. The HUD image can see it stops. Do not use the HUD image as a parking aid, you can only be...
...have to readjust your HUD. 3. The current audio system information will happen whenever one of the steering wheel on , the speedometer reading will always be adjusted up and down, not side-to see. The HUD controls are located to the left of the radio controls is facing and where you may... buttons until the HUD image is on the instrument panel. If you are entering a dark area and may need to adjust the HUD brightness again using the dimmer knob. Adjust the driver's seat. The HUD image can see it stops. Do not use the HUD image as a parking aid, you can only be...
Owner's Manual
Page 176
... and the defroster and side window outlets. Use this mode to send air to the rear of the vehicle. Keep the area under the front seats free of objects that could obstruct airflow to the rear of the vehicle. When the button is directed to the upper outlets and... warmer air to adjust the passenger's temperature. The recirculation mode can be used with all modes, but it cannot be used with floor, defog, defrost or outside air...
... and the defroster and side window outlets. Use this mode to send air to the rear of the vehicle. Keep the area under the front seats free of objects that could obstruct airflow to the rear of the vehicle. When the button is directed to the upper outlets and... warmer air to adjust the passenger's temperature. The recirculation mode can be used with all modes, but it cannot be used with floor, defog, defrost or outside air...
Owner's Manual
Page 178
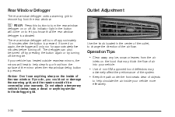
.... • Use of non-GM approved hood deflectors may adversely affect the performance of the system. • Keep the path under the front seats clear of objects to help clear fog or frost from the rear window. If you do, you know that may block the flow of... The rear window defogger uses a warming grid to remove fog from the surface of the mirror when the rear window defog button is pressed. Outlet Adjustment < REAR: Press this button to turn off .
.... • Use of non-GM approved hood deflectors may adversely affect the performance of the system. • Keep the path under the front seats clear of objects to help clear fog or frost from the rear window. If you do, you know that may block the flow of... The rear window defogger uses a warming grid to remove fog from the surface of the mirror when the rear window defog button is pressed. Outlet Adjustment < REAR: Press this button to turn off .
Owner's Manual
Page 253
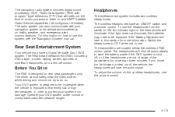
...Digital Versatile Disc (DVD) system. See "Battery Replacement" later in use this section for more than three minutes. The headphones will illuminate. To adjust the volume on the cordless headphones, use the headphones turn the switch to ON. If the light does not illuminate, the batteries may have an... You Drive The RSE is shut off automatically to save the battery power if the DVD system is designed for more information. Rear Seat Entertainment System Your vehicle may need to be inoperable when the vehicle is exposed to extremely low or high temperatures, in order to protect...
...Digital Versatile Disc (DVD) system. See "Battery Replacement" later in use this section for more than three minutes. The headphones will illuminate. To adjust the volume on the cordless headphones, use the headphones turn the switch to ON. If the light does not illuminate, the batteries may have an... You Drive The RSE is shut off automatically to save the battery power if the DVD system is designed for more information. Rear Seat Entertainment System Your vehicle may need to be inoperable when the vehicle is exposed to extremely low or high temperatures, in order to protect...
Owner's Manual
Page 445
.... Inspect all key lock cylinders, hood latch assemblies, secondary latches, pivots, spring anchor and release pawl, hood and door hinges, rear folding seats and liftgate hinges. Maintenance Footnotes † The U.S. Inspect disc brake pads for wear and rotors for proper hook-up , binding, leaks,...;ng, etc. (c) Visually inspect hoses and have it repaired. Inspect other loose or damaged safety belt system parts. Check parking brake adjustment. (b) Visually inspect front and rear suspension and steering system for damaged, loose or missing part or signs of the radiator and air ...
.... Inspect all key lock cylinders, hood latch assemblies, secondary latches, pivots, spring anchor and release pawl, hood and door hinges, rear folding seats and liftgate hinges. Maintenance Footnotes † The U.S. Inspect disc brake pads for wear and rotors for proper hook-up , binding, leaks,...;ng, etc. (c) Visually inspect hoses and have it repaired. Inspect other loose or damaged safety belt system parts. Check parking brake adjustment. (b) Visually inspect front and rear suspension and steering system for damaged, loose or missing part or signs of the radiator and air ...
Owner's Manual
Page 483
... 3-100 Sheet Metal Damage ...5-105 Shifting Into Park (P) ...2-27 Shifting Out of Park (P) ...2-29 Shoulder Belt Height Adjuster ...1-30 Skidding ...4-17 Some Other Rainy Weather Tips ...4-22 Special Fabric Cleaning Problems ...5-101 Specifications, Capacities ...5-115 Speedometer ...3-... Overhead Console ...Rear Convenience Center ...Rear Storage Area ...Roof Rack System ...Storage Compartment ...Storing a Flat or Spare Tire and Tools ...Stowable Seat ...Stuck in Sand, Mud, Ice or Snow ...Sun Visors ...Sunglasses Storage Compartment ...Sunroof ...Switchbanks, Instrument Panel ... 2-39 2-44 2-40...
... 3-100 Sheet Metal Damage ...5-105 Shifting Into Park (P) ...2-27 Shifting Out of Park (P) ...2-29 Shoulder Belt Height Adjuster ...1-30 Skidding ...4-17 Some Other Rainy Weather Tips ...4-22 Special Fabric Cleaning Problems ...5-101 Specifications, Capacities ...5-115 Speedometer ...3-... Overhead Console ...Rear Convenience Center ...Rear Storage Area ...Roof Rack System ...Storage Compartment ...Storing a Flat or Spare Tire and Tools ...Stowable Seat ...Stuck in Sand, Mud, Ice or Snow ...Sun Visors ...Sunglasses Storage Compartment ...Sunroof ...Switchbanks, Instrument Panel ... 2-39 2-44 2-40...

Owner's Manual
Page 485
... Used Replacement Wheels ...5-73 Using Cleaner on Fabric ...5-100 Using HomeLink® ...2-38 Using Song List Mode ...3-110 Vehicle Personalization DIC ...3-64 Memory Seat ...2-49 Vehicle Storage ...5-42 Ventilation Adjustment ...3-38 Video Screen ...3-116 Visor Vanity Mirror ...2-15 Visors ...2-15 W Warm-Up Shift ...2-25 Warning Lights, Gages and Indicators ...3-39 Warnings Hazard...
... Used Replacement Wheels ...5-73 Using Cleaner on Fabric ...5-100 Using HomeLink® ...2-38 Using Song List Mode ...3-110 Vehicle Personalization DIC ...3-64 Memory Seat ...2-49 Vehicle Storage ...5-42 Ventilation Adjustment ...3-38 Video Screen ...3-116 Visor Vanity Mirror ...2-15 Visors ...2-15 W Warm-Up Shift ...2-25 Warning Lights, Gages and Indicators ...3-39 Warnings Hazard...


