Owner's Manual
Page 4
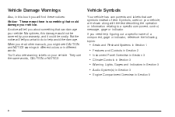
... information relating to help figuring out a specific name of text. They use symbols instead of a component, gage or indicator, reference the following topics: Seats and Restraint Systems in Section 1 Features and Controls in Section 2 Instrument Panel Overview in Section 3 Climate Controls in Section 3 Warning Lights, Gages and Indicators in... vehicle has components and labels that could damage your warranty, and it could be costly. Vehicle Damage Warnings Also, in this damage would not be covered by your vehicle.
... information relating to help figuring out a specific name of text. They use symbols instead of a component, gage or indicator, reference the following topics: Seats and Restraint Systems in Section 1 Features and Controls in Section 2 Instrument Panel Overview in Section 3 Climate Controls in Section 3 Warning Lights, Gages and Indicators in... vehicle has components and labels that could damage your warranty, and it could be costly. Vehicle Damage Warnings Also, in this damage would not be covered by your vehicle.
Owner's Manual
Page 83
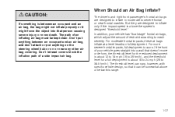
Don't let seat covers block the in flate at a level less than full deployment. The threshold level can be kept clear. The driver's and right front passenger's frontal ... 29 km/h), and the threshold level for a full deployment is about 18 to 24 mph (29 to severe frontal or near any other air bag covering.
Don't let seat covers block the in flate at a level less than full deployment. The threshold level can be kept clear. The driver's and right front passenger's frontal ... 29 km/h), and the threshold level for a full deployment is about 18 to 24 mph (29 to severe frontal or near any other air bag covering.
Owner's Manual
Page 92
Section 2 Features and Controls Rear Storage Area ...2-40 Roof Rack System ...2-41 Convenience Net ...2-44 Cargo Cover ...2-44 Rear Convenience Center ...2-44 Sunroof ...2-48 Vehicle Personalization ...2-49 Memory Seat ...2-49 HomeLink® Transmitter ...2-35 Programming the HomeLink® Transmitter ...2-35 Storage Areas ...2-39 Glove Box ...2-39 Cupholder(s) ...2-39 Cell Phone Storage Area ...2-39 Overhead Console ...2-39 Floor Console Storage Area ...2-40 Front Armrest Storage Area ...2-40 2-2
Section 2 Features and Controls Rear Storage Area ...2-40 Roof Rack System ...2-41 Convenience Net ...2-44 Cargo Cover ...2-44 Rear Convenience Center ...2-44 Sunroof ...2-48 Vehicle Personalization ...2-49 Memory Seat ...2-49 HomeLink® Transmitter ...2-35 Programming the HomeLink® Transmitter ...2-35 Storage Areas ...2-39 Glove Box ...2-39 Cupholder(s) ...2-39 Cell Phone Storage Area ...2-39 Overhead Console ...2-39 Floor Console Storage Area ...2-40 Front Armrest Storage Area ...2-40 2-2
Owner's Manual
Page 134
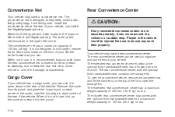
...vehicle, just inside the liftgate/tailgate opening . The rear convenience center, with the optional third row stowable seat has a maximum weight capacity of the lid to hold larger, heavier loads. Cargo Cover If your vehicle, as far forward as you can. When it is not secured properly, it to...a rear convenience center. The extended rear convenience center, without the optional third row stowable seat, has a forward bin and rear bin. Store such loads on either side of your vehicle has a cargo cover, you take down the rear convenience net to extend its life and retain its pouch ...
...vehicle, just inside the liftgate/tailgate opening . The rear convenience center, with the optional third row stowable seat has a maximum weight capacity of the lid to hold larger, heavier loads. Cargo Cover If your vehicle, as far forward as you can. When it is not secured properly, it to...a rear convenience center. The extended rear convenience center, without the optional third row stowable seat, has a forward bin and rear bin. Store such loads on either side of your vehicle has a cargo cover, you take down the rear convenience net to extend its life and retain its pouch ...
Owner's Manual
Page 178
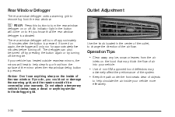
Outlet Adjustment < REAR: Press this button to turn off . The defogger can also be covered by turning off . Rear Window Defogger The rear window defogger uses a warming grid to remove fog from the air inlets on the hood that the .... • Use of non-GM approved hood deflectors may adversely affect the performance of the system. • Keep the path under the front seats clear of the mirror when the rear window defog button is pressed. If your vehicle more effectively. 3-38 The rear window defogger will only run...
Outlet Adjustment < REAR: Press this button to turn off . The defogger can also be covered by turning off . Rear Window Defogger The rear window defogger uses a warming grid to remove fog from the air inlets on the hood that the .... • Use of non-GM approved hood deflectors may adversely affect the performance of the system. • Keep the path under the front seats clear of the mirror when the rear window defog button is pressed. If your vehicle more effectively. 3-38 The rear window defogger will only run...
Owner's Manual
Page 313
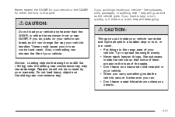
...rear GAWR. These could cause you put things inside your vehicle - like suitcases, inside the vehicle, secure it can . • Don't leave a seat folded down unless you have to spread the weight evenly. • Never stack heavier things, like suitcases, tools, packages, or anything else - they will... your vehicle. If you put inside your vehicle can shorten the life of the seats. • Don't leave an unsecured child restraint in the cargo area of your warranty. Repairs would not be covered by your vehicle. Notice: Loading objects that some of them are above the tops...
...rear GAWR. These could cause you put things inside your vehicle - like suitcases, inside the vehicle, secure it can . • Don't leave a seat folded down unless you have to spread the weight evenly. • Never stack heavier things, like suitcases, tools, packages, or anything else - they will... your vehicle. If you put inside your vehicle can shorten the life of the seats. • Don't leave an unsecured child restraint in the cargo area of your warranty. Repairs would not be covered by your vehicle. Notice: Loading objects that some of them are above the tops...
Owner's Manual
Page 416
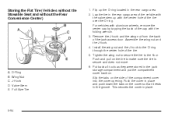
... the D-ring. E. For vehicles with aluminum wheels, remove the center cap by tapping the back of the cap with the center hole of the compartment cover into the cover opening. Lay the tire in the rear cargo area of the jack access door. Slip the tabs on . This secures the... cover in the rear cargo area. 2. D. Storing the Flat Tire (Vehicles without the Stowable Seat and without the Rear Convenience Center) 1. Flip up with the folding wrench. 3. Assemble the wing nut and the...
... the D-ring. E. For vehicles with aluminum wheels, remove the center cap by tapping the back of the cap with the center hole of the compartment cover into the cover opening. Lay the tire in the rear cargo area of the jack access door. Slip the tabs on . This secures the... cover in the rear cargo area. 2. D. Storing the Flat Tire (Vehicles without the Stowable Seat and without the Rear Convenience Center) 1. Flip up with the folding wrench. 3. Assemble the wing nut and the...
Owner's Manual
Page 418
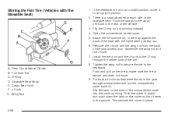
... Flat Tire (Vehicles with the valve stem pointing out. 6. If the seatback is a strap attached to the D-ring through the center hole of the stowable seat. There is not in the tray against the back of the vehicle. 3. Flip the D-ring so it is secure and does not move it rests... the tire is pointing outward. 4. Assemble the wing nut and the J-hook. 7. E. Put back all tools as they were stored in place. 5-96 Push the cover in place and push down the tabs on the tire to an upright position. 2. C. Tighten the wing nut to secure the tire to the cargo...
... Flat Tire (Vehicles with the valve stem pointing out. 6. If the seatback is a strap attached to the D-ring through the center hole of the stowable seat. There is not in the tray against the back of the vehicle. 3. Flip the D-ring so it is secure and does not move it rests... the tire is pointing outward. 4. Assemble the wing nut and the J-hook. 7. E. Put back all tools as they were stored in place. 5-96 Push the cover in place and push down the tabs on the tire to an upright position. 2. C. Tighten the wing nut to secure the tire to the cargo...
Owner's Manual
Page 419
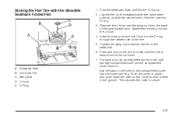
Assemble the wing nut and the J-hook. 4. This secures the cover in the jack storage compartment and put the compartment cover back on the tire to the seatback. 6. Stowable Seat Full-Size Tire Wing Nut J-Hook D-Ring 5-97 Install the wing nut and the J-hook to the D-ring through the center ...hole of the compartment cover into the cover opening. Slip the tabs on the...
Assemble the wing nut and the J-hook. 4. This secures the cover in the jack storage compartment and put the compartment cover back on the tire to the seatback. 6. Stowable Seat Full-Size Tire Wing Nut J-Hook D-Ring 5-97 Install the wing nut and the J-hook to the D-ring through the center ...hole of the compartment cover into the cover opening. Slip the tabs on the...
Owner's Manual
Page 445
...be performed at least once a year. (d) Visually inspect wiper blades for damaged or missing parts. Have any opened or broken air bag coverings, and have high effort or excessive wear. Inspect all key lock cylinders, hood latch assemblies, secondary latches, pivots, spring anchor and release... pawl, hood and door hinges, rear folding seats and liftgate hinges. Inspect power steering lines and hoses for any torn or frayed safety belts replaced. Also look for proper hook-up ...
...be performed at least once a year. (d) Visually inspect wiper blades for damaged or missing parts. Have any opened or broken air bag coverings, and have high effort or excessive wear. Inspect all key lock cylinders, hood latch assemblies, secondary latches, pivots, spring anchor and release... pawl, hood and door hinges, rear folding seats and liftgate hinges. Inspect power steering lines and hoses for any torn or frayed safety belts replaced. Also look for proper hook-up ...
Owner's Manual
Page 471
Care of (cont.) Your CDs and DVDs ...3-131 Cargo Cover ...2-44 Cargo Lamp ...3-20 Carrier Assembly-Differential (Rear Drive Module) ...5-49 Cassette Tape Messages ...3-94 CD Adapter Kits ...3-95 CD Messages ...3-84, 3-97, 3-111 ...(cont.) Securing a Child Restraint Designed for the LATCH System ...1-64 Securing a Child Restraint in a Center Rear Seat Position ...1-67 Securing a Child Restraint in a Rear Outside Seat Position ...1-64 Securing a Child Restraint in the Right Front Seat Position ...1-69 Top Strap ...1-57 Top Strap Anchor Location ...1-58 Where to Put the Restraint ...1-56 Cigarette...
Care of (cont.) Your CDs and DVDs ...3-131 Cargo Cover ...2-44 Cargo Lamp ...3-20 Carrier Assembly-Differential (Rear Drive Module) ...5-49 Cassette Tape Messages ...3-94 CD Adapter Kits ...3-95 CD Messages ...3-84, 3-97, 3-111 ...(cont.) Securing a Child Restraint Designed for the LATCH System ...1-64 Securing a Child Restraint in a Center Rear Seat Position ...1-67 Securing a Child Restraint in a Rear Outside Seat Position ...1-64 Securing a Child Restraint in the Right Front Seat Position ...1-69 Top Strap ...1-57 Top Strap Anchor Location ...1-58 Where to Put the Restraint ...1-56 Cigarette...


