Owner's Manual
Page 372
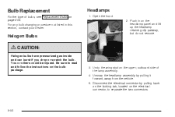
Be sure to separate the two connectors. 5-50 Disconnect the electrical connector by pulling it forward, away from the vehicle. 5. Headlamps 1. Push in this section, contact your dealer. Halogen Bulbs {CAUTION: Halogen bulbs have pressurized gas inside and can burst if you ...Replacement Bulbs on page 5-54. Open the hood. 2. Bulb Replacement For the type of the lamp assembly. 4. For any bulb changing procedure not listed in on the bulb package. 3. Unsnap the headlamp assembly by pulling back on the locking tab, located on the electrical connector, to read and follow the ...
Be sure to separate the two connectors. 5-50 Disconnect the electrical connector by pulling it forward, away from the vehicle. 5. Headlamps 1. Push in this section, contact your dealer. Halogen Bulbs {CAUTION: Halogen bulbs have pressurized gas inside and can burst if you ...Replacement Bulbs on page 5-54. Open the hood. 2. Bulb Replacement For the type of the lamp assembly. 4. For any bulb changing procedure not listed in on the bulb package. 3. Unsnap the headlamp assembly by pulling back on the locking tab, located on the electrical connector, to read and follow the ...
Owner's Manual
Page 374
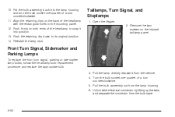
...position. 14. Reinstall the wing stud. Remove the two screws on the back of a turn signal, parking or sidemarker lamp bulbs, follow the headlamp bulb replacement procedure and replace the appropriate bulb. 3. Pull the lamp directly rearward from the bulb base. 5-52 Unhook the electrical connector by ... housing. 6. 10. Put the bulb assembly back into position. 13. Push the retaining clip down to snap it into the lamp housing and turn the bulb socket one -quarter of a turn counterclockwise. 5. Turn the bulb socket one -quarter of the headlamp with the rectangular holes in the mounting ...
...position. 14. Reinstall the wing stud. Remove the two screws on the back of a turn signal, parking or sidemarker lamp bulbs, follow the headlamp bulb replacement procedure and replace the appropriate bulb. 3. Pull the lamp directly rearward from the bulb base. 5-52 Unhook the electrical connector by ... housing. 6. 10. Put the bulb assembly back into position. 13. Push the retaining clip down to snap it into the lamp housing and turn the bulb socket one -quarter of a turn counterclockwise. 5. Turn the bulb socket one -quarter of the headlamp with the rectangular holes in the mounting ...
Owner's Manual
Page 376
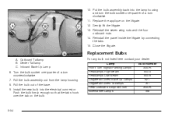
...lift the liftgate. 13. Reinstall the panel inside the liftgate by connecting the tabs. 15. Close the liftgate. Center Taillamp C. Pull the bulb assembly out from the lamp housing. 8. Reinstall the seven wing nuts and the four outboard nuts. 14. Replace the applique on the bulb. Replacement ... bulb into the lamp housing and turn the bulb socket one -quarter of the base. 9. Lamp Front Turn Signal/Parking Lamps Headlamps High-Beam Headlamps Low-Beam Liftgate-Mounted Back-Up Lamps Liftgate-Mounted Taillamps Rear Outboard Stop/Tail/Turn Sidemarker Lamps Bulb Number 3457K 9005 9006 921...
...lift the liftgate. 13. Reinstall the panel inside the liftgate by connecting the tabs. 15. Close the liftgate. Center Taillamp C. Pull the bulb assembly out from the lamp housing. 8. Reinstall the seven wing nuts and the four outboard nuts. 14. Replace the applique on the bulb. Replacement ... bulb into the lamp housing and turn the bulb socket one -quarter of the base. 9. Lamp Front Turn Signal/Parking Lamps Headlamps High-Beam Headlamps Low-Beam Liftgate-Mounted Back-Up Lamps Liftgate-Mounted Taillamps Rear Outboard Stop/Tail/Turn Sidemarker Lamps Bulb Number 3457K 9005 9006 921...


