
Owner's Manual
Page 1
2004 Buick Rendezvous Owner Manual Seats and Restraint Systems ...1-1 Front Seats ...1-3 Rear Seats ...1-9 Safety Belts ...1-22 Child Restraints ...1-47 Air Bag Systems ...1-72 Restraint System Check ...1-82 Features and Controls ...2-1 ......2-48 Vehicle Personalization ...2-49 Instrument Panel ...3-1 Instrument Panel Overview ...3-4 Climate Controls ...3-28 Warning Lights, Gages and Indicators ...3-39 Message Center ...3-50 M Driver Information Center (DIC) ...3-60 Audio System(s) ...3-73 Driving Your Vehicle ...4-1 Your Driving, the Road, and Your Vehicle ...4-2 Towing ...4-33 Service and ...
2004 Buick Rendezvous Owner Manual Seats and Restraint Systems ...1-1 Front Seats ...1-3 Rear Seats ...1-9 Safety Belts ...1-22 Child Restraints ...1-47 Air Bag Systems ...1-72 Restraint System Check ...1-82 Features and Controls ...2-1 ......2-48 Vehicle Personalization ...2-49 Instrument Panel ...3-1 Instrument Panel Overview ...3-4 Climate Controls ...3-28 Warning Lights, Gages and Indicators ...3-39 Message Center ...3-50 M Driver Information Center (DIC) ...3-60 Audio System(s) ...3-73 Driving Your Vehicle ...4-1 Your Driving, the Road, and Your Vehicle ...4-2 Towing ...4-33 Service and ...

Owner's Manual
Page 7
... ...1-64 Securing a Child Restraint in a Center Rear Seat Position ...1-67 Securing a Child Restraint in the Right Front Seat Position ...1-69 Front Seats ...1-3 Manual Passenger Seat ...1-3 Four-Way Manual Driver Seat ...1-3 Six-Way Power Seats ...1-5 Manual Lumbar ...1-5 Heated Seats ...1-6 Reclining Seatbacks ...1-6 Head Restraints ...1-8 Rear Seats ...1-9 Rear Seat Operation ...1-9 Split Bench Seats ...1-9 Captain Chairs ...1-14 Stowable Seat ...1-18 Safety Belts ...1-22 Safety Belts: They...
... ...1-64 Securing a Child Restraint in a Center Rear Seat Position ...1-67 Securing a Child Restraint in the Right Front Seat Position ...1-69 Front Seats ...1-3 Manual Passenger Seat ...1-3 Four-Way Manual Driver Seat ...1-3 Six-Way Power Seats ...1-5 Manual Lumbar ...1-5 Heated Seats ...1-6 Reclining Seatbacks ...1-6 Head Restraints ...1-8 Rear Seats ...1-9 Rear Seat Operation ...1-9 Split Bench Seats ...1-9 Captain Chairs ...1-14 Stowable Seat ...1-18 Safety Belts ...1-22 Safety Belts: They...
Owner's Manual
Page 9
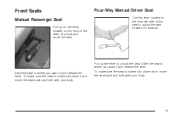
...lever. To make sure the seat is locked into place, try to move the seat back and forth with your body. 1-3 Four-Way Manual Driver Seat Use the lever located on the front of the seat to adjust the seat forward or rearward. Front Seats Manual Passenger Seat Pull up the lever to ...unlock the seat. To make sure the seat is locked into place,...
...lever. To make sure the seat is locked into place, try to move the seat back and forth with your body. 1-3 Four-Way Manual Driver Seat Use the lever located on the front of the seat to adjust the seat forward or rearward. Front Seats Manual Passenger Seat Pull up the lever to ...unlock the seat. To make sure the seat is locked into place,...
Owner's Manual
Page 10
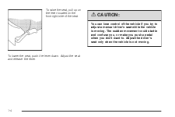
To lower the seat, push the lever down. Adjust the seat and release the lever. 1-4 Adjust the driver's seat only when the vehicle is moving . The sudden movement could startle and confuse you, or make you push a pedal when you try to . To raise the seat, pull up on the lever located on the front right side of the seat. {CAUTION: You can lose control of the vehicle if you don't want to adjust a manual driver's seat while the vehicle is not moving .
To lower the seat, push the lever down. Adjust the seat and release the lever. 1-4 Adjust the driver's seat only when the vehicle is moving . The sudden movement could startle and confuse you, or make you push a pedal when you try to . To raise the seat, pull up on the lever located on the front right side of the seat. {CAUTION: You can lose control of the vehicle if you don't want to adjust a manual driver's seat while the vehicle is not moving .
Owner's Manual
Page 11
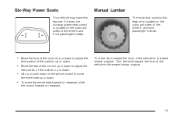
...located on the outboard sides of the vehicle to decrease lumbar support. • Lift up or push down on the outboard sides of the driver's and front passenger's seats. • Move the front of the control up or down to adjust the front portion of the cushion up or down. • .... 1-5 If it does, the six-way power seat control is located on the whole control to increase lumbar support. Turn the knob toward the front of the cushion up or down . Turn the knob toward the rear of the driver's and front passenger's seats. Manual Lumbar The knob that controls this feature.
...located on the outboard sides of the vehicle to decrease lumbar support. • Lift up or push down on the outboard sides of the driver's and front passenger's seats. • Move the front of the control up or down to adjust the front portion of the cushion up or down. • .... 1-5 If it does, the six-way power seat control is located on the whole control to increase lumbar support. Turn the knob toward the front of the cushion up or down . Turn the knob toward the rear of the driver's and front passenger's seats. Manual Lumbar The knob that controls this feature.
Owner's Manual
Page 12
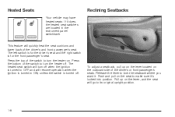
... Push and pull on . The left switch is for the driver's seat and the right switch is turned off . Press the top of the driver's and front passenger's seat. Reclining Seatbacks This feature will go to turn the heater on the seat to lock the seatback where you want it. If it 's ...locked into position. Press the bottom of the driver's or front passenger's seats. Heated Seats Your vehicle may have heated seats. Release the lever to make sure it does, the heated seat switches are located in the instrument panel switchbank. Pull up on the lever located ...
... Push and pull on . The left switch is for the driver's seat and the right switch is turned off . Press the top of the driver's and front passenger's seat. Reclining Seatbacks This feature will go to turn the heater on the seat to lock the seatback where you want it. If it 's ...locked into position. Press the bottom of the driver's or front passenger's seats. Heated Seats Your vehicle may have heated seats. Release the lever to make sure it does, the heated seat switches are located in the instrument panel switchbank. Pull up on the lever located ...
Owner's Manual
Page 34
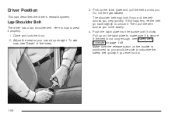
... belt quickly if you ever had to wear it properly. 1. Push the latch plate into the buckle until it get twisted. Lap-Shoulder Belt The driver has a lap-shoulder belt. Pick up the latch plate and pull the belt across you very quickly. If this happens, let the belt go back... This part describes the driver's restraint system. The shoulder belt may lock if you pull the belt across you can sit up on the latch plate to unlock it is how to . 1-28 Pull up straight. Here is secure. Adjust the seat so you more slowly. 4. Then pull the belt across you...
... belt quickly if you ever had to wear it properly. 1. Push the latch plate into the buckle until it get twisted. Lap-Shoulder Belt The driver has a lap-shoulder belt. Pick up the latch plate and pull the belt across you very quickly. If this happens, let the belt go back... This part describes the driver's restraint system. The shoulder belt may lock if you pull the belt across you can sit up on the latch plate to unlock it is how to . 1-28 Pull up straight. Here is secure. Adjust the seat so you more slowly. 4. Then pull the belt across you...
Owner's Manual
Page 52
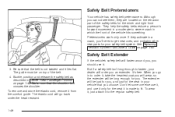
... you go back under the head restraint. Buckle, position and release the safety belt as described in a crash, you should use it only for the seat it is not twisted and it , take the heaviest coat you choose. The elastic cord will fasten around you, you 'll need to the regular...'s forward movement in your vehicle that you will wear, so the extender will be long enough for the driver and right front passenger. The guide must be just for you, and just for the seat in a moderate to order it lies flat. The extender will order you . Make sure that the...
... you go back under the head restraint. Buckle, position and release the safety belt as described in a crash, you should use it only for the seat it is not twisted and it , take the heaviest coat you choose. The elastic cord will fasten around you, you 'll need to the regular...'s forward movement in your vehicle that you will wear, so the extender will be long enough for the driver and right front passenger. The guide must be just for you, and just for the seat in a moderate to order it lies flat. The extender will order you . Make sure that the...
Owner's Manual
Page 83
... must be somewhat above the system's designed "threshold level." In addition, your vehicle goes straight into that person causing severe injury or even death. The driver's and right front passenger's frontal air bags are designed to inflate only if the impact speed is about 12 to 18 mph (19... a wall that doesn't move or deform, the threshold level for the reduced deployment is about 18 to 24 mph (29 to 38.5 km/h). Don't let seat covers block the in flate at a level less than full deployment. When Should an Air Bag Inflate? {CAUTION: If something is between...
... must be somewhat above the system's designed "threshold level." In addition, your vehicle goes straight into that person causing severe injury or even death. The driver's and right front passenger's frontal air bags are designed to inflate only if the impact speed is about 12 to 18 mph (19... a wall that doesn't move or deform, the threshold level for the reduced deployment is about 18 to 24 mph (29 to 38.5 km/h). Don't let seat covers block the in flate at a level less than full deployment. When Should an Air Bag Inflate? {CAUTION: If something is between...
Owner's Manual
Page 89
...may be if worn during a more severe crash, then you may need to replace the driver and front passenger's safety belt retractor assemblies, even if the frontal air bags have LATCH system, safety belt or seat parts repaired or replaced. See the part on page 3-43. 1-83 Then the new ... air bags inflate you may not properly protect the person using it, resulting in serious injury or even death in a crash. The driver and front passenger's safety belt retractor assemblies contain the safety belt pretensioners. A damaged restraint system may need new LATCH system parts. If the LATCH...
...may be if worn during a more severe crash, then you may need to replace the driver and front passenger's safety belt retractor assemblies, even if the frontal air bags have LATCH system, safety belt or seat parts repaired or replaced. See the part on page 3-43. 1-83 Then the new ... air bags inflate you may not properly protect the person using it, resulting in serious injury or even death in a crash. The driver and front passenger's safety belt retractor assemblies contain the safety belt pretensioners. A damaged restraint system may need new LATCH system parts. If the LATCH...
Owner's Manual
Page 119
This is in the OFF position. When you are parking on a hill and you do not shift your regular brakes before you leave the driver's seat. Shifting Out of PARK (P), try this: 1. If you cannot shift out of PARK (P), ease pressure on the parking pawl in the transaxle, so you can ...
This is in the OFF position. When you are parking on a hill and you do not shift your regular brakes before you leave the driver's seat. Shifting Out of PARK (P), try this: 1. If you cannot shift out of PARK (P), ease pressure on the parking pawl in the transaxle, so you can ...
Owner's Manual
Page 123
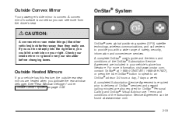
... delivery of the OnStar® Subscription Service Agreement are included in your vehicle has this feature, the outside rearview mirrors are . For more from the driver's seat. Outside Convex Mirror Your passenger's side mirror is convex.
... delivery of the OnStar® Subscription Service Agreement are included in your vehicle has this feature, the outside rearview mirrors are . For more from the driver's seat. Outside Convex Mirror Your passenger's side mirror is convex.
Owner's Manual
Page 129
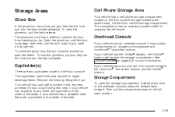
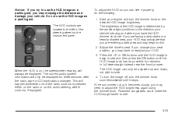
...items. Remove the liners by lifting them out. If your vehicle has a stowable seat, there are cupholders in the center of the seat. To open the storage compartment, located at the front of the seats. See OnStar® System on page 2-33 for storage and sunglasses and HomeLink®...vehicle has the OnStar® System, the OnStar® buttons will replace the storage compartment. The glove box door has a detent to the driver's seat. Cell Phone Storage Area Your vehicle has a cell phone storage compartment located on the sides of the overhead console, press the release latch forward...
...items. Remove the liners by lifting them out. If your vehicle has a stowable seat, there are cupholders in the center of the seat. To open the storage compartment, located at the front of the seats. See OnStar® System on page 2-33 for storage and sunglasses and HomeLink®...vehicle has the OnStar® System, the OnStar® buttons will replace the storage compartment. The glove box door has a detent to the driver's seat. Cell Phone Storage Area Your vehicle has a cell phone storage compartment located on the sides of the overhead console, press the release latch forward...
Owner's Manual
Page 139
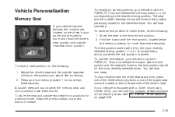
... or one beep. Adjust the driver's seat and the outside rearview mirror positions for a second driver, follow the previous steps, but press button 2 instead. 2-49 To store the seat and outside rearview mirrors to program certain functions of the driver's seat. A double beep will move to store and recall the driver's seat position and outside rearview mirrors will...
... or one beep. Adjust the driver's seat and the outside rearview mirror positions for a second driver, follow the previous steps, but press button 2 instead. 2-49 To store the seat and outside rearview mirrors to program certain functions of the driver's seat. A double beep will move to store and recall the driver's seat position and outside rearview mirrors will...
Owner's Manual
Page 142
Section 3 Instrument Panel Navigation/Radio System ...3-112 Rear Seat Entertainment System ...3-113 Rear Seat Audio (RSA) ...3-126 Theft-Deterrent Feature ...3-128 Audio Steering Wheel Controls ...3-129 DVD Distortion ...3-129 Understanding Radio Reception ...3-... Program Mode Message ...3-58 Remote Keyless Entry Transmitter Battery Low Warning Message ...3-58 Parking Lamp Warning Message ...3-59 Highbeam Out Warning Message ...3-59 Driver Information Center (DIC) ...3-60 DIC Controls and Displays ...3-62 DIC Vehicle Personalization ...3-64 Audio System(s) ...3-73 Setting the Time ...3-73 Radio...
Section 3 Instrument Panel Navigation/Radio System ...3-112 Rear Seat Entertainment System ...3-113 Rear Seat Audio (RSA) ...3-126 Theft-Deterrent Feature ...3-128 Audio Steering Wheel Controls ...3-129 DVD Distortion ...3-129 Understanding Radio Reception ...3-... Program Mode Message ...3-58 Remote Keyless Entry Transmitter Battery Low Warning Message ...3-58 Parking Lamp Warning Message ...3-59 Highbeam Out Warning Message ...3-59 Driver Information Center (DIC) ...3-60 DIC Controls and Displays ...3-62 DIC Vehicle Personalization ...3-64 Audio System(s) ...3-73 Setting the Time ...3-73 Radio...
Owner's Manual
Page 163
Adjust the driver's seat. The HUD image can see . When the HUD is on, the speedometer reading will always be adjusted up and down, not side-to-side. 4. Do ... so you can only be displayed. Polarized sunglasses could make the HUD image harder to see it becomes cloudy, you may need to readjust your seat position, you may have the HUD dimmer knob set. Press the UP or DN buttons until the HUD image is facing and where you have...
Adjust the driver's seat. The HUD image can see . When the HUD is on, the speedometer reading will always be adjusted up and down, not side-to-side. 4. Do ... so you can only be displayed. Polarized sunglasses could make the HUD image harder to see it becomes cloudy, you may need to readjust your seat position, you may have the HUD dimmer knob set. Press the UP or DN buttons until the HUD image is facing and where you have...

Owner's Manual
Page 168
... With this system you put flammable items in the ashtray, hot cigarettes or other smoking materials could be blown. Lift the lid to the driver's seat. The cigarette lighter is heating. Never put papers or other flammable items in the ashtray.
... With this system you put flammable items in the ashtray, hot cigarettes or other smoking materials could be blown. Lift the lid to the driver's seat. The cigarette lighter is heating. Never put papers or other flammable items in the ashtray.
Owner's Manual
Page 176
... to prevent outside air modes. Press this mode to send air to the rear of airflow in your vehicle. Temperature Control: Use the DRIVER knob to turn the outside air from entering your vehicle or help heat or cool the air inside your vehicle; The MODE button can be.... If the front passenger would like the temperature to be used to turn the recirculation mode on or off . Keep the area under the front seats free of objects that could obstruct airflow to the rear of the air to the instrument panel outlets, then directs the remaining air...
... to prevent outside air modes. Press this mode to send air to the rear of airflow in your vehicle. Temperature Control: Use the DRIVER knob to turn the outside air from entering your vehicle or help heat or cool the air inside your vehicle; The MODE button can be.... If the front passenger would like the temperature to be used to turn the recirculation mode on or off . Keep the area under the front seats free of objects that could obstruct airflow to the rear of the air to the instrument panel outlets, then directs the remaining air...
Owner's Manual
Page 475
Following Distance ...4-48 Four-Way Manual Driver Seat ...1-3 Front Armrest Storage Area ...2-40 Front Console Storage Area ...2-40 Front Reading Lamps ...3-20 Fuel ...5-4 Additives ...5-6 California Fuel ...5-5 Filling a Portable Fuel ... ...5-50 Bulb Replacement ...5-50 Front Turn Signal, Sidemarker and Parking Lamps ...5-52 Halogen Bulbs ...5-50 Headphones ...3-113 Head-Up Display (HUD) ...3-21 Heated Seats ...1-6 Highbeam Out Warning Message ...3-59 Highway Hypnosis ...4-26 Hill and Mountain Roads ...4-26 G Gage Engine Coolant Temperature ...Fuel ...Speedometer ...Tachometer ...Garage Door ...
Following Distance ...4-48 Four-Way Manual Driver Seat ...1-3 Front Armrest Storage Area ...2-40 Front Console Storage Area ...2-40 Front Reading Lamps ...3-20 Fuel ...5-4 Additives ...5-6 California Fuel ...5-5 Filling a Portable Fuel ... ...5-50 Bulb Replacement ...5-50 Front Turn Signal, Sidemarker and Parking Lamps ...5-52 Halogen Bulbs ...5-50 Headphones ...3-113 Head-Up Display (HUD) ...3-21 Heated Seats ...1-6 Highbeam Out Warning Message ...3-59 Highway Hypnosis ...4-26 Hill and Mountain Roads ...4-26 G Gage Engine Coolant Temperature ...Fuel ...Speedometer ...Tachometer ...Garage Door ...
Owner's Manual
Page 482
... Everyone ...1-22 Safety Chains ...4-46 Safety Warnings and Symbols ...iii Scheduled Maintenance ...6-4 Seat Recall ...3-71 Seats Captain Chairs ...1-14 Four-Way Manual Driver Seat ...1-3 Head Restraints ...1-8 Heated Seats ...1-6 Seats (cont.) Manual Lumbar ...1-5 Manual Passenger ...1-3 Memory ...2-49 Rear Seat Operation ...1-9 Reclining Seatbacks ...1-6 Six-Way Power Seats ...1-5 Split Bench Seats ...1-9 Stowable Seat ...1-18 Secondary Latch System ...5-84 Securing a Child Restraint Center Rear...
... Everyone ...1-22 Safety Chains ...4-46 Safety Warnings and Symbols ...iii Scheduled Maintenance ...6-4 Seat Recall ...3-71 Seats Captain Chairs ...1-14 Four-Way Manual Driver Seat ...1-3 Head Restraints ...1-8 Heated Seats ...1-6 Seats (cont.) Manual Lumbar ...1-5 Manual Passenger ...1-3 Memory ...2-49 Rear Seat Operation ...1-9 Reclining Seatbacks ...1-6 Six-Way Power Seats ...1-5 Split Bench Seats ...1-9 Stowable Seat ...1-18 Secondary Latch System ...5-84 Securing a Child Restraint Center Rear...


