2003 Buick Rendezvous Support Question
2003 Buick Rendezvous Support Question
Find answers below for this question about 2003 Buick Rendezvous.Need a 2003 Buick Rendezvous manual? We have 1 online manual for this item!
Question posted by prasStoe on September 5th, 2013
How To Remove A Rear Axle Differential Assembly Rendezvous
The person who posted this question about this Buick automobile did not include a detailed explanation. Please use the "Request More Information" button to the right if more details would help you to answer this question.
Current Answers
Related Manual Pages
Owner's Manual - Page 16
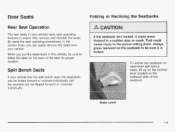
... in the vehicle, be sure to follow the label on the seatback to be flipped forward or removed individually. Always s press rearward on the back of the seatback.
Base-Level
1-9 To recline the...the person sitting there. That could move forward in a sudden stop or crash. Rear Seats
Rear Seat Operation
The rear seats in your vehicle has the split bench seat, the seatbacks can be folded forward...
Owner's Manual - Page 18

...
---I!I U C ~ ~
U W
ly
forward on the outboard side to release the rear latches from the vehic!e by rocking it slightly toward the straight crossbar.
6. Repeat these steps... for the other section of the seat on the recliner lever to release the rear latches from the floor pins and flip the seat forward.
7
5. Remove the seat by fo!!nwing the next steps.
1-11 Base-Level
4. U ...
Owner's Manual - Page 22
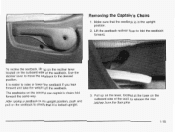
...to an upright position, push and pull on the outboard side of the seat, to release the rear latches from the floor pins.
1-15 It is easier to the desired position. Lift the seatback ...recliner lever to check that the seatback is locked upright.
3. Removing the Captain's Chairs
1. To recline the seatback, lift up on the lever, located at the base...
Owner's Manual - Page 138

... screws are four small storage compartments in front of various sizes. To remove the covers, lift up .
? ~
2-45 Pull the cover towards the rear of 100 Ibs. (45 kg). To adjust the crossrails, lift the release levers on each side rail assembly. Slide the crossrails forward or backward, as you can . The convenience...
Owner's Manual - Page 302

To find out the actual loads on your front and rear axles, you need to spread out your load equally on your vehicle.
i
Things ...vehicle. they 'll keep going. Do not load , ~ u rvehicle an, .leavier than the GVWR, or either the front or rear axle. Also, overloading can help you with this. Never stack heavier things, like suitcases, tools, packages, or anything else - Don't leave ...
Owner's Manual - Page 303

..., you may not work well --
Automatic Level Control
On vehicles equipped with the automatic level control, the rear of the vehicle is required for a vehicle used to tow a trailer. If the sound continues for an... the system self-adjusts. You and your vehicle needs service. Additional rear axle maintenance is automatically kept level as you don't use the correct equipment an-.
Owner's Manual - Page 358
...; What to Use
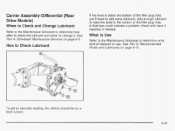
Refer to the Maintenance Schedule to determine what kind of the filler plug hole, you'll need to add some lubricant. Carrier Assembly-Differential (Rear Drive Module)
When to Check and Change Lubricant
Refer to the Maintenance Schedule to determine how often to check the lubricant and when to change...
Owner's Manual - Page 365

... securely on the wiper arm until you hear the release clip "click" into place.
3.
Turn the rear wiper off.
2. Push the release clip, from Step 3, down to remove it from the backglass.
4. Then, pull the blade assembly down toward the glass to secure the wiper blade into place.
6. Push the new wiper blade...
Owner's Manual - Page 380

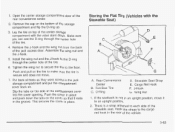
... the mhle, tilt the ?he retainer and slip it through the wheel opening. 5. Compact Spare Tire
1. After removing the spare tire, turn the wrench clockwise to expose the hoist shaft.
4 . HoistShaft B.
Hoist Assembly
D. Flip the rear cargo area carpet cut out to raise the cable back up. FoldingWrench C. Use the spare tire hoist...
Owner's Manual - Page 382

... Wrench G. Flip the cut out carpet that is located through the wheel opening.
6. After removing the spare tire, turn the wrench clockwise to the ground. Do not store a full-size or a flat road tire under the vehicle. Rear Convenience D. B
4. Hoist Shaft E. Retainer B. Storage Compartment Cap Hole 1. See "Storing a Flat or Spare Tire...
Owner's Manual - Page 383

... the valve stem pointing down. Your vehicle has an underbody mounted hoist tire assembly equipped with the Rear Convenience Center)" earlier in this section.
5. See "Storing the Spare Tire ...then loosen it 's not visible, see "Removing the Flat Tire and Installing the Spare Tire" later in this section.
2. Check under "Removing the Spare Tire (Vehicles with secondary latch system...
Owner's Manual - Page 387

... compact spare tire near you may damage your ing vf ! Only use an impact wrench with key.
3. Notice: Do not place the jack under the rear axle control arms or you .
- __ your vehicle. Near each wheel, there is supported only by a jack.
Owner's Manual - Page 393

Assemble the wing nut and the J-hook.
4.
RearConvenience Center C.Wing Nut
D. Cap on Bottom of the tire.
5. For vehicles with aluminum wheels, remove the center cap by tapping ...of Storage Compartment
5-82 Slip the tabs on . Push the cover in the rear cargo area.
2. A. J-Hook E. D-Ring B. Remove the J-hook and the wing nut from the back of the compartment cover into ...
Owner's Manual - Page 394
... wing Nut i
1. Hook the straps to the D-ring through the center hole of the rear convenience center. 2. Remove the J-hook and the wing nut from the back of the storage compartment and flip the D-...A. There is a strap attached to the iioor. Remove the cap on the tire to an upright position. 2. Push the cover in place and push down . Assemble the wing nut and the J-hook. Open the ...
Owner's Manual - Page 416

Section 6
Maintenance Schedule
Steering, Suspension and Front Drive Axle Boot and Seal Inspection ...6-13 Exhaust System Inspection ...-6-13 Fuel System inspection ...6-13 ...6-13 Engine Cooling System Inspection ...Throttle System Inspection ...6-14 Transfer Case (Power Transfer Unit) and Carrier Assembly-Differential (Rear Drive Module) AII-Wheel Drive Inspection ...-6-14 Brake System ...
Owner's Manual - Page 429
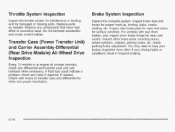
... wear and rotors for wear and cracks. Check parking brake adjustment. Transfer Case (Power Transfer Unit) and Carrier Assembly-Differential (Rear Drive Module) All-Wheel Drive Inspection
Every 12 months or at transfer case and differential for kinks and proper installation.
6-14 check and have it repaired, if needed . A fluid loss could indicate a problem...
Owner's Manual - Page 430

... (GM Part No. Dielectric Silicone Grease (GM Part No.
Usage Key Lock Cylinders Carrier Assembly Differential (Rear Drive Module) and Transfer Case (Power Transfer Unit) Hood Latch Assembly, Secondary Latch, Piwts, Spring Anchor and Release Pawl Hood and Door Hinaes. Rear Folding Seat
Fluid/Lubricant Mulit-Purpose Lubricant, Superlube (GM Part No. See Engine Coolant...
Owner's Manual - Page 448

... CD DVD and Player ...3-115 the LATCH System ...1-66 CDsDVDs and Cargo Lamp ...3-18 Securing a Child Restraint in a Center Carrier Assembly-Differential Seat Rear Position ...1-69 (RearDriveModule) ...5-47 Securing a Child Restraint in Rear a Cassette Deck Service ...6-9 Outside Seat Position ...1-66 Cassette TapeMessages ...3-86 Securing a Child Restraint in the Right CDAdapter Kits ...3-86 Front...
Owner's Manual - Page 453
...System ...6-13 6-13 ExhaustSystem ...6-13 Fuel System ...Part C - Periodic Maintenance ...6-13 Steering, Suspension and Front Drive Axle Boot and Seal ...6-13 Throttle System ...6-14 Transfer Care (Power Transfer Unit) and Carrier Assembly-Differential (Rear Drive Module) All-Wheel Drive ...6-14 Instrument Panel 3-36 Cluster ...Overview ...3-4 Switchbank ...3-18 Instrument Panel Brightness ...3-15...
Owner's Manual - Page 455

.... Scheduled Maintenance Services ...6-4 Part B - Maintenance Record ...ScheduledMaintenance ...6-4 Steering, Suspension and Front Drive Axle Boot and Seal Inspection ...6-13 Throttle System Inspection ...6-14 Transfer Case (Power Transfer Unit) and Carrier Assembly-Differential (Rear Drive Module) All-Wheel Drive Inspection ...6-14
Maintenance Schedule (cont.) 6-4 Using Your ...Your Vehicle...
Similar Questions

How To Remove The Spare On Buick Rendezvous Secondary Latch System
(Posted by Donno 10 years ago)

How To Remove Speakers From A 2003 Buick Rendezvous
(Posted by michkall 10 years ago)

How To Remove Rear Panel On Lift Gate For Buick Rendezvous 2004
(Posted by harjprucz 10 years ago)

How To Remove Rear Panel On Buick Rendezvous
(Posted by butlertjj2 10 years ago)

Need Rear Axle Repair Manual And Schematic
right rear output shaft loose and axle is growling, need picture so I can dismantle and repair
right rear output shaft loose and axle is growling, need picture so I can dismantle and repair
(Posted by lr3bro 11 years ago)