2005 Buick Rendezvous Support Question
2005 Buick Rendezvous Support Question
Find answers below for this question about 2005 Buick Rendezvous.Need a 2005 Buick Rendezvous manual? We have 1 online manual for this item!
Question posted by electric4 on April 18th, 2012
Rear Wiperblade Assembly
how do you replace or fix the rear wiperblade assembly
Current Answers
Related Manual Pages
Owner's Manual - Page 1
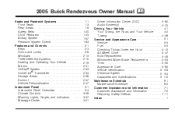
...Rendezvous Owner Manual
Seats and Restraint Systems ...1-1 Front Seats ...1-3 Rear Seats ...1-8 Safety Belts ...1-20 Child Restraints ...1-43 Airbag System ... ...5-3 Fuel ...5-5 Checking Things Under the Hood ...5-10 All-Wheel Drive ...5-47 Bulb Replacement ...5-49 Windshield Wiper Blade Replacement ...5-53 Tires ...5-55 Appearance Care ...5-95 Vehicle Identification ...5-103 Electrical System...
Owner's Manual - Page 23

...the rear convenience center.
Push down , pull up on the seatback to stow the strap on the lever to the person sitting there. Always press rearward on the seatback to be removed and replaced or...The stowable seat is a two passenger bench seat and comes with the convenience center. See Rear Convenience Center on the back of the seatback when not in a sudden stop or crash. The seatback...
Owner's Manual - Page 24

... , put the seatback in the vehicle could cause injury to the person sitting there. Remove the rear nuts located on the floor on each side. 7. Be sure to be done in ... it slightly toward the rear of the vehicle and then pulling it is down . 6. Always press rearward on page 2-44 for more information. 2. Removing the Stowable Seat
1. Replacing the Stowable Seat
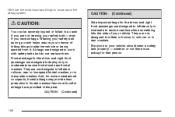
{CAUTION...
Owner's Manual - Page 48
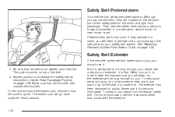
...to the regular safety belt. To wear it, just attach it from the comfort guide. See Replacing Restraint System Parts After a Crash on page 1-38. The elastic cord will fasten around you... once. Although you . To help the safety belts reduce a person's forward movement in Center Rear Passenger Position on page 1-83. For more information, see them, they activate in to order ...
Owner's Manual - Page 74
... for that person.
1-68 Everyone in your safety belt - even if you have provided in rear crashes. CAUTION: (Continued)
Side impact airbags for the driver and right front passenger are designed to...You can be severely injured or killed in moderate to work with safety belts but do not replace them. Here are the most important things to severe frontal and near frontal crashes. Frontal ...
Owner's Manual - Page 90

.... If the LATCH system was not being used at the time of the collision. New parts and repairs may need to replace the driver and front passenger's safety belt retractor assembly. Be sure to help protect you may be there to do so. See Airbag Readiness Light on the airbag system earlier...
Owner's Manual - Page 129

...;oor console. If your vehicle has the OnStar® System, the OnStar® buttons will replace the storage compartment. The compartment has an accessory power outlet for larger beverage items. Remove the ... OnStar® buttons. If your vehicle has an overhead console, it has a split folding rear seat. Lift the lid to the driver's seat.
The cupholders have liners that remove for ...
Owner's Manual - Page 133
... side rail assembly. This will lock the crossrails in the full rear position. 2. When you are in the full-rear position before opening the sunroof. Make sure the screws are not in the rear of 100...from falling over the four pegs in the upper left corner. It is recommended that you must replace the sunroof stop , do the following: 1. Notice: Opening the sunroof when the luggage rack ...
Owner's Manual - Page 136
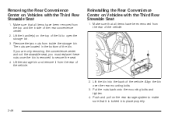
... Make sure that all items have been removed from the rear of the rear convenience center. 2. Reinstalling the Rear Convenience Center on the rear storage system to make sure that all items have been removed...vehicle. Align the bin over the rear mounting bolts. 3. The nuts are only removing the convenience center and not the stowable seat, you must replace these nuts once the bin is ...
Owner's Manual - Page 368
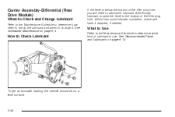
A fluid loss could indicate a problem; How to change it repaired, if needed.
check and have it . Carrier Assembly-Differential (Rear Drive Module)
When to Check and Change Lubricant
Refer to the Maintenance Schedule to determine how often to check the lubricant and when to Check ...
Owner's Manual - Page 373

...15.
Turn the wipers on page 6-13. Put the bulb assembly back into the lamp housing and turn clockwise. 11. Replace the applique on page 6-8 for more accessible for wear or... Replacement Parts on to replace the windshield wiper blades: 1. Replacement Bulbs
Exterior Lamp Front Turn Signal/Parking Lamps Headlamps High-beam Low-beam Liftgate-Mounted Back-Up Lamps Taillamps Rear ...
Owner's Manual - Page 374

...remove it from the wiper arm. 4. Push the release clip, from the wiper arm. 5. To replace the backglass mounted wiper blade, do the following: 1. Then, pull the blade assembly down toward the glass to remove it from Step 3, down to secure the wiper blade into place... blade securely on the wiper arm until you hear the release clip click into place. 4. Turn the rear wiper off. 2.
Owner's Manual - Page 395

... the hoist shaft. 3. Hoist Shaft B. The tools you will be pulled out from under the vehicle, behind the rear bumper.
Retainer E. Use the spare tire hoist to expose the hoist shaft. 2. Hoist Assembly
D. See Compact Spare Tire on page 5-94 for more information about the compact spare. Turn the folding wrench counterclockwise...
Owner's Manual - Page 397

... still cannot lower the spare tire to the ground, continue with a Rear Convenience Center)
The compact spare tire is located under "Removing the Spare Tire (Vehicles without the Rear Convenience Center)" listed previously. 5.
G. Hoist Shaft Compact Spare Tire Retainer Hoist Shaft Assembly
5-77 E. If the spare tire has not lowered, tighten the cable...
Owner's Manual - Page 404
... the hoist assembly and you and others could damage the cover or the spare. 10. Tighten the wheel nuts firmly in the rear of the vehicle until you have the flat tire repaired or replaced.
{CAUTION....
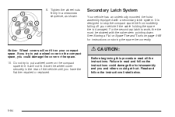
Secondary Latch System
Your vehicle has an underbody mounted tire hoist assembly equipped with the valve stem pointing down.
It will not fit on the compact spare tire.
Owner's Manual - Page 408

... and the wing nut from the back of the cap with the center hole of the tire over the D-ring. Assemble the wing nut and the J-hook. 4. Push and pull on the tire to the floor. Put back ...the compartment cover back on the side of the tire. 5. A. This secures the cover in the rear cargo area. 2. Full-Size Tire
5-88 Slip the tabs on . Flip up with the folding wrench. 3. Lay the...
Owner's Manual - Page 409

Assemble the wing nut and the J-hook. 5. Tighten the wing nut to secure the tire to make sure the tire is secure and does not move. 7. Slip the tabs on the side of Storage Compartment
1. A. Rear ...Make sure you can see the D-ring through the center hole of the center storage compartment with a Rear Convenience Center)
3. Put back all tools as they were stored in place. Remove the cap on ...
Owner's Manual - Page 410

...each side of the compartment cover into the cover opening. This secures the cover in the groove. Rear Convenience Center B. D-Ring
D. F. There is secure and does not move it to an upright position...seat. Full-Size Tire C. Stand the full-size tire up, in an upright position, move . 9. Assemble the wing nut and the J-hook. 7. Stowable Seat Strap Cargo Net Hook J-Hook Wing Nut
1. Hook...
Owner's Manual - Page 441

...any components that all key lock cylinders, hood latch assemblies, secondary latches, pivots, spring anchor and release pawl, hood and door hinges, rear folding seats and liftgate hinges. Also look for ...leaks, cracks, chafing, etc. (c) Visually inspect hoses and have it repaired. Replace blade inserts that appear worn or damaged or that the failure to the completion of the ...
Owner's Manual - Page 446

... GM Optikleen Washer Solvent. Usage
Usage Automatic Transaxle Key Lock Cylinders Carrier Assembly - Differential (Rear Drive Module) and Transfer Case (Power Transfer Unit) Hood Latch Assembly, Secondary Latch, Pivots, Spring Anchor and Release Pawl Hood and Door Hinges, Rear Folding Seat Weatherstrip Conditioning
Fluid/Lubricant DEXRON®-III Automatic Transmission Fluid.
U.S. 12346293...
Similar Questions

How To Replace Rear Wiper On 05 Buick Rendezvous
(Posted by dicautc 10 years ago)

How To Remove The Rear Wiper Assembly On A 2005 Buick Rendezvous
(Posted by liPAL 10 years ago)

How To Remove A Rear Axle Differential Assembly Rendezvous
(Posted by prasStoe 10 years ago)

Rear Hatch
Rear hatch has no power need to know what fuse looks like have no manual and fuse box schedule does ...
Rear hatch has no power need to know what fuse looks like have no manual and fuse box schedule does ...
(Posted by Anonymous-117049 10 years ago)

Cost To Replace Rubber Rear Knuckles Fwd
(Posted by Loisfrankmiller 11 years ago)